

The WordPress platform is used for over 289,946 sites among the top 1 million websites, making it the most successful management system on the web, especially for small businesses. If you want to run an ecommerce website, one of the best WordPress plugins you can use is WooCommerce. The only cost you'll have is for the hosting provider as WordPress and WooCommerce are open source web applications.
Getting started with WordPress is straightforward if you choose a reliable hosting provider. Fortunately, Nexcess is among the most reliable and affordable hosting options for WordPress sites. With Nexcess managed WordPress hosting, you can choose the ideal WordPress hosting plan that suits your website needs to create an excellent customer experience.
Nexcess provides all the tools you need to quickly start running and managing your WordPress content/ecommerce website with minimal effort. In this "Getting Started on WordPress and WooCommerce" guide, we will walk you through the procedure to ensure your site runs flawlessly on Nexcess servers. Let's get started.
How to get started — WordPress and WooCommerce hosting at Nexcess
In this “How to get started — WordPress and WooCommerce” section, we will share with you the detailed procedures you can follow to get started and manage your WordPress site at Nexcess.
Step #1: Logging into your Nexcess account
To begin your “Getting Started on WordPress and WooCommerce” journey, you must first log into your Nexcess account. There are two ways to access your managed WordPress or WooCommerce hosting account. The first one is going directly to the web address of the site. Simply type in the URL of the site (provided to you by Nexcess), and you'll be directed to the login page.
The second option is to use your Nexcess account to log in using your username and password. For more details on creating an account and log into your Nexcess account, consider checking our article for managed WordPress and WooCommerce — logging into the WordPress Admin Panel.
Step #2: Migrating an existing WordPress site
If you already have an established WordPress site running on another hosting provider and wish to move it to our managed WordPress or WooCommerce hosting platform, Nexcess has streamlined this process. Proceed to Step #3 if you’re setting up a new site.
You can migrate your site to Nexcess in several ways, but the easiest one is by using our Migrate to Liquid Web & Nexcess WordPress plugin. Our Introducing the easy-to-use Nexcess WordPress migration plugin article covers all of the possible site migration methods. With the plugin installed, migrating your site to our servers becomes a lot easier. You can also migrate your site manually or leverage our Migration services, which are available at an affordable cost.
Step #3: Adding a site
Once you're logged into your Nexcess account, another step for getting started with WordPress and WooCommerce is adding a new site to your hosting environment. This step is crucial when setting up a new website or managing multiple sites from a single Nexcess dashboard. Adding a site involves various settings and configurations essential to ensure optimal website performance.
To add your site, log in to your Nexcess Client Portal, click the +Site option, and input your domain. It is that simple. We also have an article about Adding a site in managed WordPress and managed WooCommerce hosting. Check it out if you need a detailed step-by-step guide for adding your site through the Nexcess Client Portal.
Step #4: Going live with your site
After successfully migrating your site or adding a new site, the next crucial step is to update the Domain Name System (DNS) settings for your site to go live. If your domain registration is managed by Liquid Web, follow our Managed WordPress & WooCommerce: How to make a WordPress site live guide to update your DNS settings.
However, if your domain is registered with another service provider, you'll need to modify the DNS records accordingly. We have a detailed guide for How to configure DNS records in the Nexess Client Portal that you can read to learn how to change the DNS record for your domain, ensuring that your website points to the correct location. If you’re unsure where your domain is hosted, use our detailed What is WHOIS and why is it important in web hosting? article to find out.
Step #5: Creating backups
Data protection is a crucial aspect of website management. Nexcess provides the capability to create backups easily after getting started with WordPress and WooCommerce hosting at Nexcess. These backups serve as a safety net to safeguard your website's data in case of unexpected issues. To create your backup, follow the steps below:
- Log into your Nexcess Client Portal.
- Click the Plans from the left menu bar.
- After finding the plan you want, click on its name and then click the Plan Dashboard option.
- From the Domain dropdown, click the Site Dashboard option. From your Site Dashboard, you will see the Backups option on the left side of the screen.
We also have a more detailed guide for Creating website backups from the Site Dashboard for WordPress/WooCommerce. You can check it out if you want to follow a more detailed step-by-step process. It is also important to note that, currently, staging sites cannot be backed up in the Nexcess Client Portal.
Step #6: Managing your sites
Once you've added a new site within the Nexcess Client Portal, you'll have access to a range of control options for your websites. These options include managing WordPress updates, handling domain name changes, pushing your site live, and accessing and reviewing logs.
You can also use your cloud control panel to manage and view email, MySQL, .htaccess, firewall rules, cron jobs, backups, and statistics. Note that to edit your .htaccess file you would have to use a file manager application with your SSH credentials. Additionally, your firewall rules are not exposed in the Nexcess Client Portal.
Check out our detailed guide for How to access tour Nexcess Cloud Control Panel to learn more about everything you can manage through your Nexcess Client Portal.
Step #7: Finding your SFTP/SSH credentials
Nexcess also allows you to log into your managed WordPress or WooCommerce hosting site via Secure Shell (SSH) or Secure File Transfer Protocol (SFTP).
This is essential for managing your site's files and configurations securely. To do this, you'll need your SFTP or SSH credentials, which were sent to you when creating your account. If you can’t find them, consider contacting our support team for further help.
Step #8: Creating a staging site
A staging site allows you to test and develop your site without making changes to the live website. It allows you to make changes, updates, or additions to your website in an isolated environment that your users cannot access. This practice ensures that you can thoroughly test changes without affecting your live website's functionality or user experience.
To create a staging website, go to your Nexcess Client Portal and sign in with your credentials. Click the Plans option on the left panel to view your site. To go to your site dashboard, click the three dots on the extreme right of the selected website name and select the Plan Dashboard option. While on the dashboard, click Environments and select the Staging Environments option to create your staging site.
For more detailed steps, check out our guide for How to easily set up a WordPress staging site 2023.
Step #9: Logging into your database
The database is the heart of your WordPress site. It is where all the content and essential data of the site are stored. To manage and make changes to your database, you can use a tool called phpMyAdmin. The phpMyAdmin tool can be accessed from the left menu bar of your site’s dashboard (follow the procedure in step 8 to access your site’s dashboard).
After launching this tool, you will view all the different options for managing your database. Check our guide for Accessing the website database in the Nexcess Client Portal for more details.
Step #10: Restoring a WordPress site from a backup
In the unfortunate event that you need to revert your WordPress site to a previous state, having a backup and knowing how to restore it is crucial. To restore your site from a backup, Log into the Nexcess Client Portal and go to your Plan Dashboard. Within the dashboard, click the Backups tab to view all the available backups from your site.
Fortunately, Nexcess creates regular backups for your site automatically. However, you can also create a backup manually if you wish to. You can now restore your site from one of the available backups. To start the process, click the three dots beside the backup you want to restore and choose from the three options, including Restore Files, Restore Databases, and Restore Files + Databases.
For more details on restoring backups, check out our Restoring a site from a backup in managed WordPress and managed WooCommerce hosting guide.
Step #11: Adding team members using the Nexces Client Portal
In the Nexcess Client Portal, you can create additional users to assist you in managing your websites. These users can perform a wide range of functions, similar to what you can do. Such tasks include organizing your sites by tagging and labeling them, creating stencils of your sites, utilizing the visual comparison tool, and even pushing updates.
To add users, log into your client portal and click the Team Members option from the <Your Name> list on the upper right of the page. You can then add different people to your team using their email addresses and selecting the team you want them to be part of. Remember, each team member has different roles and levels of access to the site files and settings. We also have an article about How to add or edit team members in your Nexcess Client Portal. You can check it out for more details on creating and managing users.
Step #12: Upgrating to PHP 8
PHP is a crucial component of web development and keeping it up to date is important for security and performance. With our managed WordPress and WooCommerce hosting, you can easily upgrade your site to PHP 8.1 with just a click.
To do this update, go to your Plan Dashboard and choose the website for which you need to update the PHP version. By clicking its domain name, you will be redirected to the website’s Credentials page. Here, you will find the PHP version update feature under the Management option. For more details, check out our How to update PHP versions in the Nexcess Cloud guide.
Step #13: Using the Nexcess Installer plugin
The Nexcess Installer simplifies the process of installing provided plugins for your Managed WordPress or Managed WooCommerce plan. It streamlines the setup of essential plugins, making it easier for you to enhance your website's functionality.
Step #14: Using the Plugin Performance Monitor plugin
Nexcess offers an exclusive feature called the Plugin Performance Monitor. This tool captures and compares your WordPress site's performance before and after making changes to plugins or themes. It runs nightly performance tests, providing valuable insights to administrators regarding what changed and the impacts on site performance.
This monitoring functionality for WordPress helps you make informed decisions about which plugins you should maintain on your site and which ones you should delete.
Step #15: Using the Solid Security Pro plugin
Nexcess partners with SolidWP to provide you with the Solid Security Pro plugin, which is designed to enhance the security of your site. Some of the features and functionalities that this plugin offers include the following:
- Stopping automated attacks
- Monitoring for suspicious activity
- Strengthening user credentials
- Scanning for vulnerable plugins and themes
- Blocking bad bots
- Reducing spam
- Database backups
- Two-Factor Authentication
- Passwordless Login
Check out our Using the Solid Security Pro plugin article to learn more about how this plugin works.
Step #16: Using Solid Central plugin
Solid Central is a service with a plugin for the integration to connect the WordPress sites to your Solid Central dashboard:
- Control Theme & Plugin Updates
- Send Client Reports for WordPress Maintenance
- Monitor Site Uptime, Downtime & Performance
- Track & View Google Analytics Data
Detailed information on the features and how to set up Solid Central can be found in our Solid Central: Manage Multiple WordPress Sites guide.
Step #17: Using the website comparison tool
The Managed WordPress Portal includes a powerful Visual Comparison Tool that simplifies the process of reviewing visual changes to your website when you update plugins. This tool creates a regression site, updates your plugins, and enables you to see the changes (if any) made by the plugin update before it goes live.
With this tool, you don’t have to manually create a staging site and go through pages to identify changes. You can control which URL paths the visual comparison tool tests directly in wp-admin. For more details about how this tool works, check out our Website comparison tool — using our Visual Comparison feature guide.
Step #18: Viewing AWStats
AWStats provides valuable insights into your site's web traffic and performance. You can conveniently access and view AWStats for your site from directly within the Nexcess Client Portal, allowing you to monitor key metrics and analyze visitor data.
Step #19: Using the Nexcess Page Cache feature
All managed WordPress and managed WooCommerce hosting plans come with the Nexcess Page Cache feature. This feature will significantly improve front-end load times for your sites by utilizing caching techniques to serve content to your users more efficiently.
Step #20: Bulk optimization
Site speed can be impacted by oversized images. To resolve this issue, we partnered with TinyPNG, a JPEG and PNG image compression plugin that is included in your hosting package at no extra cost. This plugin allows you to optimize images in bulk, helping your site load faster, which is good for SEO as well. To learn more about using this feature effectively, refer to our Using bulk Optimization in managed WordPress and WooCommerce hosting article.
Contacting Nexcess Support
If you find any issues following any of the steps for how to get started with WordPress, contact our dedicated support staff, available 24/7 to assist you. You can reach out to our support team via phone, chat, or by creating a support ticket.
Overview of our WordPress and WooCommerce hosting plans
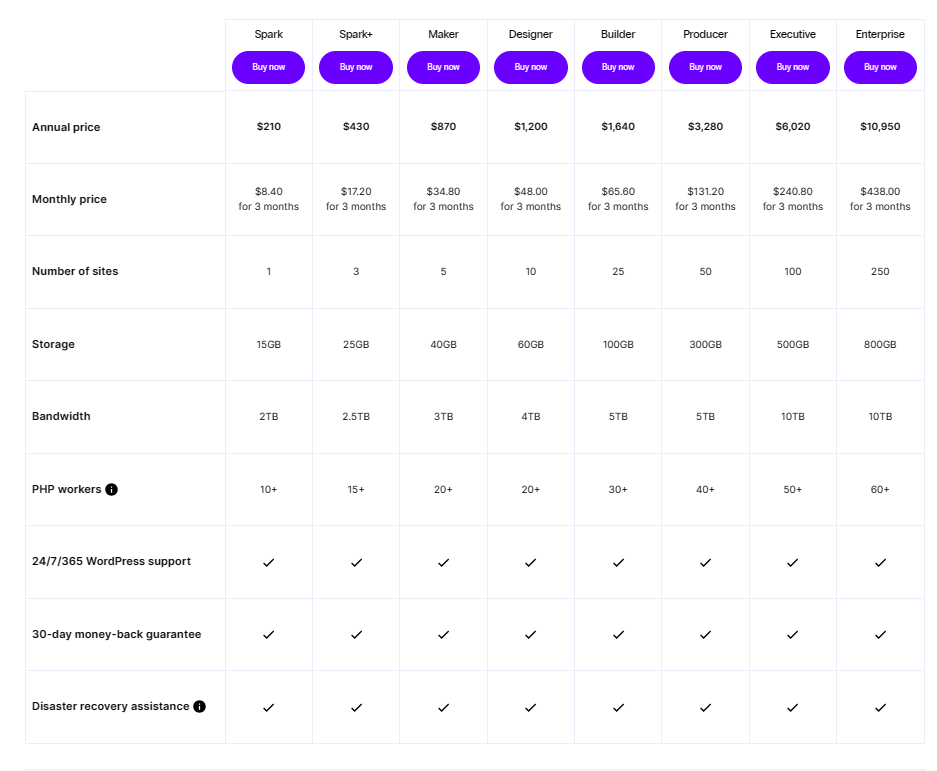
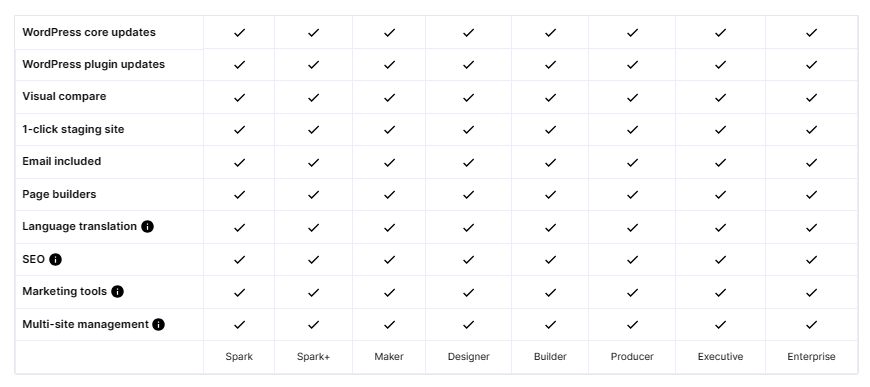
Nexcess provides eight WordPress hosting plans and seven WooCommerce plans to choose from. They can be purchased monthly or annually. Below is an overview of what each plan includes along with a comparison chart.
Getting started with WordPress plans

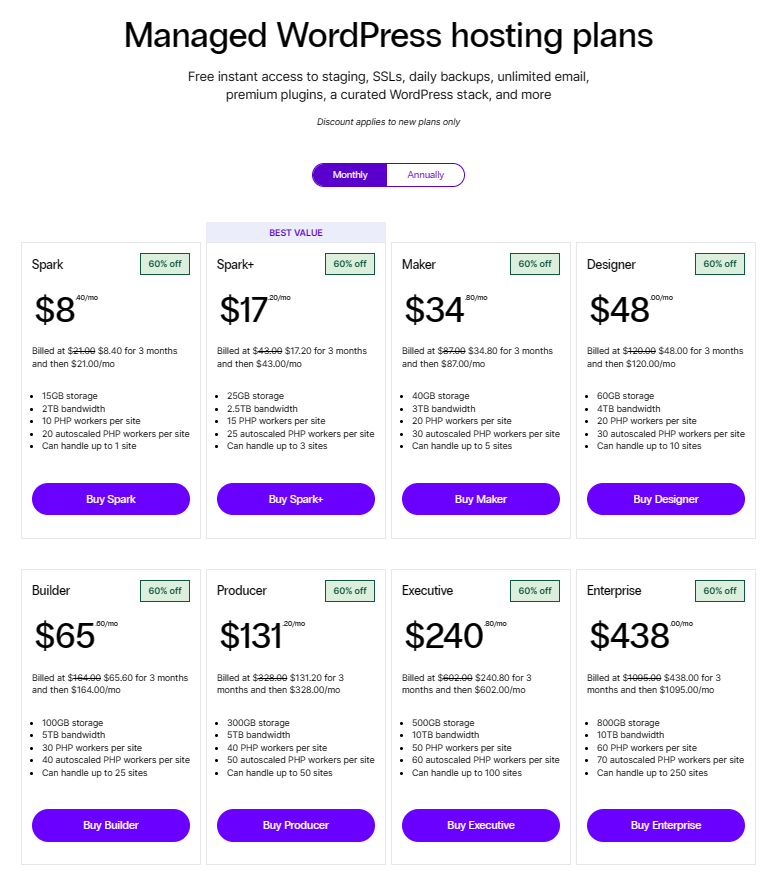
Compare ↔ 8 WordPress hosting plans

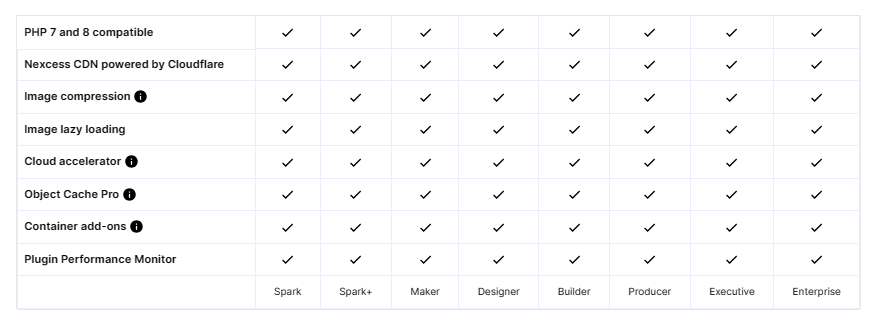
WordPress hosting features

WordPress security features


WordPress Performance features

Getting started with WooCommerce plans


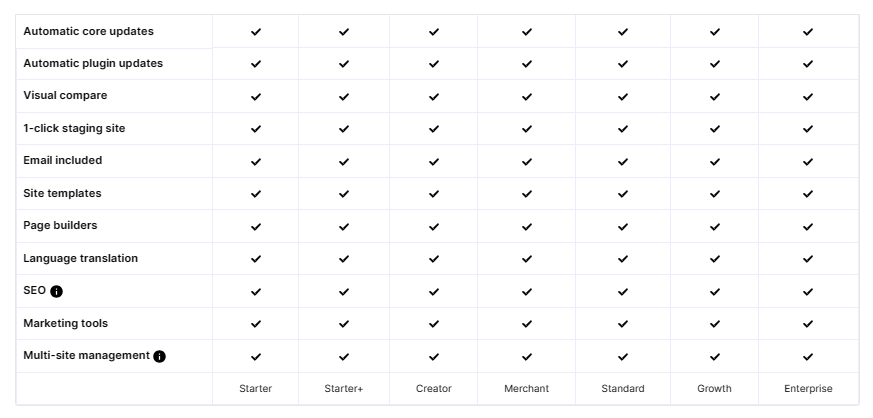
Compare ↔ 7 WooCommerce hosting plans


WooCommerce hosting features

WooCommerce security features


WooCommerce performance features


WooCommerce design features

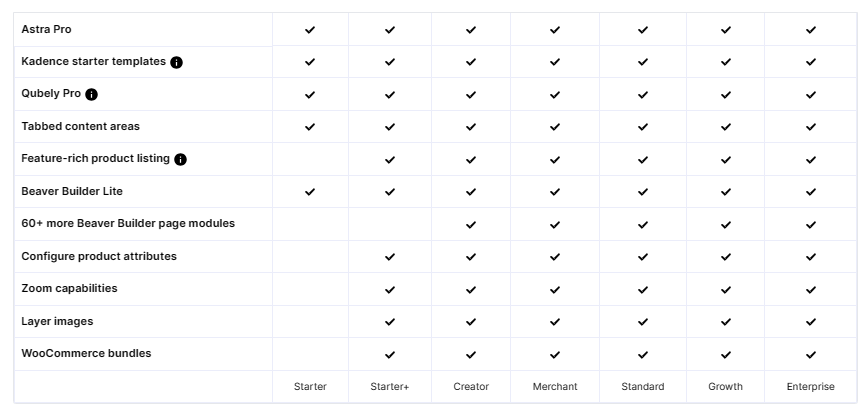
WooCommerce recommended features


Selecting the best WordPress or WooCommerce plan to meet your website's requirements
You can pick the WordPress/WooCommerce plan that suits your needs based on storage, bandwidth, the number of websites you want to host, the number of PHP workers, and your budget. If your website needs more resources later, you can upgrade to a higher plan. If you're unsure which plan is right for you, don't hesitate to contact our support team. They will gladly assist you in making the best choice.
Conclusion
Our Getting started with WordPress and WooCommerce hosting tutorial in this article has explained all the steps to efficiently set up and manage your WordPress and WooCommerce site with Nexcess. You can access most website management and configuration settings from your Nexcess Client Portal. Therefore, keeping your login credentials safe is important, since you'll need them to access the dashboard for site management.
With fully managed WordPres hosting from Nexcess, better is built in
Managed WordPress hosting, elevated with cloud hosting optimized for WordPress. Speedy, secure, scalable, and more PHP workers than any other provider.
So, begin your managed WordPress hosting or managed WooCommerce hosting now to build a website that will give your users a best-in-class experience. If you encounter any difficulties with these steps, our heroic support team is here 24/7 to help you out.
Note about the original publication date
This article was originally published in October 2019. It has since been updated for accuracy and comprehensiveness.


