


Wix is a great way to get started quickly, but the significant restrictions of this plug-and-play website builder can hinder your web design journey. You may hit a wall in terms of growth potential with Wix.
From being unable to change your template once your site is published to being unable to change any of the code behind your website, Wix limits your choices as you build out and change the vision for your site.
Transfer my Wix website to Nexcess — why Nexcess is an excellent Wix alternative
WordPress and Magento on the Nexcess web hosting platform allow for customizing your website and online store in a more comprehensive way than you could ever achieve with Wix. At Nexcess, our Managed WordPress, Managed Magento, Managed WooCommerce, and StoreBuilder products offer extreme flexibility and numerous plan sizes with many addon functional options.
The savvy site admin will eventually crave more robust web hosting options. And those features are exactly what draw customers to Nexcess.
Transfer my Wix website to Nexcess — overview of the Wix site move process
Congratulations on outgrowing your previous Wix platform. With your step up to the next level of web hosting providers, you will no longer be able to use the free Wix-branded domain you were using for your website.
About signing up with a web hosting company and purchasing a domain
If you were using a Wix site domain (for example, https://username.wix.com/site), you would need to purchase a domain from a domain registrar like NameCheap, GoDaddy, or another similar company managing domain registrations to set your site up.
If you connected your Wix site to your own custom domain, you don't have to purchase a new one. However, there will be a few steps later on in the process to make sure your users see your new WordPress site instead of your old Wix site after the move.
You will also need to select a new hosting provider now that you will no longer be using Wix's paid service. A hosting provider gives you server space to host your website in exchange for a monthly fee, similar to Wix, but with total control over how your website is built.
Nexcess is an excellent option for hosting your website, and we highly recommend it to meet your website requirements. We optimize our hosting architecture for the demands of the modern-day cloud web hosting environment — and all the facets involved with managing it optimally.
Transfer my Wix website to Nexcess — how to export your blog-only Wix site
There are a couple of different options for exporting your Wix website for importing elsewhere. If you have a blog only, you can export your site via the RSS (RDF Site Summary or Really Simple Syndication) feed supplied by Wix.
Blog only — exporting your site via the RSS feed supplied by Wix
Simply append /blog-feed.xml or /feed.xml to your URL to be able to see your RSS feed. It will look something like the one below:

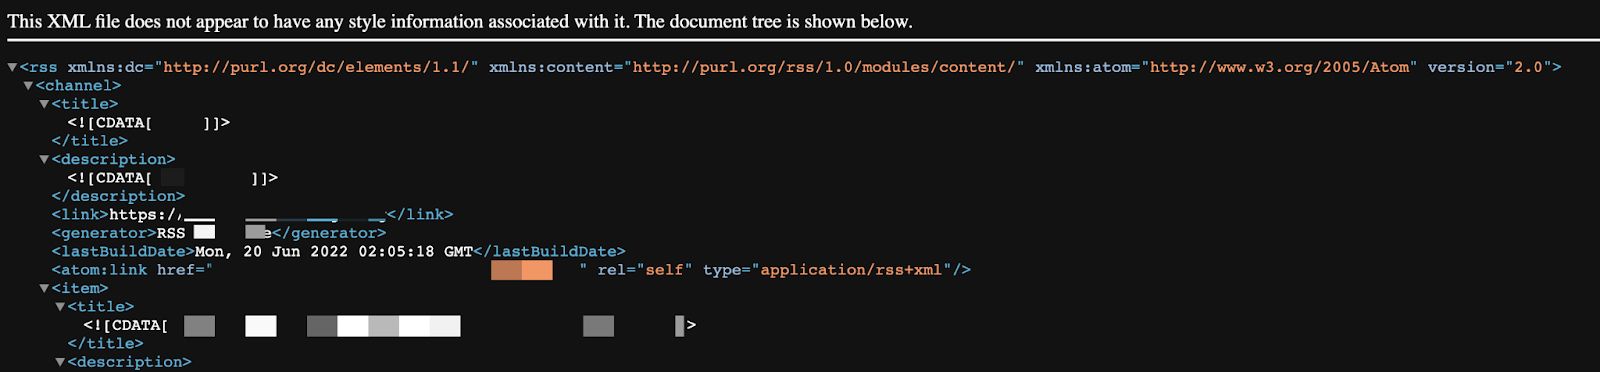
To save this, right-click anywhere on the screen above, and select Save As:

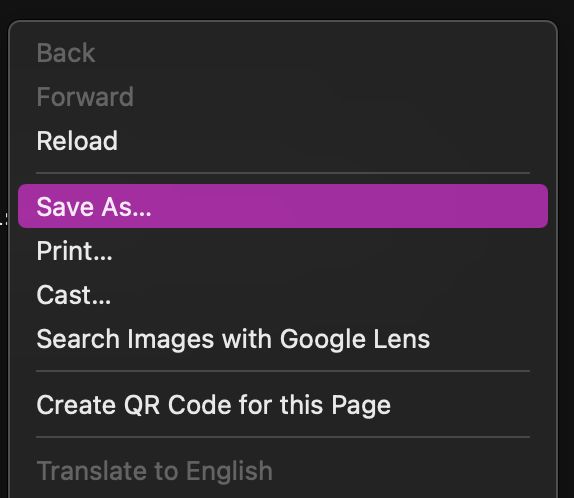
A window will pop up, with "blog-feed" in the Save As field. It will also show you where it will save the file.
In this example, it will be saved to the Desktop, but a very common place to save it is in your Downloads folder. You can change it to wherever it is easiest for you to remember where it is. You will need this file later.
Click Save to save the file. It will download and save blog-feed.xml (or whatever you decide to name it) where you choose to save it.
Import RSS into WordPress
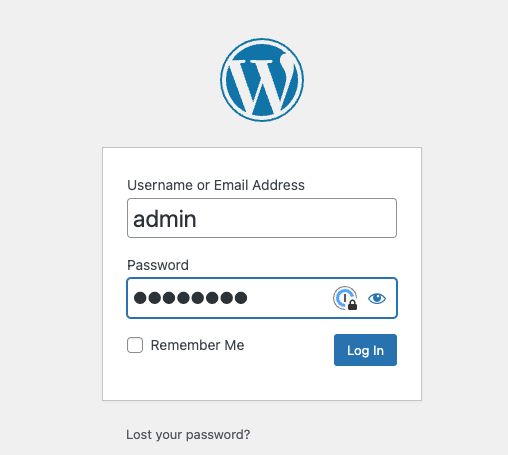
Now that your file is saved to your computer, you can import the file into WordPress. Next, log in to your WordPress Admin Dashboard:

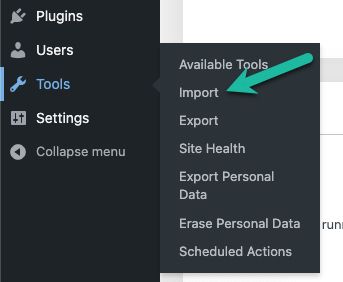
The homepage will appear with a menu on the left side of the screen. There will be a menu item called Tools in the bottom left area.


Another menu will show up by placing your mouse pointer over the Tools option. Click Import in this menu that appeared to navigate to the Import page:

You will see a list of options to import from:

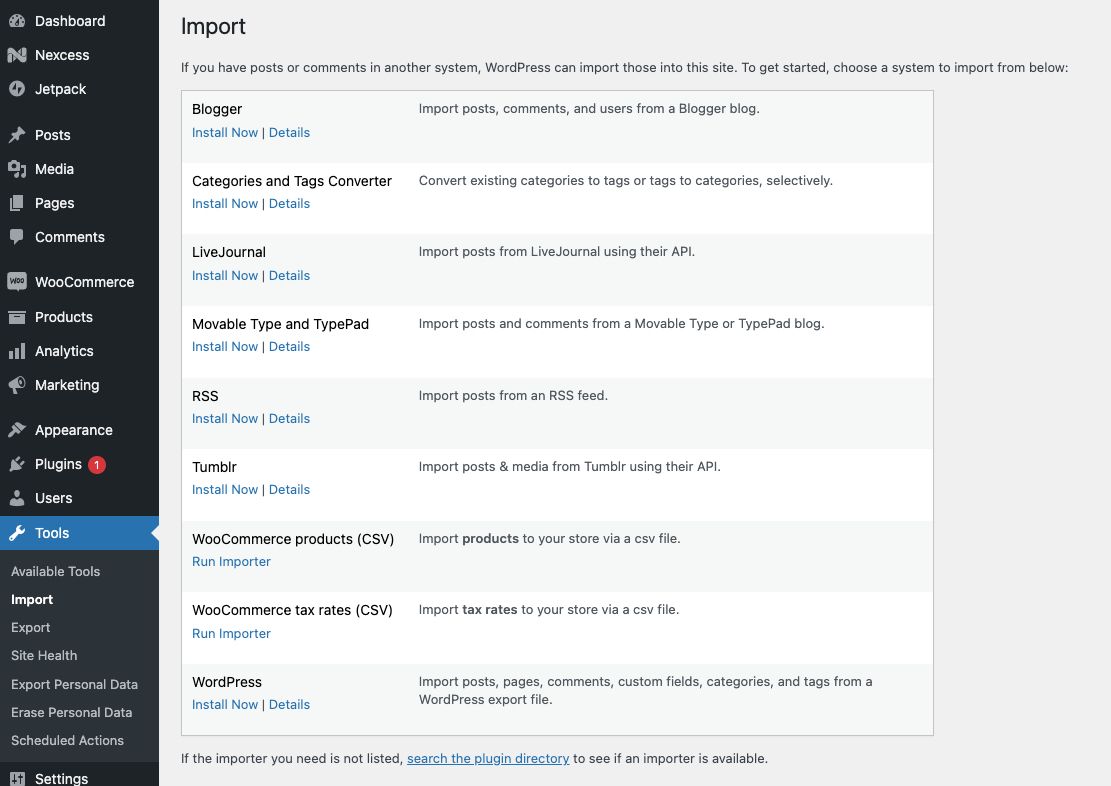
About midway down, you will see RSS as an option to import with. Click Install Now to install the plugin that will import your file:


Once it is installed, click Run Importer:


On the Import RSS page, click the Choose File button, and navigate to where you saved your file. Click on it:


You should see your file's name next to the Choose File button, and the Upload File and Import button should be blue now instead of gray:


Once your file is imported, you will want to confirm the posts you expected were imported correctly. Unfortunately, you won't be able to import your pages the same way, so you'll need to copy them from Wix to your WordPress pages manually. You will also need to move your images manually or as a batch via SFTP if you feel comfortable with that technology.
Transfer my Wix website to Nexcess — using a plugin to transfer your Wix site to WordPress automatically
If you have a larger Wix site, especially an ecommerce component, consider a plugin to transfer your site over. An associated cost increases with the size of your website (the more taxonomies, categories, products, etc.).
If you have connected a custom domain to your Wix site, you will want to create a test site and change your custom domain temporarily to that new test site. This step will allow you to get a free Wix URL to use as the starting point for the transfer to WordPress.
After you're certain that your Wix site is available at your free URL, you'll want to go to your domain registrar and update the nameservers to point to the new nameservers at your new hosting provider.
Nameservers and domain records take visitors to your site when they enter your URL in a web browser. One caveat with this method is that you will not be able to set up redirects for your old domain if you are using a free domain for this switch.
With regard to your existing nameservers at Wix, you can update them to your new nameservers rather than filling in a value in the blank field shown below:


It can take 24 hours for the changes to nameservers to go live. Also, you will need to manage the MX records for your email functionality related to your website if you have it in place with your domain. You'll want your new WordPress website's installation already established and set up at your new hosting provider as well — as prerequisite.
You would want to start the transfer process if you purchased your domain via Wix. First, sign up for a new account at a domain registrar of your choosing. Then, follow the directions from Wix to transfer away your domain to your new registrar.
They will send you an Extensible Provisioning Protocol (EPP) code (transfer authorization code) via email that you need to enter at your new registrar's site. All domain registrars are different, so look for a Transfer Domain or Domain Transfer option with your new registrar.
Transfer my Wix website to Nexcess — using the CMS2CMS website migration tool
Let's go over the steps to import using CMS2CMS.
Step #1
First, go to https://cms2cms.com/ and select the site you are moving from (Wix) and the site you're moving to (WordPress) and click Try Now for Free to go to the next screen:


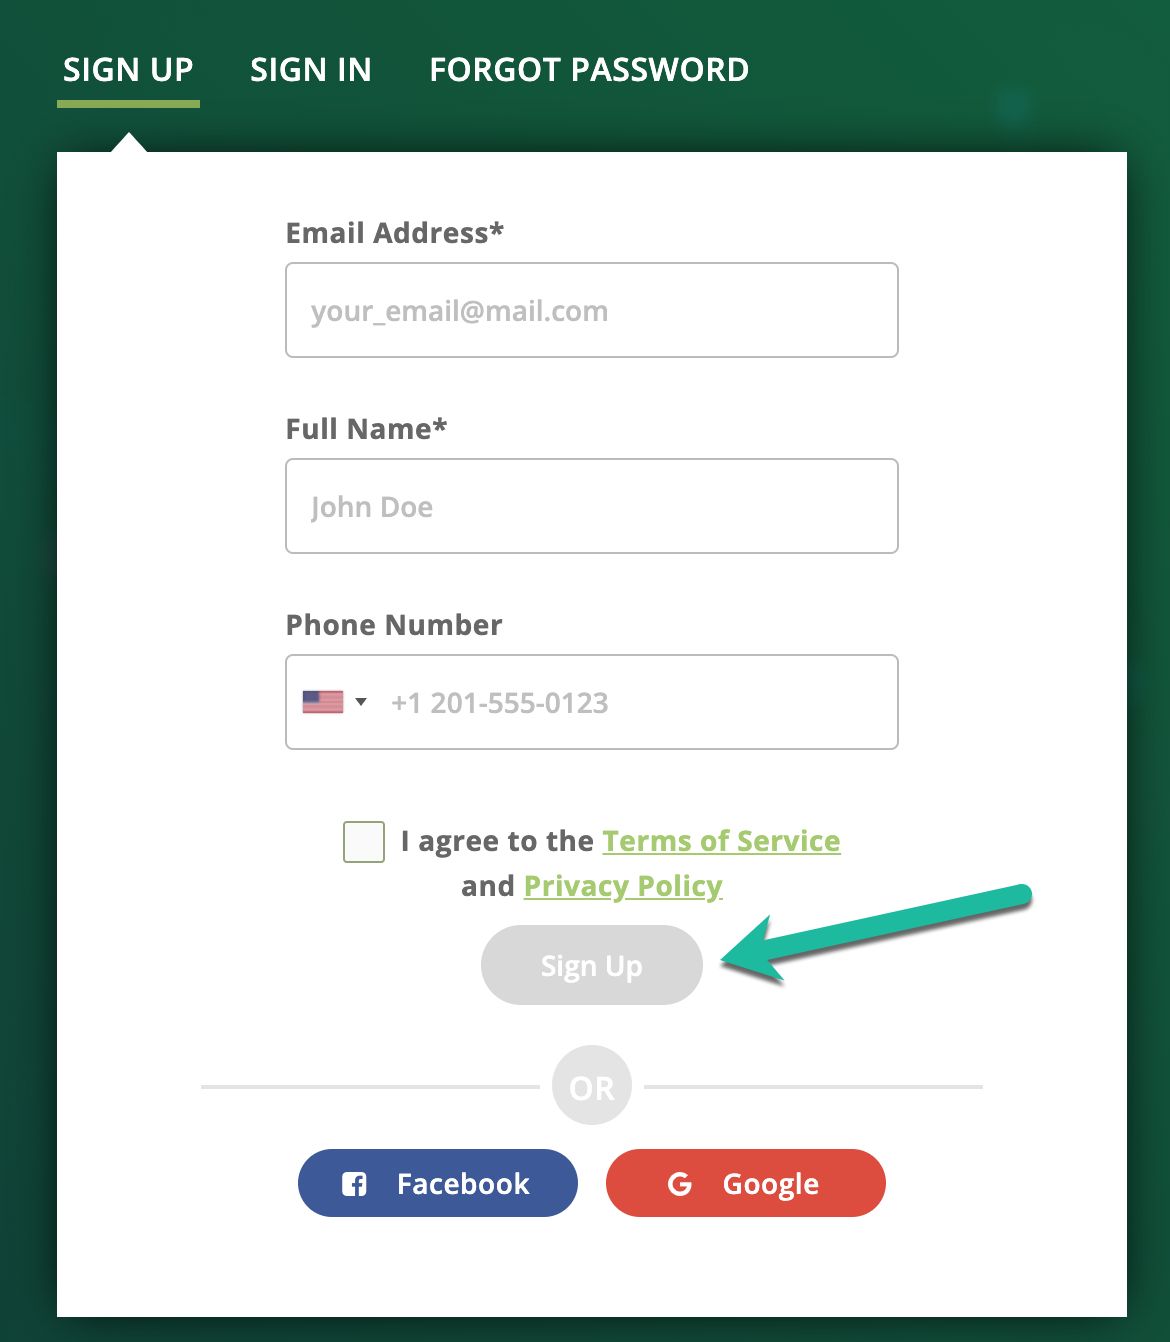
Step #2
Fill out the form and click Sign Up option located on the bottom of the form. Note that a phone number is not required, but accepting the terms and conditions is. The Sign Up button will turn green when you've properly filled out the form:

Step #3
After you've signed up, they will email you a password and send you to the page to get started:


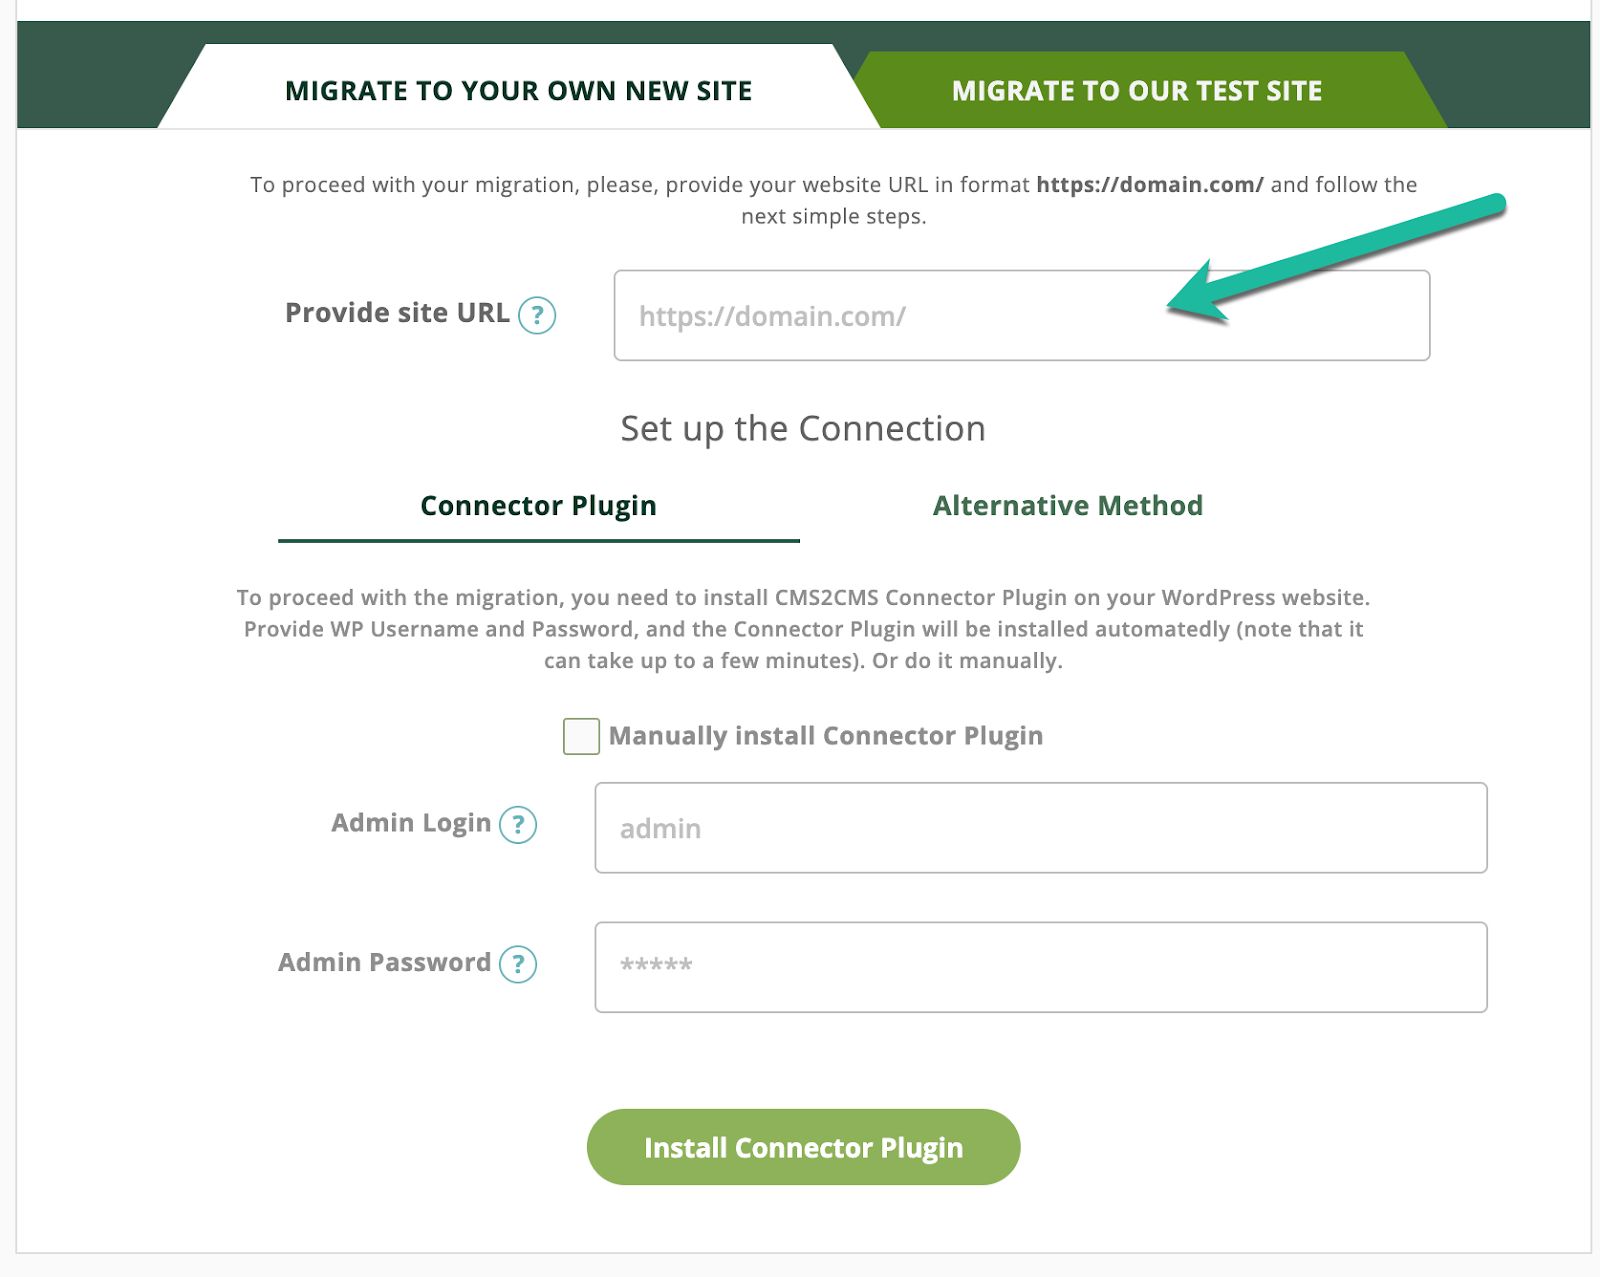
Step #4
Fill out the form with your free Wix URL and click on the green Verify Connection button:


CMS2CMS will verify that your site is live, and when it is complete, it will have you move on to the next step. This completion action is indicated in the user interface with a graying out the first step with a green check mark shown on top of the gray shading:


Step #5
If you still need to get set up with your new hosting provider as described above, you can use CMS2CMS's Migrate to Our Test Site, then click Verify Connection and follow their prompts. However, enter the custom domain here, if you are all set up with your WordPress at the new hosting provider and your custom domain (URL):

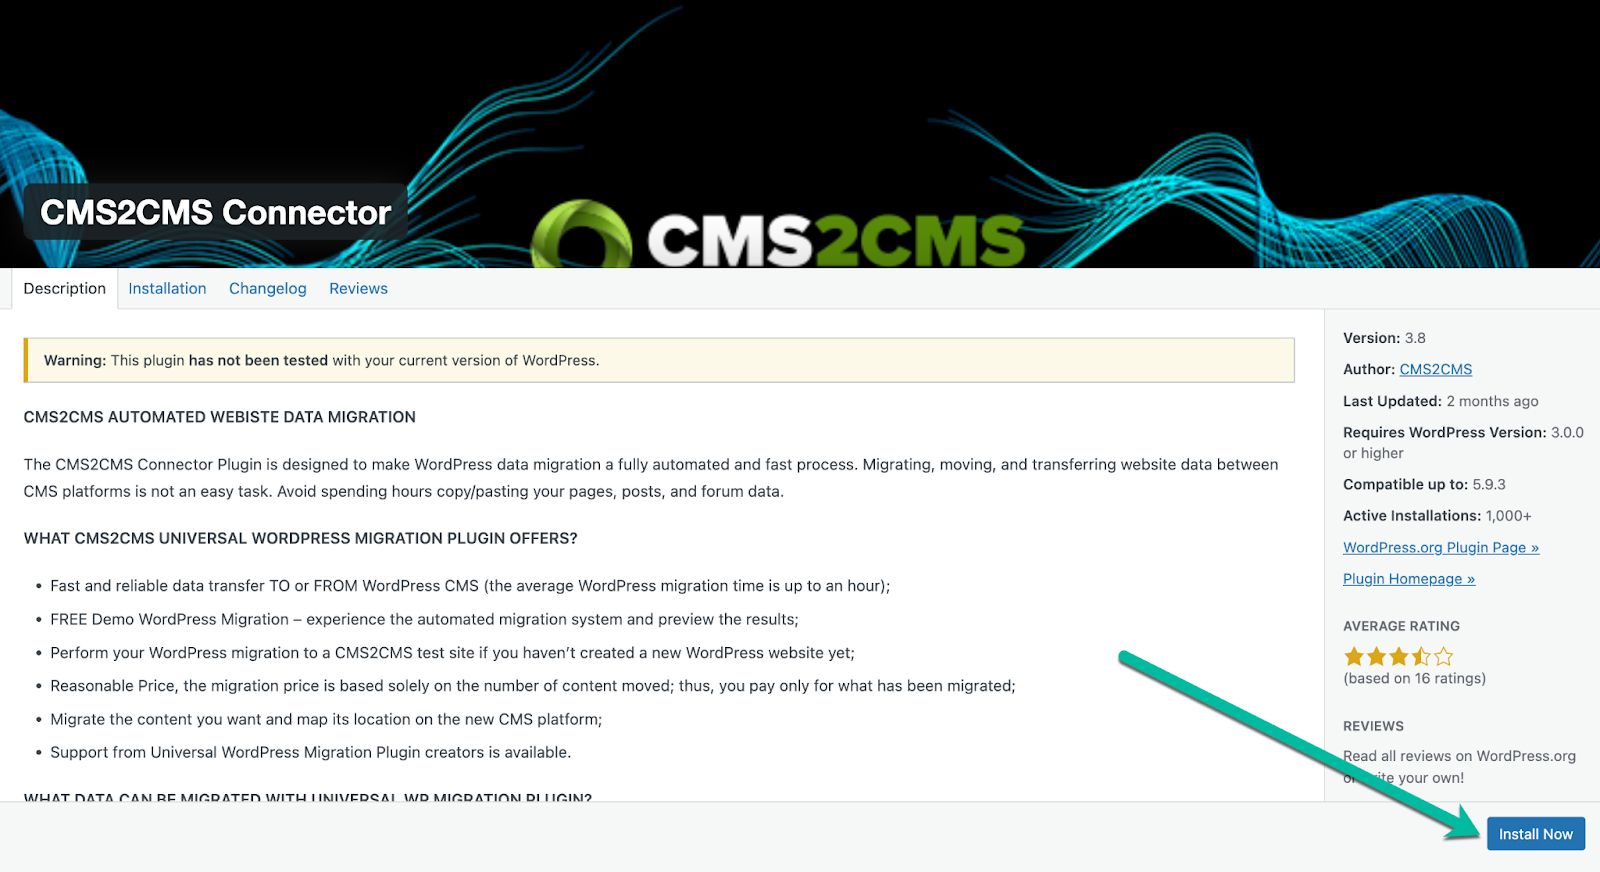
Step #6
From this page, you can either enter your Admin login credentials to install the plugin automatically or download the plugin package and install it yourself via the Add Plugin page in the WordPress admin screen.
If you do choose to use an admin login, we recommend that for security purposes that you create a separate admin user for the install and import that you can remove privileges from later.
Step #7
To install manually, check the box next to Manually Install Connector Plugin with your URL in the box next to Provide site URL, then click on Install to open a new page to your new WordPress admin page:


Step #8
If the page doesn't open, it's possible the popup was blocked by your browser. In Chrome, there will be a little icon of a browser with a red x on it on the right side of the URL bar. Click on it. Then, click on the URL at the top of the window that appeared when you clicked on the icon in the URL bar. This action will open the window. In the bottom right corner, click Install Now:

Step #9
The page will then take you to a screen that looks like this. Click on the Activate Plugin button to continue:


You should see CMS2CMS as an option in the left-hand menu of your WordPress admin page under Tools:


Step #10
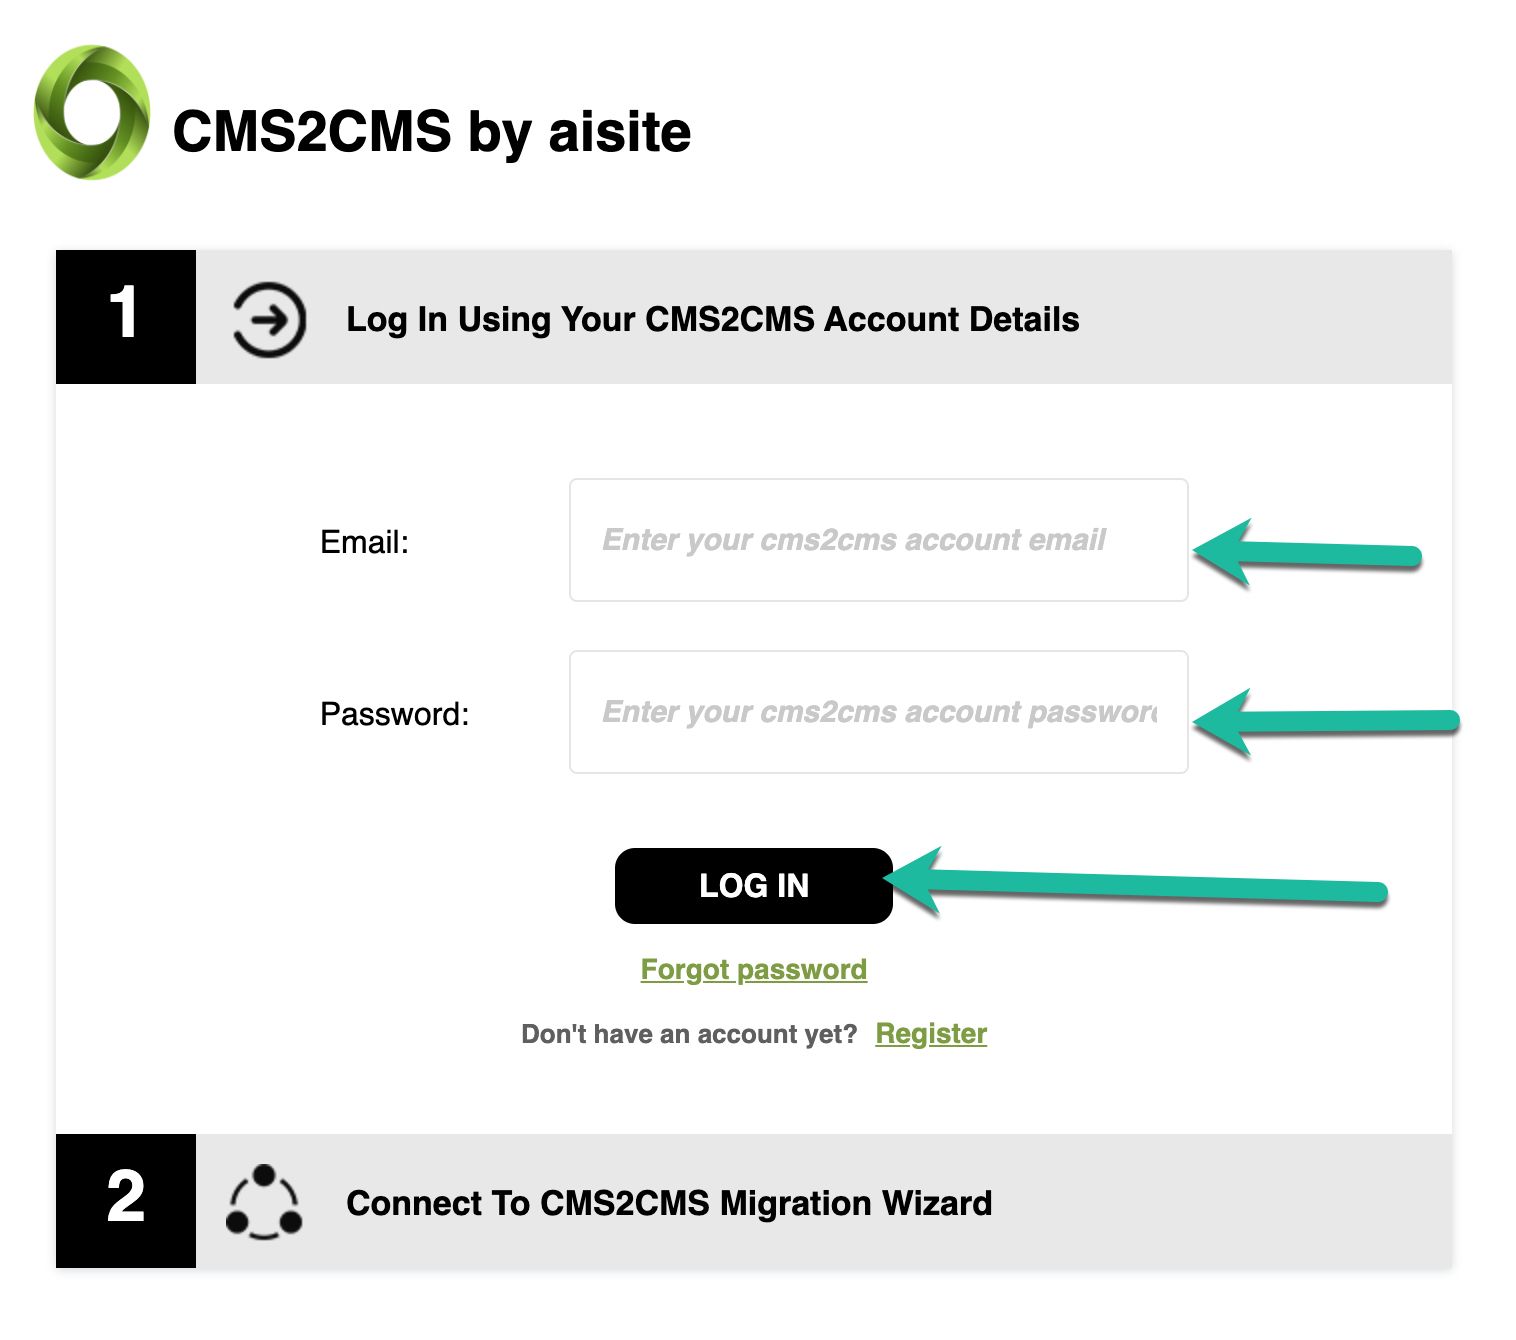
If you do not see CMS2CMS as an option in the left-hand menu, go back to the tab or window where you have the CMS2CMS website open and click on Sign In:

You will see a page where you must enter your CMS2CMS credentials (remember they emailed a password to you) and log in:

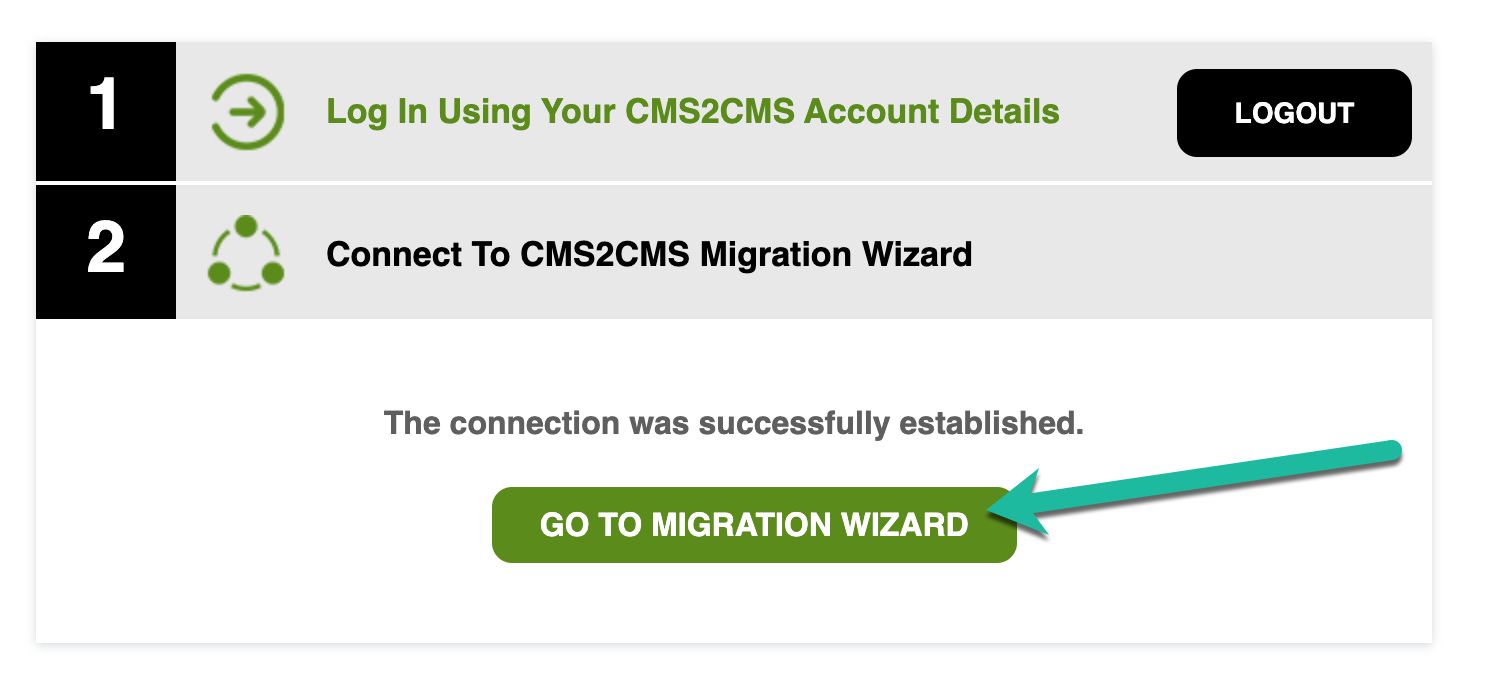
Step #11
Click Go to Migration Wizard:

Step #12
From here, add the funds necessary to move your website from Wix to WordPress:


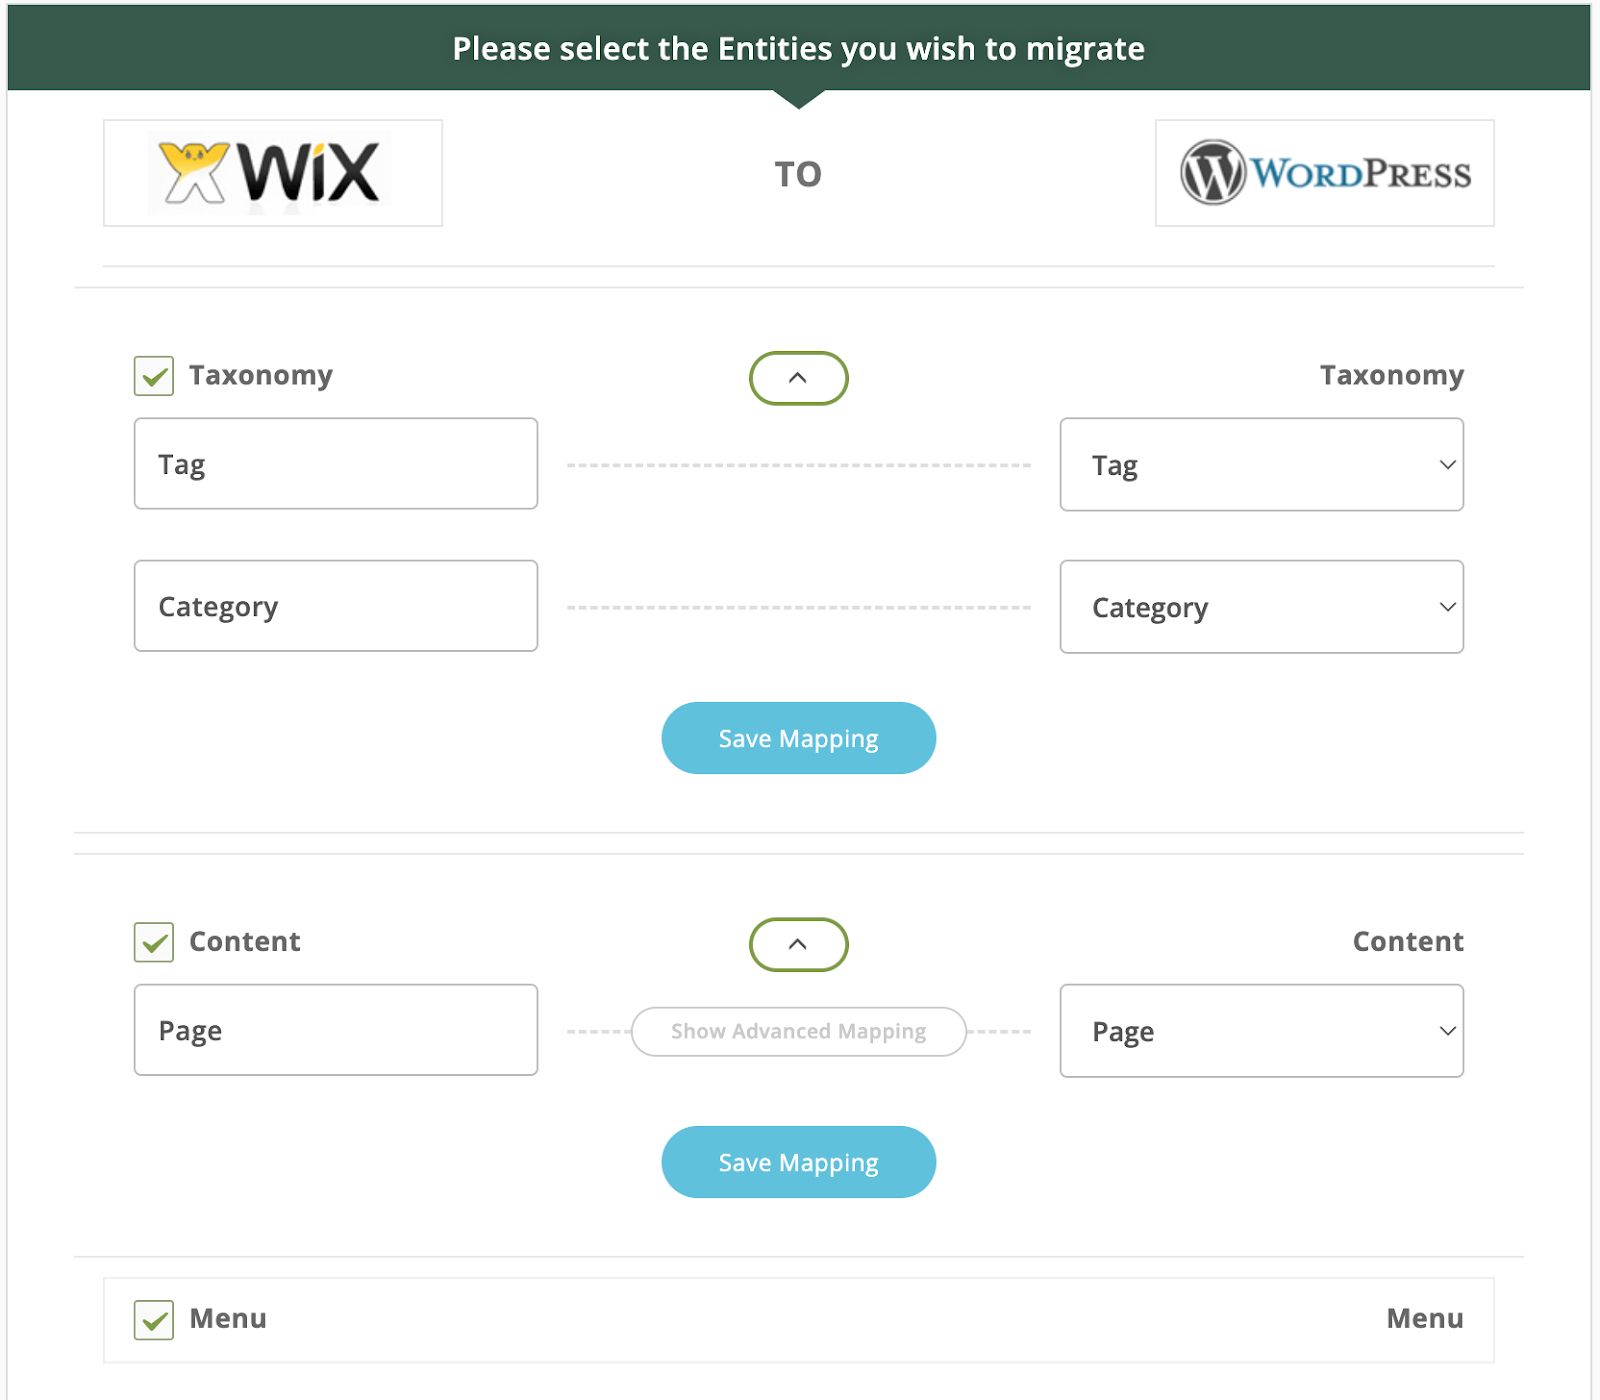
Step #13
You must select the items you want to be transferred from Wix to WordPress:

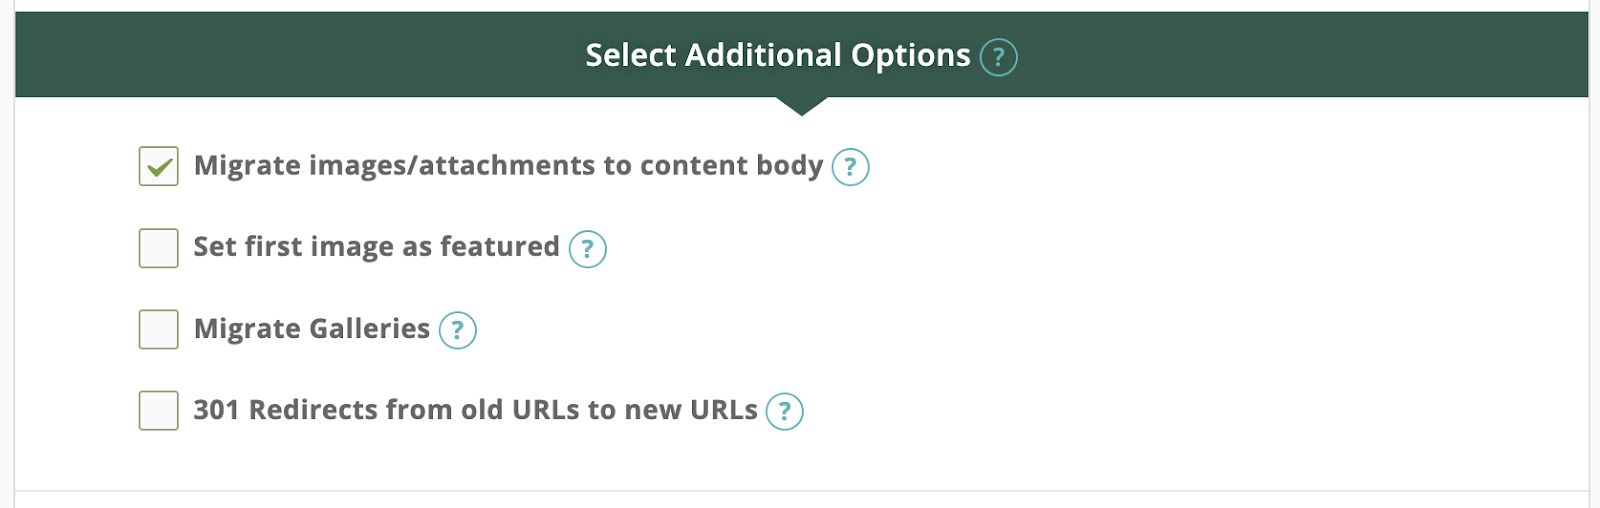
Step #14
You can select additional options here as well. Please note that if you are using a free Wix URL, you cannot redirect the old URL to the new URL:

Step #15
Once you've selected your desired options, click the green button at the bottom to start your migration:


Once the migration is complete, check your website over to ensure that all the content you expected to be there, is there as you were expecting. If you chose to have images moved with the migration process, make sure that they are correctly pointing to your WordPress media library. If not, you will need to upload them manually and place them in the posts or products they were used in.
Transfer my Wix website to Nexcess — what if my images are still linked to Wix?
You can find out if the import was successful in bringing images over to your WordPress media library. Here are the steps involved.
Step #1
Review your WordPress media library. If your images are present, then just update the URLs used for your images in the corresponding your WordPress posts:

Step #2
There exists a free plugin you can use by the name of Auto Upload Images. It can help fix your images without the process of downloading and reuploading.
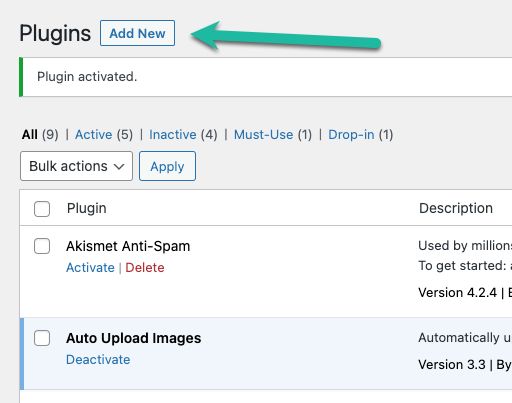
Step #3
You will want to install the plugin. Download from the link above, install it, and activate it. Alternatively, you can search for it on the Plugins page using the Add New feature:

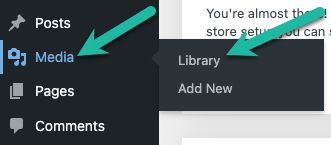
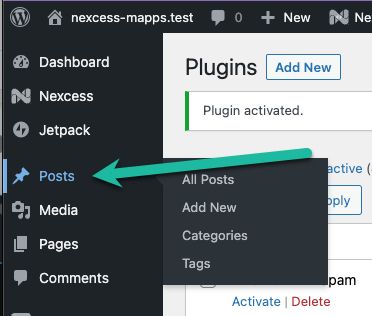
Step #4
With the Auto Upload Images plugin installed, go to the Posts area:

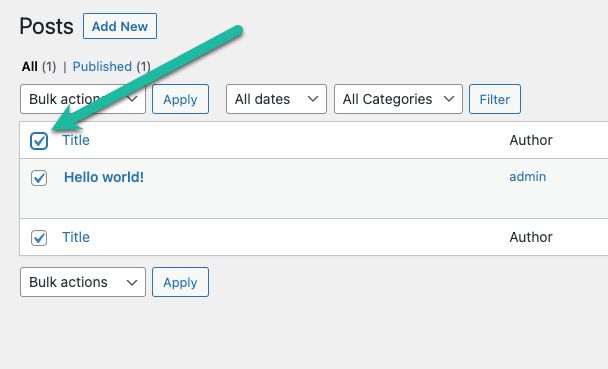
Once you arrive on the Posts page, ensure that you set your Posts per page is set to the value of 999. If you do, the next step will select all your posts. Then, click the checkbox in the upper left-side corner to select all the posts that were imported:

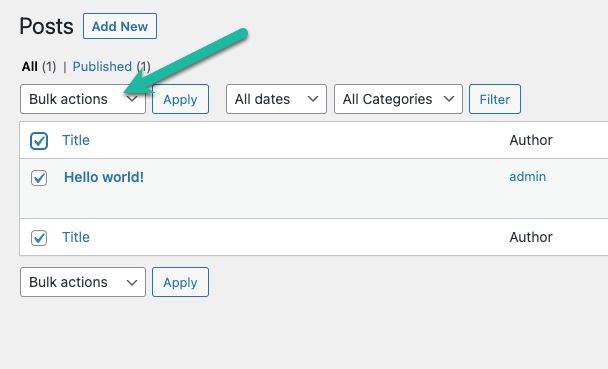
Step #5
With all posts selected, click the Bulk Actions dropdown menu:
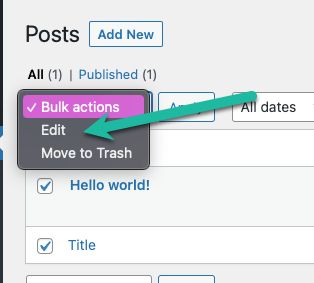
Step #6
You can then selection Edit from the dropdown.

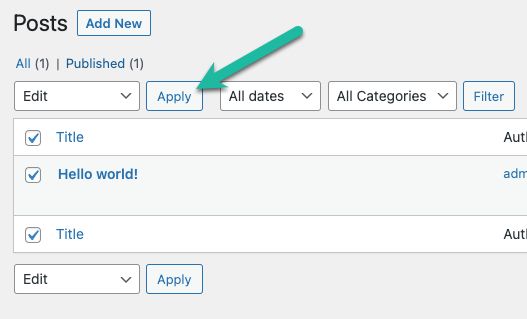
Step #7
From here, select the Apply option to bring up a new screen:

Step #8
From there, click Update and do not alter any other settings:

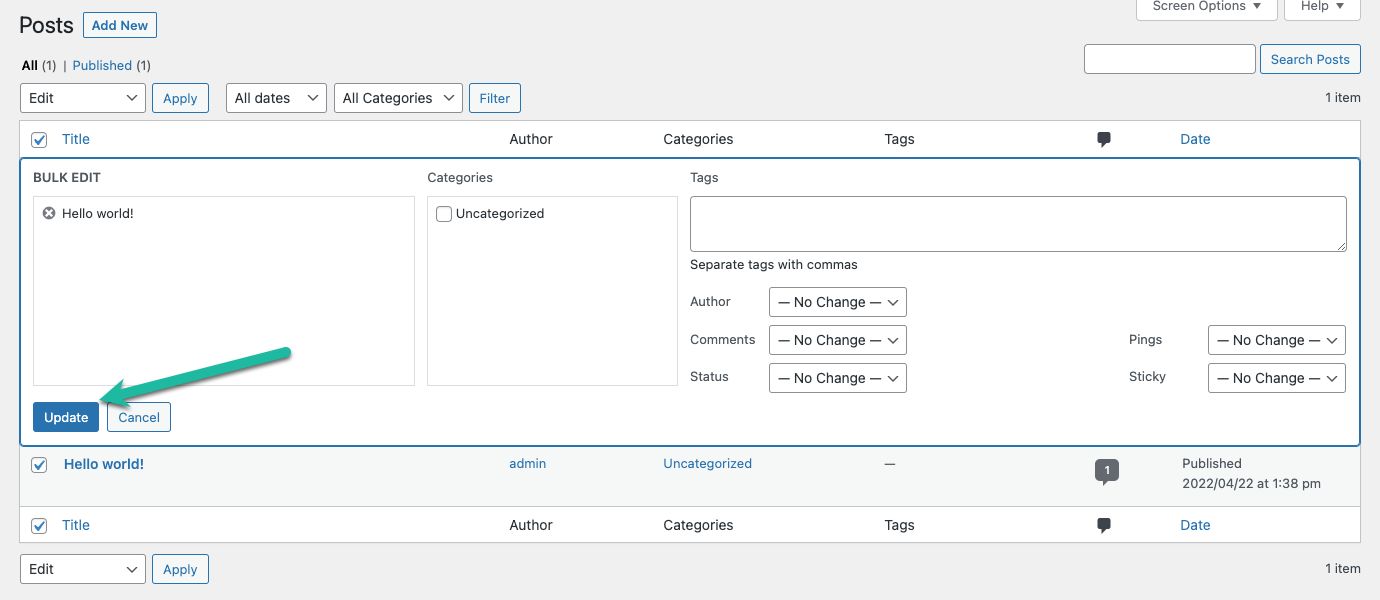
Doing so will save the images still linked to the old source to your new WordPress media library and update the image links in your posts to the new images.
Fully managed web applications from Nexcess
Discover our hosting products for every business need built on top of leading content management and ecommerce platforms.
Transfer my Wix website to Nexcess — importing to Magento
In some scenarios, Magento is worthwhile Wix alternative. However, there are only a few importing solutions for moving your Wix website to the Magento platform.
If the work of manually moving your Wix site to Magento seems overwhelming, a Wix-to-Magento extension called Wix to Magento Migration is available, but it may be cost-prohibitive, depending on your budget constraints.
Learn more about Nexcess Managed Hosting
Web hosting value and reliability are strengths a Nexcess. We offer a diverse web hosting product mix to bring your online presence to life.
Find the hosting plan that works best for and your business.
Recent articles
- How to customize the Nexcess MAPPS MU (must-use) plugin
- Updating ExpressionEngine CMS to use the Nexcess CDN
- Secure Shell (SSH) user setup, access, and FAQ for the Nexcess Cloud


