

Some website admins have trouble leveraging phpMyAdmin as a MySQL/MariaDB management tool, but Nexcess Hosting makes it easy to use from the Client Portal.
Nexcess & phpMyAdmin: Frequently Asked Questions when Using phpMyAdmin
What is phpMyAdmin?
The phpMyAdmin tool is a free software application written in PHP that allows the management of MySQL or MariaDB databases. Most administration tasks are performed by phpMyAdmin. Using phpMyAdmin, you can create or modify databases, run queries, and create user accounts.
The phpMyAdmin interface can be accessed through SiteWorx (non-cloud) or your Client Portal, depending on whether you use a physical (non-cloud) account or a Nexcess Cloud account.
Many people who have trouble understanding the use of phpMyAdmin as a management tool, but Nexcess makes it extremely easy to manage it from the Client Portal.
Find out how to use phpMyadmin with Nexcess by reviewing the answers below to the most frequently asked questions.
What are the Best Features of phpMyAdmin?
- The phpMyAdmin web interface can run on any server or on any Operating System (OS) using a web browser.
- Admins can create, delete, and manage the database using the Graphical User Interface (GUI) provided by phpMyAdmin, which is much easier to use than the standard MySQL command-line editor.
- Admins back up the MySQL or MariaDB database and export the data in different formats, including CSV, DOCX, PDF, ODT, SQL, XLSX, and XML.
- Admins can execute complex SQL statements and queries, create and edit functions, triggers, and events using the easy-to-understand GUI that phpMyAdmin offers.
What are the Differences Between Using phpMyAdmin & MySQL Workbench?
The Graphical User Interface (GUI) provided by phpMyAdmin as a web application makes it easier to use when compared to MySQL Workbench, which is fairly complex for beginners.
Users find the easy-to-understand GUI a great way to run SQL commands and perform SQL operations for a MySQL or MariaDB database.
How Do You Access phpMyAdmin?
So, first-time phpMyAdmin users ask this question the most often.
Nexcess Cloud > Client Portal - Using phpMyAdmin Step #1
Log in to your Nexcess Client Portal. Your Nexcess Cloud account superuser access and Client Portal login credentials are required in this process. If you cannot locate your credentials, click Forgot Password? on the login page.
About Nexcess Client Portal
Log in to your Nexcess Client Portal and pick the product plan you have with Nexcess. Review to the Nexcess Client Portal Guide for more details on how best to use the portal.
Nexcess Cloud > Client Portal - Using phpMyAdmin Step #2
Once you have successfully logged in, navigate to Plans and select the plan of your choice.

Nexcess Cloud > Client Portal - Using phpMyAdmin Step #3
Next, select the site for which you want to work with phpMyAdmin to management the database.
Nexcess Cloud > Client Portal - Using phpMyAdmin Step #4
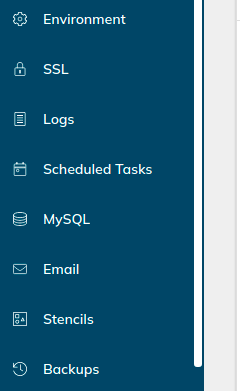
Once you are in the Site Dashboard area, click on the Show More option.
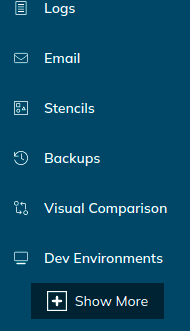
When you click on Show More, it will expand the feature list, and a MySQL option will appear in the sidebar.
Nexcess Cloud > Client Portal - Using phpMyAdmin Step #5
Click on MySQL. When the screen with Launch phpMyAdmin button appears, click the button to go the phpMyAdmin Web Interface.

How Do You Launch phpMyAdmin SiteWorx?
Non-Cloud > SiteWorx - Using phpMyAdmin Step #1
Log in to your SiteWorx account.
- If you do not know your password, click Forgot Your Password on the login page.
- If you do not know the web address for your SiteWorx login page, either refer to your Welcome Email, or contact our Support Team.
Non-Cloud > SiteWorx - Using phpMyAdmin Step #2
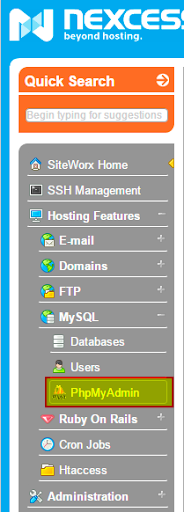
In the SiteWorx main menu, select Hosting Features > MySQL > phpMyAdmin:
Check out the informative links below to articles within the Nexcess Knowledge Base for more information:
- https://help.nexcess.net/74176-mysql-database-management
- https://help.nexcess.net/74113-siteworx/what-is-phpmyadmin
How Do you Access phpMyAdmin for a Magento Database?
There is confusion among Magento users about how to use phpMyAdmin.
The process for accessing phpMyAdmin for your Magento sites is basically the same. An important difference to make note of is that all the sites are integrated under a single Magento environment when you choose the Magento plan. Consequently, you will have a common MySQL option for all your Magento sites.

What is the History of phpMyAdmin?
The phpMyAdmin application is an open-source database management tool written in PHP, which was introduced on September 9, 1998. Basically, the software uses third-party tools to manage the tables and data within databases. The phpMyAdmin tool supports different types of operations on MySQL and MariaDB databases. Its main functionality is to provide web-based management for MySQL.
MySQL databases can be managed using phpMyAdmin, which uses a graphical user interface. You can create a database and table manually using phpMyAdmin. It offers a web-based interface and can run on any server.
Features of phpMyAdmin
Teh phpMyAdmin application supports several features that are given below:
A user can create, alter, browse, and delete databases, views, tables, columns, and indexes in phpMyAdmin.
Multiple results sets can be displayed via queries and stored procedures.
The phpMyAdmin tool can display multiple result sets using queries and stored procedures.
Foreign keys and InnoDB tables are supported.
Databases, views, and tables can be tracked with phpMyAdmin.
PDF output of database layouts can also be created.
There are many formats in which you can export phpMyAdmin, including CSV, DOCX, PDF, ODT, SQL, XLSX, and XML.
The phpMyAdmin tool supports the MySQLi file extension for MySQL.
The phpMyAdmin tool can interact with 80 different languages.
SQL statements and batch queries can be edited, executed, and bookmarked in phpMyAdmin.
With the help of predefined functions, data can be transformed into any format — for example BLOB data as an image or a download link.
It is possible to backup the database into different formats.
How Do You the MySQL Enable Event Scheduler in phpMyAdmin?
MySQL Event Scheduler (event_scheduler) will be disabled server-wide in our Nexcess shared environment.
The MySQL Event Scheduler (event_scheduler) is available upon request. If you wish to enable it, please get in touch with our Support Team or drop us an email at support@nexcess.net.
When Do phpMyAdmin Upgrades Occur?
Our Nexcess Systems Team manages our shared server software upgrades during periodic scheduled maintenance windows of time. Therefore, phpMyAdmin will most likely be upgraded in the future at an unspecified time.
If there is ever a feature or solution you require that is present in a newer version of phpMyAdmin but not the current version, kindly contact the Support Team, they will be able to provide you with a solution.
How Do You Reset a User's Password via phpMyadmin?
We will now see how we can reset the passwords for both Magento and WordPress using phpMyAdmin.
Password Resets - Using phpMyAdmin Step #1
First, you will need to access the phpMyAdmin via the Nexcess Client Portal.
Password Resets - Using phpMyAdmin Step #2
Choose your database once you have logged into the phpMyAdmin interface.
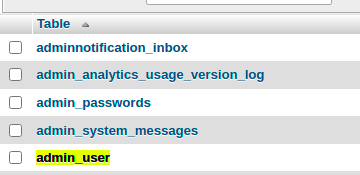
Password Resets - Using phpMyAdmin Step #3
If you are using WordPress, and searching for a user, select the database table with the name wp_users (the prefix wp_ can be changed). If you are using Magento, and searching for a user, select the database table with the name admin_user table.

Password Resets - Using phpMyAdmin Step #4
A table containing your user's data rows will now appear. Simply click on the Edit button beside the username whose password you wish to change.
Password Resets - Using phpMyAdmin Step #5
The phpMyAdmin form will display the user information fields.
In the user_pass field, you will need to replace the old password with your new one. Then, choose MD5 from the dropdown menu under the function column and click Go at the bottom of the page. The MD5 hash of your password will be used to encrypt and store it in the database.
How Do You Export a MySQL Database Using phpMyAdmin?
Exporting a Database
Step #1: Log in to your Nexcess Portal and access the phpMyAdmin option.
Step #2: The left sidebar of the interface displays a list of your databases.
Tip: You can expand the list by clicking the + button on the left.
Step #3: Choose the name of the database you want to export.
Step #4: Click Export at the top.
Step #5: You can choose the method you would like to use to for the export. In case you are unsure, leave it as it is.
Step #6: In the dropdown box, select the file format.
Step #7: Click Go. A SQL file will be downloaded.

How Do You Import a MySQL Database Using phpMyAdmin?
Importing a Database
Step #1: Log in to your Nexcess Portal and access the phpMyAdmin.
Step #2: The left sidebar of the interface displays a list of your databases.
Tip: You can expand the list by clicking the + button on the left.
Step #3: Choose the name of the database you wish to import to
Step #4: On the top menu, select the Import tab.
Step #5: Select Choose File.
Step #6: You can now select the database file you imported earlier on your PC and click Go.
Step #7: This will import your SQL file for you.

Have more questions? For those seeking additional knowledge, the Control Panel Tools > Client Portal sections in the Nexcess Knowledge Base are invaluable. You can also read the related articles found in the sections below.
Useful Resources for MySQL Database Management
- What is phpMyAdmin?
- Accessing Your Database in Managed WordPress or WooCommerce Portal
-
MySQL User Permissions for a Magento/Flex Cloud Plan
- How to truncate MySQL tables in Nexcess Cloud
- How to manage MySQL databases in Nexcess Cloud
- How to create MySQL databases with SiteWorx
- How to create MySQL database user accounts in SiteWorx
- How to delete a MySQL database with SiteWorx
- How to truncate MySQL tables from the CLI
- How to show running MySQL queries in Nexcess Cloud
- How to show running MySQL queries from the CLI
-
How to change the password for MySQL database users in Nexcess Cloud
- Logging Database Queries in Magento | Nexcess
- How to change the password for a MySQL database user
- Nexcess: MySQL & IP Whitelisting for Remote Access
Consider Hosting with Nexcess
Hosting optimized for the industry's leading platforms, including Managed WordPress Hosting, Managed WooCommerce Hosting, and Managed Magento Hosting:
Build Better Sites and Stores With Fully Managed Hosting from NexcessFaster Speeds, Stronger Security, Inherent Scalability and Trusted Support.
Our range of hosting plans caters to any business scale. We do all the heavy lifting for you to focus on growing your business. In addition, we automatically update ore components and plugins to the latest version and ensure your hosting environment is properly optimized, secured, and updated.
Nexcess infrastructure was specially designed to keep up the best speed and performance in the industry. No traffic surge can threaten your website to go down thanks to our autoscaling technology which adds more resources to your server to handle the load. In addition, we offer always-on security monitoring and support from web hosting experts 24/7/365 and a built-in CDN with 22 locations and advanced caching for ultra-fast loading.
All hosting plans include The Nexcess 30-Day Web Hosting Money Back Guarantee.
Why Choose Nexcess?
Because we're different! Chris Lema captures "the why" in his passionate and stirring recount of a Nexcess support-related story.
Useful YouTube > Nexcess Channel Links
- Nexcess on YouTube - Home
- Nexcess on YouTube - Welcome to Your Nexcess Portal
- Nexcess on YouTube - Featured Videos
- Nexcess on YouTube - All Videos
- Nexcess on YouTube - All Playlists
Resources for More Information
Need more help? The File Management and Databases sections within the Nexcess Knowledge Base are important resources for those seeking additional knowledge.
The Applications section also contains valuable insights for those seeking additional knowledge about our other various hosted applications and platforms. Check out our related video playlists and articles below:
- Managed WordPress by Nexcess - Video Playlist
- Managed WooCommerce by Nexcess - Video Playlist
- Managed Magento by Nexcess - Video Playlist
Need a No-Code Website Building Solution?
Are you on an accelerated schedule and already ready to move forward? If you need to get started with your Nexcess StoreBuilder Solution sooner rather than later, check out these resources:
Next Steps with a Nexcess Cloud Hosting Solution?
Read more about the Fully Managed Cloud Environment by Nexcess and its benefits for your business.
A Cloud Hosting Solution That Lets You Do Business Your Way
We believe in the promise of cloud: scalability, security, performance, and ease of use. Together with our team, clients, and partners, we’ve built something better.
Choose From Multiple Applications
Whether you’re a small business or a high-traffic eCommerce store, our cloud hosting solutions are designed around your needs: auto scaling, PCI compliance, and comprehensive development tools provide you with maximum dynamic flexibility in a fully managed cloud environment.
We make applications easy with environment optimizations for:
And there are many more!
We also have a variety of Nexcess support articles about how best to implement our product offerings housed in the Nexcess Knowledge Base, including how to get your site going with a number of different configuration options. These resources include a great article on setting this up for Migrating to Nexcess with managed WordPress and managed WooCommerce hosting.
24-Hour Assistance
If you need any assistance with the above-mentioned, don't hesitate to reach out. For 24-hour assistance any day of the year, Nexcess customers can contact our support team by email or through your Client Portal.
New Customers: Fully Managed Hosting Solutions
Not a Nexcess customer yet? Check out our fully managed hosting solutions. The option to chat with an expert is also available.
Related Articles
- Databases
- What is phpMyAdmin?
- How to Access Your Nexcess Cloud Control Panel
- What are the advantages of using SSH keys to control access for multiple users?
- How to export tables and import MySQL tables via CLI/SSH
- How to manage MySQL databases in Nexcess Cloud
- How to show running MySQL queries in Nexcess Cloud
- How to change the password for MySQL database users in Nexcess Cloud
- How to manage MySQL databases in Nexcess Cloud
- Accessing Your Database in Managed WordPress or WooCommerce Portal
- Tuning Your MySQL Database for Performance
- WordPress Cleanup 101: 9 Easy Ways To Clean Up and Optimize Your WordPress Site


