

WordPress local development tools have been gaining popularity over the past years — providing a free and safe way to build a website, test updates. and try out new features before going live. However, as the final step of the website-building process, you must move your newly created website to the production environment to present it to the world.
About moving WordPress local development to your server
Moving from localhost to a live website is similar to migrating a website from one server to another, regardless of the WordPress local development platform you used. In this Nexcess Knowledge Base guide for WordPress, you will learn how to go live with your newly built WordPress website by moving it to Nexcess Managed WordPress hosting.
Overview of WordPress local development
WordPress local development can be referred to as the process of building a website locally as opposed to working in the server environment. WordPress local development requires you to set up an infrastructure on the localhost that will allow you to build, view, and manage your website without having to set up DNS or request server resources from a hosting provider.
Developing a website on localhost requires you to have the application stack used by WordPress to be set up in the local environment. Most Content Management Systems (CMSs) and other web applications use an application stack that includes PHP, a web server, and a database server. For example, Apache and NGINX as web servers and MariaDB/MySQL database servers are often used for WordPress in both the development and production environments.
WordPress local development platforms
Quite a few modern WordPress local development platforms simplify the process of building a website on the localhost. In addition, most platforms that can be used for WordPress, including XAMPP and Laragon, are usually cross-platform, which means that you can set up a local development environment on any operating system.
Here are the three most popular WordPress local development platforms:
- XAMPP. WordPress Local Development with XAMPP is available to Windows, Linux, and MacOS users and provides Apache, MariaDB, PHP, and Perl on localhost.
- Valet. Local WordPress Development with Valet was presented to MacOS users by Laravel as an environment for PHP frameworks.
- Laragon. Laragon is a great development environment for building a WordPress website on localhost for Windows users.
Here are a few more options that are used:
- MAMP. MAMP is a local server environment optimized for Windows and macOS environments. The MAMP acronym comes from the names of the components of macOS, Apache, MySQL/MariaDB, and
PHP/Perl/Python. - Local (localwp.com). Local (localwp.com) is a tool created to help simplify the process of spinning up a local WordPress server on a Mac, PC, or Linux for local WordPress development.
- Docker. Docker has container-based development and services that enable you to deploy Docker for local WordPress development. You are able to build your WordPress sites, web apps, databases, and more in containers rather than installing the necessary services on your machine directly.
Nexcess hosting as a great solution for going live with your WordPress site
Nexcess Managed WordPress hosting plans provide unrivaled performance, enterprise-grade security, high scalability, and award-winning support to make your business thrive as you transition from WordPress local development to the server environment. Fully optimized for WordPress, Nexcess Cloud hosting plans are the solution that works.
Going live does not mean the development process stops being secure and convenient. You can continue developing in a safe environment with options for database scrubbing included. In addition, Nexcess Cloud development sites ensure streamlined development with access to tools such as Git, Mercurial, and Composer.
Nexcess provides automatic WordPress core, theme, and plugin updates, which means all software used stays up to date without your direct intervention. In addition, using the Visual Comparison tool and Nexcess Cloud Development sites can help you avoid issues by testing updates before pushing the changes to the production environment.
Before you migrate
Before you start the migration process from the WordPress local development environment, there are a few crucial aspects to keep in mind.
Managed WordPress hosting plans from Nexcess
WordPress Managed WordPress hosting is a perfect solution for websites of any size and complexity. Before you launch the migration process, create an account with Nexcess and choose a hosting plan.
DNS and domain names
Choose and register a domain name for the WordPress site if you still need to do it. Nexcess provides domain registration services allowing you to buy and register a domain name fast and efficiently.
Nexcess temporary domains
You can choose a domain name at a later stage, as each WordPress website at Nexcess is assigned a temporary domain name upon creation. Nexcess uses temporary domain names to help make the migration process easier and more convenient for you. It also provides a number of other benefits, so we strongly recommend using a CNAME target instead of pointing your website to Nexcess using an A record. You can use Nexcess nameservers and manage DNS from the Nexcess Client Portal.
Once you have transferred your WordPress localhost website to Nexcess, registered a domain name, and updated DNS, you will need to change the domain name from the Nexces Client Portal. This step will allow you to replace the temporary domain name assigned to your website with the one you plan to use for your website.
Open the Domains page from the WordPress Site Dashboard in the Client Portal and click on the Modify Master Domain button, as shown below. Once you confirm the update, Nexcess will automatically replace the temporary domain name used with the domain name you provided in all WordPress configuration files and database tables, so you do not have to do it manually.
Nexcess website credentials — FTP and SSH/SFTP
Regardless of how exactly you transfer your website from the WordPress local development environment to Nexcess, you must obtain your SSH/SFTP and FTP credentials to connect to the account created for your WordPress website at Nexcess.
Log in to your Nexcess account and navigate to your WordPress hosting plan from the Plans page. Then, access your newly created website’s Site Dashboard, like shown below:


You can find your FTP and SFTP/SSH credentials on the Credentials page of your WordPress Site Dashboard. Click on Generate New Password to retrieve your FTP or SFTP/SSH user password:


Nexcess hosting server infrastructure for WordPress
Once you create a WordPress hosting plan, Nexcess will create a new installation for you. Your newly created website at Nexcess will not be empty, so you do not need to transfer all website files from the WordPress local development environment. A database and a database user will also be automatically created for you.
The database connection information, including the database user’s password, will also be added to the wp-config.php file. You can adjust the database prefix if needed after you have uploaded your WordPress database to Nexcess.
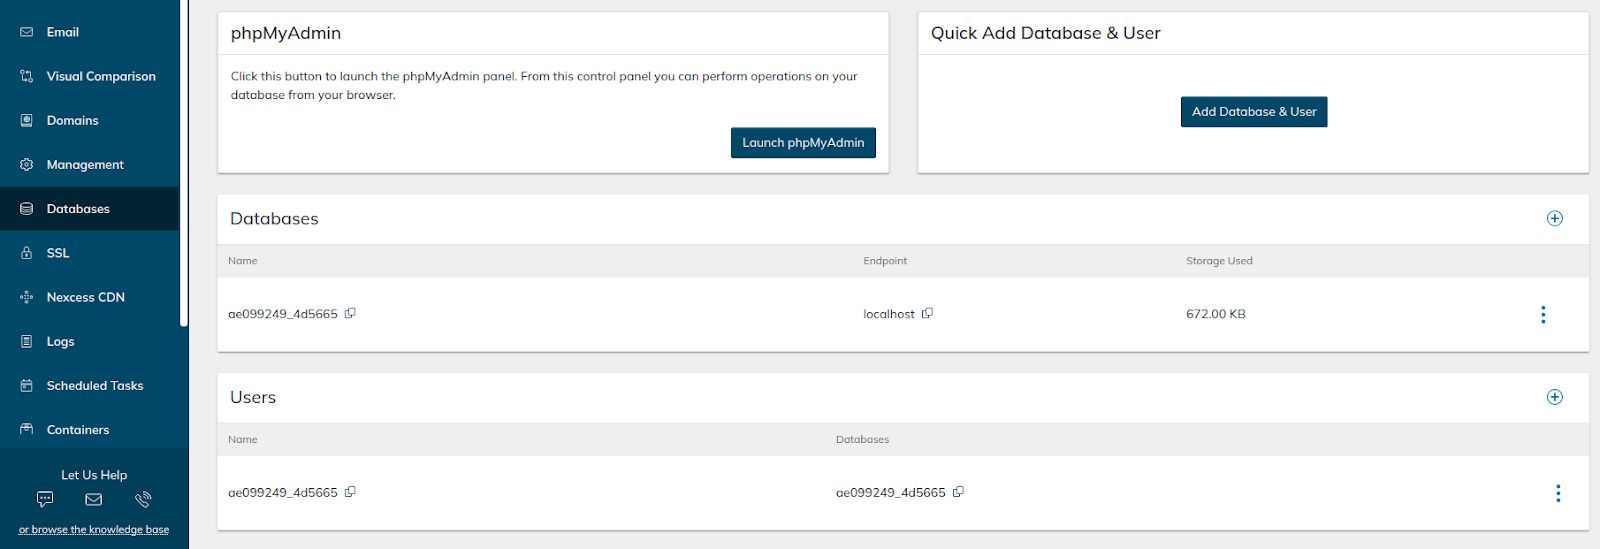
You can access the Databases management interface from the Site Dashboard. In addition, you will see the option to launch phpMyAdmin to import your database backup:

Moving from WordPress local development environment to Managed WordPress hosting at Nexcess
There are two main ways to transfer your WordPress localhost website to Managed WordPress hosting at Nexcess — using a WordPress migration plugin or moving your website manually.
1. Using a WordPress migration plugin
WordPress migration plugins simplify the migration process and can be used for both server-to-server migrations and moving a website from a WordPress local development environment.
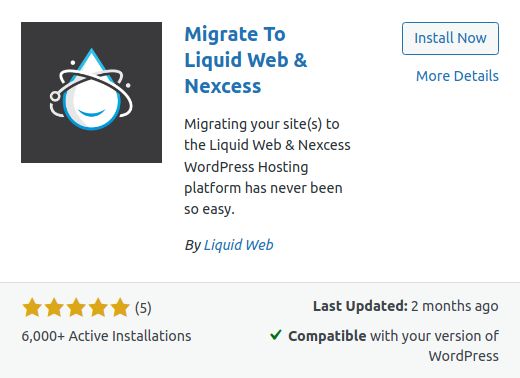
The Migrate to Liquid Web & Nexcess is the best plugin for transferring your WordPress website to Nexcess-managed WordPress hosting. The plugin takes care of all aspects of the migration process, from transferring day to making the necessary changes to your WordPress website’s configuration.
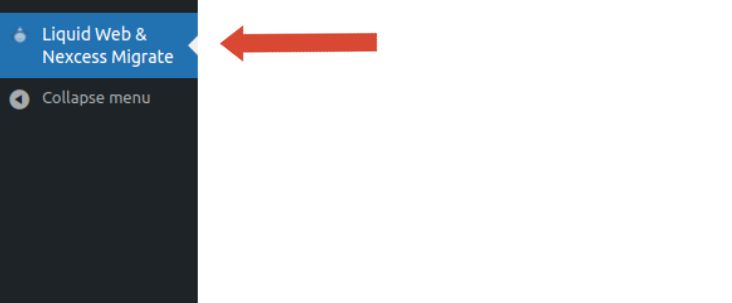
Step 1a. Install and activate the Migrate To Liquid Web & Nexcess plugin for WordPress
Install and activate the Migrate To Liquid Web & Nexcess plugin from your WordPress dashboard in the WordPress local development environment. Upon activation, a link to its interface will appear in the main vertical menu of your admin dashboard:

Step 1b. Provide your migration details
Open the plugin’s interface from the WordPress dashboard:

You must provide the following information:
- Your Email Address. The migration plugin will send you automatic updates on your migration status from the WordPress local development environment and notify you once your website data has been transferred to Nexcess.
- Destination Site URL. The destination URL is the temporary domain name provided by Nexcess.
- Host/Server Address. You can use either the newly created Nexcess site's IP address or the temporary domain name.
- FTP Type. Choose whether you want to transfer the WordPress localhost website to Nexcess via FTPS or SFTP.
- FTP Username. Your FTPS/SFTP username.
- FTP Password. Your FTPS/SFTP password.
Provide your email address, confirm that you agree with the plugin’s terms and conditions, and then click the Migrate button:


Provide the destination website address and FTP/SFTP credentials of your newly created WordPress website at Nexcess. In most cases, you will not need to do anything else. However, if you have any additional folders created, include them under the Add Folders section:


Click on the Migrate button to start the migration process once you have completed the form:

Step 1c. Finish the migration
Depending on the size of your WordPress localhost website, the migration to Nexcess can take from a few minutes to a few hours. You will receive an email via the email address you provided once the migration has completed:


Migrate to Liquid Web & Nescess plugin will take care of all configuration changes and other technical aspects, so after your website has been moved from the WordPress local development environment, you do not need to perform any port-migration cleanup operations.
Browse your website from Nexcess using the temporary domain name assigned to it to ensure everything works as intended and no functionality is lost.
2. Migrating a WordPress localhost website manually
The Nexcess migration plugin is the best option for moving your website from the WordPress local development environment to Nexcess-managed WordPress hosting. If you choose self-migration, you must adjust all configuration settings and perform post-migration cleanup operations manually after transferring all website files to the new hosting environment.
Follow the provided steps to migrate your WordPress localhost website to Nexcess hosting manually. This process will require you to connect to Nexcess from your local development environment to transfer website files and your website database.
Step 2a. Create a backup of your WordPress localhost website
The first step is to back up your WordPress website, including its wp-content folder contents and database. You can create a backup of your WordPress database by using phpMyAdmin. Next, save the newly created database backup in your WordPress localhost installation directory.
As Nexcess creates a WordPress installation once you set up a WordPress hosting plan, the WordPress content folder’s files are typically the only thing you need to transfer from the website files residing on your local machine. Review your website content to see if you need to transfer any additional files or directories.
Step 2b. Upload your WordPress website to the new server
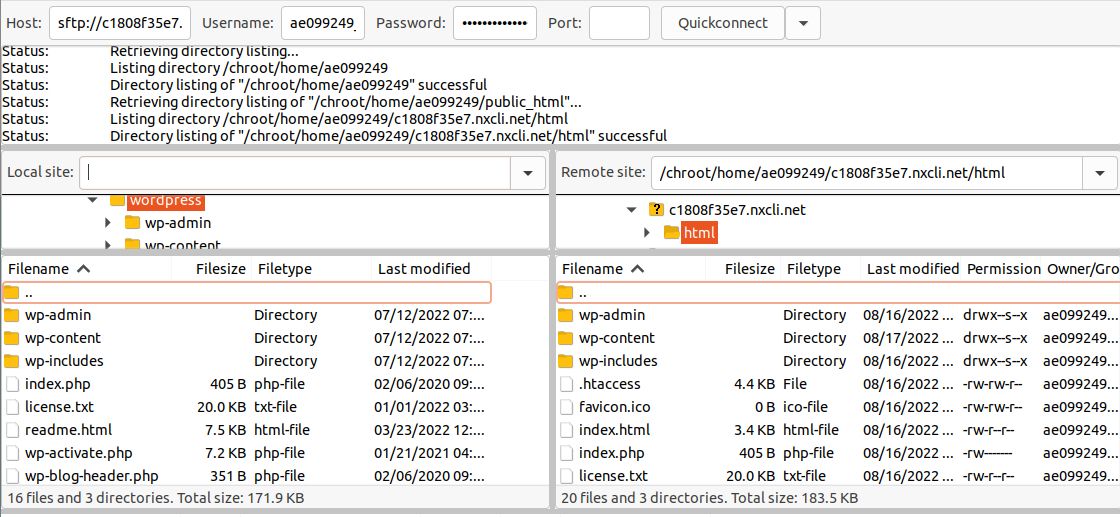
The best way to transfer your website files from the WordPress local development environment is to connect to Nexcess from your local machine via SFTP or FTPS using the credentials you have obtained from the Site Dashboard.
Open the document root of your newly created WordPress installation at Nexcess, like shown below. The path to it will be /chroot/home/username/temporary-domain/html where the username is the account username of your website at Nexcess and temporary-domain is the nxcli domain name assigned to it. As a WordPress installation already exists on the Nexcess server for your website, you can only move the files and folders unique to your WordPress localhost website.
Please note that the WordPress installation at Nexcess will have the mu-plugins folder and some other files required for the correct functioning of the website with regards to the wp-content directory. You will not be able to replace the WordPress content folder entirely:

You can upload your database backup to the installation directory at Nexcess to restore it using the command line interface or phpMyAdmin from the Nexcess Client Portal.
Step 2c. Adjust website configuration
Once your website has been imported, you need to adjust the URLs in your WordPress database to reflect the new domain name and no longer reference WordPress localhost. You can perform a search-replace using WP CLI or install a plugin like Better Search Replace for this purpose. Then, finally, save your permalinks structure and flush cache.
Browse your WordPress website using the temporary domain name to ensure everything is working correctly — and nothing has been missed during the migration process. Once you are ready to go live, create a DNS zone for your registered domain name you, update the DNS records to point to Nexcess, and modify your website’s domain name from the Client Portal.
Conclusion
Building a website in the WordPress local development environment can help you reduce costs and ensure security. Moving from the localhost to the production environment can be difficult, but using a WordPress migration plugin automates the process and takes care of all technical aspects of making your website available to the public. The Migrate to Liquid Web & Nexcess plugin is the best migration tool for transferring WordPress from both another web hosting provider and the WordPress local development environment.
Managed WordPress hosting, elevated
Hosting optimized for WordPress. Speedy, secure, scalable, and more PHP workers than any other provider.
A great website deserves great hosting! With an enterprise-level technology stack, a minimum of 10 PHP workers allocated to your website on all WordPress hosting plans, the best caching, and advanced security options — Nexcess is ready to accommodate your needs. Check out our Managed WordPress hosting plans to start risk-free.


