
 If you’re a WordPress user, it’s a good idea to get into the habit of testing every significant change you make to your installation before deploying it on your production hosting. In most cases, upgrading, adding plugins, or tweaking a theme won’t cause problems, but occasionally you’ll get incompatible plugins or break something. The last thing website owners want is for those errors to be visible on their site. WordPress users have several options for testing prior to deployment, including setting up a “testing” or “staging” subfolder on their host, using a cloud hosting platform like EC2 to spin up a temporary WordPress instance to try things out, or creating a local development environment.
If you’re a solo blogger or site manager, the latter option can be a lot more convenient. Everything can be served from your local machine, shortening the typical workflow of editing, uploading, and refreshing. It’s great to be able to play with plugins, test out design ideas, and experiment with configuration options without having to upload anything to the Internet.
There are 4 basic components that any WordPress site needs: an operating system to run on, a MySQL database, a functioning PHP environment, and a web server.
For OS X, all of that software together is known as a MAMP stack, which stands for Mac, Apache (the server), MySQL, and PHP. We’re going to show you how to get a functioning MAMP stack on your local machine. So long as you’re running a relatively recent version of OS X, it shouldn’t matter whether you’re using an iMac, a Mac Mini or a MacBook (Air or Pro).
Set Up Your MAMP Stack
Head on over to the MAMP site and grab the latest version. Unzip the downloaded file, double-click the resulting MAMP_2.1.4.pkg, and follow the installation instructions. This will give you an easy-to-control development environment with all the tools you need to serve a dynamic PHP website like WordPress.
There are two versions of MAMP, a free version and the paid-for MAMP Pro, which offers features like dynamic DNS compatibility, unlimited VHOSTs, and integration with a mail server. Unless you’re a pro, you can probably make do with the unpaid version.
Once MAMP is installed, run it from Launchpad or the Application folder, hit the button that reads “Start Servers” and you’ll be up and running.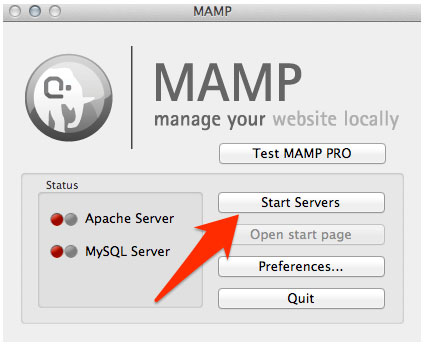
Create The Database
WordPress stores much of the data it needs in a MySQL database, so we’ll need to create one for it before install WordPress.
When you run MAMP, a browser tab with its start page should open automatically. If not, enter http://localhost:8888 in your browser’s address bar. Follow the link to phpMyAdmin.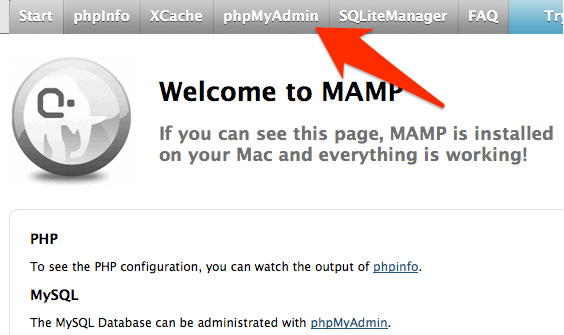
Choose the database tab, enter the name of your database (anything you like), then give it a name and hit “create”. Write the database name down somewhere, because we’ll need it later.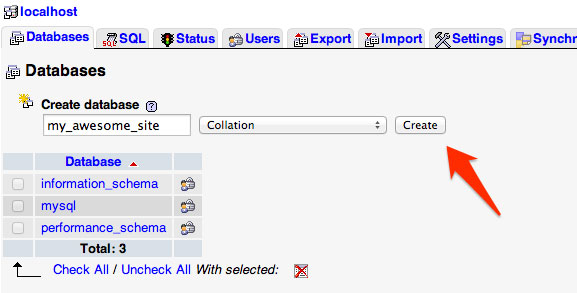
If you want to be super secure, at this point you can create a new username, but since we’re just going to be running the database on our local machine, we’ll use the root user.
Choose A Directory
We need to find somewhere for WordPress to live, so go back to the MAMP application window and click on the Apache tab, then choose a “Document Root” folder, or if you’re happy with the default, take note of it.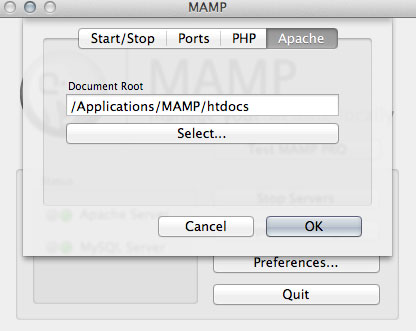
Install WordPress
You’re probably all familiar with installing WordPress, but we’re going to run through the steps you’ll need to follow to get it running with MAMP. Download the most recent version of WordPress, unpack it, and put the contents of the resulting folder into the MAMP document root you chose earlier.
Enter http://localhost:8888 into your browser’s address bar, and all being well, you’ll be presented with a page where WordPress complains about not being able to find its wp-config.php file. Don’t worry, we’re going to follow the installation process, which will create one for us.
Click through until you get to the database details page, and enter the information as you see it in the image below. Don’t forget to replace the name of the database with the one you chose earlier.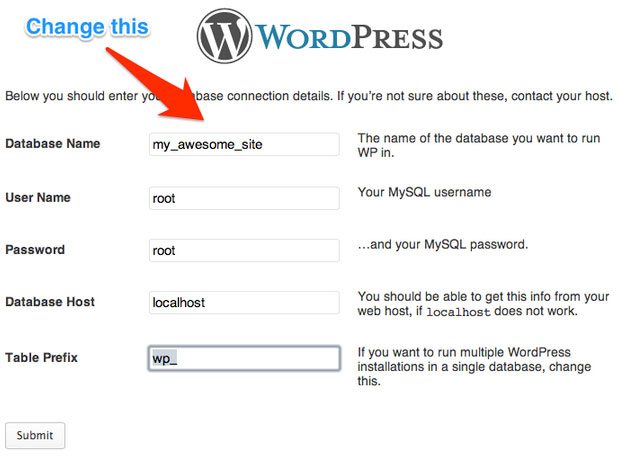
Continue with the installation process as normal. Once you’re done, WordPress will install and ask you to log in using the details you provided.
That’s it! You’re all set with a shiny new WordPress development environment.

