

In this Nexcess Knowledge Base tutorial, we will learn how autosave works and why you may want to disable this WordPress feature. Autosave is a great WordPress feature that lets you automatically save all changes to posts and pages.
A typical configuration of the autosave feature would automatically save changes every 60 seconds, ensuring that no edits are lost in case the current version of the content is not saved by the user. This feature can be extremely helpful in preventing data loss. But it may cause performance issues related to the excessive usage of server resources.
Overview of WordPress features provided by Heartbeat API
Heartbeat API was first introduced with WordPress 3.6 to allow the browser to communicate with the server when a user is logged into the WordPress Admin area. It sends AJAX requests to the server using the admin-ajax.php file to provide real-time updates on the WordPress dashboard.
Heartbeat API allows users to:
- Receive plugin notifications.
- See when a post is locked as another user is editing it.
- Have post changes autosaved to the database.
WordPress sends requests to the server every 15 seconds while a post is being edited and runs autosaves every 60 seconds.
Why you may want to limit WordPress Heartbeat API calls
AJAX requests sent by Heartbeat API can result in high CPU use and slow down your website. A PHP script is executed each time a call is sent to the server.
If a number of these scripts are executed simultaneously, they can begin to use up server resources. As a result, they’ll decrease your website’s performance and potentially prevent your visitors’ requests from being served. That can become a real problem for WordPress website owners.
Some administrators choose to configure WordPress to disable the Heartbeat API entirely. But that would mean having all its functionality lost. A better approach would be to limit the number of requests or disable specific features (like autosave) in WordPress settings.
WordPress settings: advantages of autosaves
Autosaves are one of the WordPress features provided by Heartbeat API. An autosave is performed every 60 seconds, ensuring that no changes made by the user editing a post are left unsaved.
This feature is specifically helpful in the case of a browser crash or internet connectivity problems that could lead to data loss.
An autosave is almost identical to a revision. But once there’s a new autosave, the previous autosaved copy gets removed automatically. So, there is only the latest version of a post present in the database at any specific time — not counting the revisions saved manually.
Autosaves don’t overwrite any existing content, so you can rest assured that the published version of the post and any other revisions are safe.
Generally, autosaves make the process of content editing more efficient and reliable. And you may never experience any issues related to the additional use of server resources by Heartbeat API.
But perhaps you’d like autosaves to run less frequently or to disable this feature entirely. Not to worry — there are several ways you can configure autosave.
WordPress settings: configure autosave to meet your needs
You can configure WordPress to limit autosaves or disable them by using one of the following options:
- Install a WordPress plugin that controls Heartbeat API or autosaves.
- Define a custom interval for autosaves by using a WordPress constant.
- Disable autosaves by using a site-specific plugin, code snippets plugin, or a WordPress hook to disable autosaves using a child theme.
A plugin can help you gain more control over Heartbeat API and autosaves. But if you want a fast and simple solution, modifying your WordPress settings is a great way to disable or limit autosaves.
Install a WordPress plugin to control Heartbeat API and autosaves
You can use WordPress plugins like Heartbeat Control to configure WordPress Heartbeat API.
You can limit the number of requests sent to the server, including the frequency of WordPress autosaves. In addition, this plugin helps you control the Heartbeat API activity in the WordPress dashboard, post editor, or on the front end.
You can install the Disable Gutenberg Autosave plugin if you just want to control autosaves. For example, it lets you disable autosaves on a specific post you’re editing or increase the time interval for saves.
Install and activate the plugin, then open a post or a page for editing. You will see a clock with an arrow on the top-right of the webpage. Once you click on it, you can choose a new interval for autosaves, disable them entirely, or save temporary revisions manually.
Click on Autosave Now to create a new autosave.

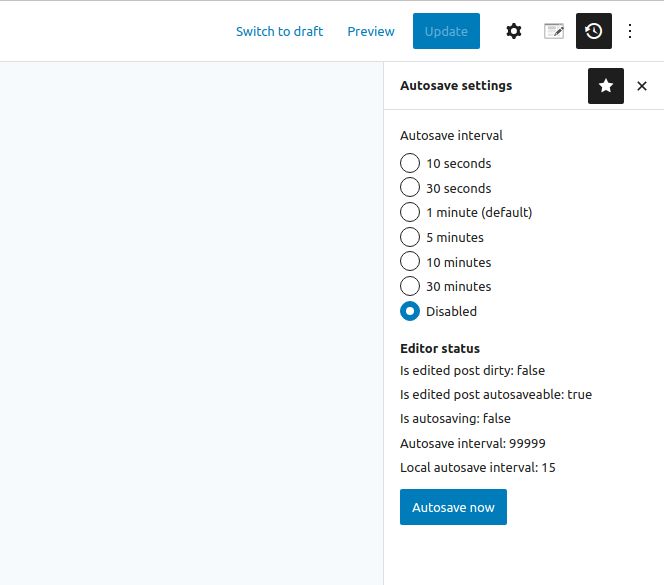
It still shows the local autosave interval as 15 seconds (the default interval when a post is being edited to keep it locked).
Use a WordPress constant to define a custom autosave interval
You can specify a custom interval for autosaves by adding the AUTOSAVE_INTERVAL WordPress constant to the wp-config.php file. The new interval will define how frequently WordPress will perform autosaves when a user is editing a specific post.
The interval needs to be configured in seconds. For example, setting it to 300 seconds means autosaves will be performed every five minutes instead of every minute:
define('AUTOSAVE_INTERVAL', 300);
You can also disable autosaves entirely by assigning the autosave interval a bigger value. For example, using 86400 (which equals 24 hours) means no temporary revisions will be added.
Use a site-specific plugin, code snippets plugin, or a WordPress hook to disable autosaves using a child theme
We would recommend against making changes to the functions.php file of the active theme unless using a child theme. However, there are viable methods to make the needed changes by way of putting custom code into a site-specific plugin or using a code snippets plugin, such as Code Snippets made by the company Code Snippets Pro.
The documentation for the Code Snippets plugin explains how using it will save you from the need to change the functions.php file directly:
"Code Snippets is an easy, clean and simple way to run code snippets on your site. It removes the need to add custom snippets to your theme’s functions.php file.
A snippet is a small chunk of PHP code that you can use to extend the functionality of a WordPress-powered website; essentially a mini-plugin with less load on your site.
Most snippet-hosting sites tell you to add snippet code to your active theme’s functions.php file, which can get rather long and messy after a while.
Code Snippets changes that by providing a GUI interface for adding snippets and actually running them on your site just as if they were in your theme’s functions.php file."
If and when you are making changes to the functions.php file of the active theme using a child theme, below is how you can do it using a hook.
You can use a hook to configure WordPress to disable the autosave feature entirely. First, you need to add the code snippet below to your current WordPress theme’s functions.php file.
But there are better ways to disable autosaves. All changes to the functions.php file can be removed after a theme update:
add_action( 'admin_init', 'disable_autosave' );
function disable_autosave() {
wp_deregister_script( 'autosave' );
}
You can modify the file directly from your theme’s folder in the WordPress content via SSH or File Manager. Or you can do it from the WordPress admin interface.
Open your WordPress dashboard and choose Theme File Editor from the Appearance menu. If you don’t see it there, temporarily deactivate the Solid Security Pro plugin. This plugin doesn’t allow you to access the Theme File Editor interface by default:


Choose functions.php from the list on the right and add the hook to the end of the file:

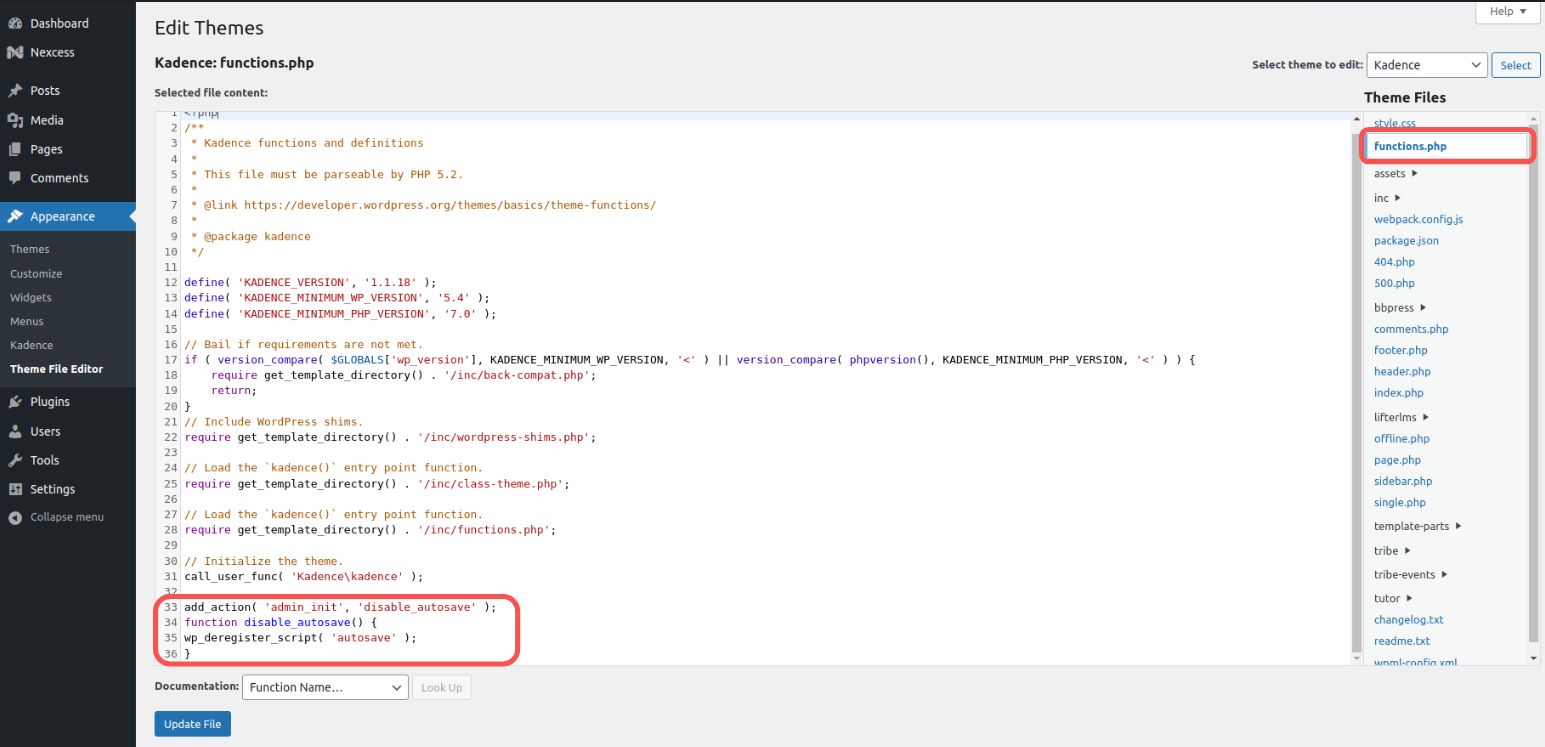
Click on the Update File button and save the changes. Now, WordPress autosaves will be disabled entirely.
Consider managed web hosting with Nexcess
Now, you know how to change the behavior of Heartbeat API and autosaves with a WordPress plugin or certain WordPress settings. Do you want to make other changes?
If you’re considering building a website or changing web hosts, there’s no better place to start than at Nexcess. Our portal guide shows you how simple it is to host your website with us.
With fully managed hosting from Nexcess, better is built in
Whether you're creating a brand new site or looking for better hosting, we can help you find the right product or customized plan to help you get there.
You can explore what we have to offer risk-free. Check out our managed WordPress hosting plans today.
Recent articles
- Accessing affiliate links, using affiliate banners, viewing referrals, and reviewing payouts
- Restricting access to the WordPress Administration Panel
- Enabling WP_DEBUG and WP_DEBUG_LOG modes in WordPress


