

Magento maintenance services are essential for keeping your website running smoothly and ensuring it’s up to date with the latest security standards.
Magento 1 and 2 maintenance —creating a custom maintenance page
When Magento maintenance is necessary, you should create a custom maintenance page to keep website visitors in the loop. On your custom maintenance page, you can recommend that visitors revisit your website once maintenance has concluded.
This article provides some easy-to-follow steps for creating and using Magento maintenance pages. You can perform these steps with minimal coding experience — or none at all.
About custom Magento maintenance pages
When you’re performing Magento maintenance services, website visitors encounter a default page that tells them your website is undergoing maintenance.
As you’d expect, the default Magento maintenance page isn’t very specific. Here’s how it looks:

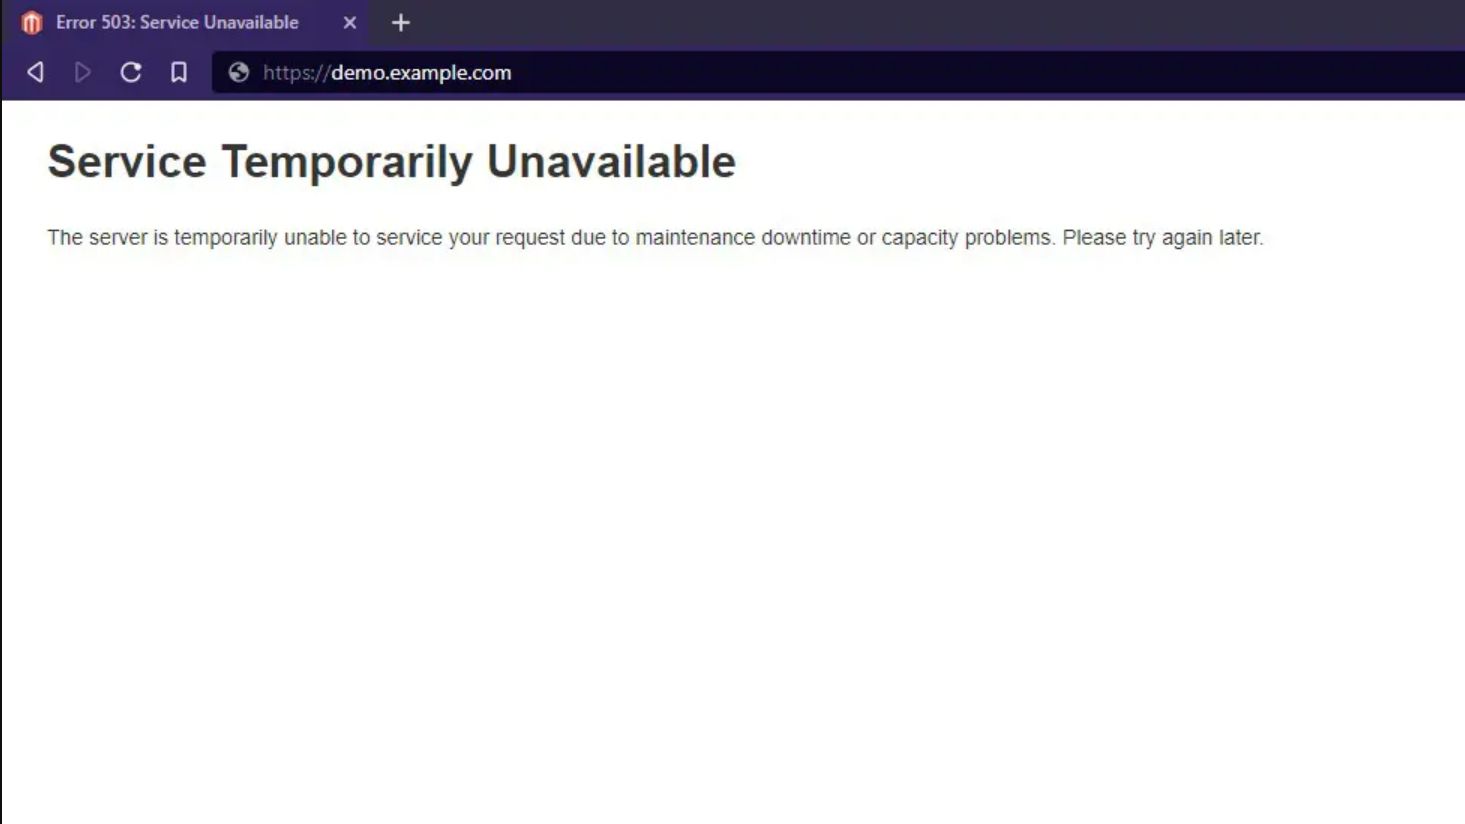
This maintenance page might make your visitors think your website is experiencing unexpected downtime or capacity issues — neither of these suggests professionalism and preparedness.
Also, the request to “Please try again later” is nonspecific and might frustrate website visitors, leaving them wondering when “later” is.
Want to provide more information to website visitors? That’s where custom Magento maintenance service pages come in. With a custom maintenance page, you can provide a detailed message that specifies the cause of the downtime, whether it’s scheduled or unscheduled, and when it’s due to end. Want to leave some of this information out? That’s your call.
You can even provide a witty message to give your website visitors something to smile about.
Magento maintenance service — create a custom page in Magento 1
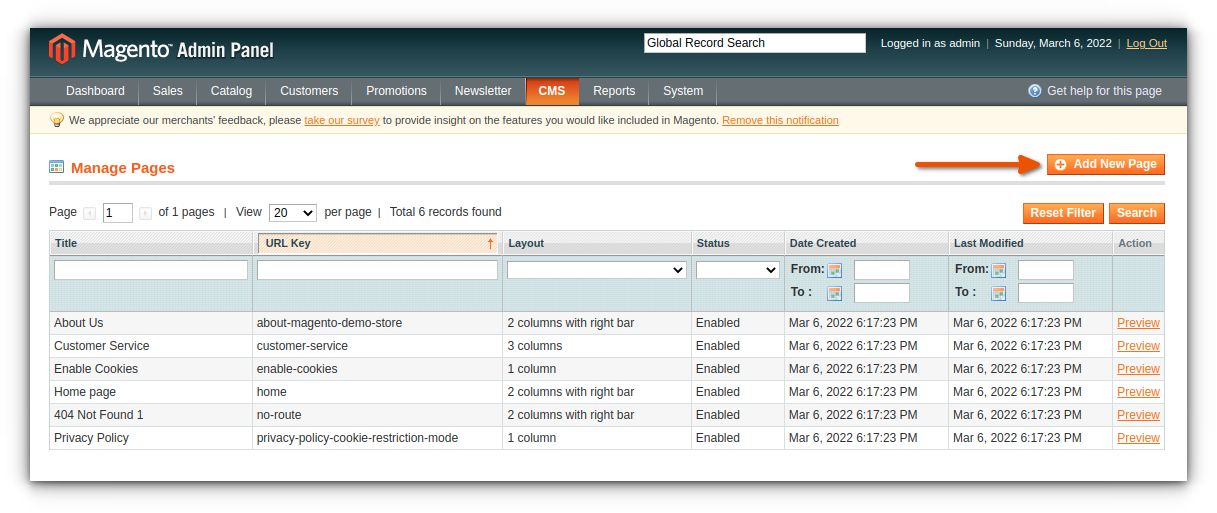
Step 1: Open your Magento Admin Panel and go to Pages
Navigate to the CMS dropdown on the top of your admin panel and select Pages:


Step 2: Add a new page
Under Manage pages, select Add New Page. This option is the orange button in the top-right part of your admin panel:

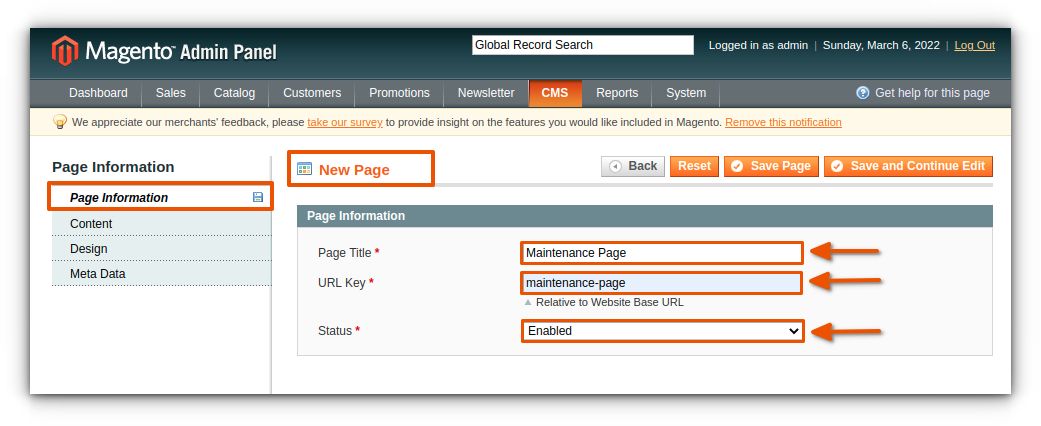
Step 3: Fill in page information
In the New Page section, you’ll be prompted to provide information for your new (maintenance) page. Add information for Page Title, URL Key, and Status:

Step 4: Complete the Content section
Under Page Information, you’ll see Content. Clicking it will open a section for editing your maintenance page. Add a Content Heading if you’d like. You can add text and images for your maintenance page in this Content section. As shown in the screenshot below, we’ve added an image to the maintenance page:


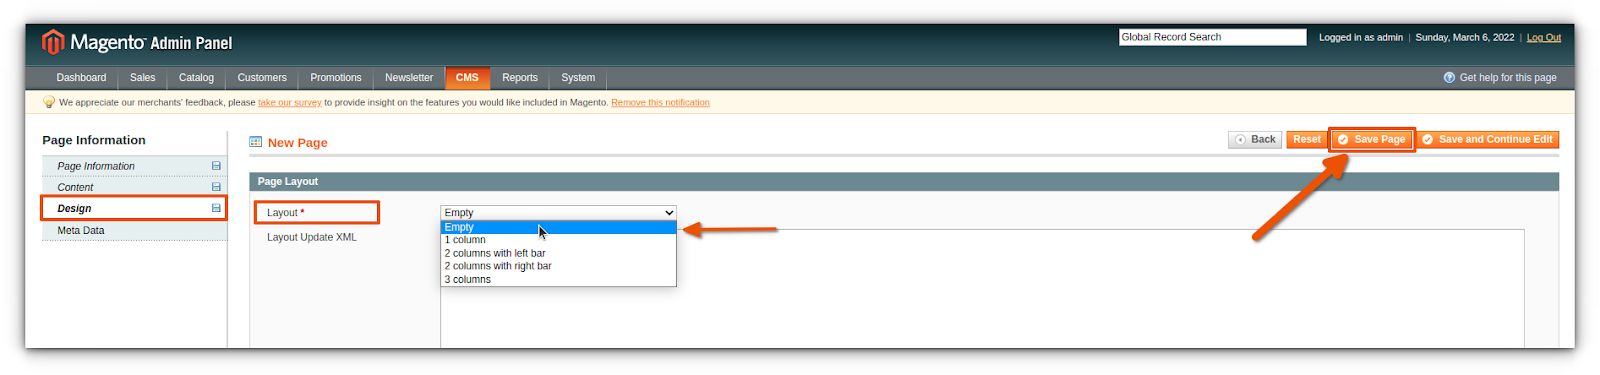
Step 5: Remove default content
Next, go to Design under Page information. Click Layout and select Empty from the dropdown menu. Then, save the page:

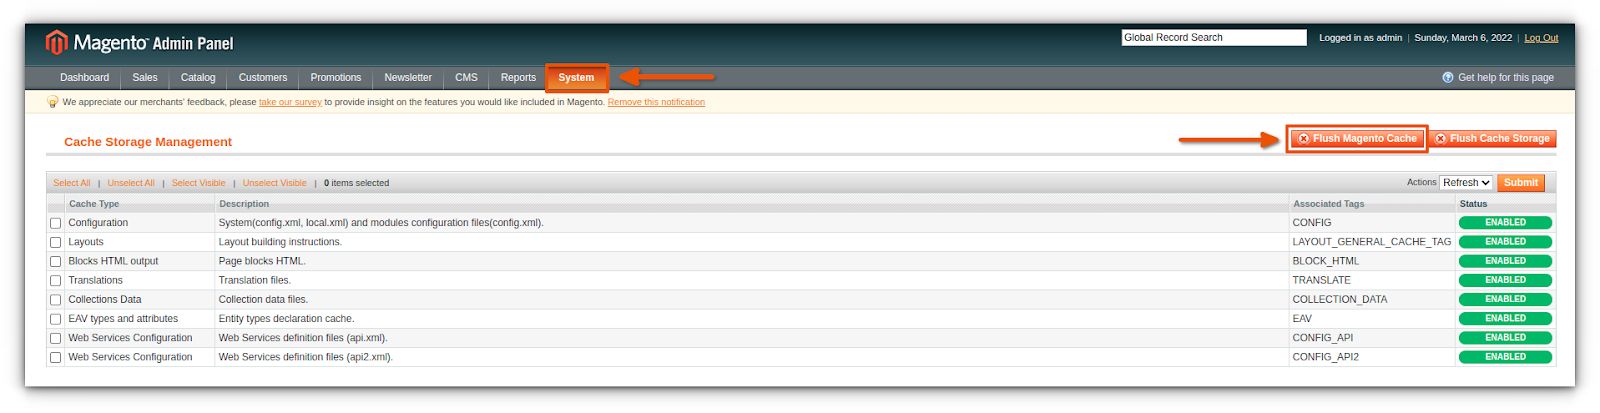
Step 6: Flush the cache
Once your new Magento maintenance service page is created, go to System on the top of your admin panel and click Cache Management. Select Flush Magento Cache:

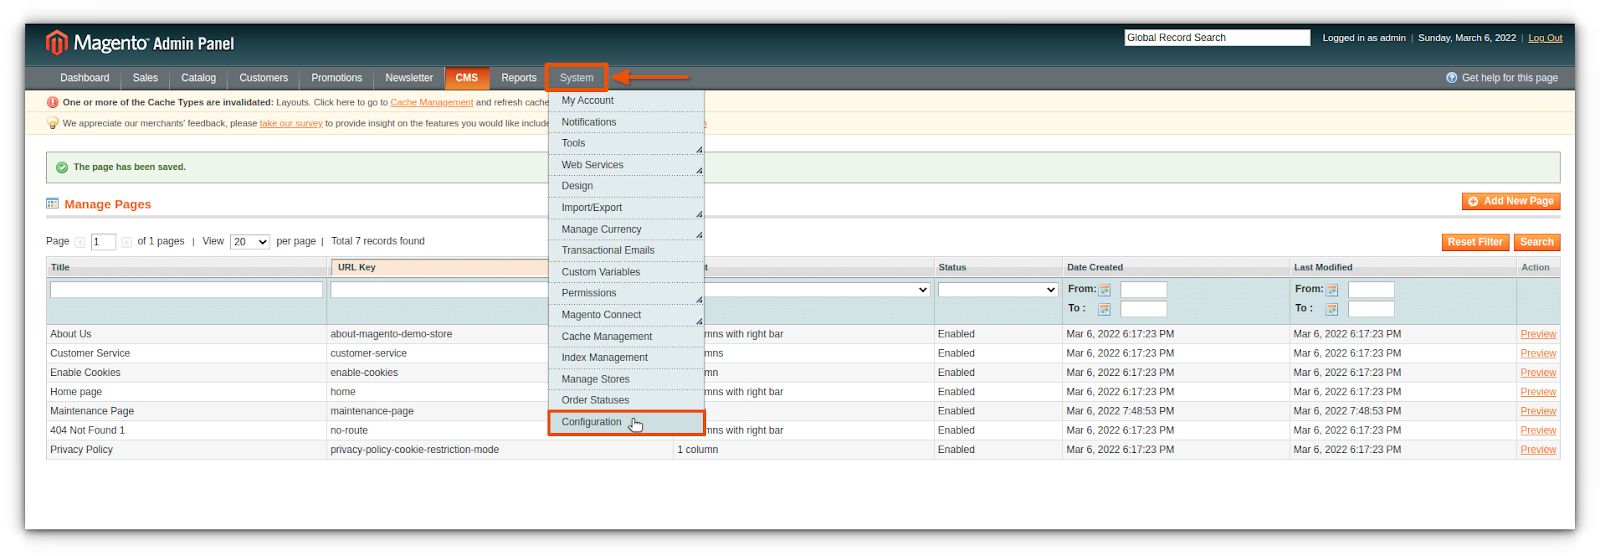
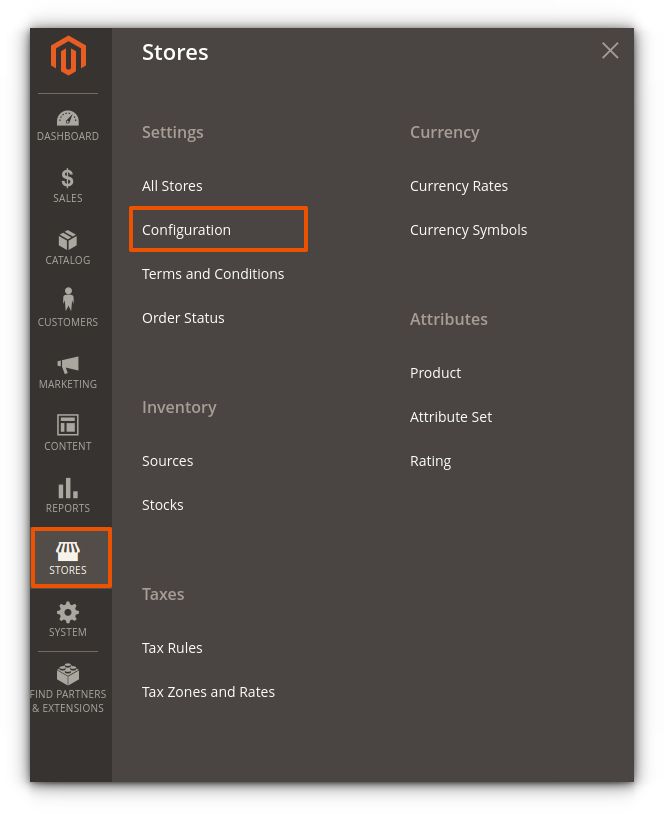
Step 7: Go to Configuration
Navigate to System and click Configuration:

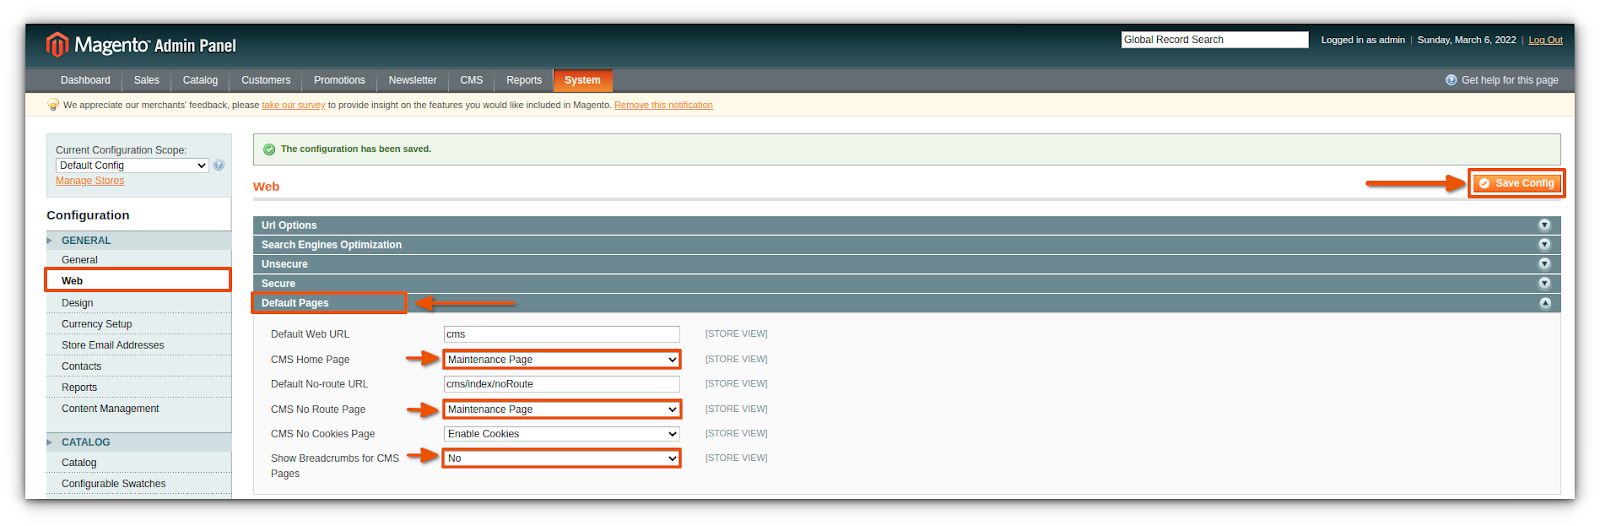
Step 8: Perform some final configuration steps
Here are the final configuration steps to perform:
- Under Configuration > Web > Default pages, enter the name of your maintenance page for the CMS Home Page and CMS No Route Page.
- For Show breadcrumbs for CMS pages, choose No.
- Save the configuration.
- Flush the Magento cache once more. You’ll need to open System and go to Cache Management:

Magento maintenance service — create a custom page in Magento 2
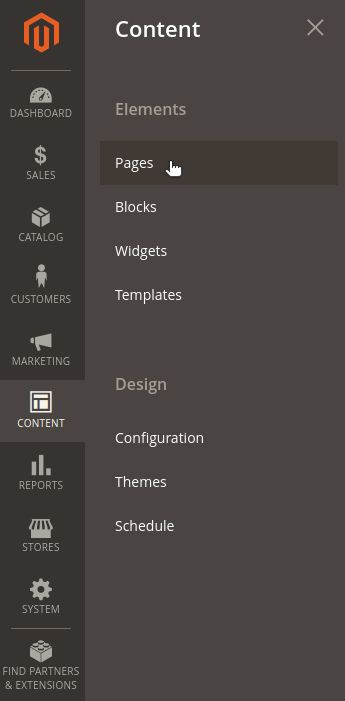
Step 1: Go to Pages
On the left-hand menu of your admin panel, go to Content. Then, select Pages, which you’ll find under Elements:

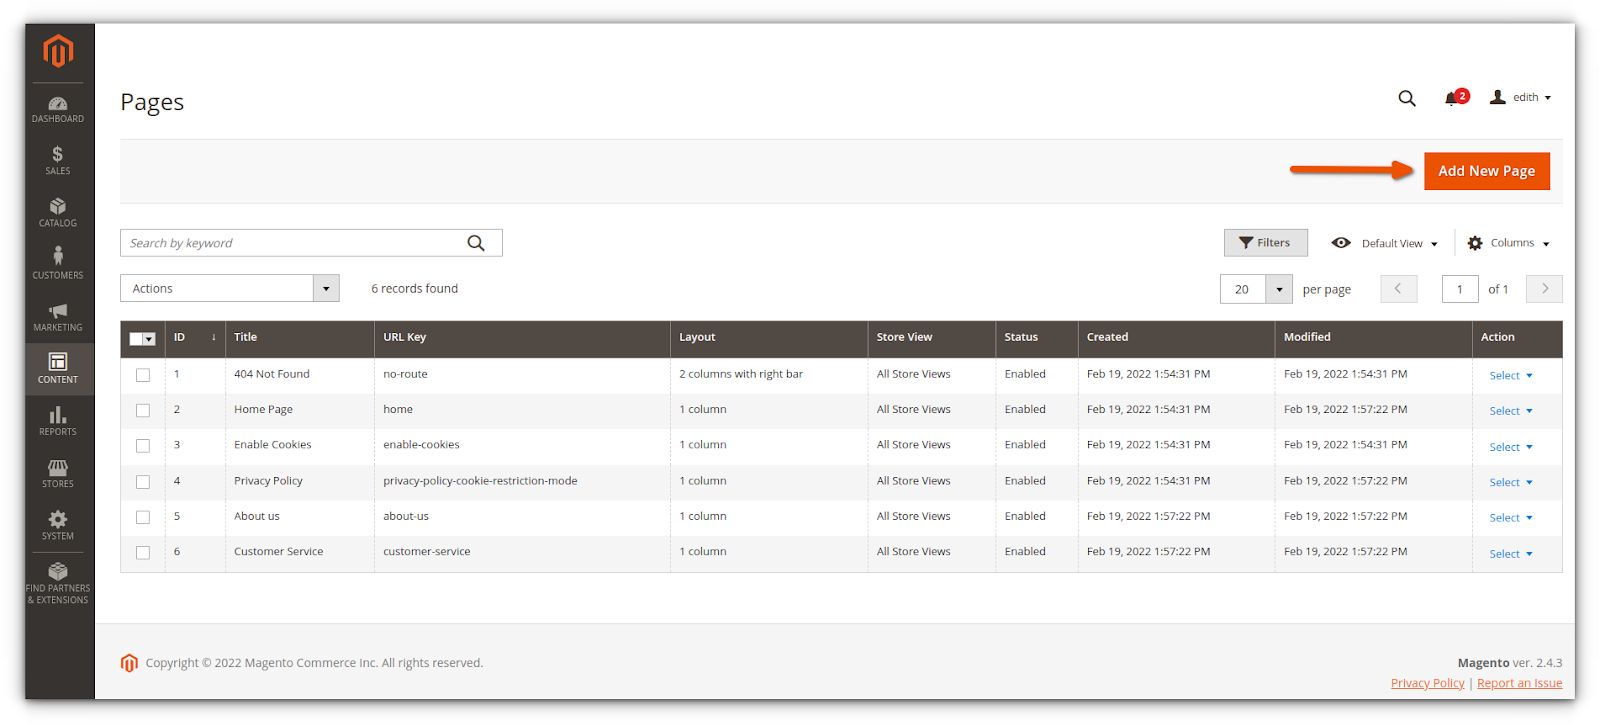
Step 2: Create a new page
Under Pages, click the Add New Page button (top-right corner of the Magento Admin Panel):

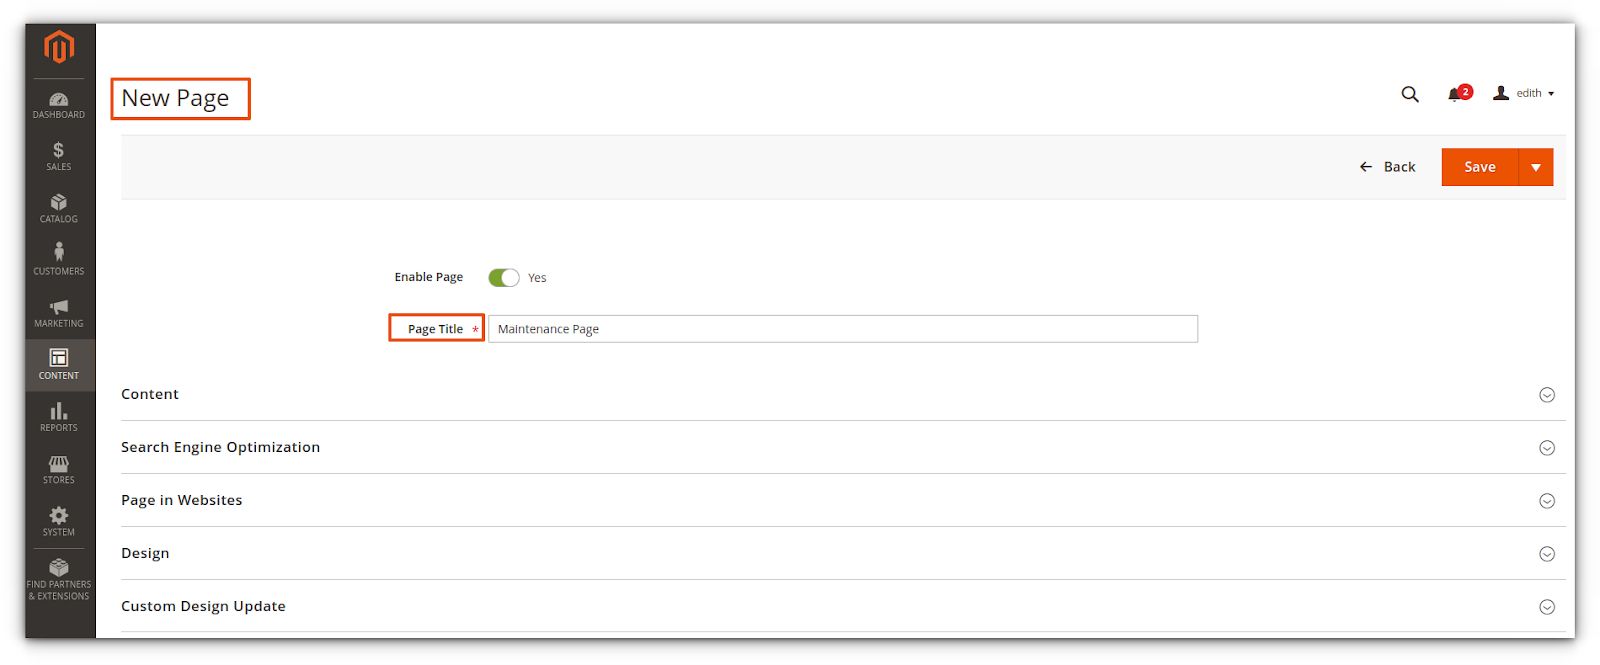
Step 3: Add information for your new page
Create a suitable Page Title:

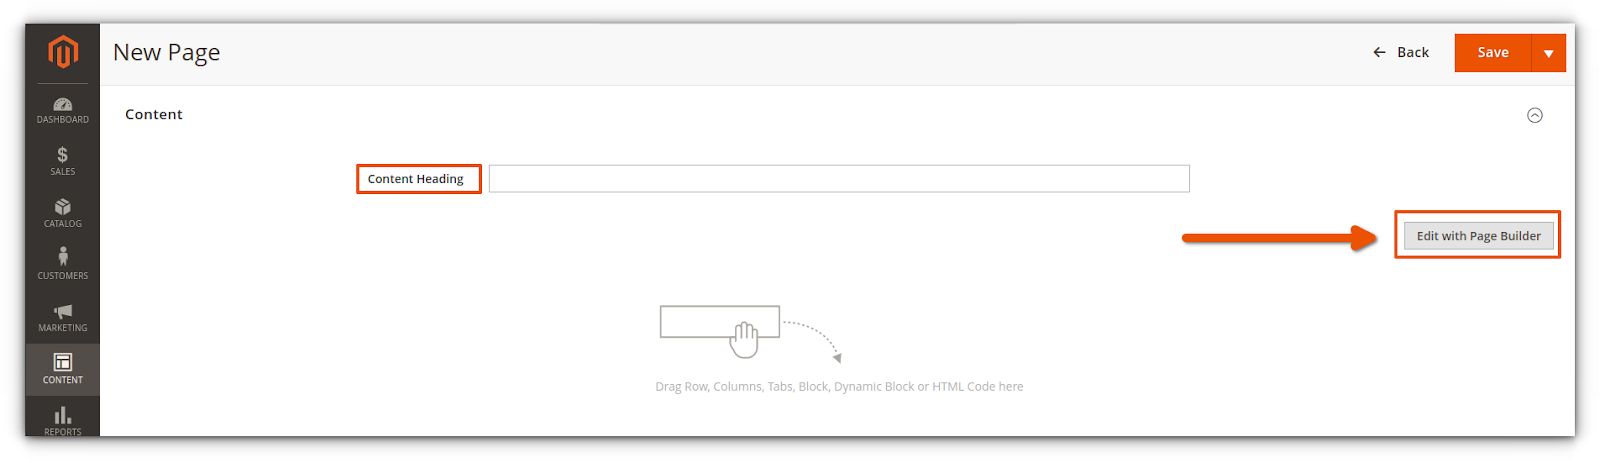
Step 4: Use the page builder to fill in new page content
Under the Content dropdown menu, type in a Content Heading. This step is optional. Select Edit with Page Builder, which will take you to the page editor:

You can start building your maintenance page. Here, we’ll add two rows: one for an image and one for page text. Navigate to row under Layout and use the drag-and-drop feature to add these two rows to the area indicated:

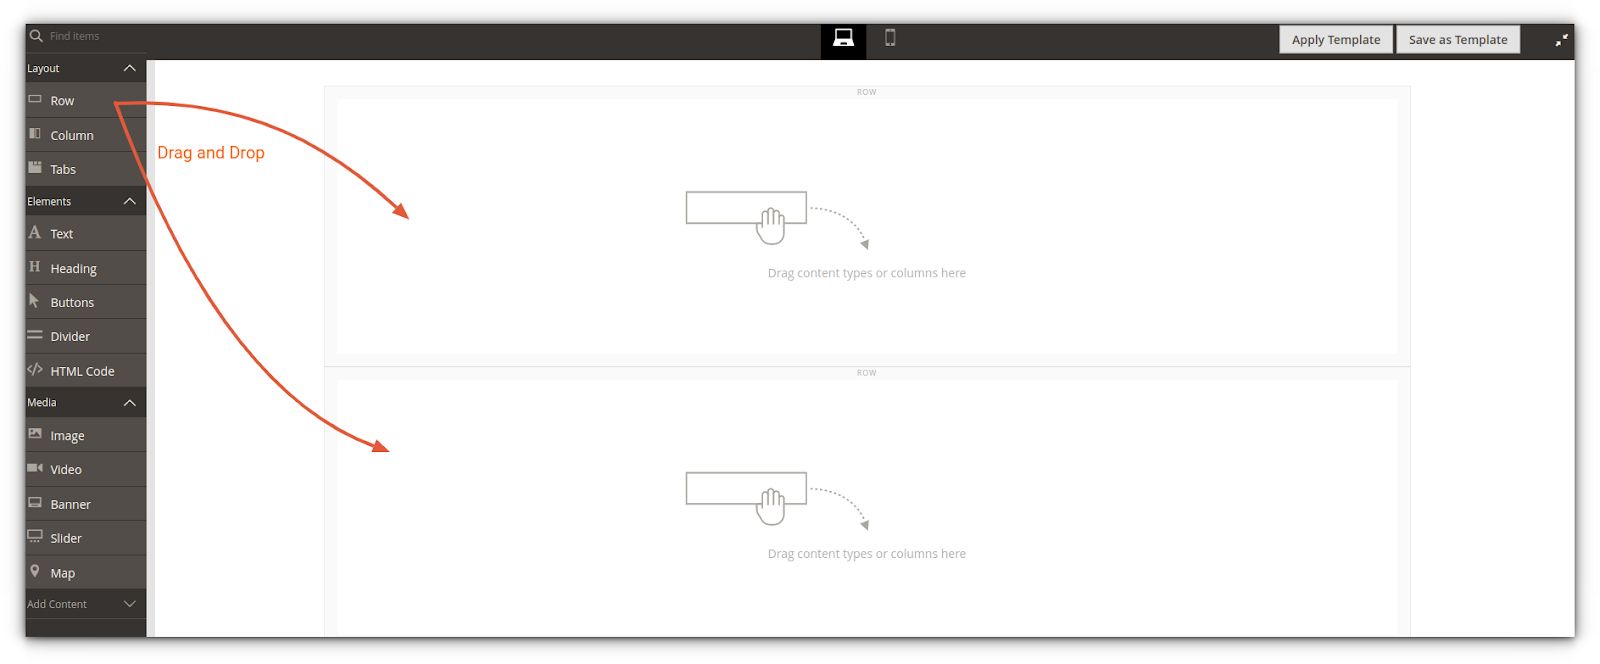
Drag and drop an image into the first row. Images are under Media. From Elements, drag and drop a heading into the second row:

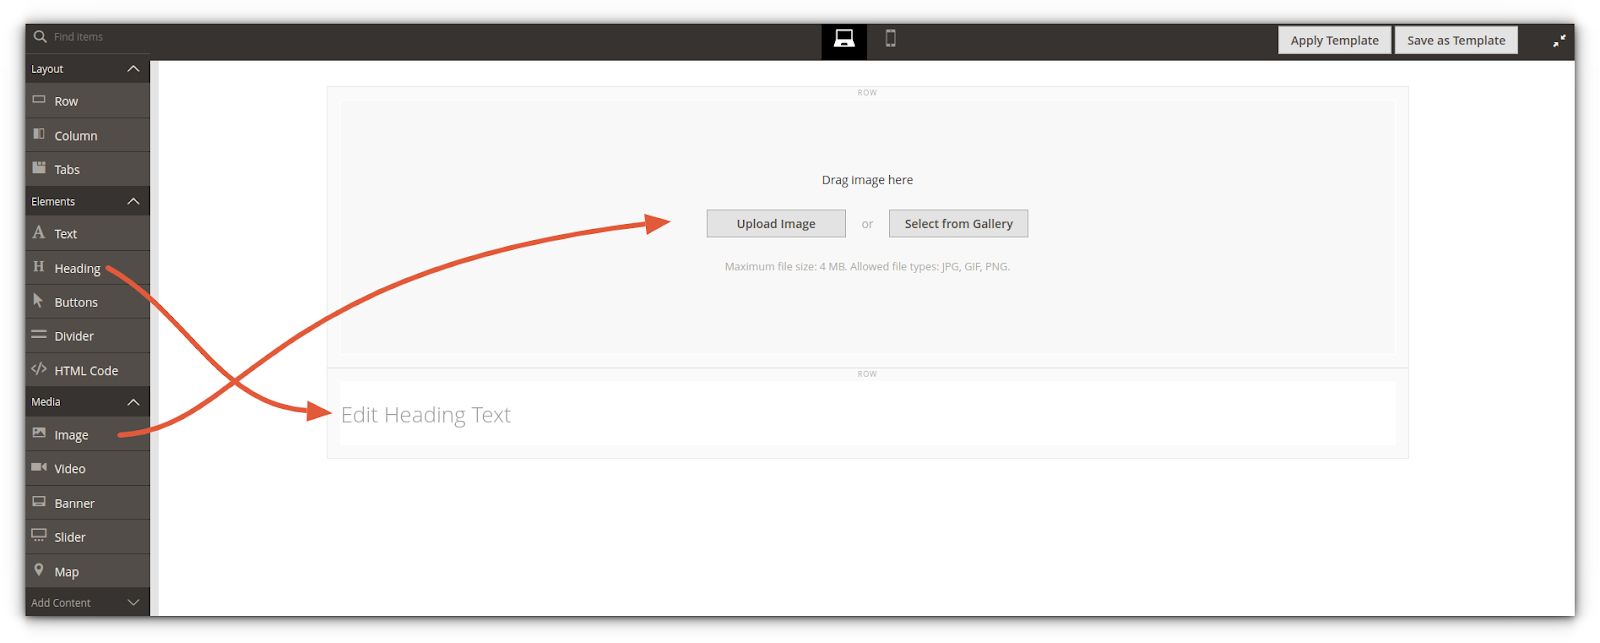
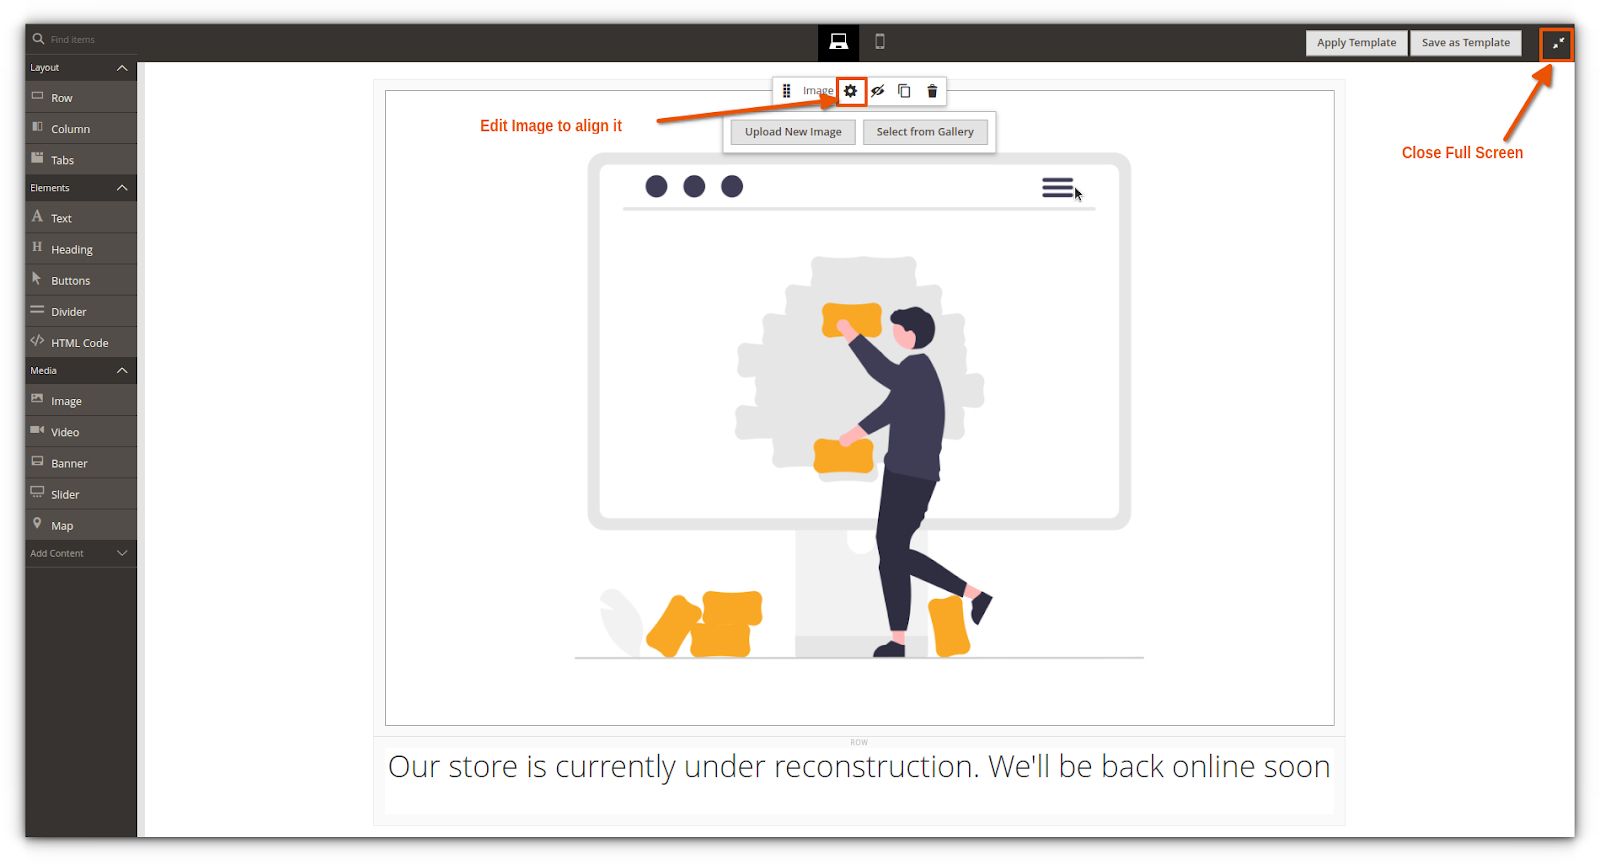
Upload your own image or select an option from the gallery. If desired, alter the image alignment to the center and save your changes.
Under your page heading, enter a title of your choice. Here, we’ve used “Our store is currently under reconstruction. We'll be back online soon.” If you know the date your website will be back online, you can add it to your message. Alter your text alignment if required.
Go to the top-right part of the admin panel and click on the Close Full Screen option to go back to the page settings:

Step 5: Update and remove default content
Under New Page, go to Search Engine Optimization. Next, enter a URL Key for your new page. It should only contain lowercase letters and hyphens (which you use instead of spaces). We’ve used the "maintenance-page" as our URL Key.

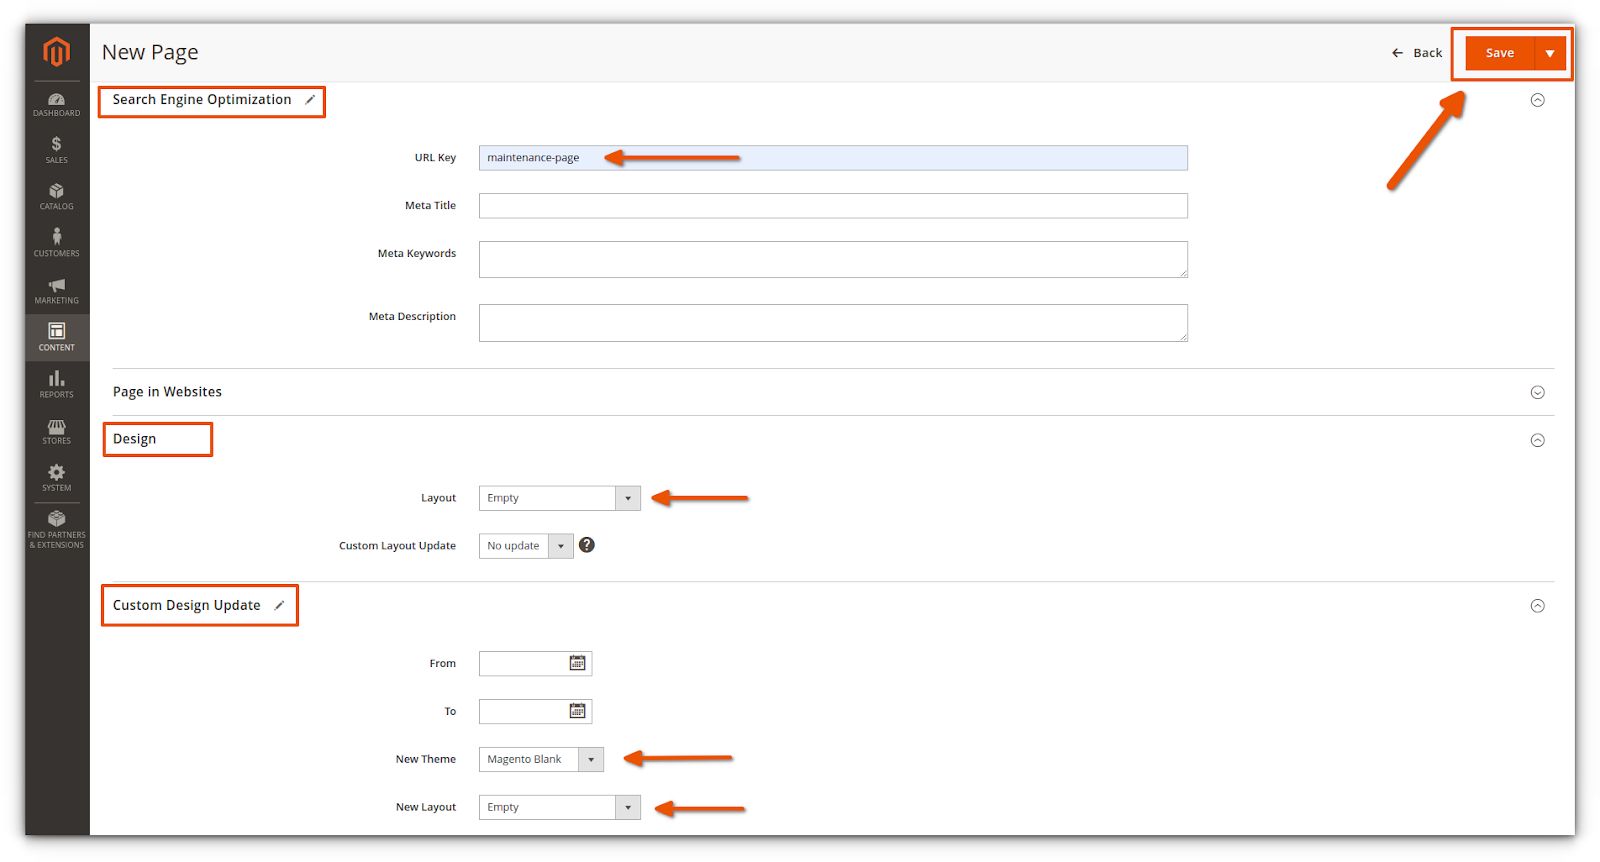
Under New Page, click Design. For Layout, choose Empty. This step removes all default content. Click Custom design update under New Page. For New Theme, select Magento Blank. For New Layout, choose Empty. Next, save your changes:
Step 6: Flush the Magento cache
Under System, navigate to Tools and then to Cache Management. Here, you can select Flush Magento Cache.
Step 7: Perform the last configuration steps
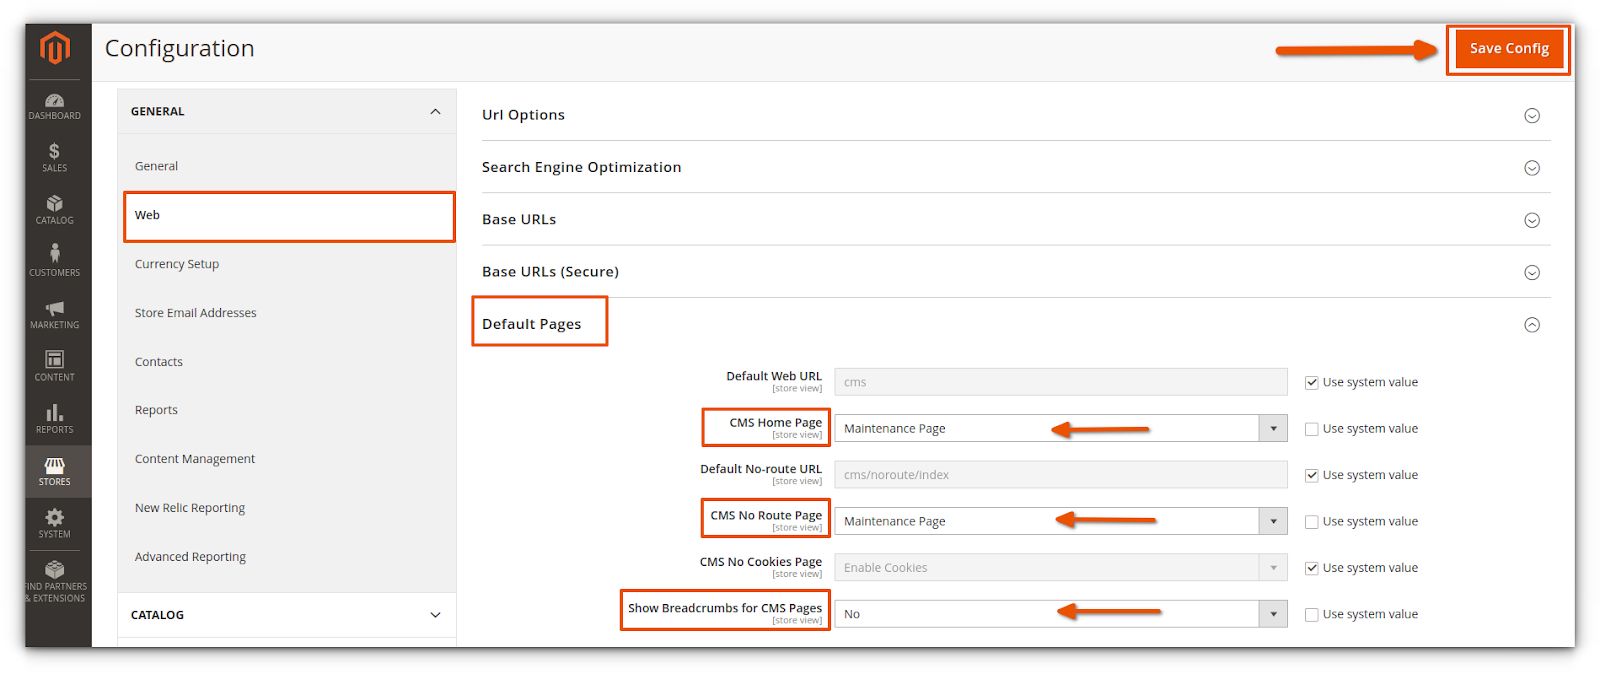
Navigate to the Default Page settings. Under Store (left-hand panel), go to Settings > Configuration and then select General. From the Web option under General, scroll down until you see Default Pages:

Under CMS Home Page and CMS No Route Page, enter the name of the custom maintenance page you’ve just created. For the Show Breadcrumbs for CMS Pages option, select No. Click the orange icon marked Save Config:

Flush the cache again using the steps described previously. You’re now the proud owner of a custom Magento maintenance page.
What to do after creating a custom Magento maintenance page
All the features and capacity you love in Magento hosting, without the hassle
Powerful Magento hosting that accelerates your store's potential, without the ongoing maintenance.
After you’ve made a maintenance page and flushed your Magento cache, you should consider clearing your cache via your web hosting interface.
If you’re a Nexcess customer, you can do this using the Nexcess Client Portal. Not sure how? No problem — have a look at our Nexcess hosting and Nexcess Client Portal guide.
Not a Nexcess customer? Get in touch today to learn how Nexcess can increase the performance of your Magento store.
The Nexcess Knowledge Base is a gold mine of information on running various types of websites, such as WordPress, WooCommerce, and Magento sites, including the following resources:


