

Magento and Flexible Cloud Plan ("Flex Plan") Nexcess customers can access the cloud SiteWorx control panel via the Nexcess Client Portal. This feature does not require additional access credentials. Rather, once logged into the portal, the cloud-based version of SiteWorx can be opened directly via the Launch Control Panel button from the corresponding hosting plan's area in the user interface.
Nexcess customers can use SiteWorx to view and manage details related to bandwidth, disk space, email setup, databases, and other technical aspects of the account configuration, website options, and email hosting features.
This article will take a detailed look at the following areas of functionality available via the cloud-based version of SiteWorx:
- Launching SiteWorx
- Hosting features
- Email settings and webmail
- MySQL and databases
- PhpMyAdmin
- Firewall rules and whitelist settings
- Cron jobs
- Administration and remote setup
- Real-time statistics
- Bandwidth history
- AWStats
Regarding the topic of analyzing AWStats data for Nexcess Cloud plans and sites, the Nexcess Knowledge Base is a great resource for learning more.
Please remember that the cloud-based version of the SiteWorx control panel is only available on Magento/Flex plans, not managed WordPress/WooCommerce plans.
Nexcess Cloud: Accessing the SiteWorx control panel from the portal
Step 1 for launching the cloud-based version of SiteWorx
Log into your Nexcess Client Portal:

Step 2 for launching the cloud-based version of SiteWorx
Go to the Plans area in the user interface. This step is accomplished by clicking on Plans option from the menu on the left side of the screen:


Then, you can either click the name of your Magento/Flexible Cloud Plan service or select the Plan Dashboard option from the three-dot menu toggle:


Next, from the dashboard, select Control Panel from the menu options shown on the left:

Step 3 for launching the cloud-based version of SiteWorx
To open the cloud SiteWorx control panel, click the Launch Control Panel button as shown below:

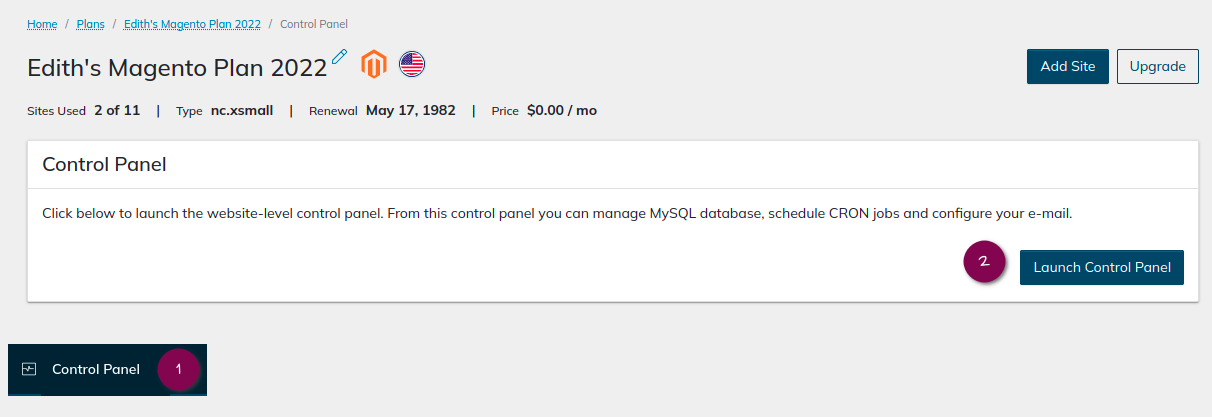
Your browser will redirect you to the homepage for the cloud-based version of the SiteWorx control panel:

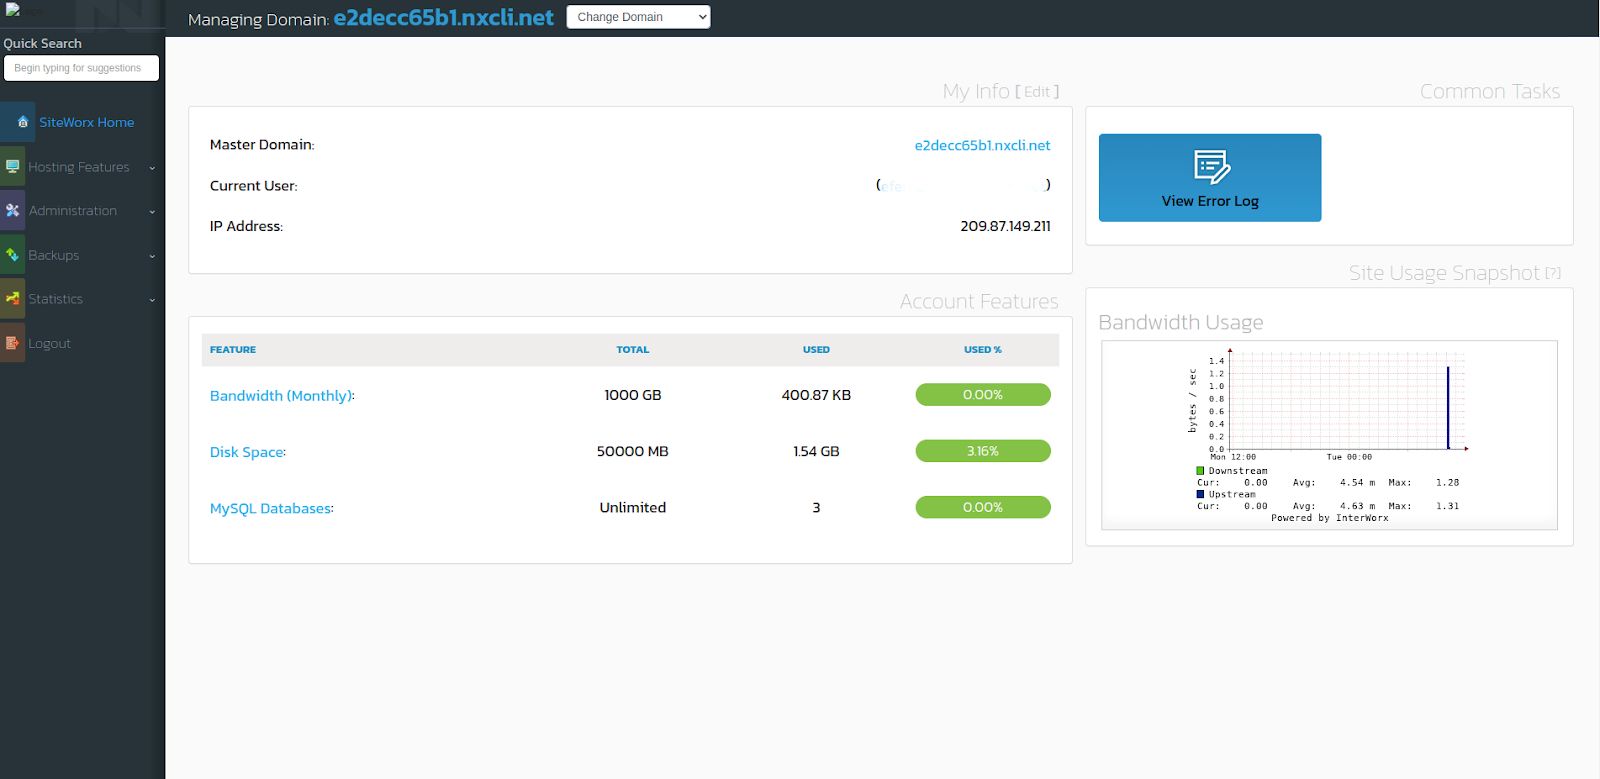
Hosting features
This section of the SiteWorx control panel contains the most essential functionality associated with your hosting account. Here you can manage email settings and mailboxes, database configurations and user permissions, firewall rules and whitelists, and cron jobs — among many other aspects of your hosting setup with Nexcess.
Email settings
In this section, you will learn how to manage email mailboxes, email aliases, email forwarders, email groups, email autoresponders, and webmail. To manage email settings, from the SiteWorx main menu, click the Hosting Features > Email option.
Manage email mailboxes — creating a mailbox
Here you can create a mailbox and also modify it. From the SiteWorx main menu, click the Hosting Features > Email > Mailboxes option:

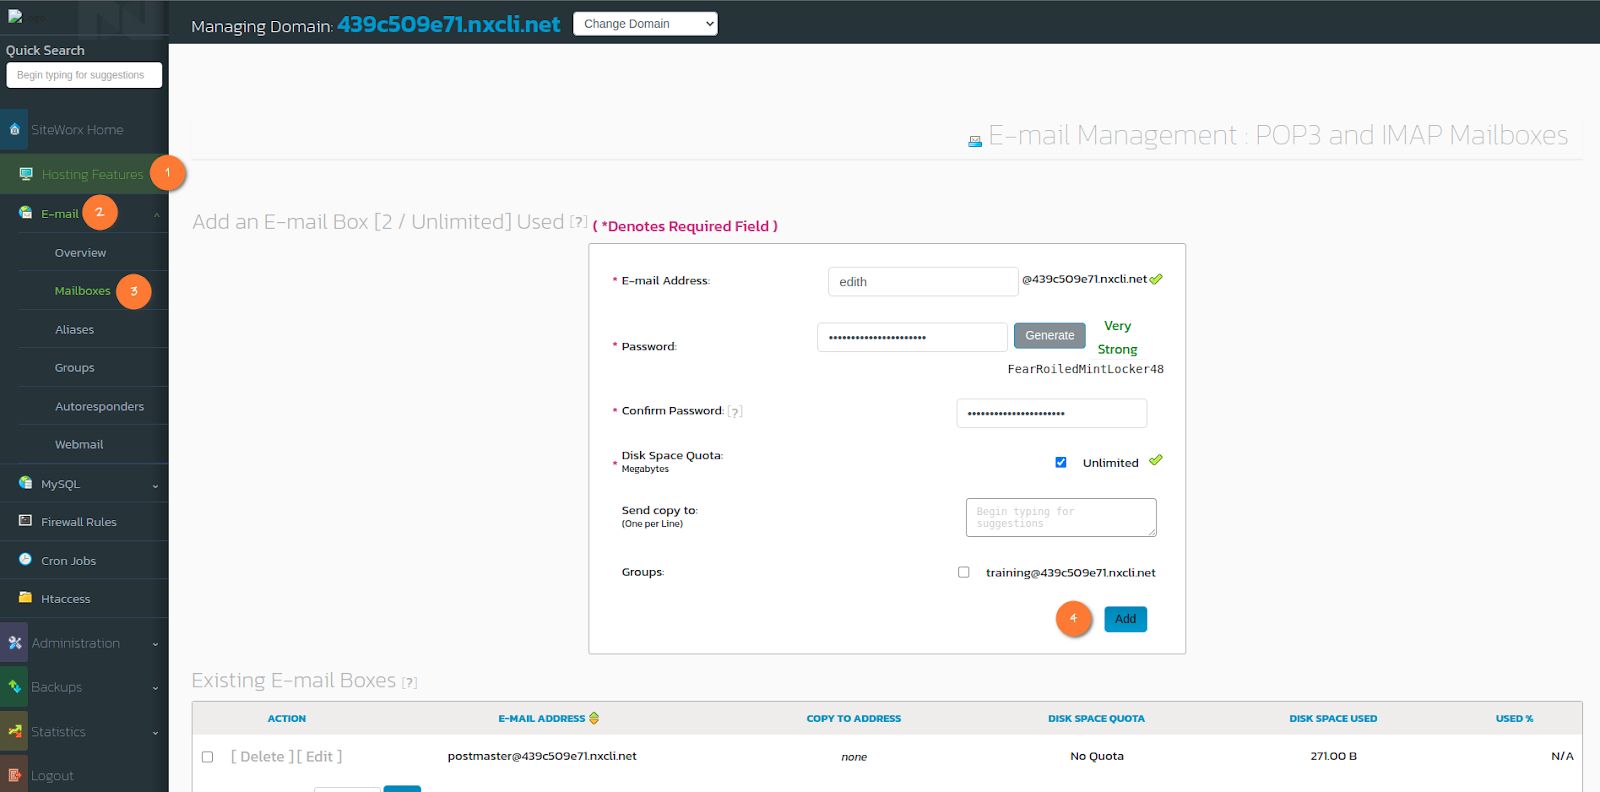
1. Type the desired name of the mailbox, as shown in the picture above.
2, Type your password in the Password field and re-enter it in the Confirm Password field (see above).
3. By default, the value for Disk Space Quota is set to Unlimited (see above). If you want to set a specific quota for the email account, clear the Unlimited checkbox and then enter the desired amount in megabytes (MB).
4. If you want to send a copy of all messages to a different email address, type in the Send Copy To field. New messages will be delivered to this email account.
5. If one or more email groups exist for your domain, they are listed under the Send Copy To field. If you want to assign the new email address to a group, click the corresponding checkbox. For more information about email groups, refer to the How to create and manage email groups article.
6. Click Add when ready.
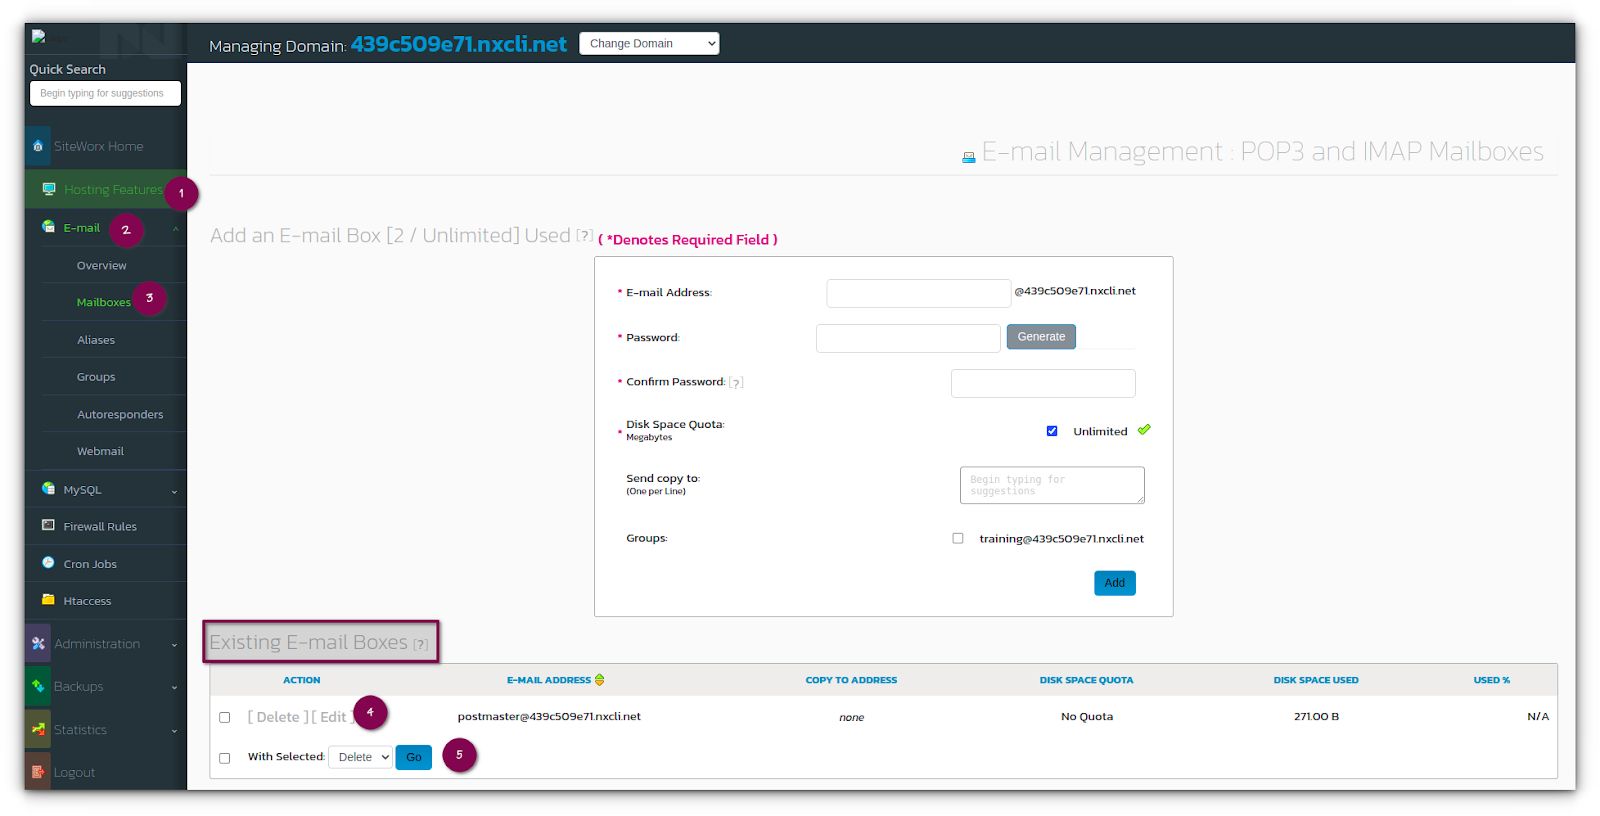
Manage mailboxes — editing and deleting a mailbox
You can also edit or delete a mailbox:
1. After successfully creating an email account, you can modify the settings by clicking Edit.
2. You can also delete email accounts by clicking Delete:

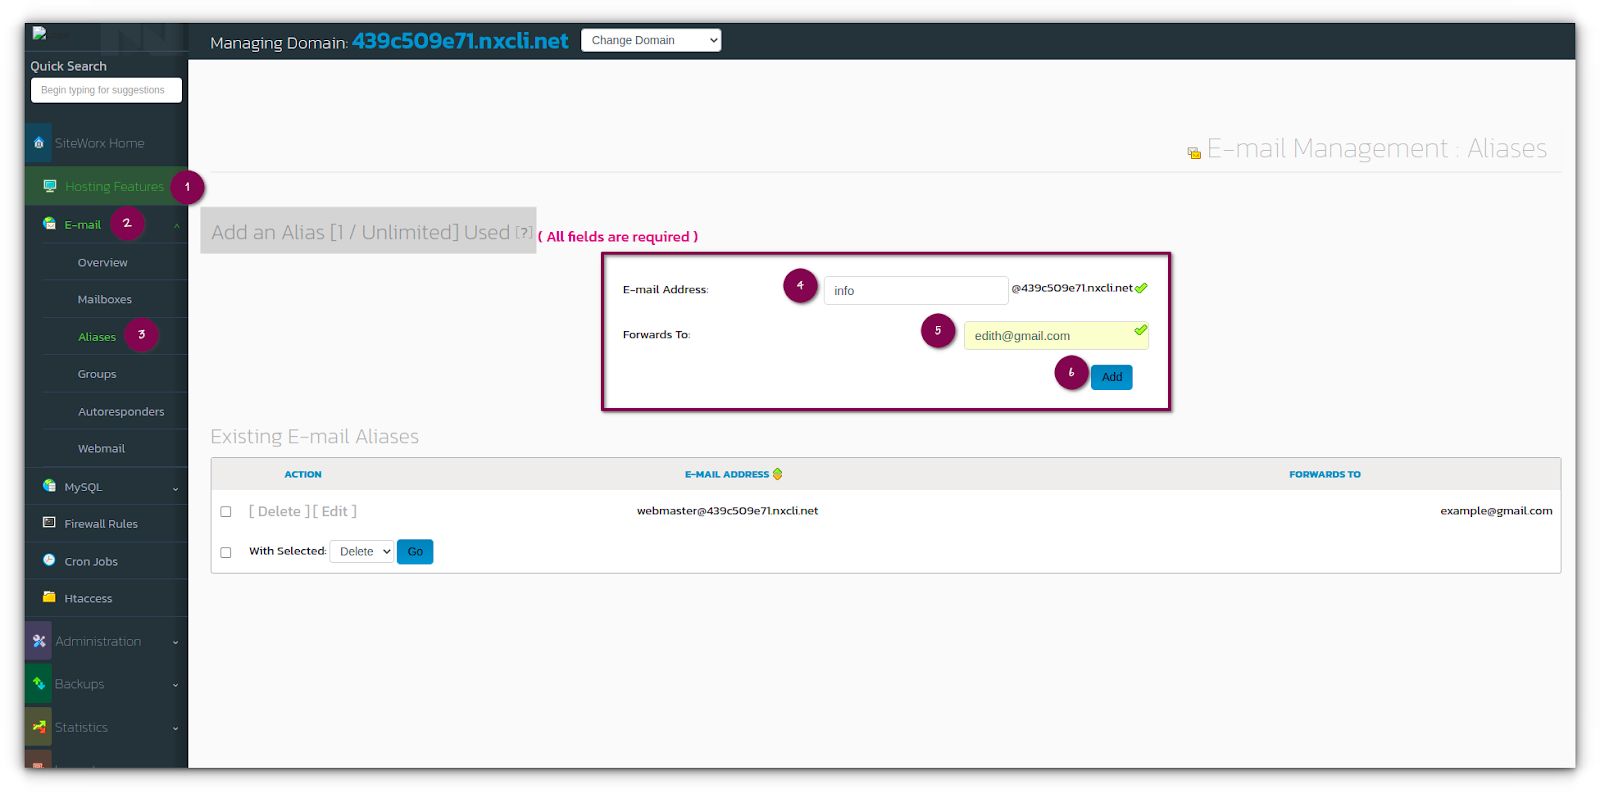
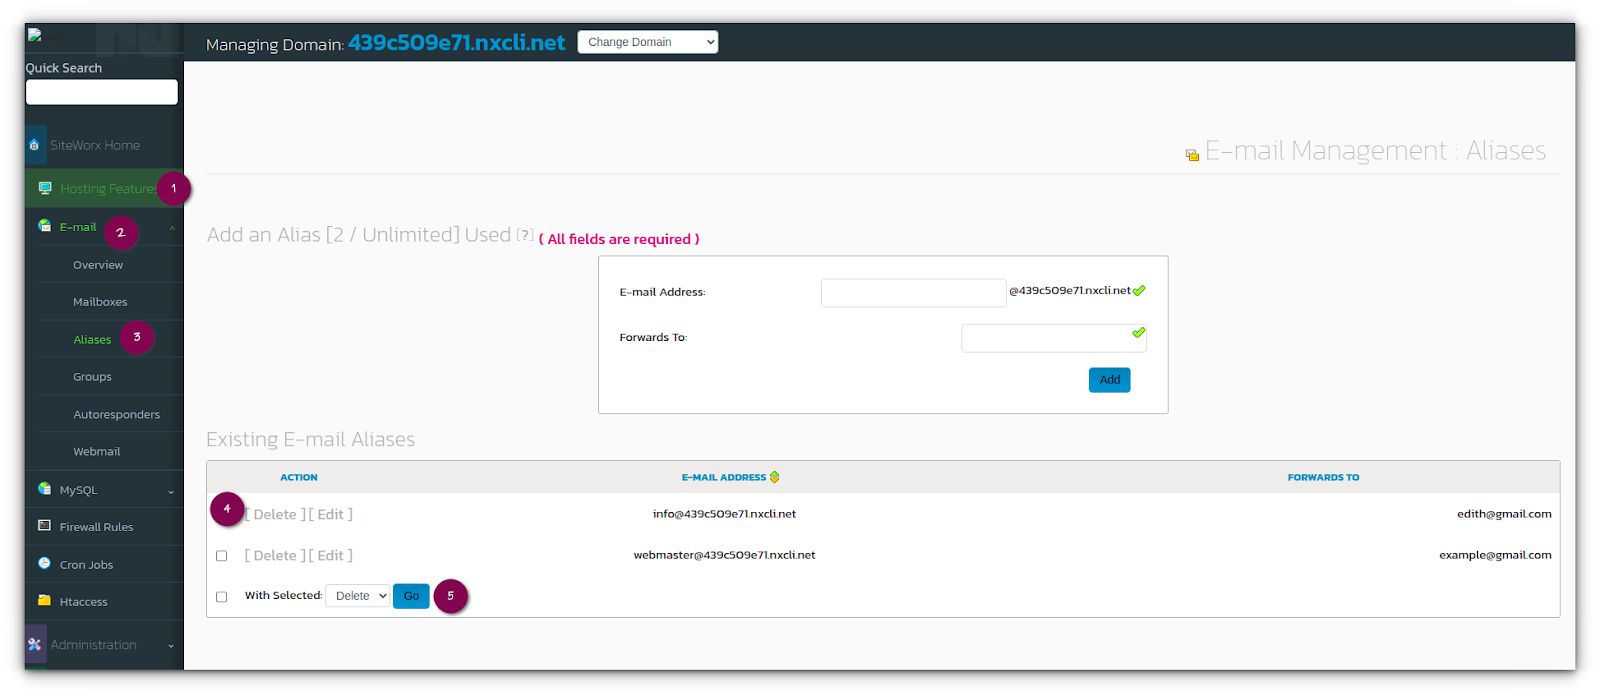
Manage email aliases — creating an alias
Creating an email alias is a straightforward process:
1. From the SiteWorx main menu, click Hosting Features > Email > Aliases.
2. In the Email Address field, type the name and email address for the email address that no longer exists.
3. In the Forwards To field, type the email address to receive the forwarded emails.
4. Click Add when ready:

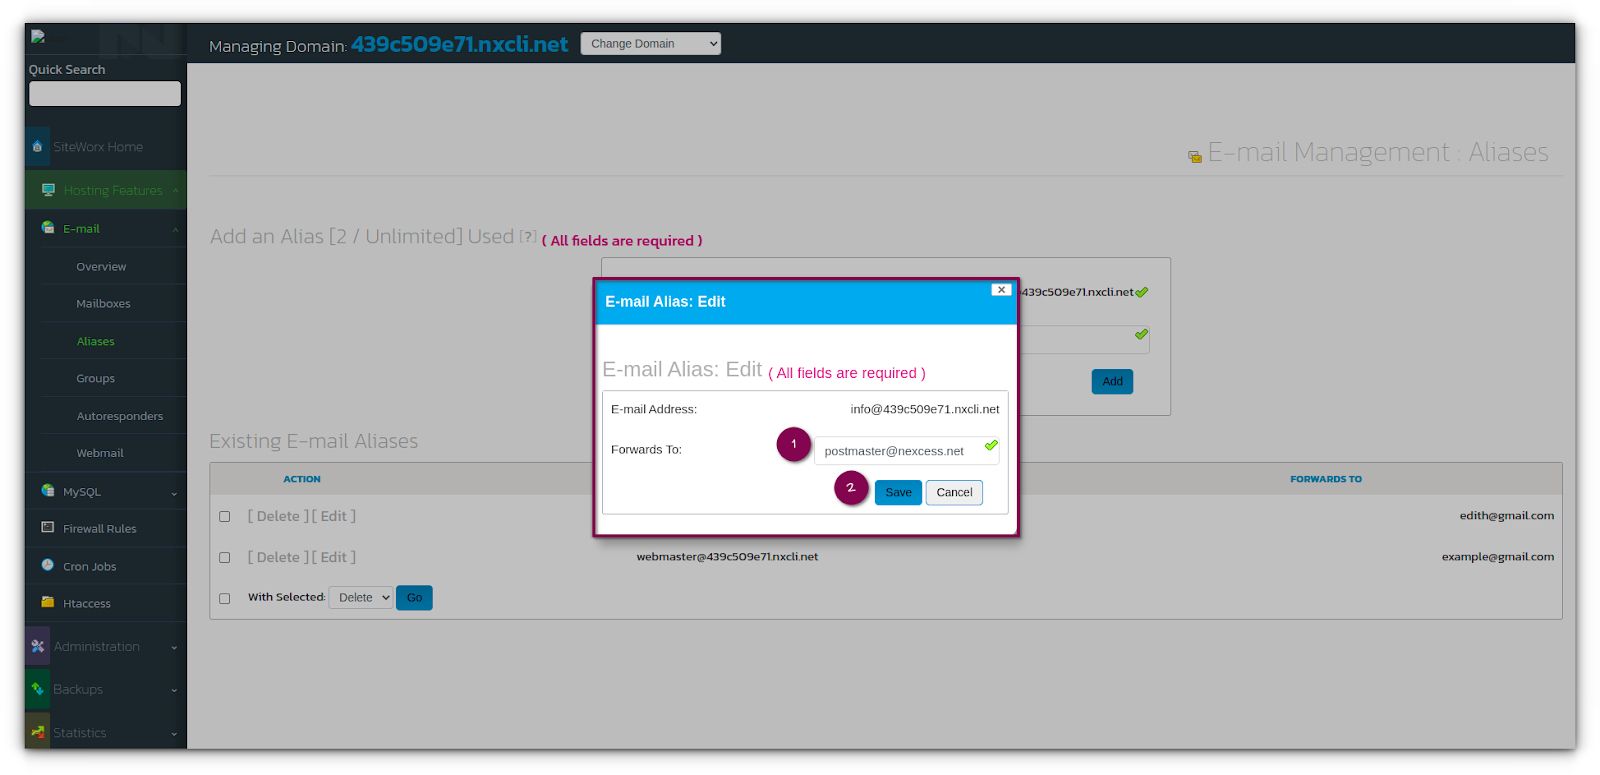
Manage email aliases — modifying an alias
You can also modify an email alias:
1. Within the SiteWorx main menu, click the Hosting Features > Email > Aliases option.
2. Click the Edit option next to the email alias you want to modify:


3. Type the desired changes and then click Save:

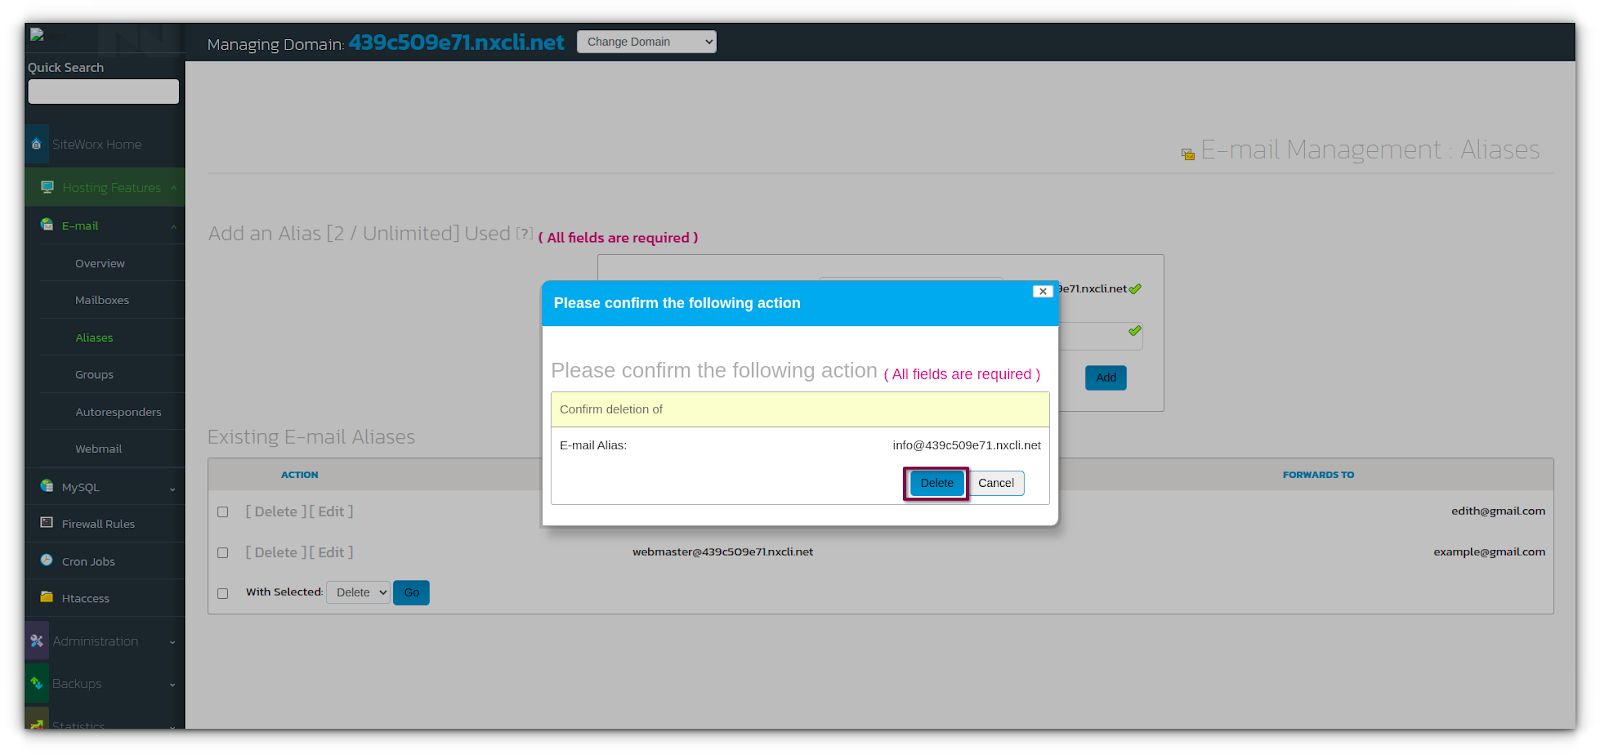
Manage email aliases — deleting an alias
The deletion of an email alias can be done when needed:
1. From the SiteWorx main menu, click Hosting Features > Email > Aliases.
2. Locate the email to be deleted, then click Delete:

3. When prompted for confirmation, click Delete:

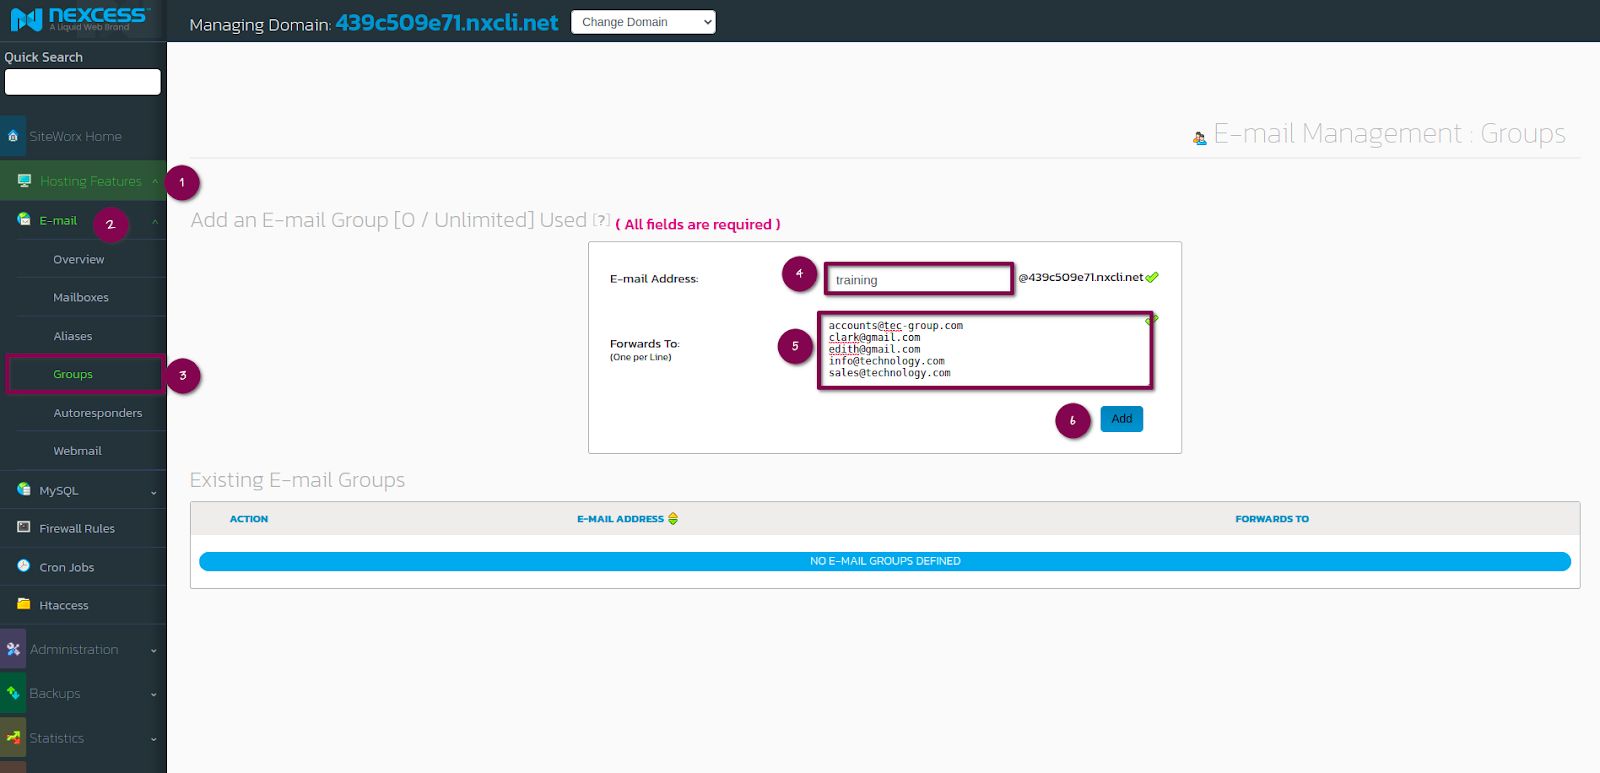
Manage email groups — creating a group
While creating a new email account, any existing email groups will be listed on the page. This fact allows you to easily assign the new email account to an email group. To do so, within the SiteWorx main menu, click Hosting Features > Email > Groups:
1. In the Email Address field, enter the name for your email group. An email sent to that group will be forwarded to all email addresses listed in the Forwards To field.
2. In the Forwards To field, enter the target email addresses one line at a time.
3. Then, when ready, click the Add button:

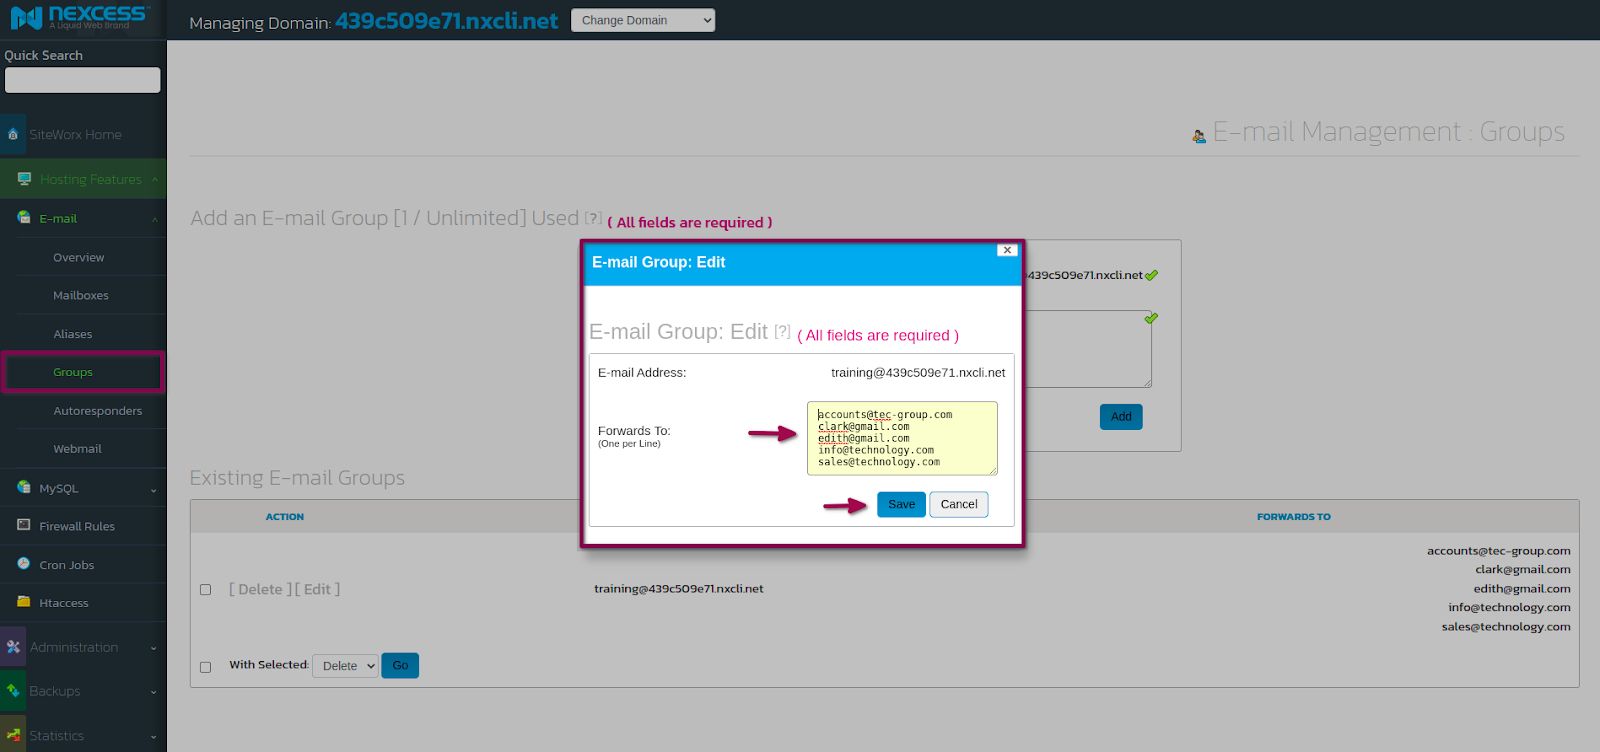
Manage email groups — modifying a group
You are able to modify an email group easily:
1. From the SiteWorx main menu, click Hosting Features > Email > Groups option.
2. Click Edit next to the group that you want to modify:

3. Find the Email Group - Edit Dialog field and click inside the Forwards To account.
4. Add or remove email addresses as needed.
5. Click Save when done:
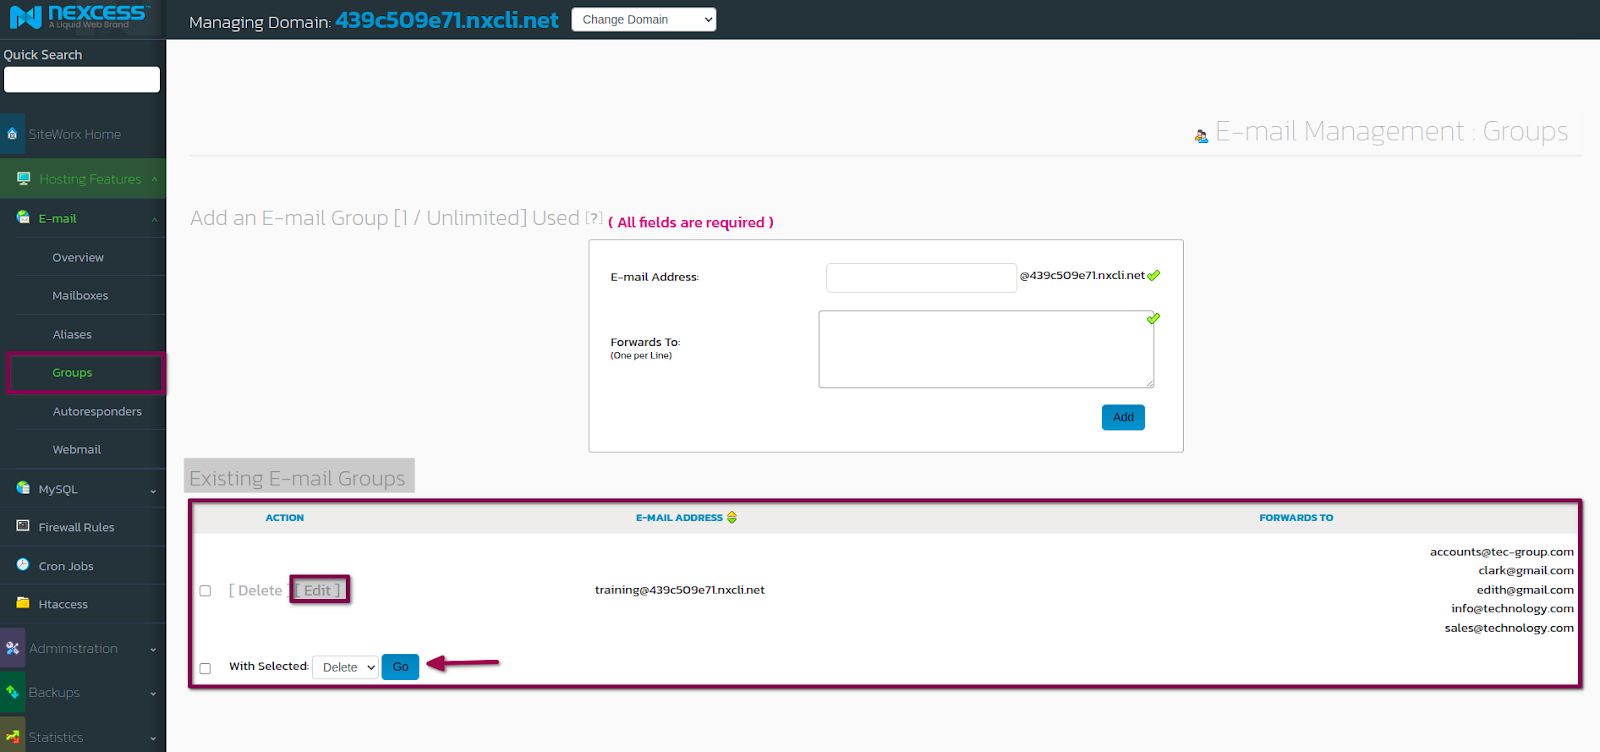
Manage email groups — deleting a group
You can delete an email group as per your requirements:
1. From the SiteWorx main menu, click Hosting Features > Email > Groups.
2. Click Delete next to the email group you wish to remove:

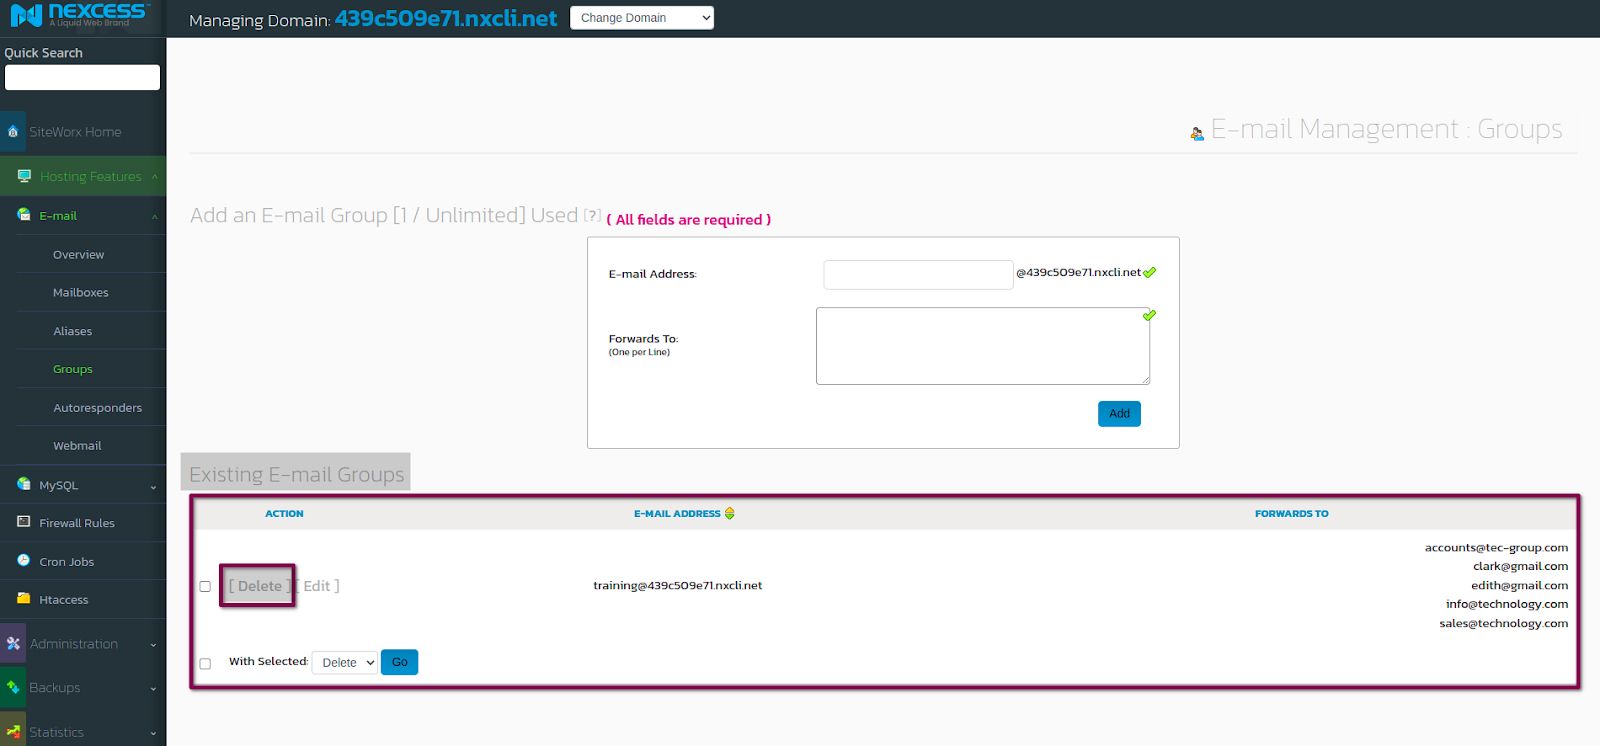
3. Click the next Delete button to confirm the deletion:


Manage email autoresponders — creating an autoresponder
Managing and creating email autoresponders can be done with SiteWorx:
1. From the SiteWorx main menu, click Hosting Features > Email > Autoresponders.
2. In the Email Address field, type the name for your autoresponder.
3. In the Autoresponder Message field, type your message (see above).
4. Click Add (see below):

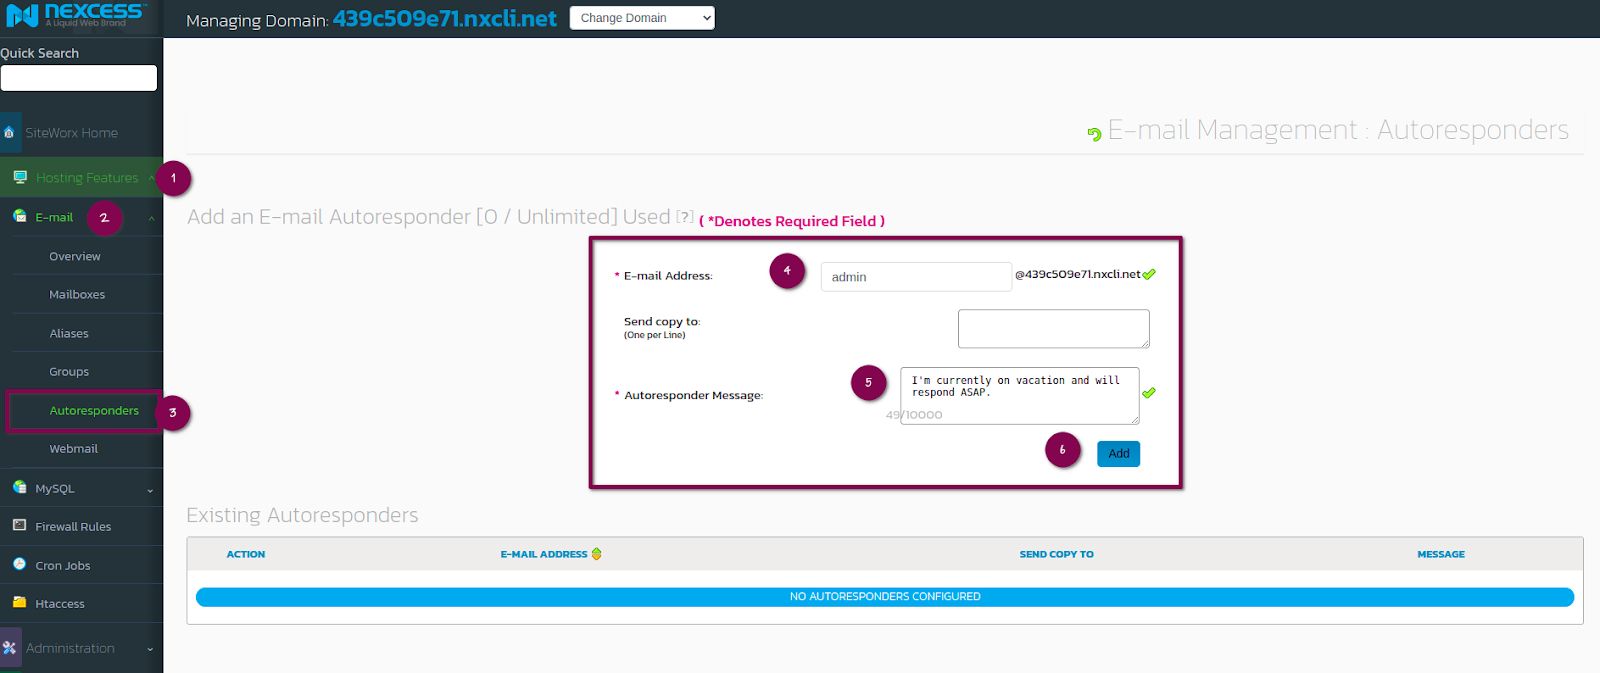
5. Please note that all autoresponders remain active until deleted.
Manage email autoresponders — modifying an autoresponder
You will want to modify email autoresponders as necessary:
1. From the SiteWorx main menu, click Hosting Features > Email > Autoresponders.
2. In the Existing Autoresponders section, locate the desired autoresponder and click Edit.
3. Make your desired changes, then click Save:


Manage email autoresponders — deleting an autoresponder
As well, deleting an autoresponder will be required at times:
1. From the SiteWorx main menu, click Hosting Features > Email > Autoresponders.
2. Next to the autoresponder that you want to delete, click Delete:

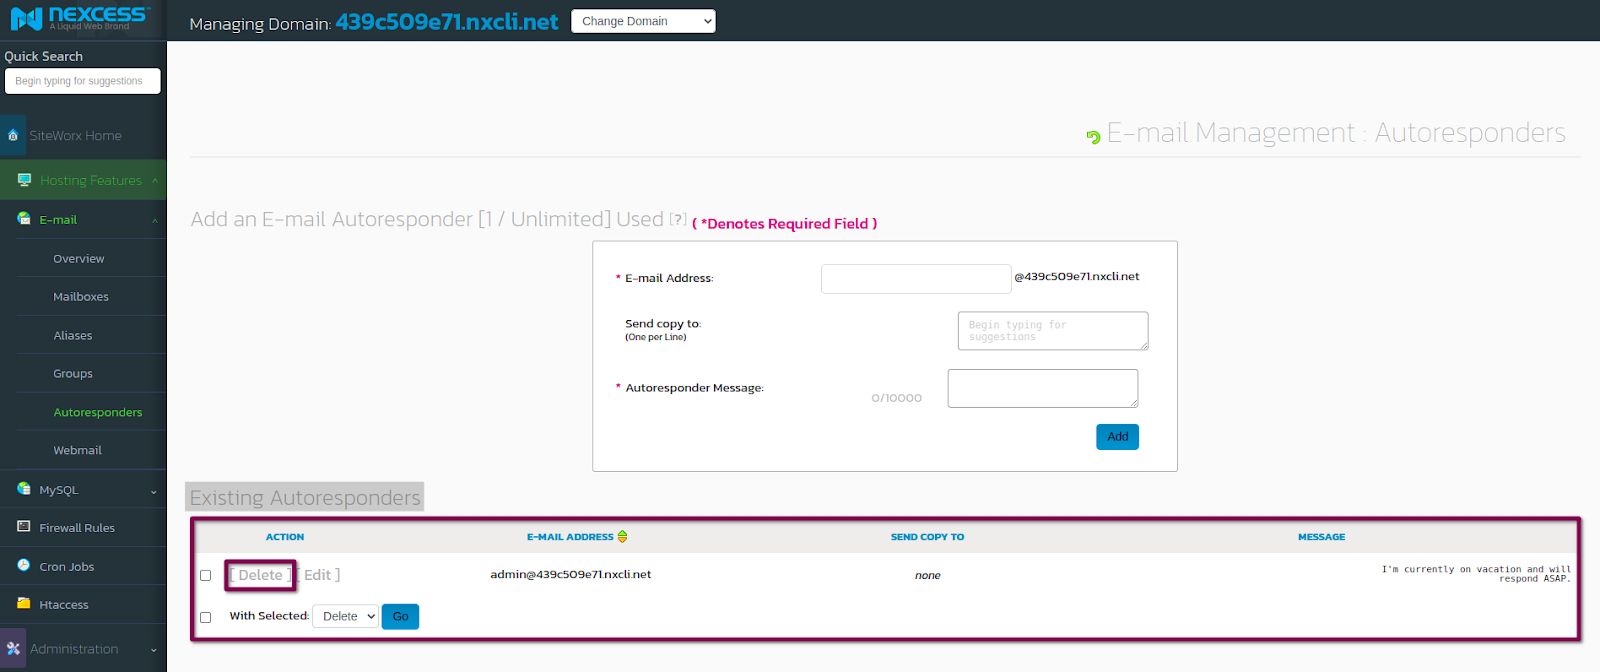
3 When prompted for confirmation, click Delete.
Webmail
Log into webmail from SiteWorx
SiteWorx users can access the webmail login page directly from the SiteWorx interface we provide. Here are the steps involved:
1. In SiteWorx, navigate to the Hosting Features > Email > Webmail option from the side menu or SiteWorx homepage:

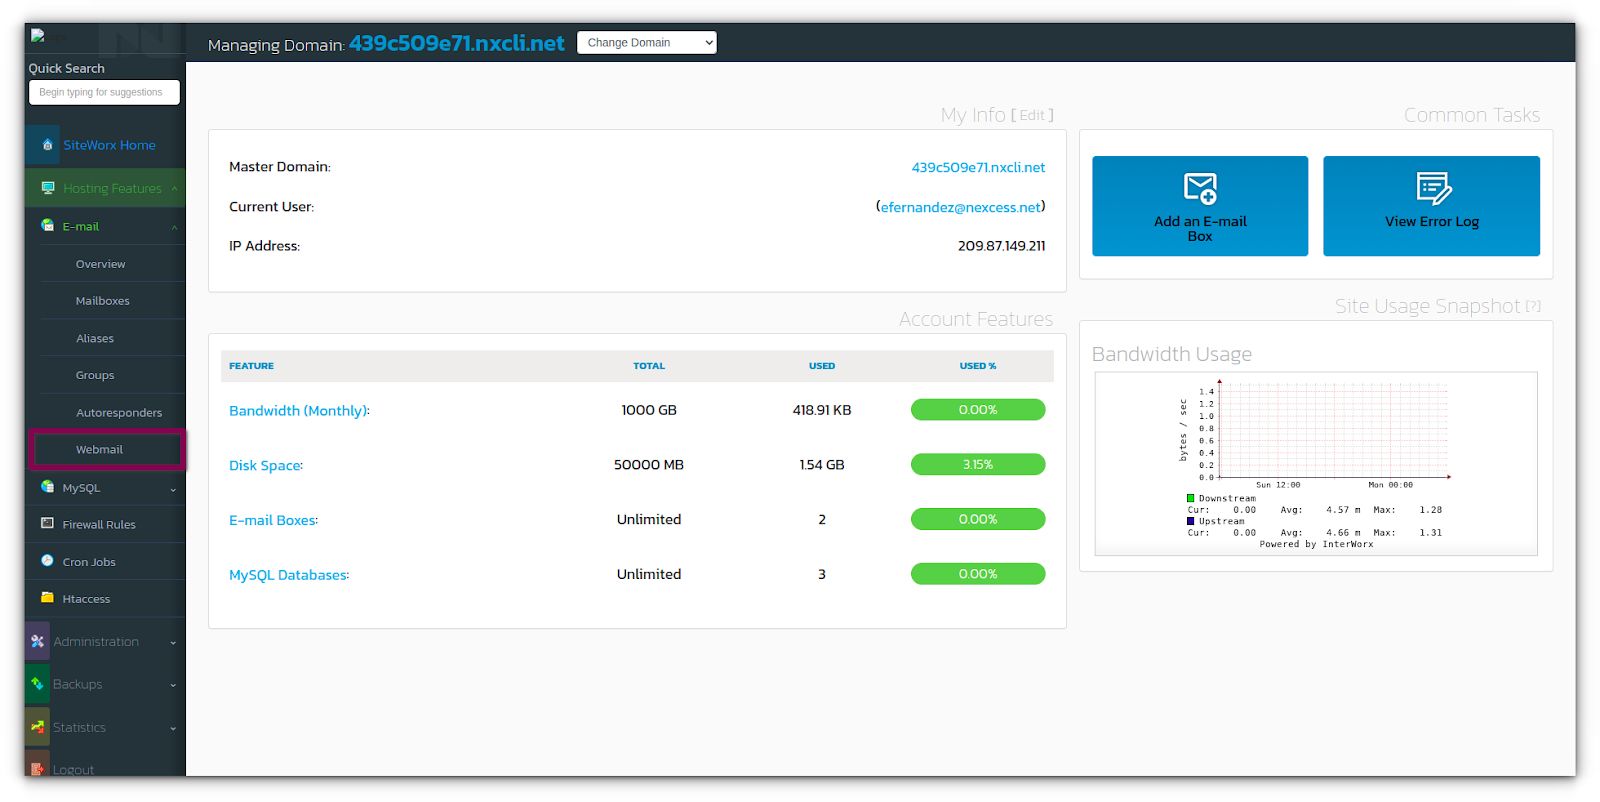
2. Taking this action opens the webmail page for the SiteWorx account in a new browser tab.
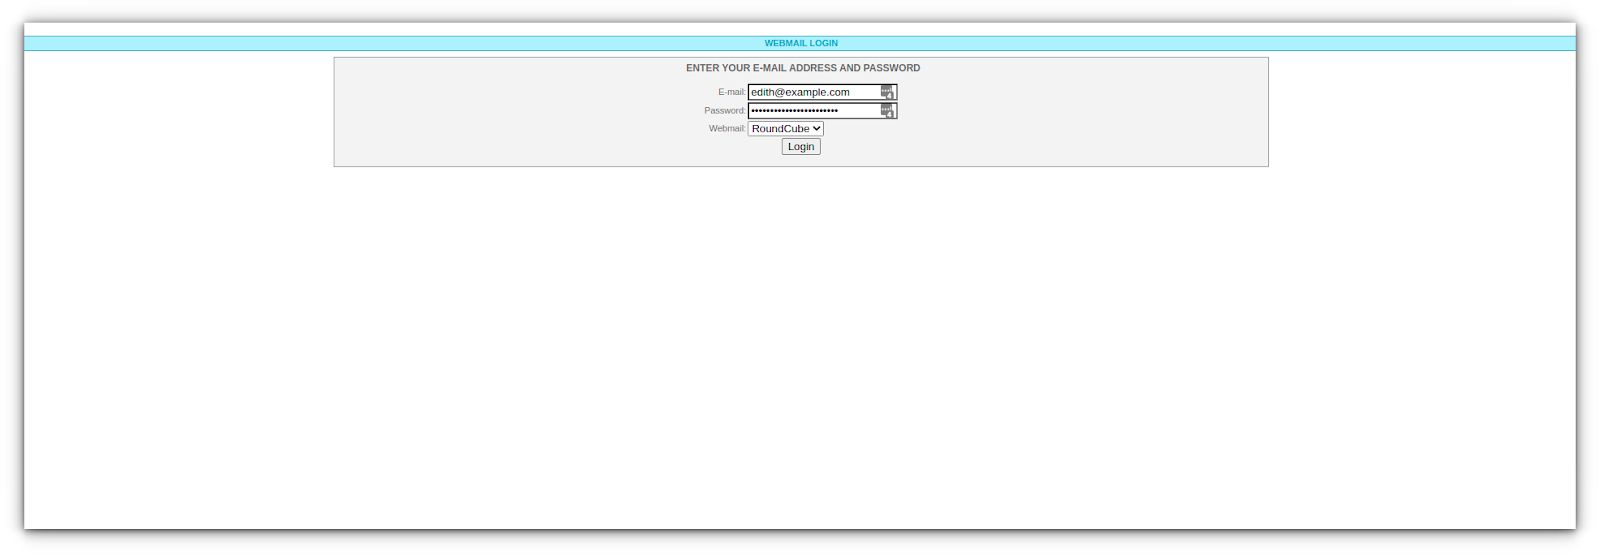
3. Populate the required fields with your details:
- Email Address: The email box to log into.
- Password: The password for the email user.
- Webmail: The webmail interface to log into — Roundcube.
4. Then, click the Login button when ready:

MySQL
Manage MySQL databases
MySQL — adding a database
You can add and manage database as your website solution requires:
1. From the SiteWorx main menu, click Hosting Features > MySQL > Databases.
2. In the Database Name field, type the name of the new database. Do not use spaces or special characters, although you may use the "_" character to indicate a space, if necessary:


3. Next, click the Create User checkbox:

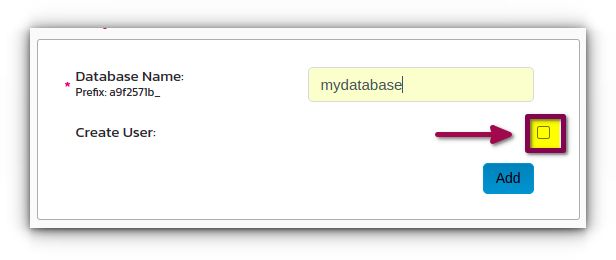
4. The menu will expand, allowing you to configure the login credentials and assign permissions:

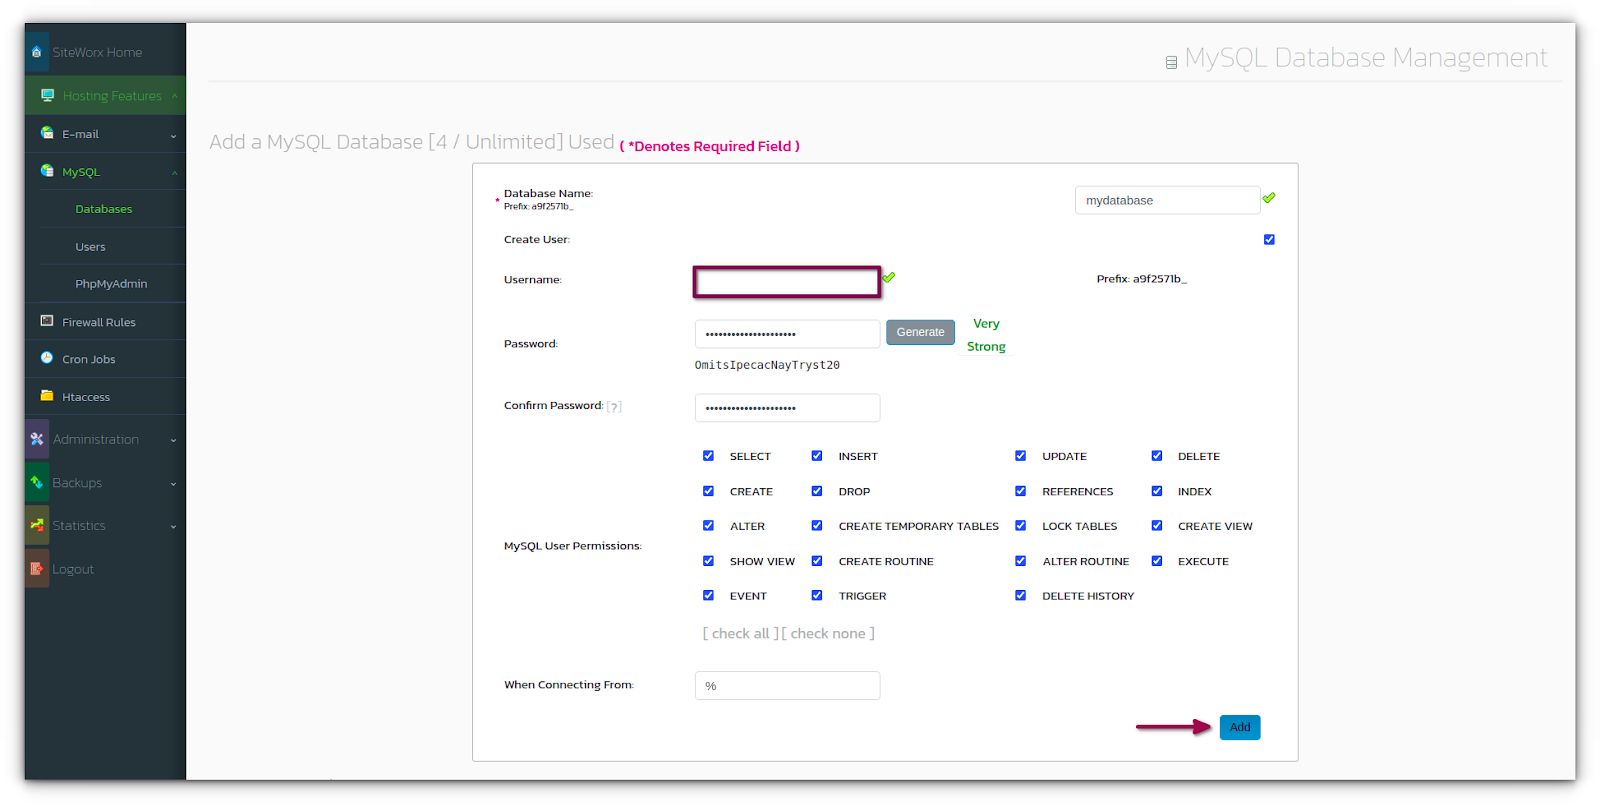
5. Enter the desired username in the Username field. You must use one word of no more than seven characters, though you may include the "_" character to indicate a space, if desired.
6. To choose the password, opt for one of the following methods:
6a. Create your own password by typing it into both the Password and Confirm Password fields. For security tips and general advice about password creation, refer to the How to create a secure password article.
6b. Enter a password or click Generate to have SiteWorx create one for you.
7. Assign permissions as desired. By default, all permissions are enabled. Clear each checkbox to remove permissions as necessary.
8. In the When Connecting From field, specify the hostname from which the user must connect to the database. If you are unsure, leave it blank.
9. Then, click the Add button.
10. When successful, the new database will appear in the Existing Databases section.
11. SiteWorx automatically prefixes your assigned database name with the first eight characters of your domain name, followed by an underscore character:

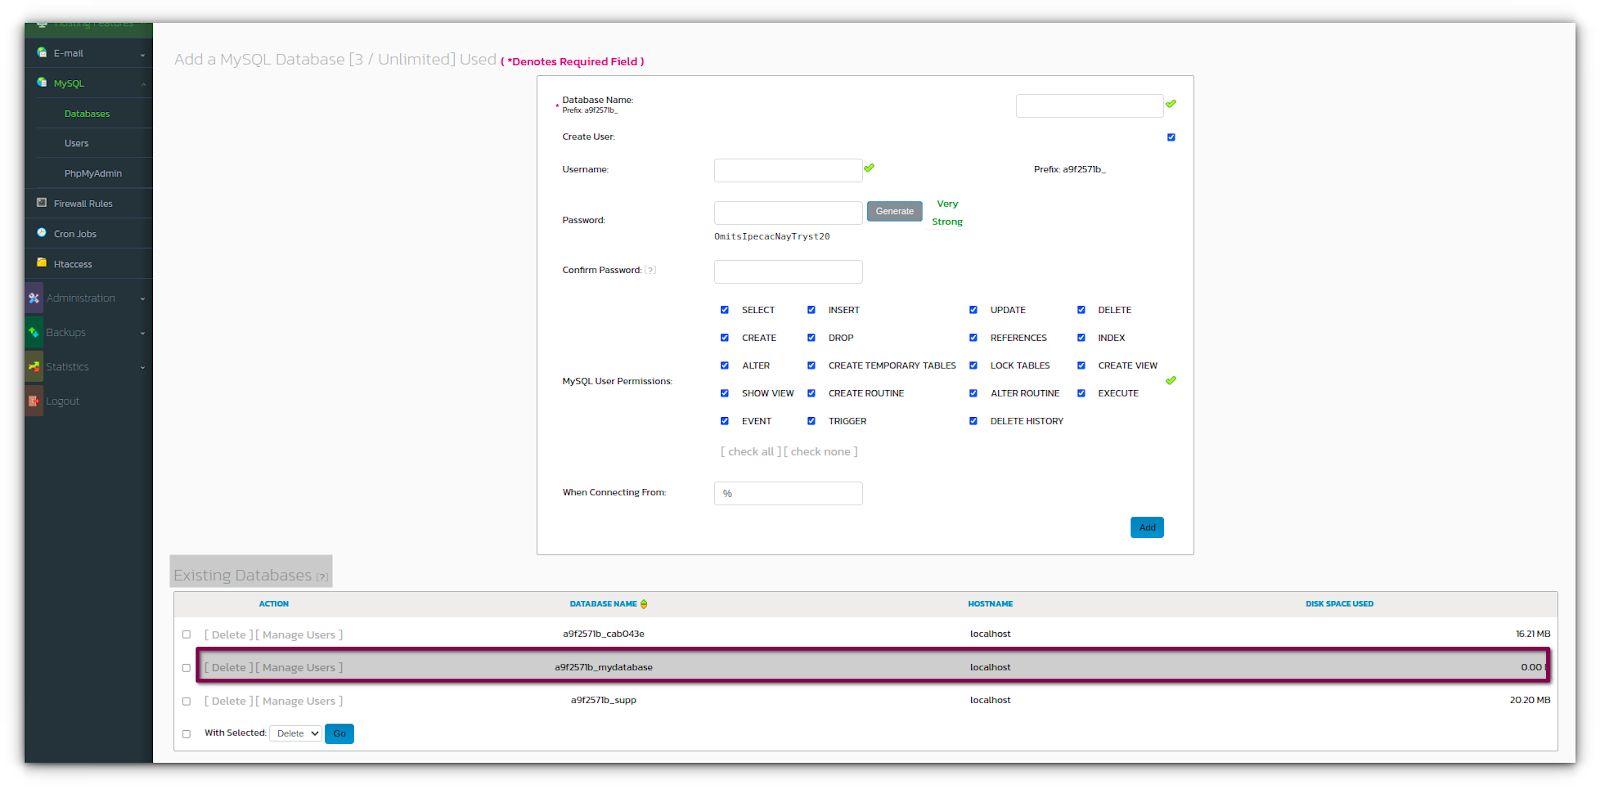
Make note that when specifying database information for other applications, you must use this entire database name.
MySQL — deleting a database
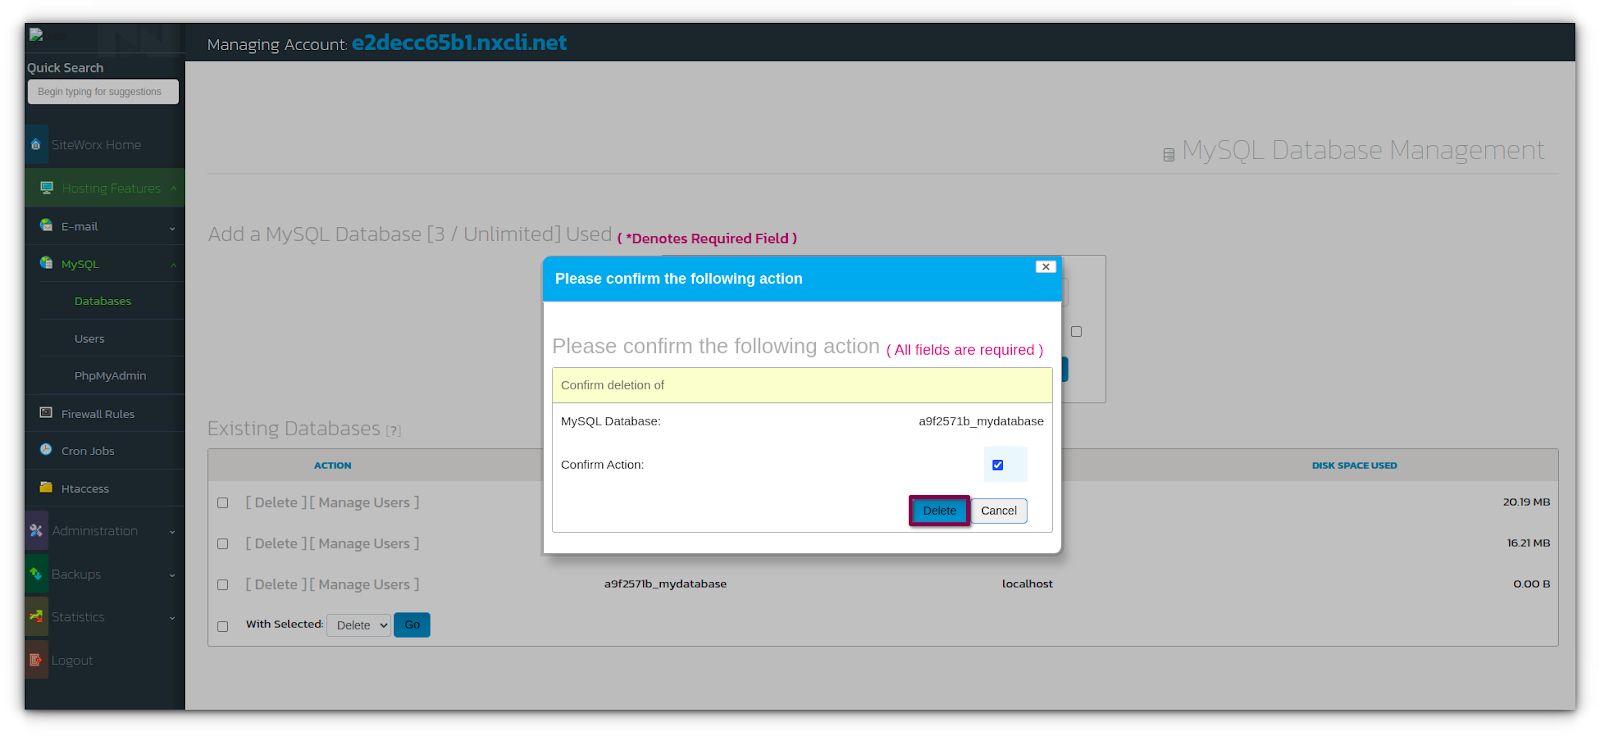
At times, database deletion may be in order:
1. In SiteWorx, navigate to Hosting Features > MySQL > Databases, either from the side menu or SiteWorx home.
2. Click the Delete option next to the database to delete. This click opens the Confirmation form.
3. Select the Confirm Action checkbox.
4. Lastly, click the Delete button:

Manage MySQL database users and permissions
This section allows you to manage database users their access levels based on the system of permissions.
MySQL — adding database users and permissions
To add a database user with configured permissions, see the following steps:
1. Launch the control panel from the Nexcess Client Portal to access SiteWorx.
2. In SiteWorx, navigate to Hosting Features > MySQL > Databases, from the side menu or the SiteWorx homepage.
3. Click the Manage Users button next to the Database in the Existing Databases section. This action opens the User Permissions page.
4. Update the required fields:
- User: The user that will be added to the database.
- MySQL User Permissions: The permissions the database user should have.
- When Connecting From: The host the database user will connect from, where % is the default value, which is a wildcard:

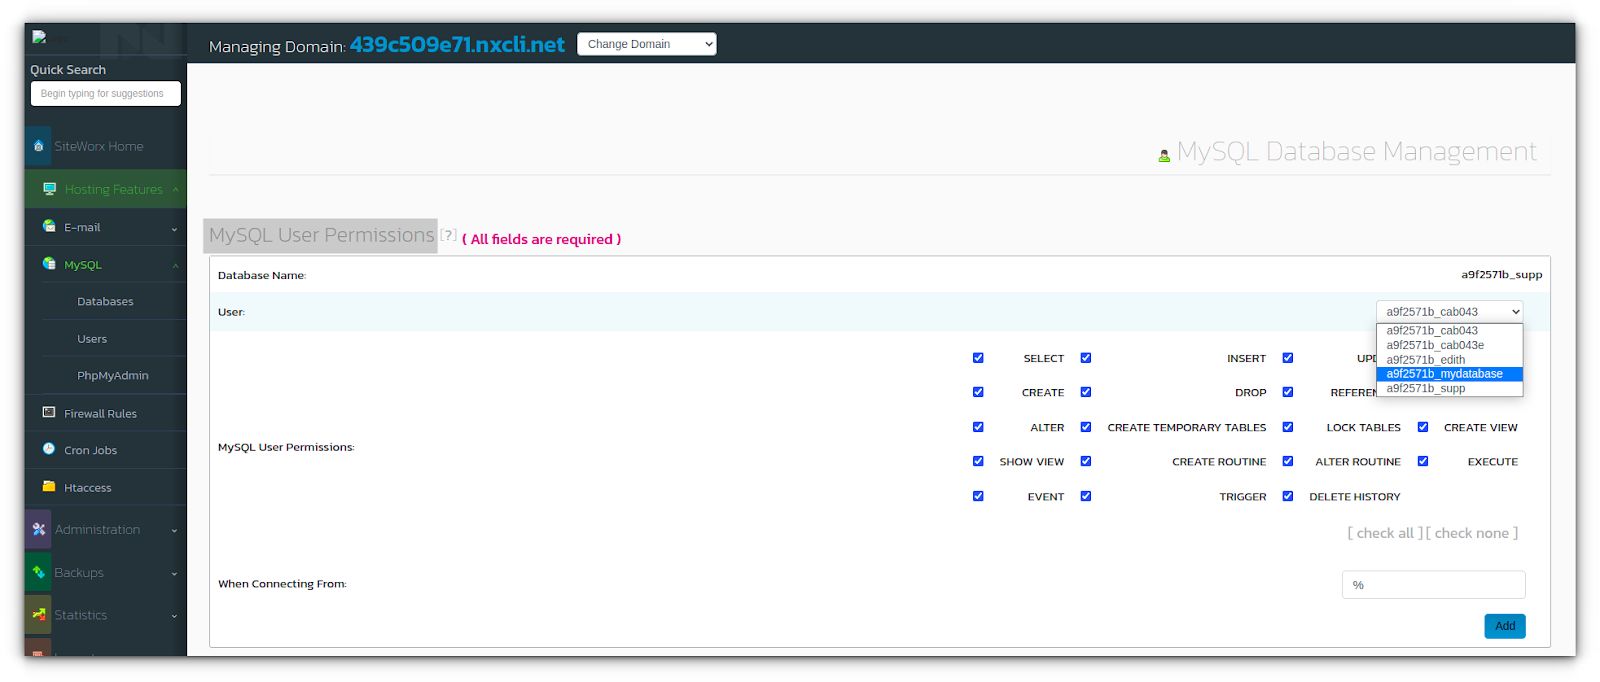
5. Then, click the Add button.
MySQL — editing database user permissions
Editing database user permissions is made easy with SiteWorx:
1. In SiteWorx, navigate to Hosting Features > MySQL > Databases, either from the side menu or SiteWorx home.
2. Click the Person icon button next to the Database. The User Permissions page is opened.
3. Under Existing Permissions, click the Pencil button next to the MySQL user to edit permissions for:

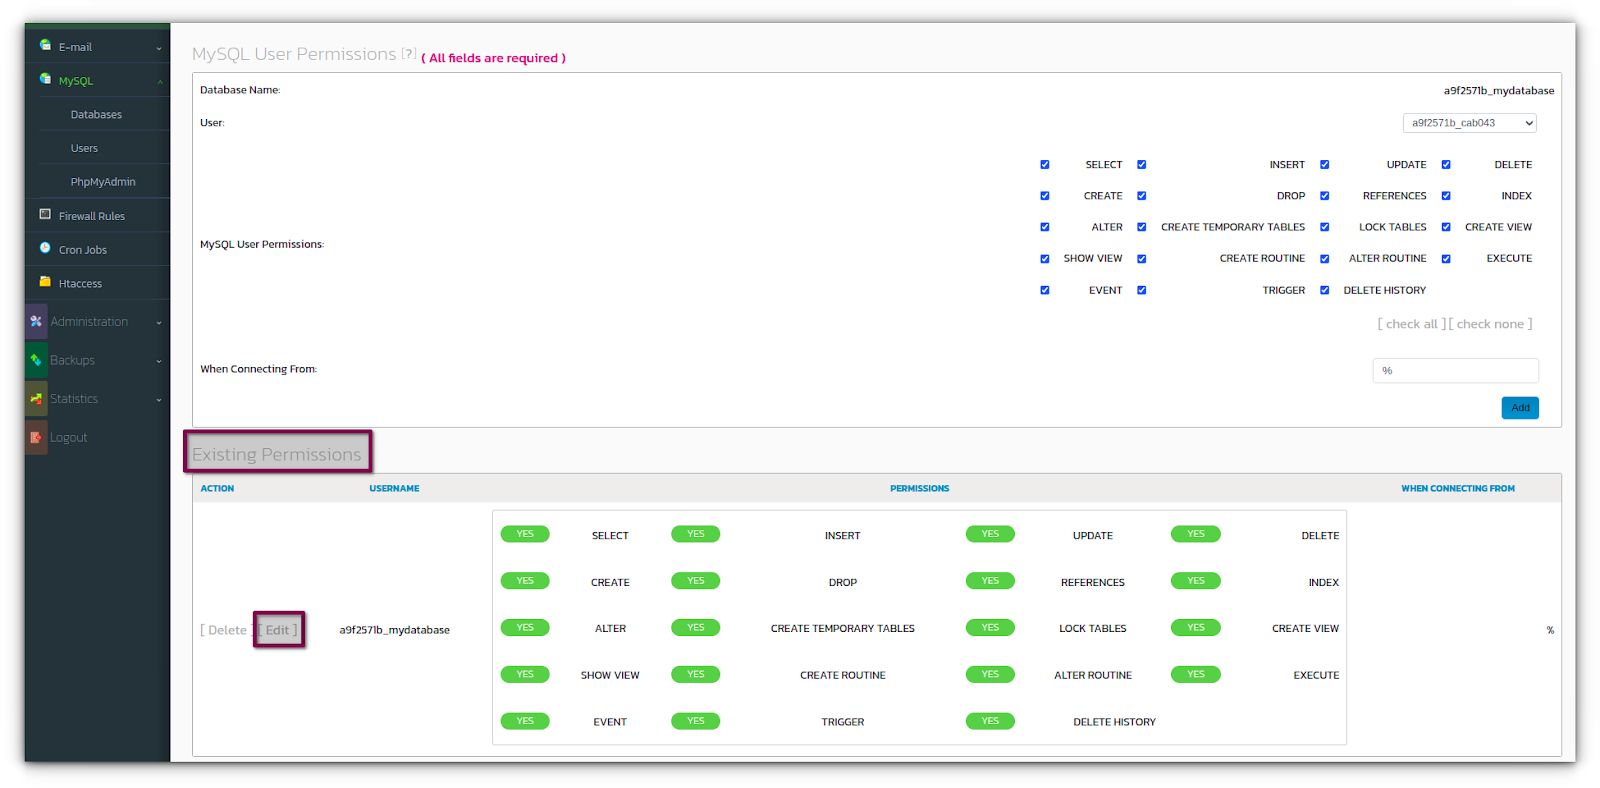
4. Update the desired permissions:

5. Finally, click the Save button.
MySQL — deleting database user permissions
There may come a time when you need to remove a database user's permissions. Here is how you can do that:
1. In SiteWorx, navigate to Hosting Features > MySQL > Databases, either from the side menu or SiteWorx home.
2. Click the Person icon button next to the Database. This step opens the User Permissions page.
3. Click the Delete button next to the MySQL user to delete permissions for. This step opens the confirmation form:

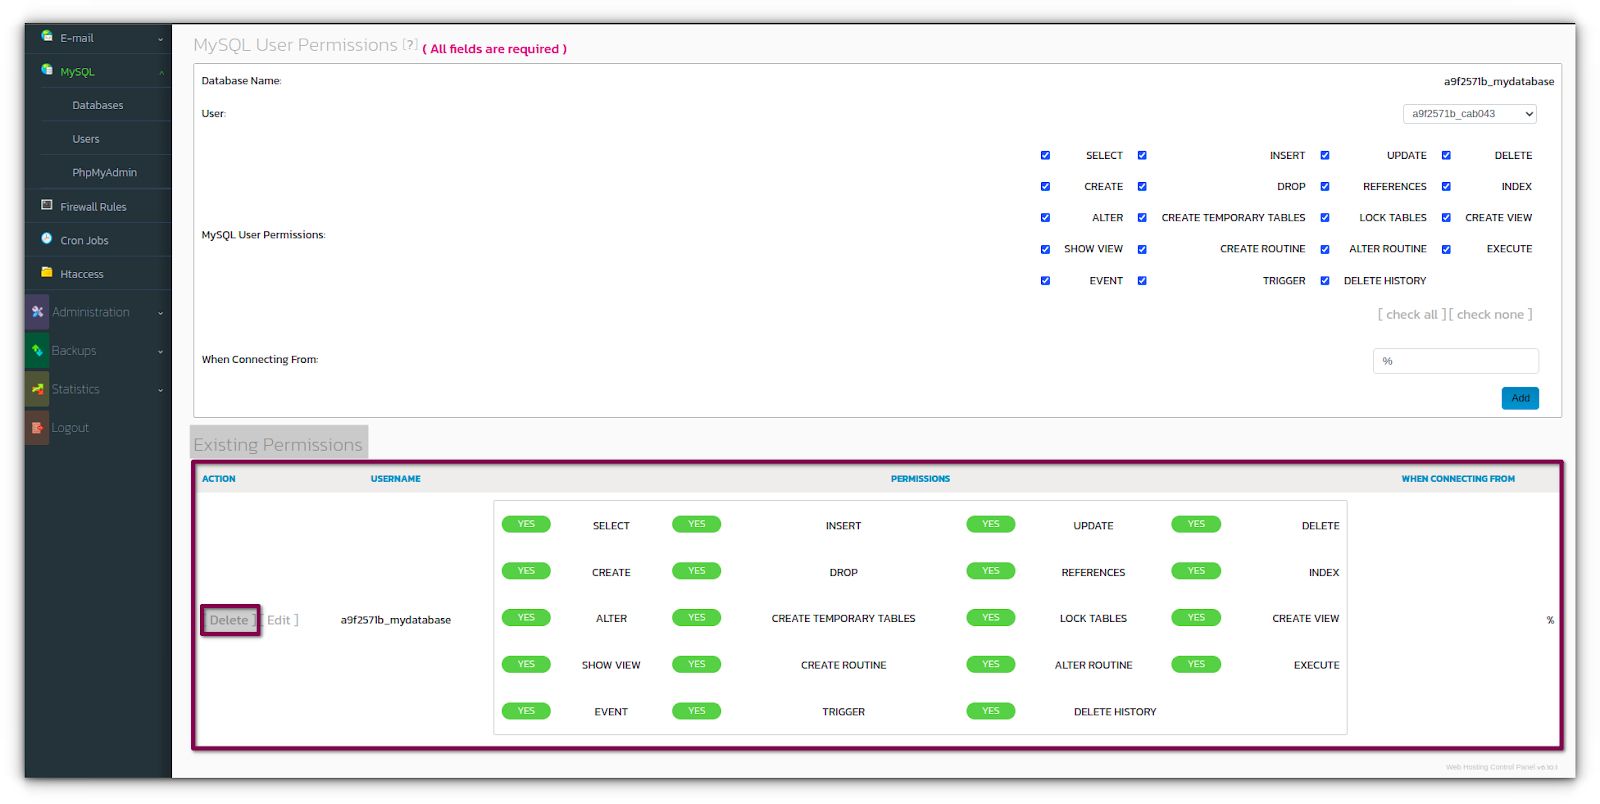
4. Next, Click Delete as needed.
phpMyAdmin
Access phpMyAdmin from SiteWorx
To access phpMyAdmin from SiteWorx, follow these steps:
1. Launch the control panel from the corresponding Magento of Flex Plan from with the Nexcess Client Portal to access cloud-based version of the SiteWorx panel:

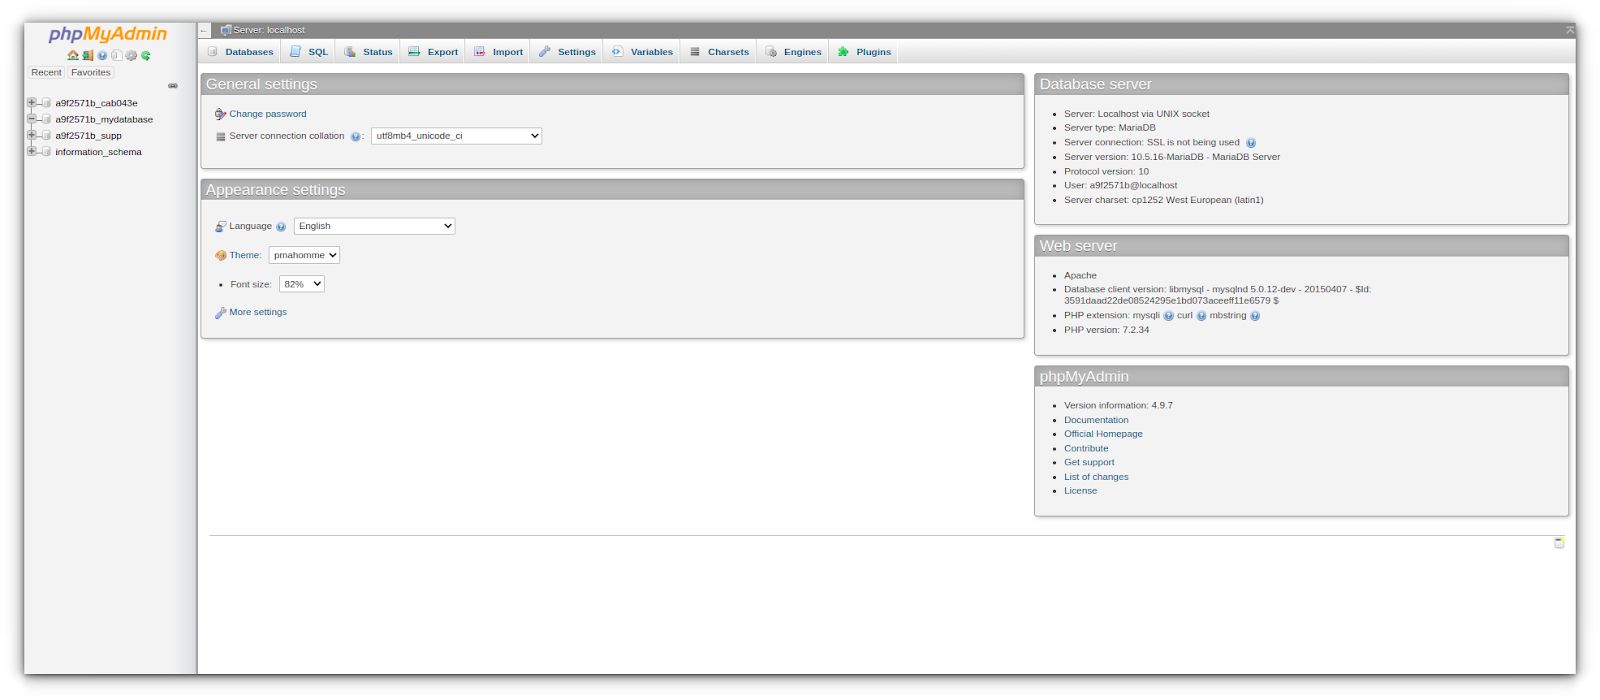
2. In SiteWorx, navigate to Hosting Features > MySQL > phpMyAdmin option, from the side menu or SiteWorx homepage.
3. This action will open the phpMyAdmin utility for the corresponding domain.
Firewall rules and whitelist settings
A whitelist is used to give authorization to specific IP addresses to have access to Nexcess servers when using services such as remote MySQL connections. Whitelisting your IP alone will not grant SSH access. See How to enable SSH access for more information about setting up SSH access.
Whitelist settings — adding your IP address to the whitelist
Here is a short list of steps to submit your IP address to the whitelist:
1. From the SiteWorx main menu, click the Hosting Features > Firewall Rules.
2. In the MySQL Whitelist IP address field, add IP address to whitelist or click the Whitelist my current IP option. This option fetches your IP address automatically.
3. If the IP address is correct, click the Submit button:


4. If you have multiple IP addresses, repeat the process.
5. Please be sure to whitelist your IP address for incoming and outgoing traffic.
6. How do you find your computer's IP address? To find out what your IP address is, you can check it by navigating to https://ipv4.nexcess.net/.
7. Congratulations! You have successfully whitelisted your IP address for MySQL remote connections.
Whitelist settings — removing your IP address from the whitelist
Here is how to remove your IP address from the whitelist:
1. To delete a MySQL whitelist IP address, you can click the Delete button or the corresponding entry to remove any IP whitelisting entry:


Cron Jobs
Adding a new cron job
As a note of caution, please do not modify the cron variables Shell, Path, and Mailto.
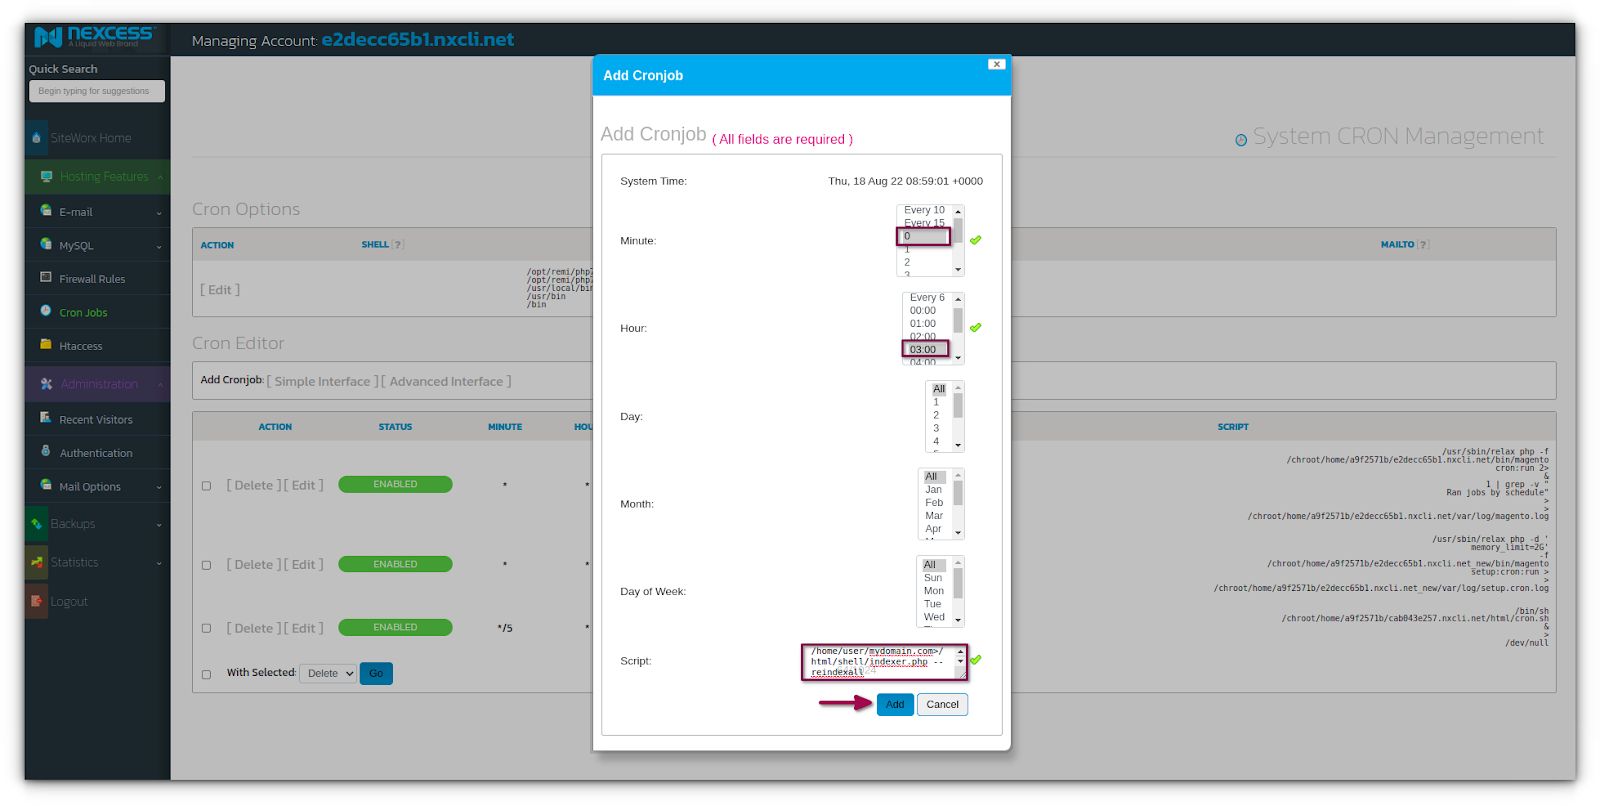
As an example, this article shows how to create a cron job for Magento to perform a reindex once per day. The procedure for creating cron jobs will vary according to your preferred frequency and the script:
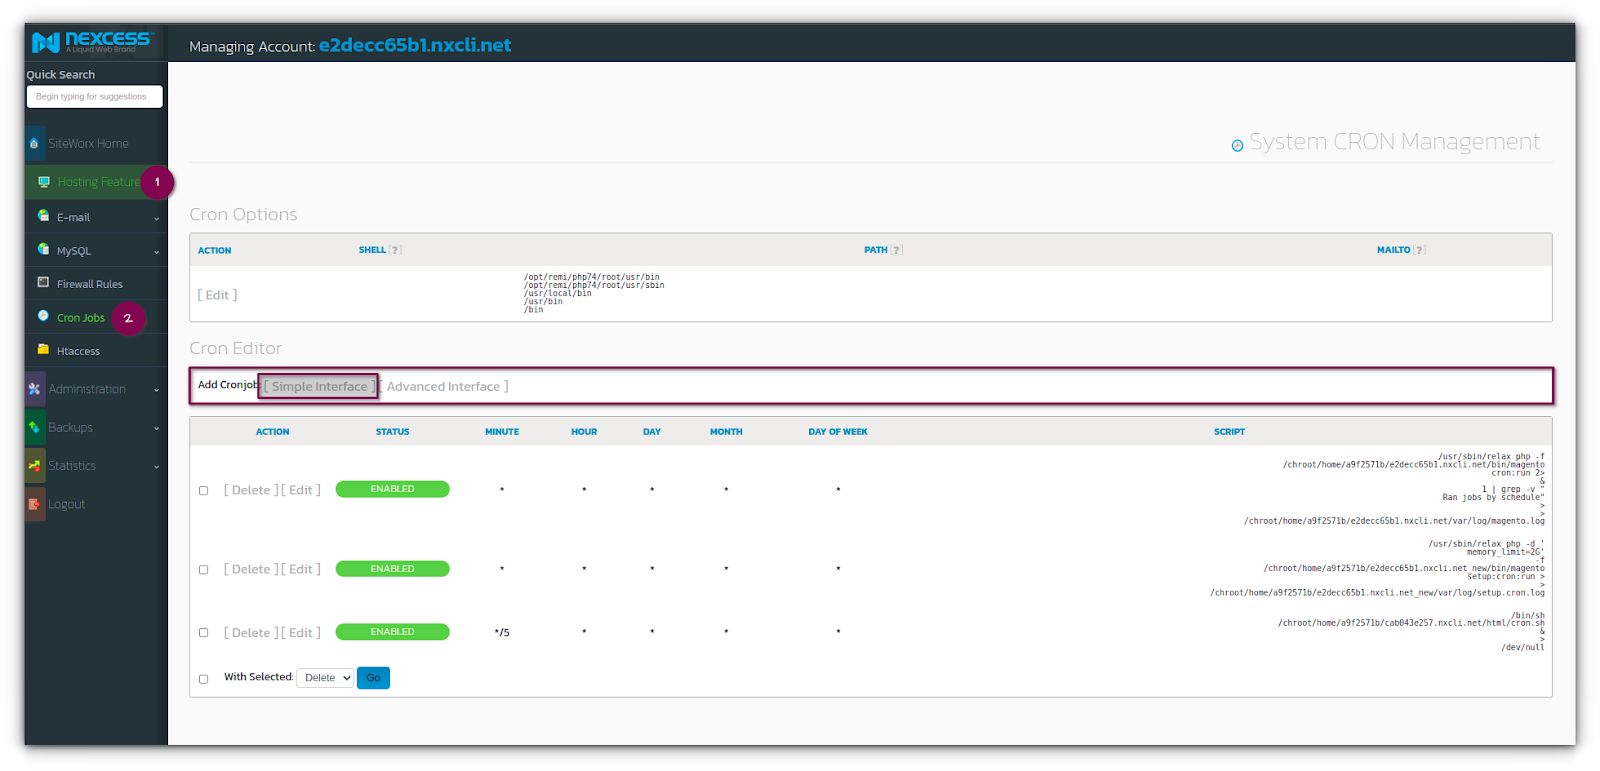
1. From the main menu, select Hosting Features > Cron Jobs.
2. In the Cron Editor section of the System Cron Management page, click the Simple Interface option:

3. Designate your preferred time for the cron job to run in the Add Cronjob panel. For this example, set the Minute value to 0 and the Hour value to 03:00. Note that the times in the hour list reflect a 24-hour clock. In the Script Field, designate both the path and the script.
4. For example, enter the following, but replace angle brackets (<>) and everything between them with your domain name:
php /home/user/<domain.com>/html/shell/indexer.php --reindexall
5. Then, click the Add button:
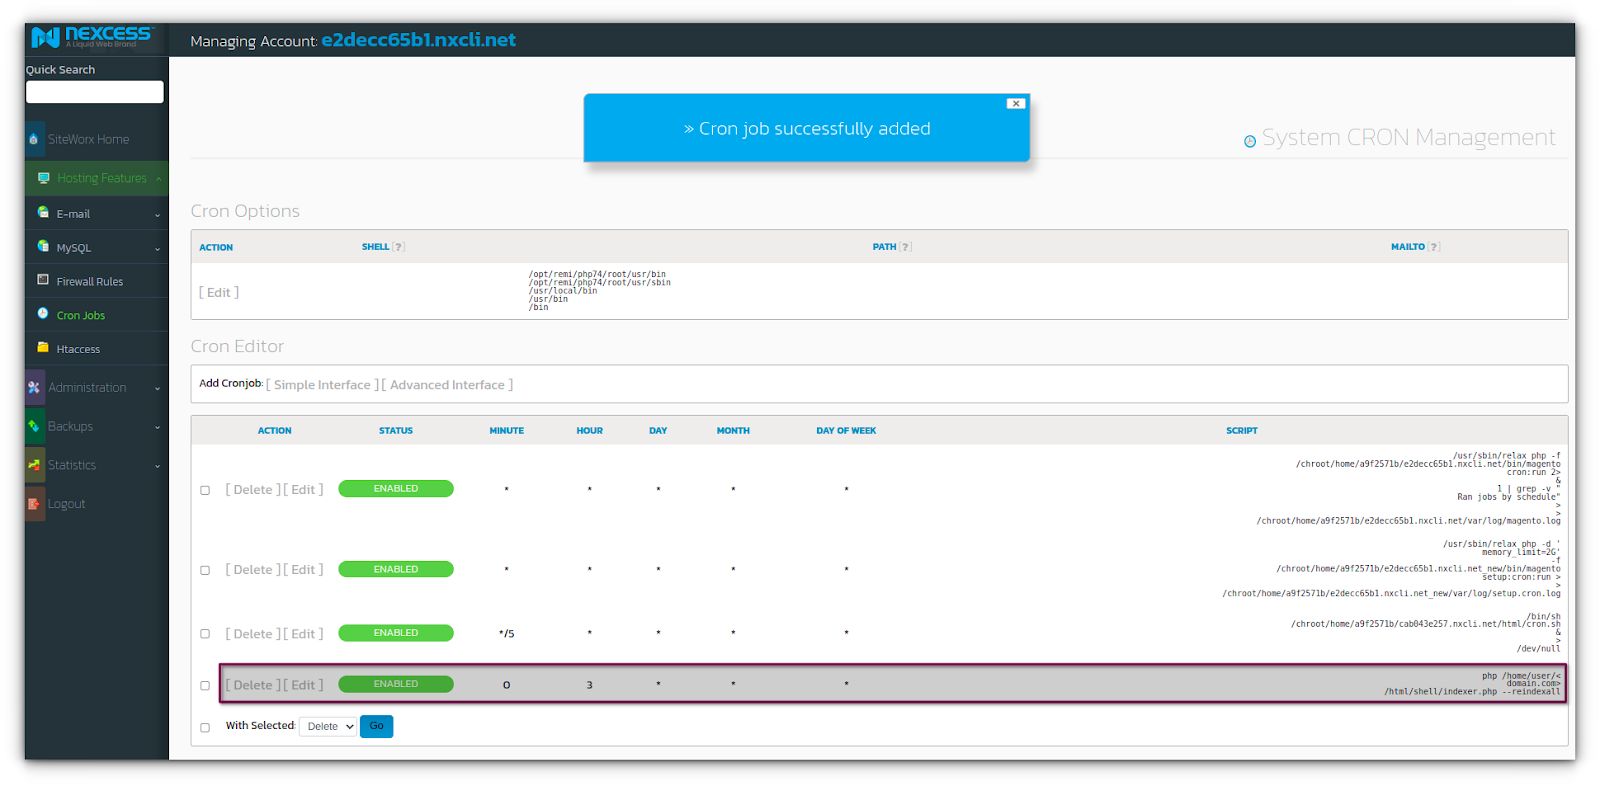
6. After clicking Add, the page redirects to the System Cron Management page, where your new cron job should appear:

Editing a cron job
You have the capability to edit cron jobs as required:
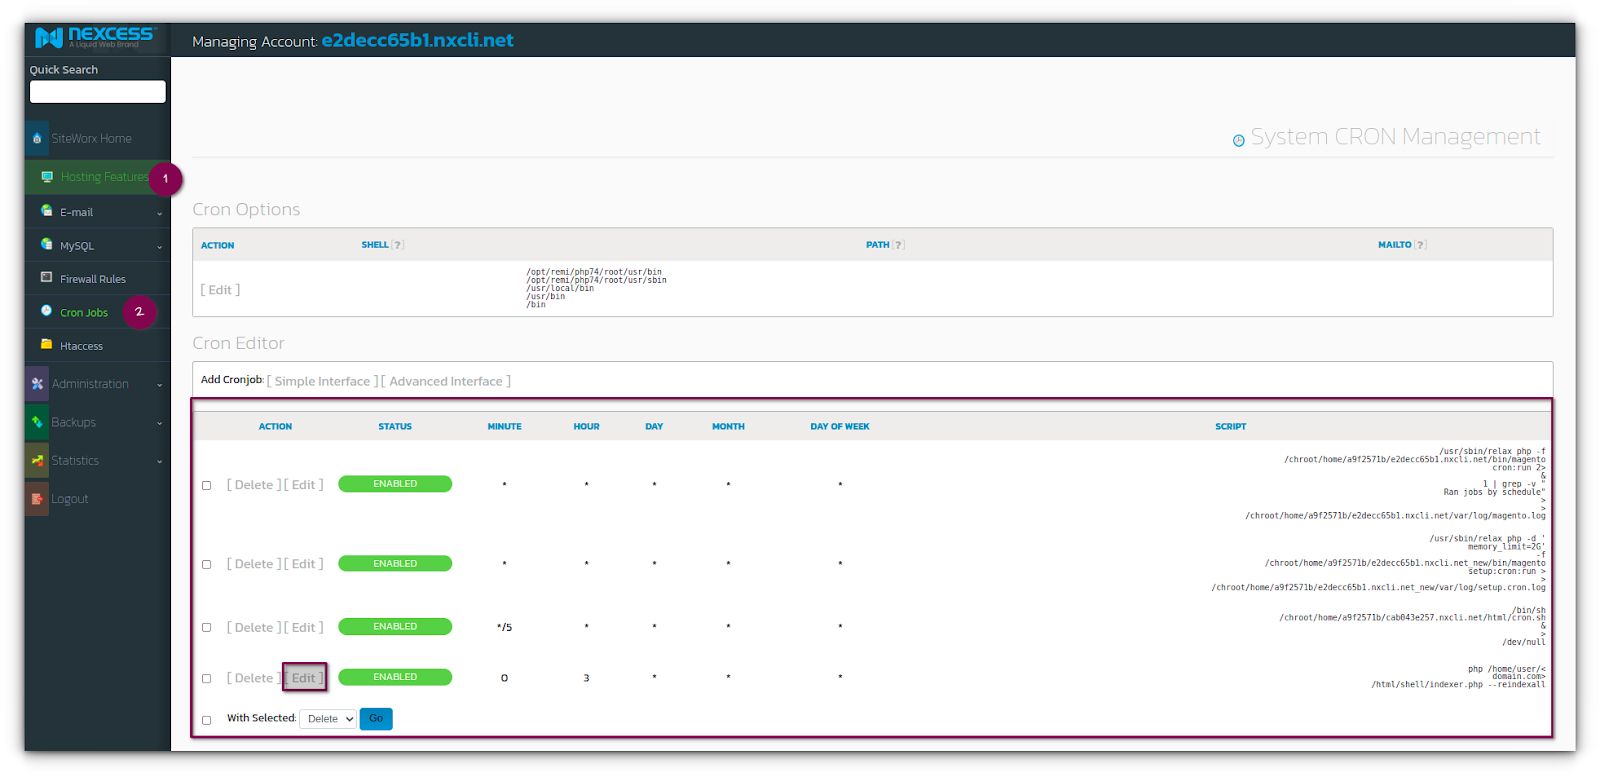
1. On the main menu, click Hosting Features > Cron Jobs. The System CRON Management page displays a list of all existing cron jobs under the Cron Editor section of the page.
2. Under the Action column for the cron job that you want to edit, click Edit:

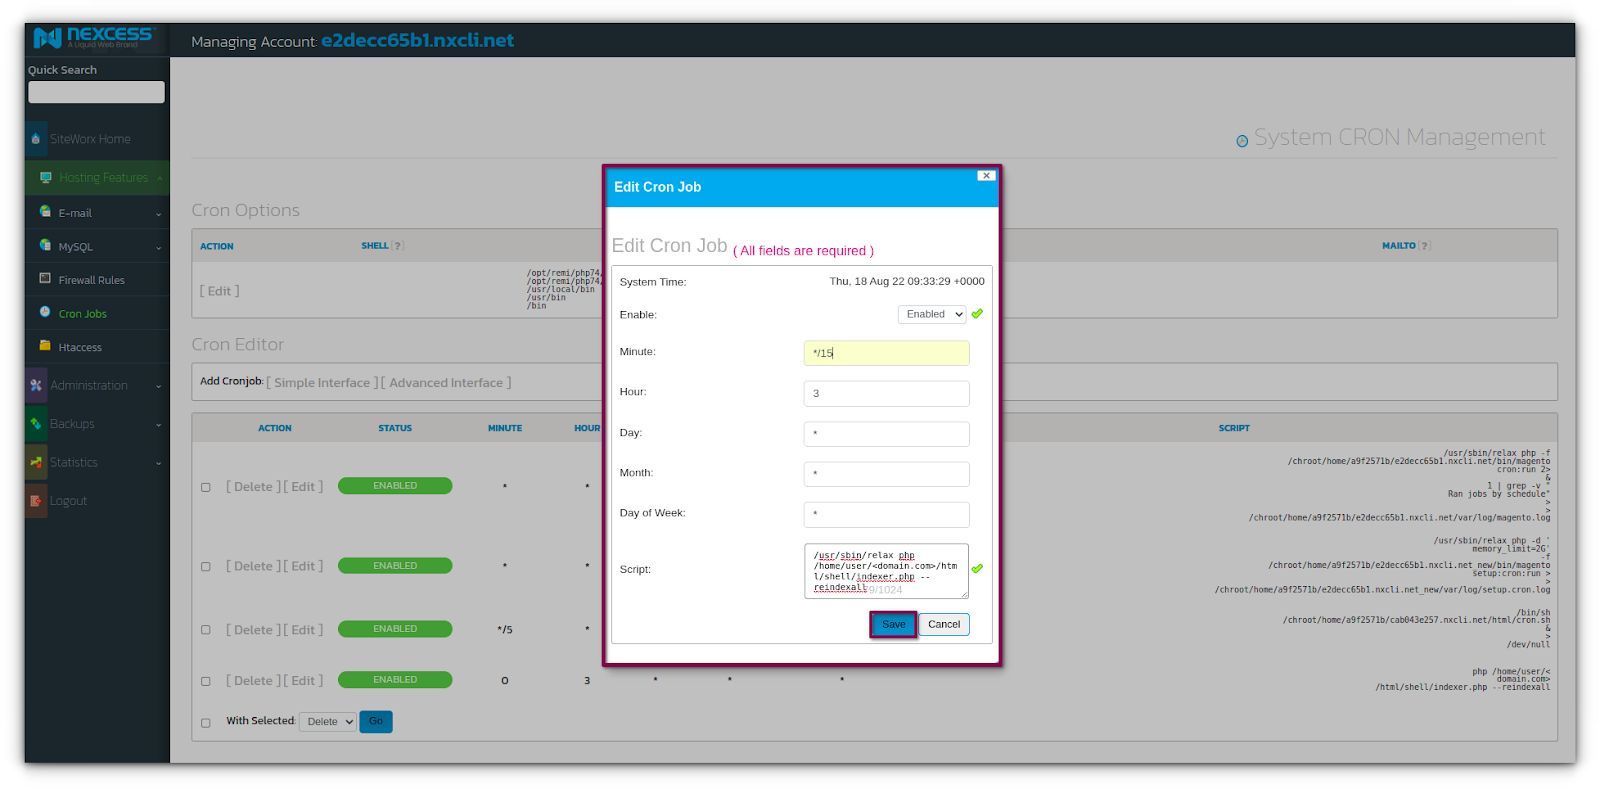
3. Make the necessary changes in the Edit Cronjob window and then click Edit to save:
Deleting a cron job
As necessary, cron job deletion can be done:
1. On the main menu, click Hosting Features > Cron Jobs. The System CRON Management page displays a list of all existing cron jobs.
2. Next to the job that you want to delete, click Delete.
3. When prompted, click Delete to confirm the deletion of the cron job.
Administration
Mail options — remote setup
Remember, if you plan on changing the MX record (mail exchanger record) to point to a remote server, retain the correct information for the destination mail server:
1. From the SiteWorx main menu, click Administration > Mail Options > Remote Setup.
2. Under Action, click [Disable] for the domain that you want local delivery disabled:

![Under Action, click [Disable] for the domain that you want local delivery disabled.](https://cdn.sanity.io/images/v6oximkk/production/1a95d5c72c69b80492c8907953d1386949f5b5d6-1600x742.jpg?w=1600&h=742&auto=format)
3. When prompted, click Disable to confirm.
3a. If you are only disabling email for your domain, stop here.
3b. If you need to configure email to point to a remote mail server, continue to Step 4.
4. Under the MX Records section, click [Edit].
5. Enter the appropriate settings for your remote mail server and click Save:
- TTL (Time to Live): The number of seconds a record will be considered valid by a server caching the information.
- Preference Number: An integer ranging from 0-65535, indicating the order in which records should be attempted. Lower numbers will be processed before higher numbers.
- Mail Server: The name of the destination server where mail traffic will be directed.
Using webmail with custom MX records
Once you have disabled local delivery and provided custom MX records, web-based email programs provided by InterWorx will now act as IMAP clients, provided that the mail server supports IMAP.
Mail options — filters
Filtering email from an address
You can filter email from a specific email address:
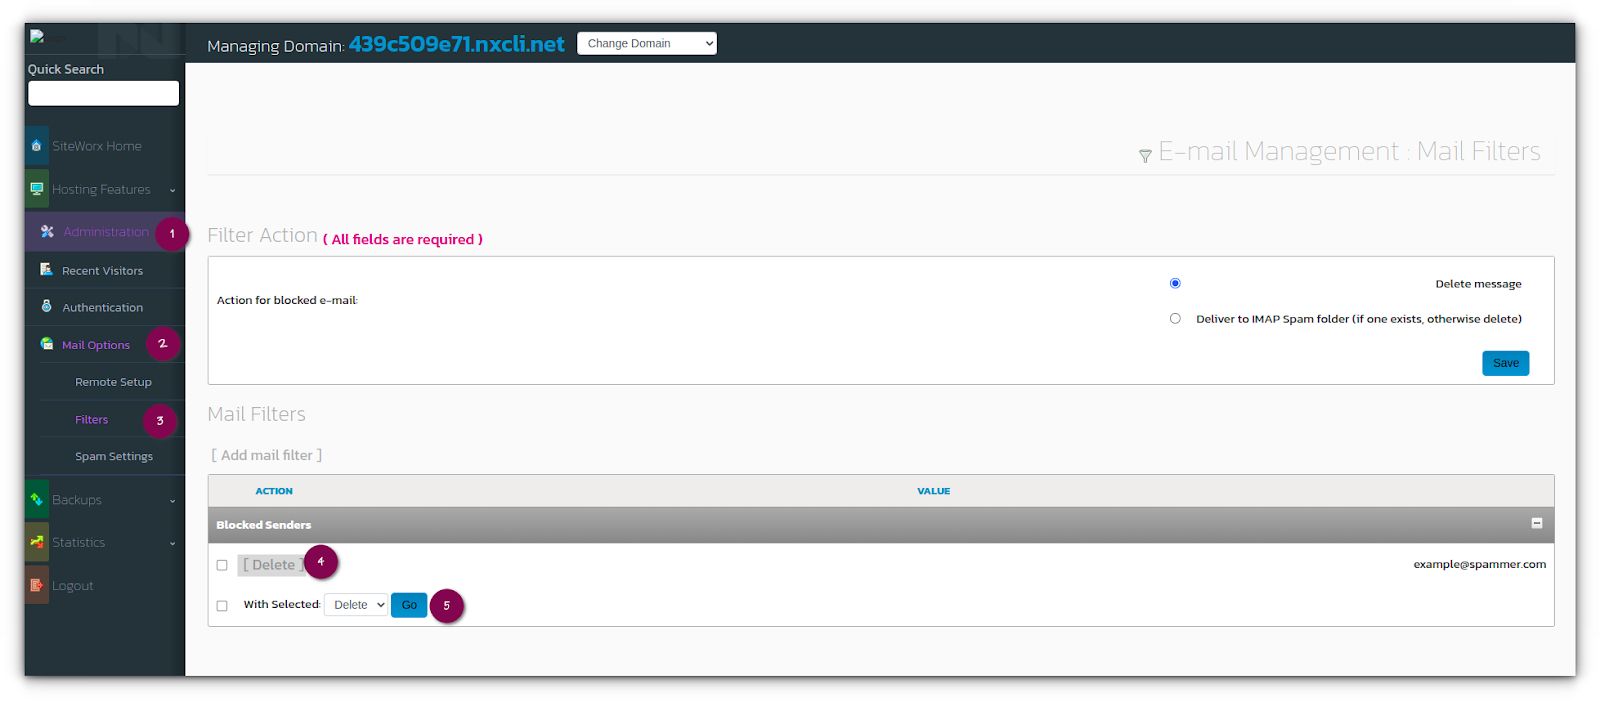
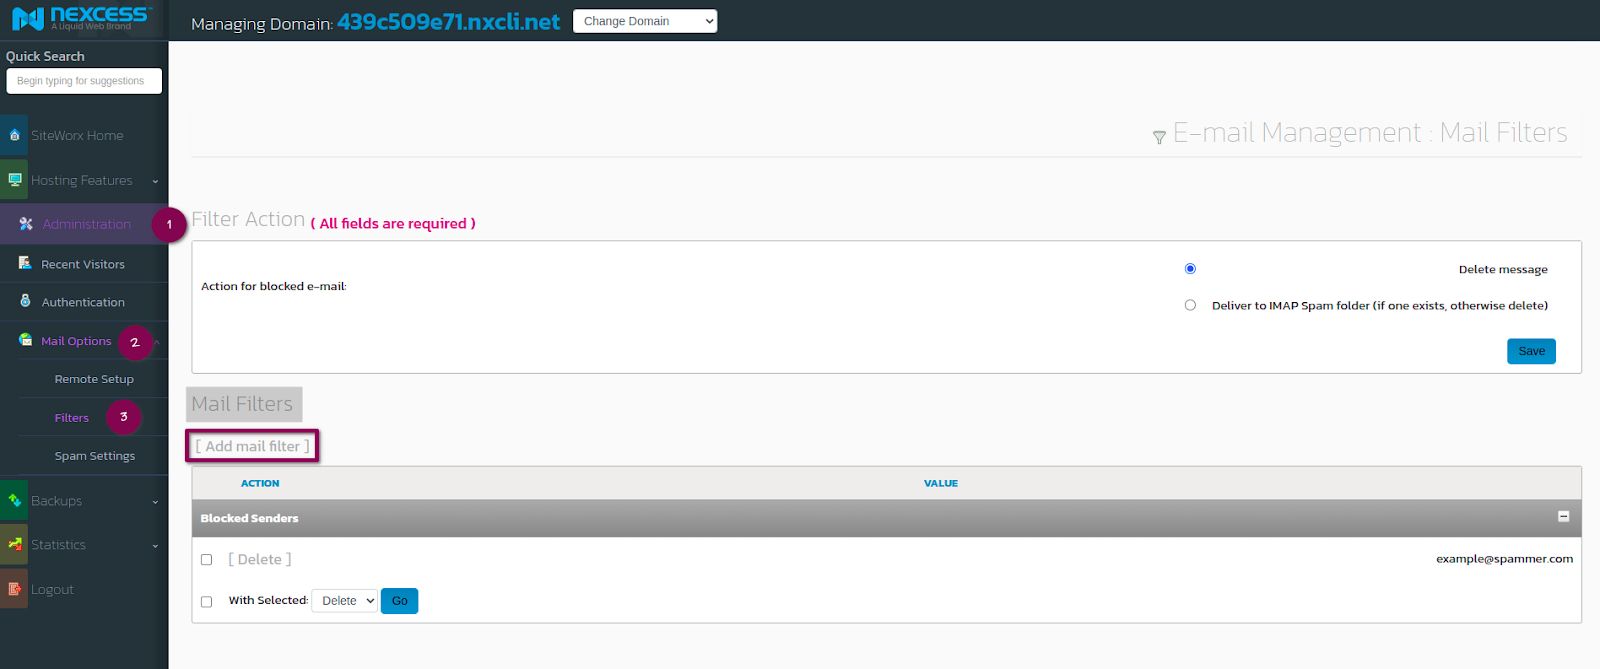
1. From the SiteWorx main menu, click Administration > Mail Options > Filters.
2. In the Mail Filters section, click Add Mail Filter option:


3. The Email Filter Rules panel appears. In the Filter Type dropdown list, select the Block Email with Sender Containing if it is not already set:

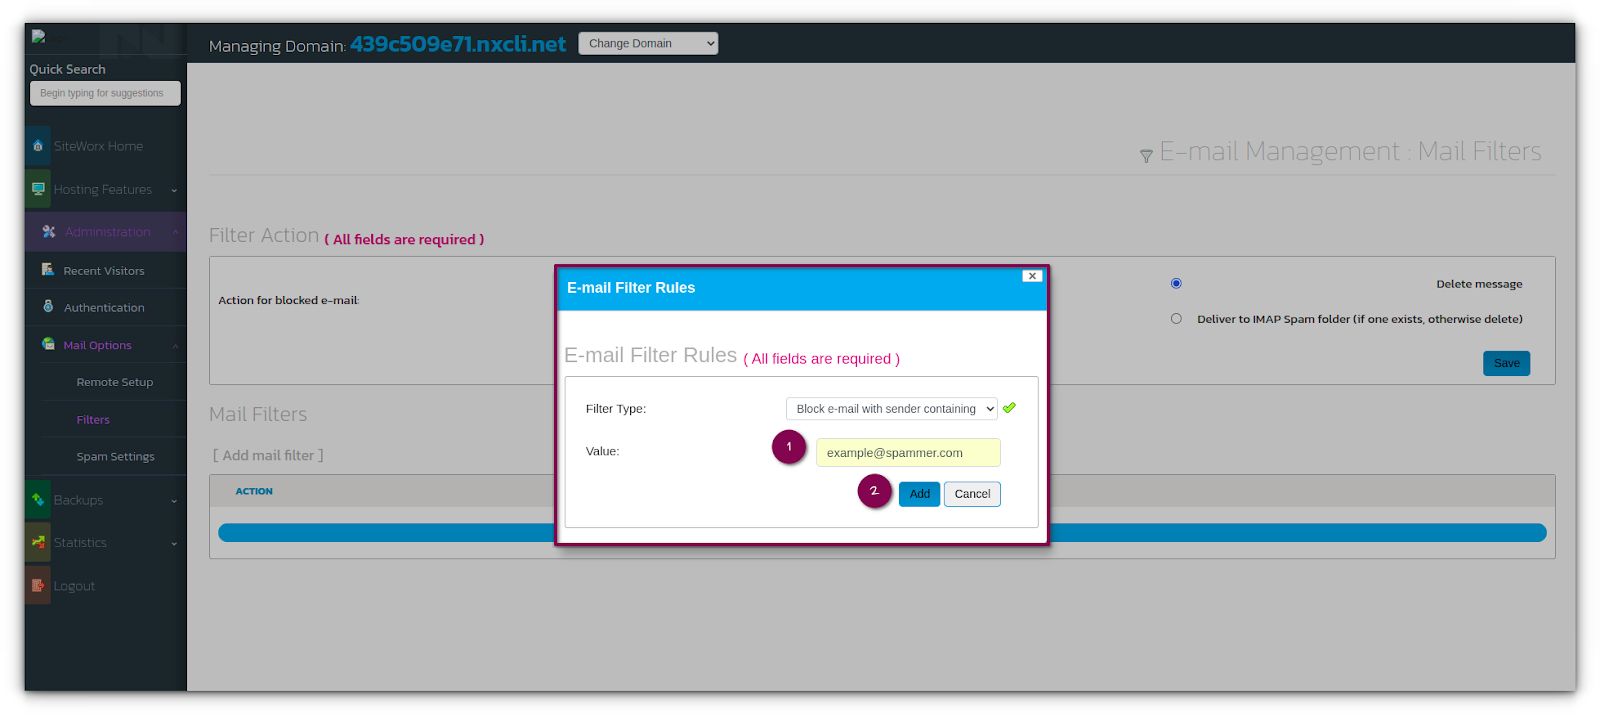
4. In the Value field (see above), type the complete or partial email address you want to block. For example, you can specify @spammer.com to block all incoming messages from that domain.
5. Click Add (see above). The Mail Filters section now shows the new blocked sender.
6. You can also remove the filter by selecting the Delete option:

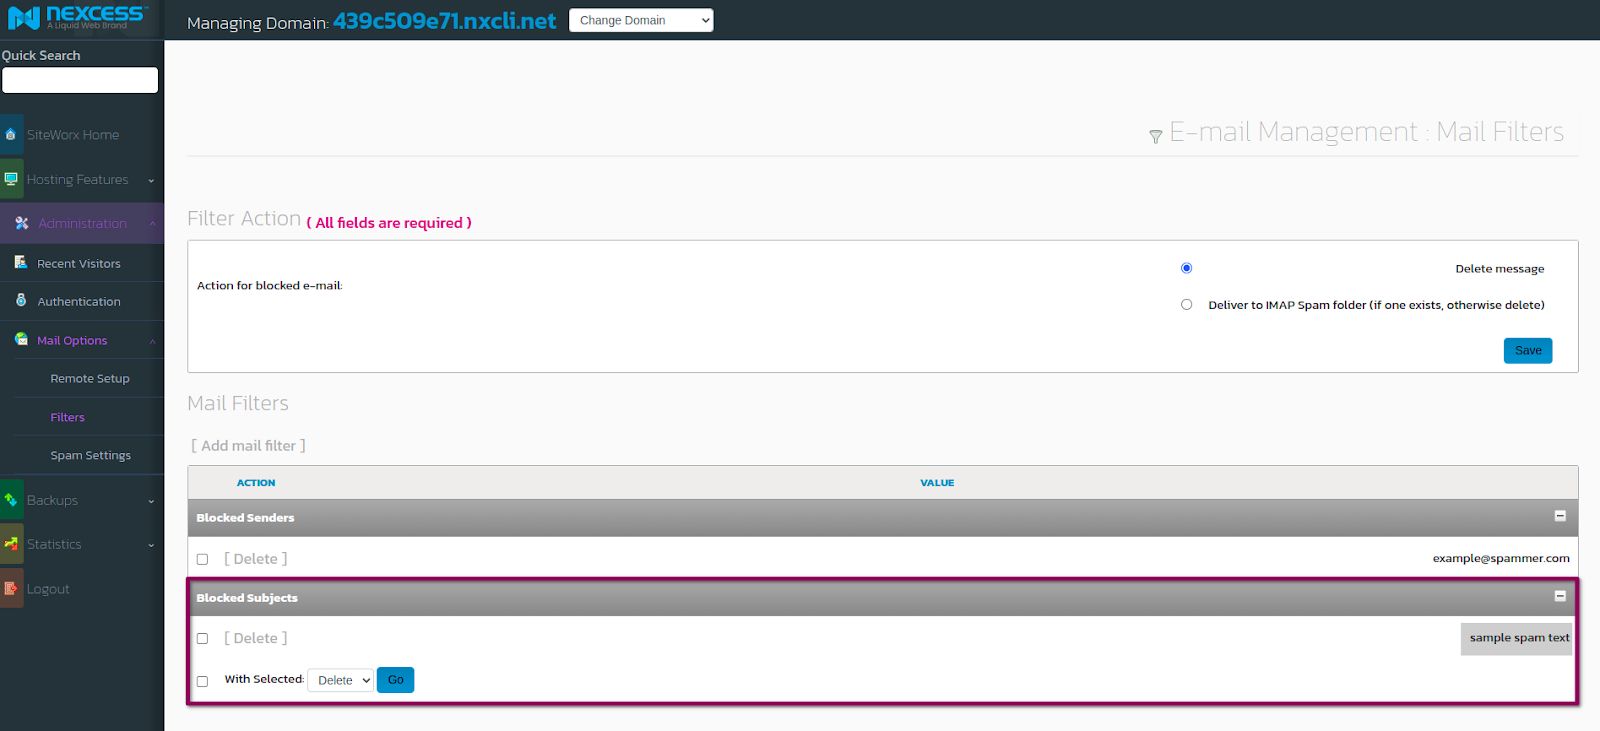
Filtering email containing specific subject text
Follow the steps below to create an email filter for messages containing specific text in the subject line:
1. From the SiteWorx main menu, click Administration > Mail Options > Filters.
2. In the Mail Filters section, click Add Mail Filter:

3. Select the Block Email with Subject Containing option from the Filter Type dropdown list:


4. In the Value field, type the subject text to be blocked:

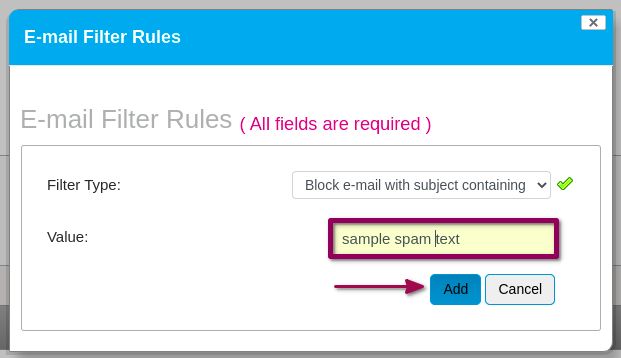
5. Then, click Add. Your chosen spam text will now appear in the Mail Filters section:

Spam settings
Configuring SpamAssassin
To configure spam settings from SiteWorx, follow these steps:
1. From the SiteWorx main menu, navigate to Administration Options > Mail Options > Spam Settings.
2. Choose the domain name from the Managing Domain list that needs SpamAssassin configuration:
3. From the SpamAssassin dropdown list, select the On toggle setting:
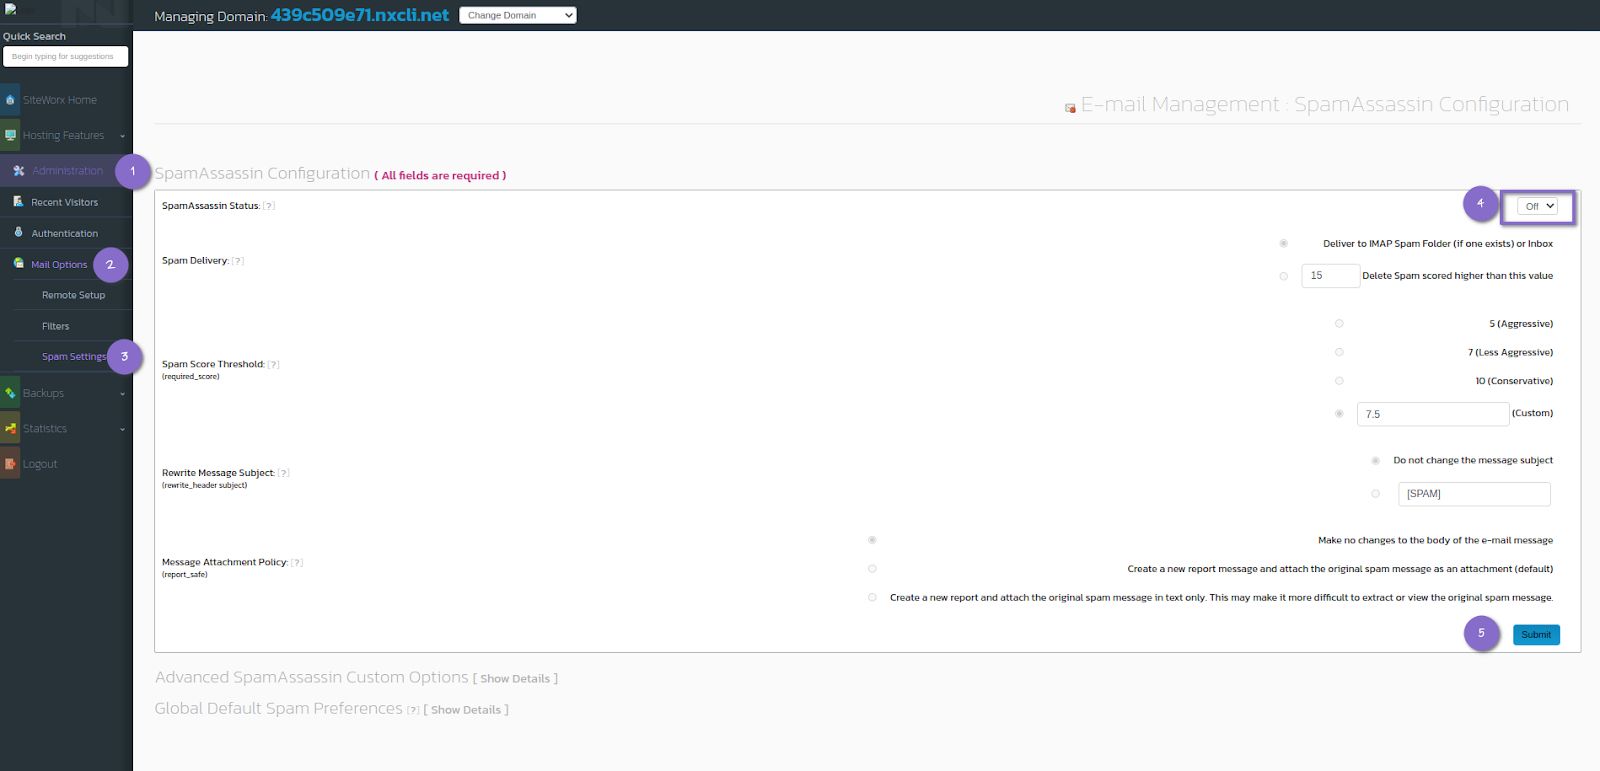
4. Once SpamAssassin has been enabled, the configuration options become available for selecting. Refer to the following table for an explanation of available configuration options:
| SpamAssassin Status | Shows the status of SpamAssassin and allows you to stop, start, and restart the SpamAssassin service. |
| SpamDelivery | Define what happens to spam once it has been tagged by SpamAssassin. The options are either of the following: 1) Deliver the Spam to an IMAP mail account named "Spam" or if that account does not exist, the "Inaccount." 2) Delete Spam scored above a certain threshold, delivering all other spam to the IMAPmail account named "Spam." Messages that are scored above this value will be tagged and identified as spam by SpamAssassin. Messages with scores below this value will not be tagged as spam. |
| Spam Score Threshold | Messages that are scored above this value will be tagged and identified as spam by SpamAssassin. Messages with scores below this value will not be tagged as spam. |
| Rewrite Message Subject | You can choose to have SpamAssassin alter the subject line of messages it identifies as spam. This can make messages tagged as spam more readily visible when viewing a list of messages, and can be used to filter messages based on the subject line in some email clients. |
| Message Attachment Policy | Set whether and how SpamAssassin alters the messages it tags as spam. |
| Global Default Spam Preferences | Your server administrator has the option of configuring server-wide SpamAssassin preferences. The preferences you define here will override any global preferences that have been specified. |
To learn more regarding these setup parameters, refer to the SpamAssassin configuration in the Nexcess Cloud article.
Statistics
Bandwidth history
To view bandwidth usage from SiteWorx, follow these steps:
1. Navigate to the SiteWorx main menu, then click Statistics > Bandwidth History:
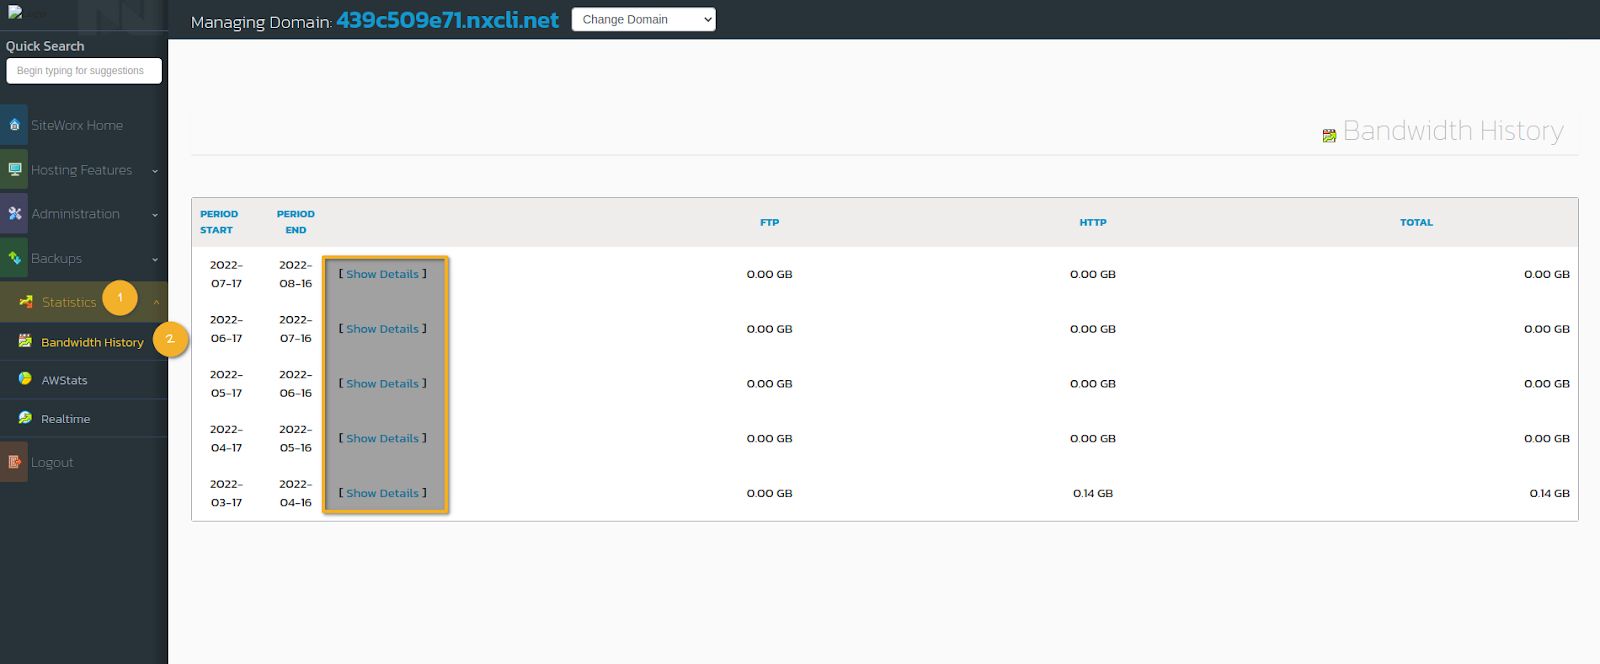
2. Click the Show Details link to view the bandwidth breakdown for a given period by domain.
3. Only the master domain and secondary domains have their own bandwidth billing.
AWStats
The AWStats report generates comprehensive data reports about how users navigate to and through your website:
1. From the SiteWorx main menu, click Statistics > AWStats:

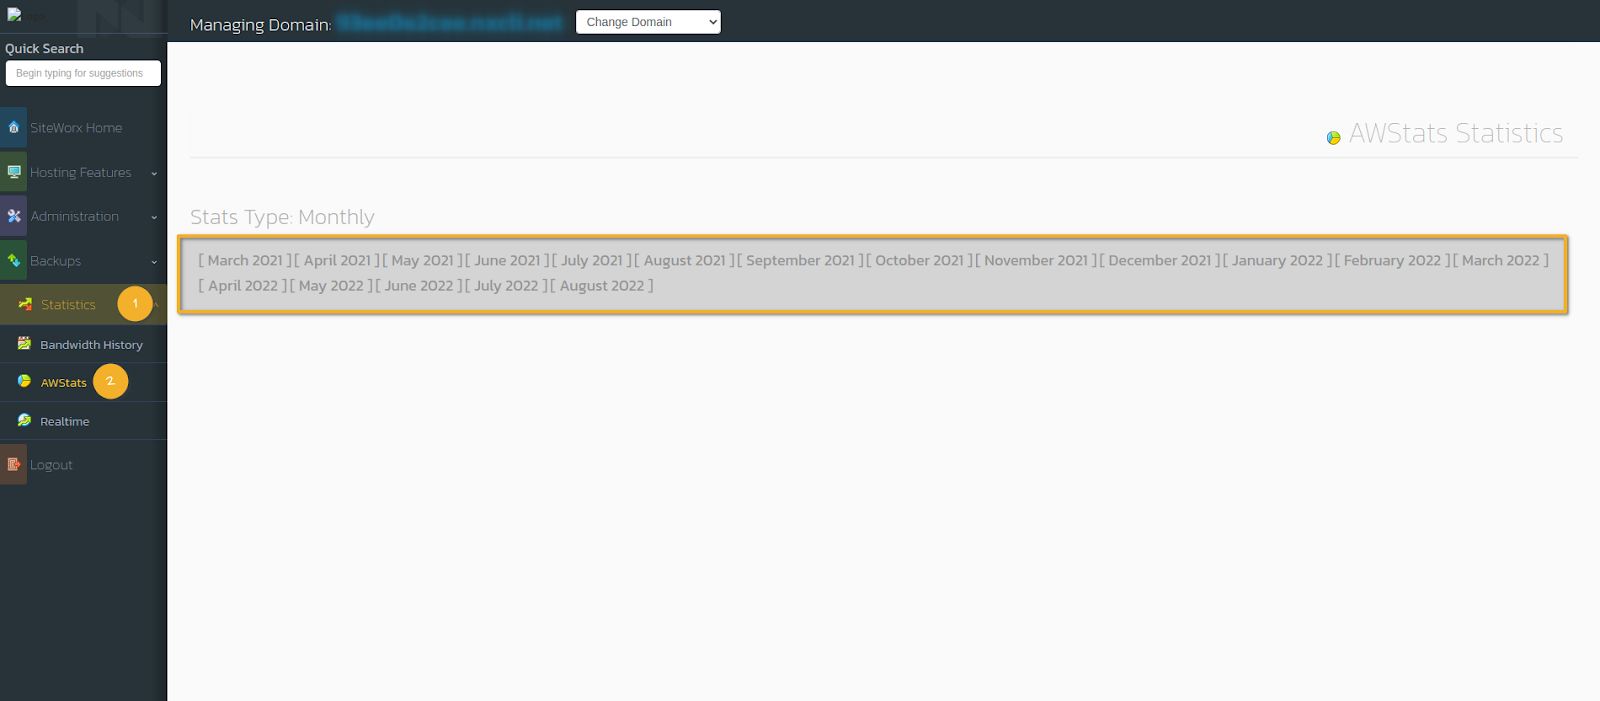
2. Select the desired month and year to view the report for that month and year.
Real-time statistics
You can view real-time statistics to examine your website's upstream and downstream data usage trends for today, the past week, or the past 30 days. To view statistics, follow these steps:
1. From the SiteWorx main menu, click Statistics > Real-Time:
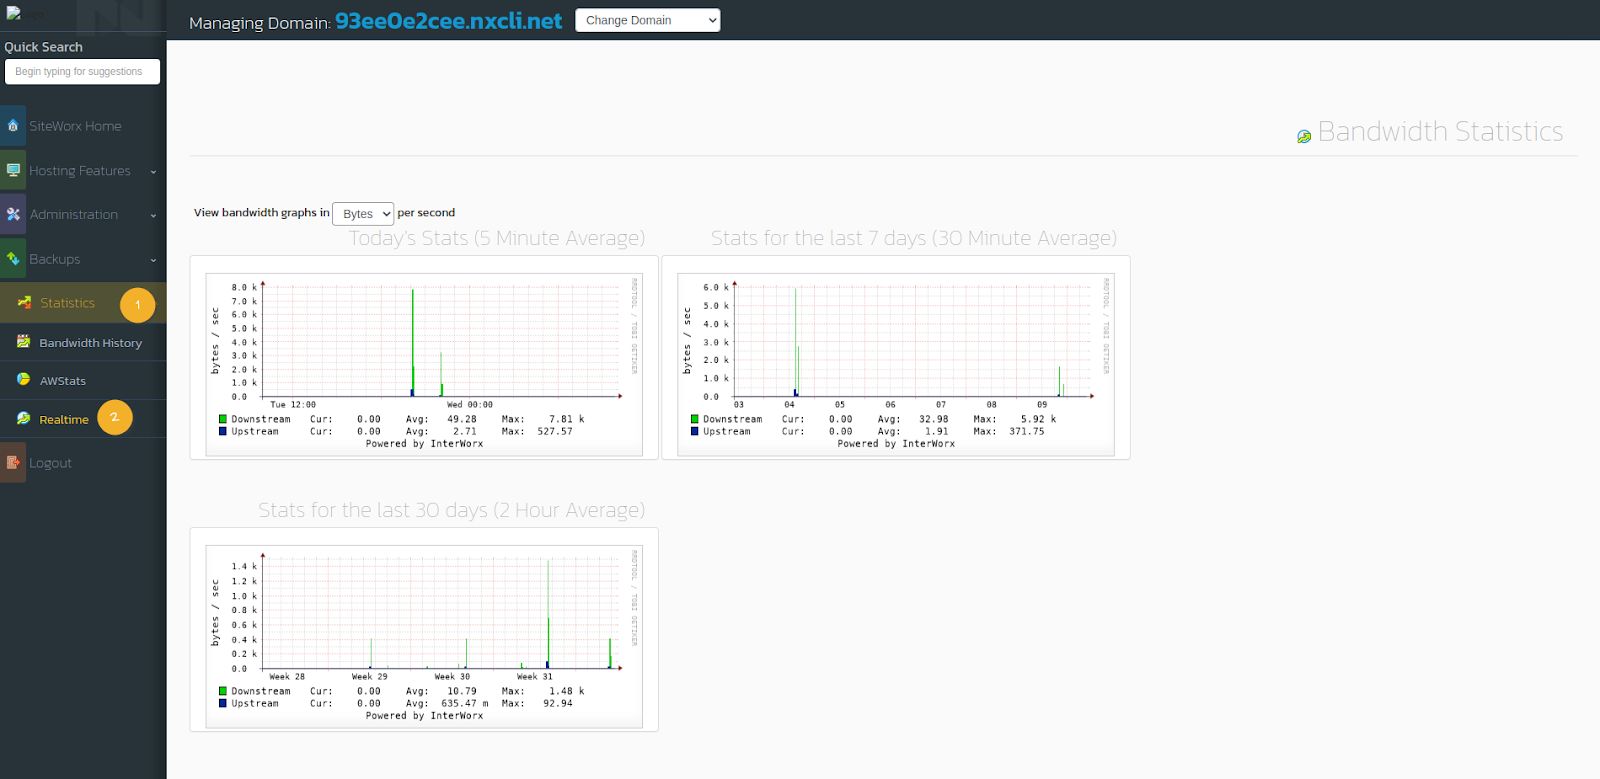
2. By default, the graph data is displayed in bytes. To view in bits, select Bits from the dropdown list.
Conclusion
We hope this article was helpful in providing everything you need to use the cloud-based version of the SiteWorx control panel. Its feature set puts all of the essential hosting management options right at your fingertips.
Partner with the pros at Nexcess
Out team of web hosting experts can help you find the right product or customized plan to get your website running with performance.


