


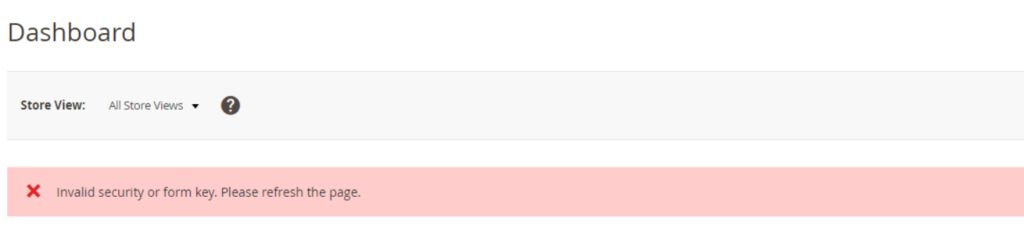
If you're a Magento 2 store owner, you may encounter the "Invalid form key. Please refresh the page." error when accessing or navigating within the admin panel. Let's learn a Magento 2 fix that can resolve this kind of error.
This issue has many underlying causes. What could have triggered the error, and how do you fix it? Read on to learn Magento 2 fixes for this error and the actions that triggered it.
Overview of Magento 2 troubleshooting
Suppose you experienced an "Invalid form key. Please refresh the page." error while accessing or working in the admin area. This condition means that your setup and configuration need to be corrected:

You will need to learn Magento 2 areas to investigate further. Some activities on Magento 2 websites that can cause this problem include:
- Creating or signing into an account.
- Performing a fresh install of Magento 2.
- Installing a new theme or extension.
- Using extension attributes to build products.
- Encountering errors in the custom module.
- Adding a product to the wishlist.
- Adding items to the cart on a localhost environment.
Reasons for the “Invalid form key. Please refresh the page” error in Magento 2
It’s essential to learn Magento 2 and why your website may get the “Invalid form Key. Please refresh the page” error. Here are some common reasons:
- Using an outdated Magento version or an old form for submission: Using an outdated version of Magento 2 translates to outdated JavaScript codes. If you don’t update it, your backend server can’t support the specific functions needed to keep your ecommerce website running smoothly.
- Incorrect PHP max_input_vars value: The server's default value of PHP max_input_vars is 1000, which is inadequate for Magento 2. This PHP variable prevents overloading your server and distributed denial-of-service (DDoS) attacks. However, you may need to change this value when working with and learning Magento 2.
- Magento 2 can’t recognize the Base URL on localhost: If you migrate your Magento 2 website to your localhost, the browser you’re using might not recognize the URL as a valid domain name. This situation can compromise your website’s cookies and sessions, causing the “invalid form key” error.
Solutions for the “Invalid form key. Please refresh the page” error in Magento 2
Here are some options for fixing this error as you learn Magento 2 better.
Solution #1: Tweak a Magento installation directory file
First, make a backup of <Magento installation directory>/vendor/magento/module-backend/App/Action/Plugin/Authentication.php.
Then, follow the steps below:
1a. Open the file.
1b. Disable the following entries:
$requestParts = explode('/', trim($request->getRequestUri(), '/'), 3);
$baseUrlPath = trim(parse_url($this->backendUrl->getBaseUrl(), PHP_URL_PATH), '/');
$routeIndex = empty($baseUrlPath) ? 0 : 1;
$requestUri = $this->_url->getUrl($requestParts[$routeIndex]);
1c. Add the following entry:
$requestUri = $this->_url->getUrl($this->_url->getStartupPageUrl());1d. Here’s the output:
      // Checks, whether secret key is required for admin access or request uri is explicitly set
        if ($this->_url->useSecretKey()) {
#            $requestParts = explode('/', trim($request->getRequestUri(), '/'), 3);
#            $baseUrlPath = trim(parse_url($this->backendUrl->getBaseUrl(), PHP_URL_PATH), '/');
#            $routeIndex = empty($baseUrlPath) ? 0 : 1;
#            $requestUri = $this->_url->getUrl($requestParts[$routeIndex]);
            $requestUri = $this->_url->getUrl($this->_url->getStartupPageUrl());
        } elseif ($request) {
            $requestUri = $request->getRequestUri();
        }

        if (!$requestUri) {
            return false;
Solution #2: Increase the value of max_input_vars
Increasing the max_input_vars limitation is often enough to resolve the error. You can increase the value in the php.ini, .htaccess, or .user.ini file.
For the php.ini or .user.ini file, use the following code to increase the max_input_vars value:
max_input_vars = 10000
For the .htaccess file, use this code:
php_value max_input_vars 10000
Please note that websites for Nexcess Magento 2 customers already have a very high max_input_vars value of 16384. So, you won’t need to change the value.
Solution #3: Change your Magento 2 Base URL
You can change your Magento 2 Base URL via phpMyAdmin or the command line. To change it via phpMyAdmin, follow the steps below:
3a. Go to phpMyAdmin.
3b. Find the core_config_data table in your database.
3c. Change the web/unsecure/base_url value to http://127.0.0.1.
If your Magento 2 website runs on HTTPS, you must change the value to https://127.0.0.1:


3d. To save the changes, click the Go button.
3e. To use the command line to change the Base URL, use this command:
php bin/magento setup:store-config:set --base-url="http://127.0.0.1:8080/3f. However, if you have an HTTPS website, use this command instead:
php bin/magento setup:store-config:set --base-url="https://127.0.0.1:8080/3g. If you face this error on the hosted server, you can replace the Base URL with your domain name via the Magento Admin Panel, phpMyAdmin, or command line. Here’s the command line code:
bin/magento setup:store-config:set --base-url="http://your-domain-name.com"
bin/magento setup:store-config:set --base-url-secure="https://your-domain-name.com"
3h. To learn more about updating Base URLs, refer to our Learn Magento 2 checklist for going live.
3i. Once you update the Base URLs, you must clear your Magento cache. Run the following command:
php bin/magento cache:flush3j. You’ll also need to remove the Magento 2 cache folder by running this command from your Magento root directory:
rm -rf var/cache var/generation var/page_cacheSolution #4: Upgrade Magento or improve Magento speed
Moving to the newest version of Magento 2 and improving your website speed and performance will help you load JavaScript quickly.
Learn Magento 2 how to improve the speed of your Magento 2 store to create a more efficient and stable environment for executing JavaScript functions, which helps fix errors related to form key validation. You can consider this step a Magento maintenance procedure to ensure your ecommerce store will always load fast and run smoothly.
If you’re still facing this error after upgrading to the latest version of Magento 2, you’ll need to ask your developer for help. To make the add to cart button available only after all scripts have loaded, they must modify the template for that button.
Best practices for Magento 2 customers
Going live with your Magento 2 store is an exciting first phase. To engage visitors for an extended time, increase conversion rates, and boost sales and revenue, it’s a good idea to learn Magento 2 best practices.
Your online store's ability to attract more clients and generate the necessary revenue depends heavily on how quickly your website loads. Here are some ways that while learning Magento 2, customers can improve their website performance.
Best Practice #1: Set indexer mode to Update on Schedule
An indexer is an essential process to ensure your ecommerce shop’s data — including products, prices, and categories — is continually updated (or re-indexed).
As a Magento 2 store owner, you can run an indexer in two ways:
1. Update on Save mode
2. Update on Schedule mode
By default, your Magento 2 store’s indexer runs on Update on Save mode, which means your store’s data is updated every time you make changes in the admin panel.
That said, we recommend setting your indexer on Update on Schedule mode because it updates your index tables through a cron job, meaning you can schedule database updates at convenient times instead of making updates on the fly.
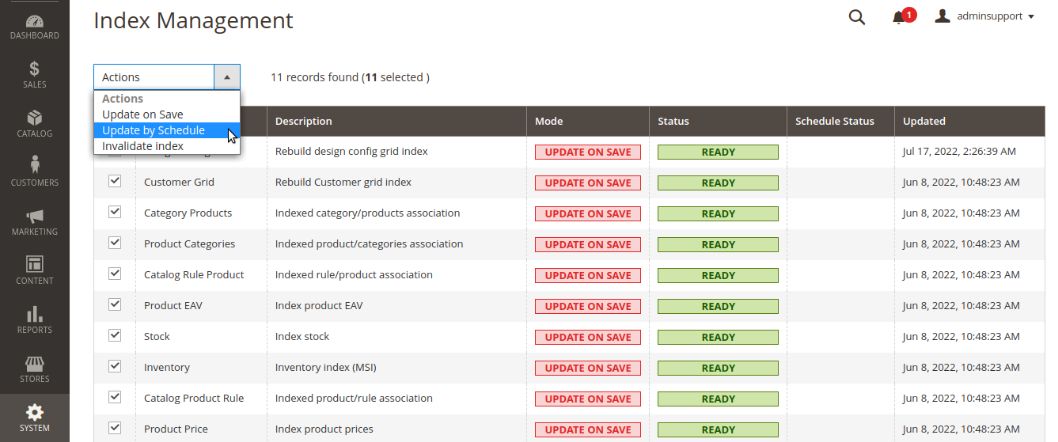
You can change the mode of indexers from your Magento Admin Panel by following the steps below:
1a. Go to System.
1b. Click on Index Management under Tools.
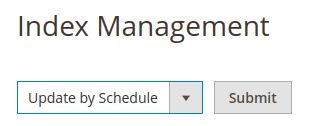
1c. Select all indexers and choose Update by Schedule:

1d. Submit your changes via the Submit button:

1f. Here’s the output:


Best Practice #2: Enable Magento cache
Data is accessed frequently and kept in a system called a cache. This mechanism allows website content to load more quickly. We strongly recommend activating all the cache types in your production server.
You can enable the Magento cache from your admin panel by following the steps below:
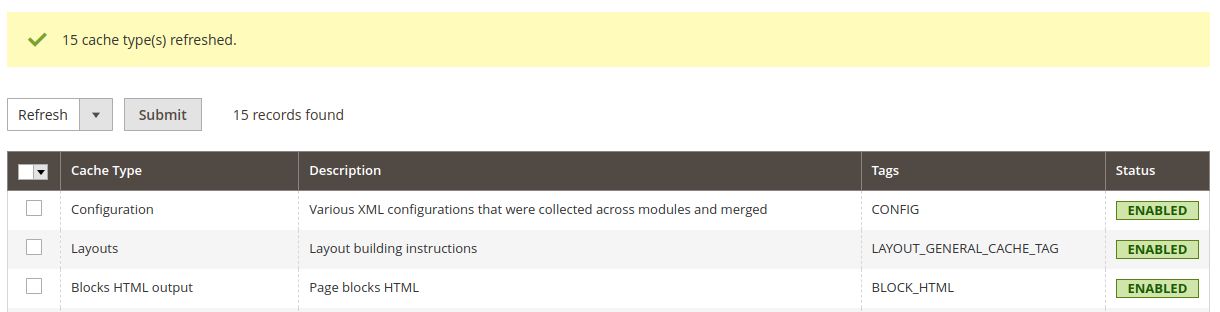
2a. Go to System and click on Cache Management under Tools.
2b. Select All Cache Types or the types you want to enable. Then choose Refresh and submit your changes using the Submit button:


2c. Here’s the output:

Best Practice #3: Enable Varnish cache
The Varnish cache is the most suggested method for increasing your website's speed. This system is the proxy server, acting as the layer before the server. When visitors access your website, the cache delivers the request rather than sending it to Magento.
Following the steps below, you can configure Magento 2 to use the Varnish cache from your Magento Admin Panel:
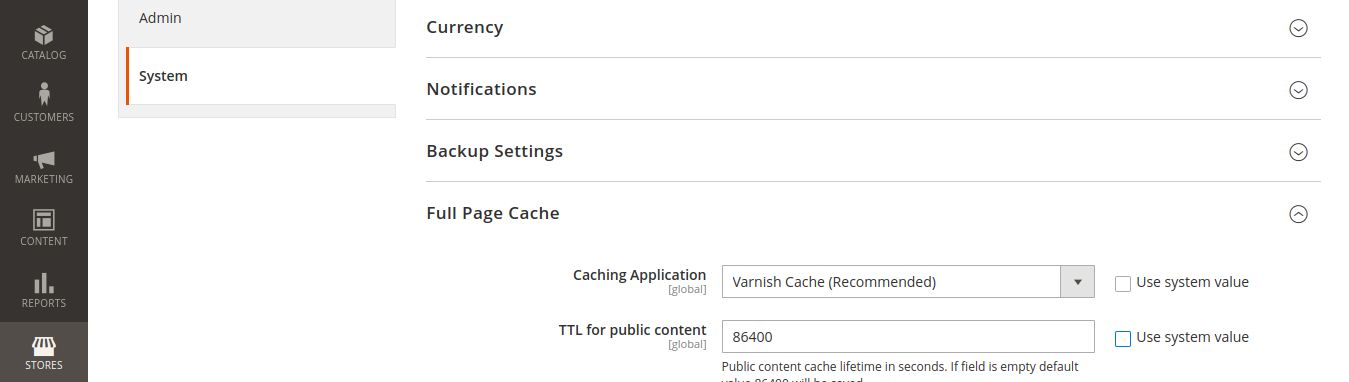
3a. Go to Stores > Configuration > Advanced > System > and select Full page cache.
3b. From the Caching application dropdown, choose Varnish cache.
3c. Enter the Time-to-Live (TTL) value for public content. The default value is 86400 seconds (24 hours — one day):

3d. Click on Varnish configuration and enter your details:

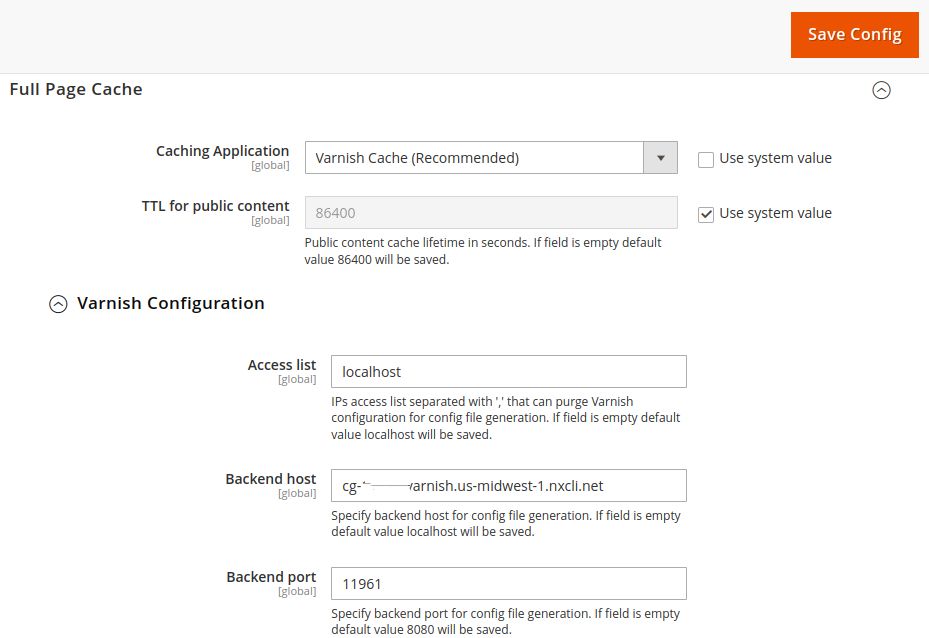
3e. Save to reflect the changes.
You can also enable Varnish for your Magento 2 websites from your Nexcess Client Portal.
Best Practice #4: Enable Redis
When you use Redis in your Magento 2 website, it stores data in the server's RAM for better performance. Redis is high-speed in-memory storage that facilitates the transfer of frequently used content from disk to RAM.
As such, your website doesn’t have to perform a full scan of the relevant cache files every time a user interacts with or requests data from your online store. The result? Improved response times and an enhanced user experience.
If you have a Magento hosting plan with Nexcess, you can find your Redis details in your Nexcess Client Portal under the Credentials section of the website that you’re configuring. To know more about how to enable and configure Redis for your Magento 2 websites, you can refer to our documentation How to configure Redis for Magento 2 help article.
Best Practice #5: Advanced JavaScript bundling
As your Magento 2 store gets more online visits, you want to make sure your server can keep up with incoming server requests. One effective way to ensure your website can handle the strain is to use advanced JavaScript bundling.
As the term implies, JavaScript bundling enables you to “bundle” your ecommerce store’s similar pages into a corresponding page type. This enhancement helps reduce the number of server requests required to fetch individual scripts, which can improve the loading speed of your Magento 2 store.
Merging and bundling are features that Magento offers to reduce server requests. You can enable these options from your Magento Admin Panel by following the below steps:
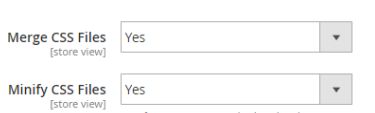
5a. Go to Stores > Settings > Configuration > Advanced and select Developer.
5b. Click on JavaScript settings and switch both dropdowns to Yes values:


5c. Save the configuration and flush the Magento cache.
5d. From the command line, you can turn on Magento 2’s built-in bundling with this code:
php -f bin/magento config:set dev/js/enable_js_bundling 1.5e. This command helps you combine all assets in the system and distribute them among the same-sized bundles.
5f. You also can use the command line to turn on Magento 2’s built-in merging. Using this code will merge all synchronous JavaScript files:
php -f bin/magento config:set dev/js/merge_files 15g. Magento generates a single JavaScript file if you enable both bundling and merging. Magento only combines RequireJS and its configuration if bundling isn't enabled. However, because Magento uses RequireJS, using merging but not enabling bundling is ineffective.
Best Practice #6: Enable asynchronous order data processing
There may be situations when Magento 2 is processing orders quickly while your storefront is experiencing intense sales. To prevent conflicts between read and write operations in the respective tables, you can configure Magento 2 to distinguish between these two traffic patterns at the database level.
Order data can be stored and indexed asynchronously. Orders are moved in bulk to the order management grid without conflict and then temporarily stored.
You can enable asynchronous order data processing from your Magento Admin Panel by following the steps below:
6a. Go to Stores > Settings > Configuration.
6b. Then, go to Advanced > Developer > Grid Settings.
6c. Enable Asynchronous Indexing:


Best Practice #7: Minifying HTML, JavaScript, and CSS
Using minified code allows your website to render considerably more quickly. It can improve your site's performance and your Google PageSpeed Insights Score.
You can enable minified HTML and JavaScript files from your Magento Admin Panel by following these steps:
7a. Navigate back to Developer.
7b. Set Minify HTML to a Yes value:


7c. Set Minify JavaScript files to a Yes value:


7d. While you’re in the Developer section, you also can enable the CSS merging and minifying by setting Merge CSS Files and Minify CSS Files to Yes values:

7e. Once everything is finished, save the configuration and flush the Magento cache.
Regain control by fixing the “Invalid form key. Please refresh the page.” error in Magento 2
You can learn Magento 2 better and eliminate the "Invalid form key. Please refresh the page" error by following the solutions mentioned in the article. By identifying what triggered the error and implementing a solution, you can get your Magento 2 website up and running again in no time.
Get your online store going with the power of Magento 2
Spin up instantly with free features like SSLs, an advanced Magento stack, RAM burst capacity, PCI compliance, SSH access, extensive support for M1 and M2, and more.
You can contact our experts if you still face difficulties fixing this error or need help picking a suitable Magento 2 hosting plan. Also, if you need a comprehensive resource to help you learn Magento 2 quickly, check out our Magento 2 FAQ article.


