Pointer or parked domains have been gaining popularity as a way of using multiple domain names to display the content of your website.
In this article, we will review how pointer domains work and how to add them for your website using the Nexcess Client Portal in the Nexcess Cloud.
What is a pointer domain?
A pointer domain is often called parked domain — essentially just an alias for the primary domain name that presents visitors with the same content. It allows for more flexibility and ensures your website can be loaded by typing more than just one domain name in the browser.
Pointer domains have been there for long enough to become widely used. Most businesses use pointer domains to present their visitors with more options to find them online while redirecting traffic to the main website. For example, you will be taken to the official Nexcess website by typing both Nexcess.com and Nexcess.net in your browser, but the .com domain name will redirect you to the .net version, the primary Nexcess domain name.
How to use pointer domains
Pointer domains can be used when you would like visitors to be able to open your website using different domain names. There is no limit to the number of aliases to the primary domain and no rules for choosing the pointer domain name.
When registering a domain name, remember that — for example — your-business.com, your-business.net, the same domain with the .org, or any other domain extension are all different domain names that need to be purchased and registered separately. The same domain name but using a different extension can even be potentially used by another online business, although the legal side of it will need to be taken into consideration. Many businesses associate their website with a few domain names using different extensions to ensure nobody else can use their second-level domain.
What to know when using pointer domains
The two crucial things to keep in mind when using pointer domains are:
- Pointer domain registration
- the Domain Name System (DNS)
It may seem like a pointer domain name is simply an alias and not a separate domain with the only difference is that it loads the exact same content as the primary domain name. However, these two points below are important to understand.
1. Pointer domain registration
Pointer domains need to be registered the same way you registered the primary domain name, which means there will be all the same registration fees and domain renewal rules and procedures. Although, you can register a pointer domain with another domain registrar; it does not necessarily need to be the primary domain’s registrar.
2. Domain Name System (DNS)
The Domain Name System (DNS) plays a key role in the pointer domain setup. After a new domain has been registered, adding Nexcess nameservers as the authoritative will allow you to manage DNS from here. As a pointer domain is an alias to the primary domain name and is designed to load the same content, it needs to resolve to the same server.
How to add a pointer domain in the Nexcess Cloud
Nexcess Client Portal is where you administer your cloud hosting plans and individual websites. You can easily change the primary domain name in Nexcess Cloud and add pointer domains.
Adding a new pointer domain to one of the existing websites can be done in three simple steps:
- First, log in to your Nexcess Client Portal and choose a plan.
- Open the website’s domains interface.
- Add a pointer domain.
Step 1. Choose the plan after logging in to the Nexcess Client Portal
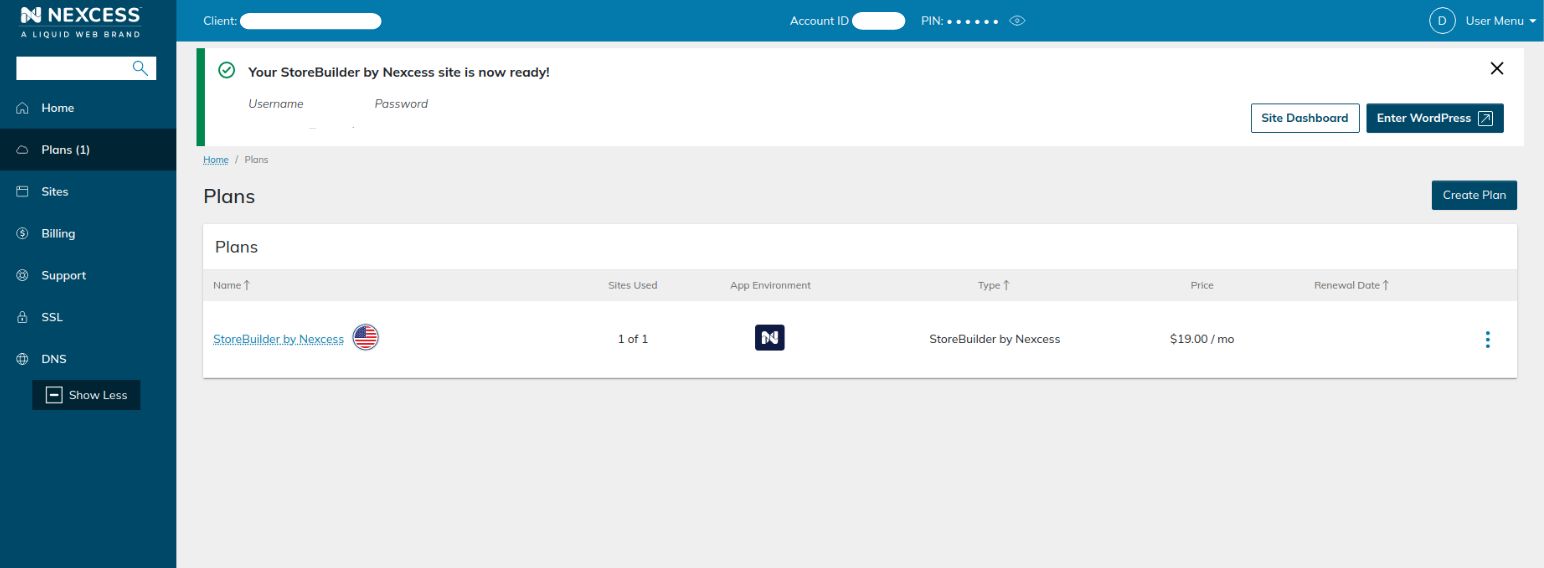
Log in to the admin portal and open the managed hosting plan you wish to work with. From the main menu after using the Plans option, you can find the WordPress, WooCommerce, or Magento portal and dashboard. Click the name of the plan that you want to work with:

Step 2. Open the website’s domain interface
Choose the website for which you need to add a pointer domain from your hosting plan sites menu and the click the domain name. You will arrive at the Credentials page:

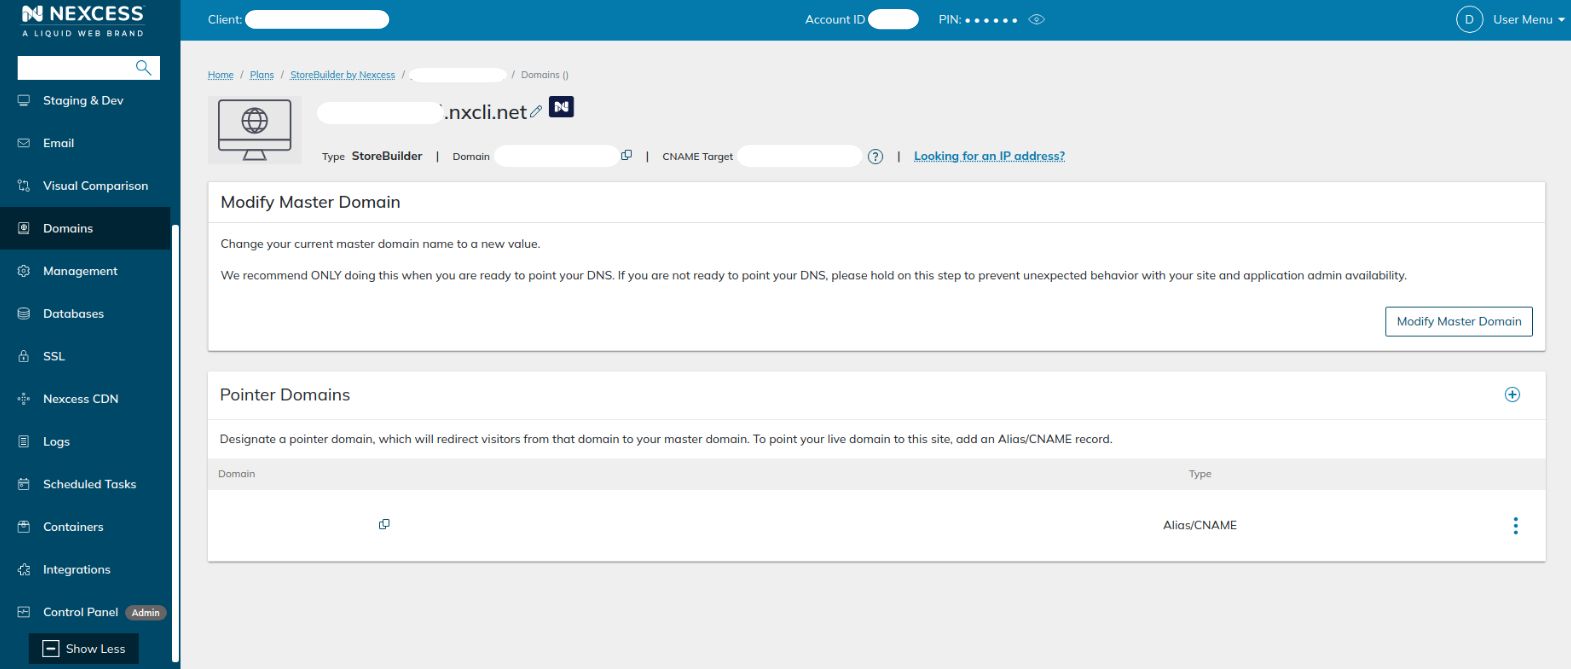
You can modify the primary domain name or add a pointer domain from the domains area of the user interface in the Nexcess Client Portal, which you can choose from the menu on the left side of the screen. This menu area will not show you all website management options so you must click the Show More button to view them all. Then, select the Domains menu option:

The Pointer Domains area in the screenshot shown allows you to add and remove pointer domains:

Step 3. Add a pointer domain
Click the Plus button on the right side of the interface to add a new pointer domain:

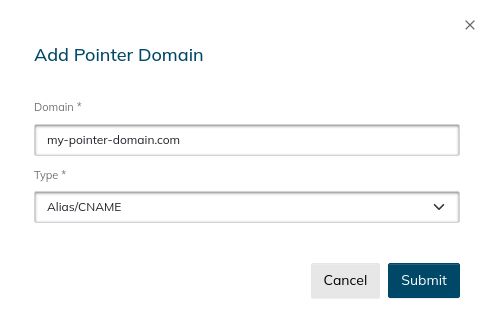
A new Add Pointer Domain window will open, allowing you to enter the new pointer domain name. The Type field for the pointer domain should be set to the value of Alias/CNAME, which is the only option available:

Click the Submit button, and the new pointer domain will be added to your website. You can delete an existing parked domain by clicking the three dots on the right and choosing Delete:

Step 4. Test the new pointer domain
Once you have added a new pointer domain, it is time to test it. First, open the new alias URL in the browser to ensure it loads the website content you added the pointer domain to. You should allow some time for Domain Name System (DNS) propagation which can take up to 48 hours. If the new pointer domain does not load the right content or throws some error messages, you may need to double-check whether everything has been set up correctly.
Wrapping up the topic of pointer domains
Pointer domains can help you drive traffic to your website using a few different domain names to load its content. Most online businesses use the same second-level domain with a different extension as a pointer domain, but there are no strict rules when choosing a new domain for this purpose.
You can add pointer domains to your websites from the domains area in your Nexcess Client Portal. Please make ensure a new domain name is purchased and registered before using it as an alias.
Our 30-day money-back guarantee
If you have questions about your plan, or technical issues, contact our expert support team 24/7/365 for fast resolutions. But if you’re not fully satisfied with your hosting products, we offer a no-hassle 100% money-back guarantee for the first 30 days of your investment. After the first 30 days, your service shall continue on a monthly or annual basis subject to the Nexcess terms of service.
Nexcess has opened a new page in the history of fully managed hosting by making it easy and headache free. Our hosting solutions have been optimized for the WordPress, WooCommerce, and Magento content and ecommerce platforms. Indeed, our hosting plans provide you with everything you need to manage your website and attract more visitors to it.
In addition, our scaling options make it possible to utilize more hosting resources without migrating your website as your business grows. Consider hosting your website with Nexcess by evaluating our Managed Hosting Plans.
Note about the original publication date
This article was originally published in September 2019. It has since been updated for accuracy and comprehensiveness.
Related articles
- Benefits of using Nexcess global DNS records
- How to edit or add a CNAME DNS record to go live with your site
- How to point your domain name to Nexcess DNS services


