

The website migration process can be complicated and time-consuming, especially if you have no experience dealing with servers and the command line interface.
While most hosting companies provide migration services, you cannot control the process, and ensure everything is moved over to the new server correctly. You may also notice that your website is not working as expected after the migration, and it's hard to understand what exactly went wrong.
You are the one who knows how your website is built, so knowing how to perform a WordPress migration manually can save you time and money. So, let's review the process of moving a WordPress site to a new server in a comprehensive, step-by-step manner.
Overview of moving a WordPress site to a new server
Moving a WordPress site to another server is pretty straightforward and does not require much time and effort, but it has important nuances. In short, migration means taking a backup of your WordPress website and then restoring it manually on another server. The only difference between the processes of restoration and migration is that you may need to set up the necessary infrastructure on the destination box first before you can get your website correctly imported there. We will review the whole process to ensure that no issues arise after your WordPress website has been migrated.
WordPress migration steps
The process of moving a WordPress website to a new web server consists of seven main steps:
- Taking a backup of the website on the source server.
- Preparing the infrastructure on the new server.
- Importing a backup to the destination server.
- Restoring from a backup.
- Changing the website configuration to adjust to the new hosting environment.
- Testing the website on the new server.
- Pointing DNS to the destination server.
The fifth step may be the most important, as just restoring the backup you took does not always lead you to success. Due to the changes in the hosting environment, including the web server and database management system configuration, you can run into technical issues of different kinds. It's vital that you take all configuration details of the new server into consideration and strictly follow the steps outlined below.
Warning about the site downtime
Another significant thing to remember about any website migration is downtime, as it is inevitable in any case. When moving a WordPress site to a new server and pointing DNS records to it, your website may undergo some changes that will be lost once you switch to the new server. DNS propagation alone can take up to 48 hours, plus the migration process. Ideally, you would want to put your website into maintenance mode, but it will mean more downtime.
When an expert from a hosting company performs a migration, all data is actually copied to the new server twice. First, we transfer everything to the destination server and ask you to test whether your website works correctly from it. There is no downtime during the initial sync.
Then, after you have confirmed there are no issues with the website functionality on the new box, we perform the final sync — we transfer everything that has been changed on the website while it was still live on the old hardware to the new server, so no data is lost. After that, we update DNS for the website to resolve to the new server.
Ultimately, if you own a vast website that undergoes many changes daily, we strongly recommend you delegate the migration to the experts.
Step-by-Step: moving a WordPress site to a new server
Let's dive into moving a WordPress site to another server in just seven simple steps. They are lists in sequence in the sections that follow.
1. Taking a backup
The first thing we must do is take a backup of our WordPress website on the source server, both the website files and the database. We will use the WordPress Command Line Interface (WP-CLI) and the tar utility in this article.
WordPress database backup
To create WordPress database backup, we will be using the WP-CLI utility, so you will need to navigate to your WordPress website installation directory and be logged in as the account owner. Next, run the wp db export command choosing the name of the database backup. You can specify the directory you need to save the dump to. Here we will save it to our website’s document root directory to then include it in the archive with the website files:
[wordpress@host html]# wp db export db_backup.sql
Success: Exported to 'db_backup.sql'.
WordPress files backup
Navigate to the parent directory of your WordPress installation. It means we need to move one directory higher than the one where we keep our website files. Again, you need to be either logged in as root or the owner of your website account.
Create a tar.gz archive of your WordPress website, like shown below. The flags we are using are:
- c - create an archive
- z - compress using gzip
- v - verbose mode; you will be able to see a detailed output as the command is running
- f - specify the archive filename
Taking a backup:
[wordpress@host wordpresstest.com]# tar -czvf website_backup.tar.gz html

The backup we saved
-rw-r--r-- 1 wordpress wordpress 38339469 Apr 10 10:37 website_backup.tar.gz
Once the backup is saved, you will see it in the directory you ran the command from. Here we saved it to our website’s parent directory or the Linux user’s home directory. It will include the database backup as well as what we saved in the html folder.
2. Preparing the new server after analyzing the plan and setup requirements
When preparing for the move of a WordPress site to a new server, we first need to ensure an account for it is created there, including having a new blank database and a database user with all necessary permissions granted. The process is similar for all control panels and managed hosting dashboards.
With regard to these preparations, the type of hosting plan you have with Nexcess in terms of both the old site and new site need to be analyzed for this effort. Below are the kinds of details to access prior to setting up the new server:
- Managed WordPress and Managed WooCommerce plans do not have access to the SiteWorx control panel, while Flexible Cloud and dedicated Secure Isolated Platform (SIP) plans do have access to the SiteWorx control panel.
- WordPress and WooCommerce sites can be hosted on Flexible Cloud and SIP plans as well. Flexible Cloud plans do have the option to install WordPress/WooCommerce so that would be the same as new installation of a WordPress/WooCommerce site on our Managed WordPress/Managed WooCommerce plans plan, but without the Nexcess MAPPS MU plugin being present on it.
- In theory, a Nexcess customer could host an "unmanaged by Nexcess" WordPress/WooCommerce site on a Flexible Cloud or SIP plan with us, in which case the references to the SiteWorx control panel below would apply.
- Remember, any new installation site can be used to migrated into without having "to rename out."
- If migrating manually to a Managed WordPress or Managed WooCommerce plan at Nexcess, then you would not need to create a database since you can use the existing database that comes with the new installation site. So, there is no step to have to create a new database for the site migration.
For example, below we have created a new SiteWorx account (if it is to be used for a Flexible Cloud or SIP plan at Nexcess), a new database, and a database user with all permissions:

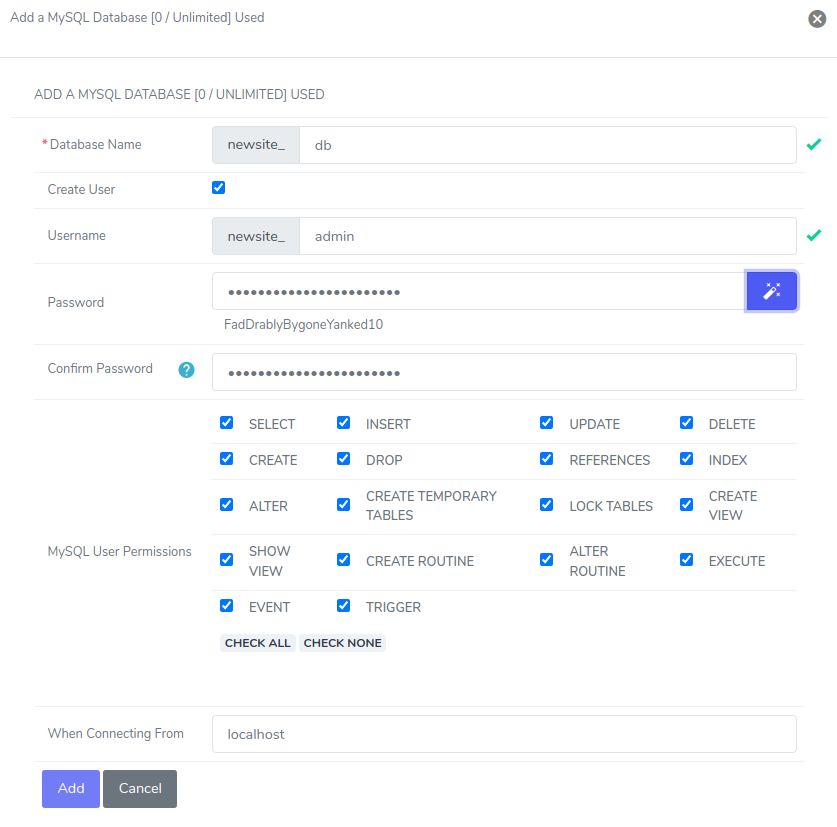
You may also need to tweak the configuration on the new server, including the chosen PHP handler, the webs server, and the database management system settings.
You can skip this step if we already have an account on the new server, for example, if you would like to migrate the staging version from the staging environment to the production server.
3. Importing a backup
We can always just download a backup from the source server to our local computer and upload it to the destination box, but a better solution would be to have it transferred to a new server directly. We can do that using the rsync utility. To successfully import the backup, we created to the new server, we need to be logged in via SSH as root or the new account owner on the destination box. We need to have either root or the old user account SSH credentials for rsync to make a connection to the source server and import the archive.
In the example below, we are transferring the website_backup.tar.gz archive we created in /var/www/wordpresstest.com to the /home/wpsite/ folder on the new server. We are connecting to the source server as root via SSH. Please note that our source server has a non-default SSH port of 2254. The default SSH port is 22, but server administrators tend to change it for security reasons:
[root@host public_html]# rsync -av -e "ssh -p 2254" --progress root@IP-Address-of-The-Source-Server-or-Its-Hostname:/var/www/wordpresstest.com/website_backup.tar.gz /home/wpsite/
root@oldserver's password:
receiving incremental file list
website_backup.tar.gz
     38,485,093 100%  104.27MB/s    0:00:00 (xfr#1, to-chk=0/1)

sent 43 bytes  received 38,494,588 bytes  8,554,362.44 bytes/sec
total size is 38,485,093  speedup is 1.00
The archive we downloaded will be owned by the user we were logged in to on the new server. In this case, we were logged in as root. So, if we keep working as root on the new server, we do not need to change the file’s ownership:
-rw-r--r-- 1 root root 38485093 Apr 10 10:45 website_backup.tar.gz4. Restoring from a backup
Now that we have imported the backup we took previously to the destination server, it's time to extract the files from the archive and import the database to restore the website.
WordPress files restoration
To decompress tar.gz archives, we can use either tar or gunzip commands. If our destination directory is empty, we can extract our files there directly. Here we created a new public_html_new directory to restore the site to it first:
-rw-r--r--   1 root   root   38485093 Apr 10 10:54 website_backup.tar.gz
drwxr-x---   4 wpsite nobody     4096 Apr 10 11:13 public_html
drwxr-xr-x   2 wpsite nobody     4096 Apr 10 11:20 public_html_new
Then we use tar to extract the files from the archive to public_html2. We are using the following flags:
- z - decompress using the gzip library
- x - extract an archive
- v - verbose mode
- f - specify the archive filename
The -- strip-components 1 element we added means we are extracting our website files to the new directory skipping the original folder we archived. If we do not use it, we will find the html directory we archived originally in the public_html_new folder:
[root@host wpsite]# tar -zxvf website_backup.tar.gz -C public_html_new --strip-components 1If we want to preserve the old content the account had, we can move the existing public_html folder, as shown below. Then we just move the newly extracted content to our website's document root directory:
[root@host wpsite]# mv public_html public_html_old
[root@host wpsite]# mv public_html_new public_html
Please note that if you are working from root, you will need to change the ownership of the files to your account user, which in our case it is the user wpsite.
WordPress database restoration
We saved our database backup to the archive, so now we will see it in the website’s document root directory. We can use WP-CLI to restore it. But before doing it, we need to modify our wp-config.php file to include the new database name and user credentials. We can edit the file from the File Manager interface or the command line using the preferred text editor or WP-CLI.
The wp config edit command launches the system editor and allows you to change the contents of the wp-config.php file. You will typically need to update DB_NAME, DB_USER, and DB_PASSWORD. You may also need to change the local hostname and the database table prefix:
[wpsite@host public_html]$ wp config edit

/** The name of the database for WordPress */
define( 'DB_NAME', 'wpsite_db' );

/** MySQL database username */
define( 'DB_USER', 'wpsite_admin );

/** MySQL database password */
define( 'DB_PASSWORD', '************' );

/** MySQL hostname */
define( 'DB_HOST', 'localhost' );

$table_prefix = 'wp367_';
After we have modified the wp-config.php file to reflect the new database information, we can import the backup we took. If you want to remove any existing data from the database first, use the wp db reset command:
[wpsite@host public_html]$ wp db reset
Are you sure you want to reset the 'wpsite_db' database? [y/n] y
Success: Database reset.

[wpsite@host public_html]$ wp db import db_backup.sql
Success: Imported from 'db_backup.sql'.
5. Making changes to the website configuration
Depending on our goals and the new hosting environment we migrated our website to, we may need to change the website or server configuration. For example, we may need to perform a search-replace step on the database if we migrated our WordPress website to use another domain name, reset permalinks, or change the database prefix.
WordPress wp search-replace command
You can perform a search-replace on the database using the wp search-replace command provided by WP-CLI. We recommend using --dry-run to preview the changes without saving them to the database:
[wpsite@host public_html]$ wp search-replace '://wordpresstest.com' '://wpsite.com' --all-tables --skip-columns=guid --skip-plugins --skip-themes --dry-run
+-------------------------------------------------+-----------------------+--------------+------+
| Table                                           | Column                | Replacements | Type |
+-------------------------------------------------+-----------------------+--------------+------+
| wp367_actionscheduler_actions                      | hook                  | 0            | SQL  |
| wp367_actionscheduler_actions                      | status                | 0            | SQL  |
| wp367_actionscheduler_actions                      | args                  | 0            | SQL  |
…
Success: 17 replacements to be made.
Once you have confirmed you would like to apply the changes, run the same command without the --dry-run option.
WordPress permalinks reset
We can reset the WordPress rewrite rules using the wp rewrite flush command provided by WP-CLI.
[wpsite@host public_html]$ wp rewrite flush
Success: Rewrite rules flushed.
WordPress cache purging
A situation may arise where you must flush the WordPress cache, especially if you are moving a website to replace an existing installation under another domain name. The WordPress Command Line Interface also allows us to flush the object cache using the wp cache flush command:
[wpsite@host public_html]$ wp cache flush
Success: The cache was flushed.
6. Testing the WordPress website
Testing is an integral part of the migration process that allows us to confirm that everything is working correctly after moving a WordPress site to a new server. We strongly recommend not skipping this step, as it's best to ensure your website works as intended before updating DNS. Using a hosts file is a great way to preview a website from the new server.
7. Changing DNS records
Updating records in your DNS zone is the final step in moving a WordPress site to a new server. Once everything looks perfect on the destination box, you can point your domain to the new IP address. Please note that DNS changes can take up to 48 hours to propagate fully, so we recommend making them during off-peak hours.
8. Cleaning up files used for the site move for security reasons
We would recommend including a final step when finished with a site migration for deleting the tar.gz backup file and the MySQL dump file. If you need to keep those files, we highly recommend moving them out of the public_html folder for security reasons. It is not a best practice to keep backup files in the public_html folder of the site server.
In fact, the least amount of time you keep backups in the public_html folder on your site, the better — for data exposure and security risk reasons. Ideally, you should pull down the backup file from any public access point as soon as possible and import it locally. If you do not remove the backup from the public_html folder on your site, you have made finding the list of users that exist in the WordPress site's database very easy for hackers to find.
Final thoughts on moving your WordPress site to a new server
The project of moving a WordPress website to a new server does not mean just taking a backup and restoring it on the destination box. Certain details need to be taken into account, including preparing the infrastructure and making the changes required to ensure your website works correctly in the new environment. In this article, we have reviewed the whole process in depth, so with a bit of practice, you should be able to manually migrate or clone your WordPress website.
Explore all WordPress server solutions
Liquid Web and Nexcess work together to provide a suite of WordPress hosting solutions for your requirements.
A critical thing to remember is downtime — as it is an unavoidable part of the migration process. Until the DNS records are updated, the website will continue to live on the old server and can undergo some changes before you switch to the new box. We strongly recommend using your hosting provider’s migration services if you are unsure whether you can migrate your website on your own.
Nexcess provides free migration services for all customers. You can be sure your data will be safely transferred and any port-migration issues will be addressed by the hosting experts.
If you would like to improve your technical skills or learn more about web hosting and system administration, the Nexcess Knowledge Base is a perfect source of information on WordPress and other content management systems. Our hosting experts are here to help you with all technical questions and teach you how to accomplish all seemingly complicated tasks. Our Managed WordPress Hosting Plans are optimized for the platform and ensure your hosting experience is convenient and enjoyable. Enhanced security, better performance, and the Nexcess 30-Day Money Back Guarantee — check out what we have to offer to start out today!
Recent articles
- WordPress email setup — changing sender name/address
- How to optimize Magento performance
- Adding a secondary domain in the Nexcess Client Portal


