How to preview and test your website after migration without waiting for DNS propagation, which can take several days.
If you have just registered a new domain name with Nexcess, or have transferred your existing domain to Nexcess, it can take up to 7 days for your domain information to fully propagate across the Internet. During this time, your website will be invisible on the Web.
Rather than wait for the propagation to complete, you can preview and test your website from our servers as though it were live by adding a line of text to your computer's hosts file.
This workaround is intended specifically for the website owner who needs to test and develop their website from the Web server while their domain is going through the propagation process.
But first...
- You must know the IP address associated with your domain. To identify it, see How to find the IP address of a website or server, or contact our support team.
Step 1: Edit the host file and test your website
Follow the method for your operating system:
Windows
- Locate the Notepad program using the method corresponding to your version of Windows:
- For Windows 7 and earlier, click Start >Accessories.For Windows 8 or 10, type Notepad into the Start menu.
- When the Notepad option appears, right-click on it and select Run as administrator.
- Confirm when prompted. If the confirmation request also prompts you to enter a password, enter the password and then click Continue or OK. If you do not know the password, contact your system administrator or refer to Windows Help for information on how to obtain a full administrator access token.
- Depending on your version of Windows, click Yes or Continue.
- In Notepad, click File > Open and browse to C:\Windows\System32\drivers\etc
- Select the \etc folder.
- In order to see the hosts file, change the file type from *.txt to *.*
- As shown below, click the File Type drop-down list located to the right of the File name field and select All Files (*.*). The hosts file should appear in the directory list.

- Double-click the hosts file and it will open in Notepad for editing.
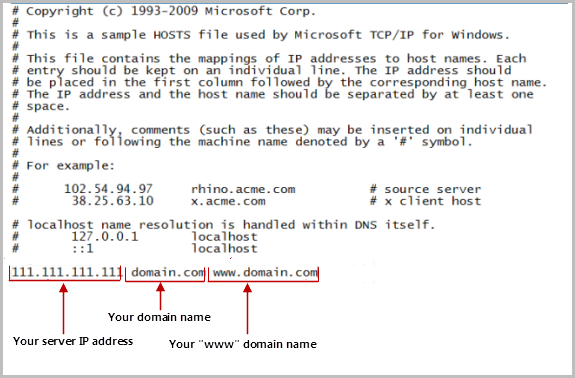
- Next, add a new mapping to the hosts file. Navigate to the end of the file, and then type the following information on the same line. Include a space between each.
- The server IP address provided by Nexcess Support. If you do not have the IP address, contact the Nexcess Support Team.
- Your domain name.
- Your domain name, preceded with www.

- Under File menu, click Save.
- Open the Windows command prompt. Choose the method corresponding to your version of Windows:
- In Windows 7 or earlier, Click Start, type command, and select Command Prompt in the search results listing.
- In Windows 8 or 10, type X and the Windowskey at the same time, then select Command Prompt.
- Flush the DNS cache by typing the following command with a space between ipconfig and /flushdns:
ipconfig /flushdns - Click Enter. The following message should display: "Successfully flushed the DNS Resolver Cache."

- To test your website's navigation and functionality, open your browser, enter your website's address, and explore your site. Proceed to the Stage 2: Disable the mapping when you are ready for your site to be live.
OS X
- Open the Terminal application by either typing Terminal on the Spotlight, or selecting Applications > Utilities > Terminal.
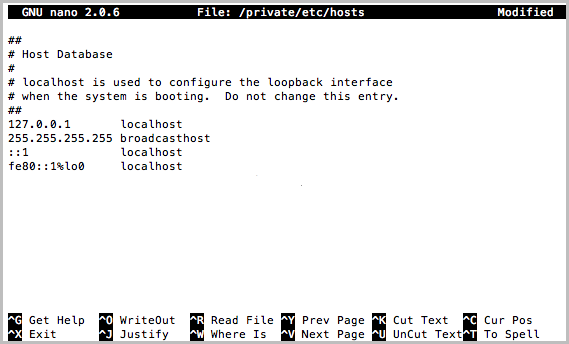
- In the Terminal, open the hosts file by typing the following command:
sudo nano /private/etc/hosts
- When prompted, type your user password. The hosts file contains some comments preceded with #, as well as some default hostname mappings.

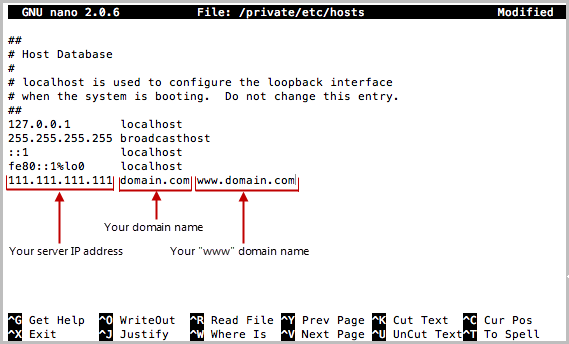
- Next, add a new mapping to the hosts file. Using your arrow keys, navigate to the end of the file, and then type the following information on the same line. Include a space between each.
- The server IP address provided by our support team. if you do not have the IP address, contact us at support@nexcess.net.
- Your domain name; for example, domain.com.
- Your domain name, preceded with www; for example, "www.domain.com"

- Save the hosts file by pressing Ctrl-O.
- When "File Name to Write" prompt appears, press Return.
- Exit by pressing Ctrl-X. Now that you have exited the editor, you should see the Terminal prompt again. For changes to take effect, you must flush your DNS cache. Since different versions of OS X use different commands, run the following and ignore any command not found output: sudo discoveryutil udnsflushcaches ; sudo dscacheutil -flushcache ; sudo killall -HUP mDNSResponder
- Exit the Terminal completely by pressing Cmd-Q.
- To test your website, open your browser and type the web address for your domain name. Proceed to the Step 2: Disable the mapping when you are ready for your site to be live.
Step 2: Disable the mapping
When you are ready for your website to be visible across the Internet and the domain is properly pointing to our nameservers, you must disable the temporary mapping that you added to the hosts file.
To do so:
- Under the section corresponding to your computer's operating system , follow the steps for opening the hosts file.
- Navigate to the line of text that you added, and either type # at the beginning of the line, or delete the line. Take care to delete only the text line for your mapping.
- Save the hosts file.
For 24-hour assistance any day of the year, contact our support team by email or through your Client Portal.


