

Caching stores data in your server memory for a while so that website users can access it faster. Caching can exponentially reduce website loading speeds, leading to a better user experience. This is a good thing!
However, if you’ve managed a WordPress or Magento 2 website before, you may have noticed a lag between when you change the content in the back end and when it shows up on your live website. Ever wonder why that is?
If changes take a while to apply across your website, this delay results from caching. Due to how caching is managed by the infrastructure, recent content changes are not immediately pushed out to all the web servers delivering your content — unless you empty the cache's stashed webpage assets, forcing those images, videos, and pages to be fetched freshly by the caching infrastructure.
Overview of the WordPress cache
Frequently accessed data can be stored in a temporary location, typically the memory or RAM, to improve the performance of your WordPress website and reduce repetitive data retrieval from your database. This is what caching involves.
Let’s say someone visits your website. Once the homepage loads, your website's content, images, and other data download from the server and is displayed on their browser.
If they navigate to a new page, the browser typically will have to download the same data again, which is redundant and slows down the page loading time. With caching, the user’s browser stores frequently accessed data in the cache on the user's computer.
Whenever the user loads a new page on your website, the browser instead retrieves the data from the stored cache rather than the database or the server. That often results in faster page load speeds.
Caching is a critical part of running a healthy WordPress website. It lets your website use far fewer server resources by serving a copy of a page rather than using PHP processes again to handle the content.
But what happens when you update your website with new content, plugins, or themes? If your website uses caching, any changes you make are first made in the database before they appear in the front end.
Because of this, cached content must be cleared for you to see these changes. Usually, when you make changes in the WordPress Admin area, that will clear the cache automatically. However, you sometimes need to flush the cache manually. That’s why in many circumstances, the first troubleshooting action you may take for your website is to clear your WordPress cache.
Now, let’s look at how to empty the cache in your WordPress website by area:
- Clearing your local web browser cache.
- Clearing your full page cache and other forms of combined caching.
- Clearing your CDN provider's edge cache and other forms of caching.
1. Clearing your local web browser cache
The first type of cache you can clear is the one in your browser. This action is usually pretty easy to do, but the process depends on your preferred browser. We’ll cover the Safari browser for Mac users and Mozilla Firefox, Microsoft Edge, Internet Explorer, and Google Chrome for Windows users.
For Safari browsers
The simplest way to go about clearing your Safari browser cache is to use a keyboard shortcut. Simultaneously press Option + Command + E.
You can also clear it manually:
- From the top-left menu bar on your browser, select Safari.
- Select Preferences.
- From the resulting pop-up, select the Privacy tab.
- Select the Manage website data option on the pop-up. Another pop-up will display, prompting you to delete all website data stored on your Mac.
- Click Remove now to complete the process.
For Chrome, Firefox, Edge, and Internet Explorer browsers
You may use the shortcut Ctrl + Shift + Delete to open up the cache-clearing command. Once you clear the cache, make sure to close and restart your browser to complete the changes you’ve just made.
2. Clearing your full page cache and other forms of combined caching
All of the caching methods can be used together on your site since each method is for a different type of caching.
It is recommended that you use Redis object caching, full page caching, minification (for example, as provided by Autoptimize for minification of CSS and JavaScript assets), and a CDN to improve the front-end load times of your site.
Clearing your full page cache using the built-in Nexcess caching functionality
Nexcess comes with a built-in full page caching solution. You can enable and configure it by going to Nexcess › Page Cache within the WordPress Admin Dashboard in you Nexcess Client Portal.
In a similar fashion, if you are using the Nexcess full page cache on your site, you can clear the full page cache by going to the admin bar and clicking the Clear Site Cache button.
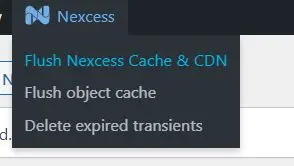
Alternatively, from within the Nexcess Client Portal, the Nexcess cache can be cleared from the admin bar by clicking the Nexcess logo and then clicking the Flush Nexcess Cache & CDN option.
About migrated WordPress websites that come over to Nexcess hosting with different full page caching plugins
For sites running another page caching plugin, when migrating to the Nexcess bundled caching solution, our platform looks for the following plugins. If found, our setup process in the website migration steps will not touch the .htaccess or advanced-cache.php files:
- WP Rocket
- WP Fastest Cache
- WP-Optimize
- WP Super Cache
- W3 Total Cache
- Hummingbird
- NitroPack
- Speed Booster Pack
- Comet Cache
- Breeze
If you’re running any of those plugins above, there’s nothing further you will need to do.
Should you choose to switch to the Nexcess built-in page caching solution, you may enable and configure it on Nexcess > Page Cache within your WordPress Admin Dashboard.
However, if you’re running another full page caching plugin that isn’t on that list (specifically if the WP_CACHE constant is set to true in your site’s wp-config.php file), you may need to deactivate the Nexcess full page cache. Then, you can turn your full page caching plugin off and back on.
Clearing your Redis object cache
You can clear your Redis object cache using your Secure Shell (SSH). Your hosting provider likely offers SSH access, so contact the support team if you don’t already have access.
First, log into your WordPress website via SSH. With Nexcess, credentials for SSH access via the command line are available. You can find them within your service plan’s or website's dashboard.
Next, go to your home directory. Typically, your website’s home directory is under HTML, so the path that is expected is:
/home/username/domainname/htmlThe final step is to run this command:
wp cache flush --allThat WP-CLI command will clear the object cache (Redis). It does not have anything to do with clearing any full page cache plugin on the site.
If you are using Redis object caching on your site, you can clear it from two other places. The first would be under the Nexcess logo in the admin bar. To use this method, simply click the Flush Object Cache option:

You can also clear it from the Redis Object Cache plugin settings in wp-admin:
Settings > Redis > Flush Cache
Clearing your full page cache using other WordPress plugins
Review which full page caching plugin you might be using on your site already. If found, confirm that it has been activated and enabled on the site. A list of different full page caching plugins was provided in the previous section. Access the plugin and use the command that allows you to “purge all” or “clear all” caches.
For example, when using the WP Rocket plugin on your site to clear the cache, go to:
Settings > WP Rocket > Clear Cache
Using the WP Rocket plugin clears the cached files along with the minified files.
3. Clearing your CDN provider's edge caching and other forms of caching
Let’s explore clearing your CDN provider's edge caching and other forms of caching that will need to be purged from time to time. These go with the browser caching and Redis object caching actions already documented in the previous sections.
Emptying the Nexcess CDN's cache
The Nexcess CDN can be cleared from the admin bar by clicking the Nexcess logo and then clicking the Flush Nexcess Cache & CDN option:
As well, if you are using the Nexcess CDN on your site, then you can purge the CDN directly using the Performance tab from you Site Dashboard in the portal.
Emptying the third party CDN provider's cache
If you are using a third party CDN provider on your sites, such as BunnyCDN or Cloudflare, then you can purge the cache from the plugin on your site. If using the Cloudflare plugin, then from wp-admin you can purge the cache from the following area:
Settings > Cloudflare > Purge Cache
If you are using the BunnyCDN plugin, then from wp-admin you can purge the cache from the following area:
Bunny.net > Clear Cache
Emptying a theme's cache
Other possible minification or performance optimization caching might be built into the active theme being used on your site. Themes to look for with performance optimization built-in would be Astra, Divi, and Avada. Refer to each theme's specific documentation.
Overview of the Magento 2 cache
Like in WordPress, Magento 2 caches help improve your website’s speed. With regard to the end user's browser cache, refer to the Clearing your web browser cache section above as this browser cache information would be the same regardless of your website being powered by WordPress or Magento 2.
When it comes to cache management within the platform itself, Magento 2 has multiple cache types. Here are some of the most critical:
- Block HTML output
- Collections data
- Compiled configuration
- Configuration
- Customer notification
- DDL
- Entity attribute value
- Integration API configuration
- Integration configuration
- Layout
- Page cache
- Reflection
- Translation
- Web services configuration
Since Magento 2 relies heavily on caching, it has a cache management interface in the Mageto Admin Panel. You can find all the information you need about cache status and usage from here. You can also enable, disable, or flush any cache type. Let’s explore how that works in the next sections.
1. Clearing the website cache using the Magento 2 cache management interface
Here’s how to empty the cache in Magento 2 with the cache management interface:
- Log in to your Magento 2 Administrator Panel.
- Access the cache management interface from the System option.
- Click on the Flush Magento Cache” button. You may also flush the cache by clicking the Flush Cache Storage button.
You must refresh the cache whenever you change your store so the changes display on the front end. The administrator panel will also remind you when to refresh the cache.
2. Clearing your Magento 2 website cache using Secure Shell (SSH)
You can also clear your Magento 2 cache using Secure Shell (SSH) commands. Here’s how to run them.
Using SSH, access the Magento root directory. To flush the cache storage, run the command:
php bin/magento cache:cleanA shorter version of the command is:
php bin/magento c:cRunning this command clears all cache types in Magento 2. It doesn’t affect non-Magento caches.
But you can also flush the cache storage, which affects all stored data. Here’s the command to run:
php bin/magento cache:flushHere is the shorter version of the command:
php bin/magento c:f3. Clearing your Magento 2 website cache using Redis
To use Redis to flush the cache, you first need to look at the connection details. You can find them in your Magento store’s configuration file. The Nexcess support team can help you locate this file.
You can quickly flush the cache using the Redis command line interface (redis-cli) with one of the commands below. Make sure to replace the brackets and the text inside of them with the correct information, which the support team will provide.
If one path doesn’t work, try the next one. The correct path will depend on several factors, including your server:
redis-cli -s /var/tmp/redis-multi_<customer_specific_name>_cache.sock flushallredis-cli -s /var/tmp/redis-multi_<customer_specific_name>_cache.sock flushall asyncredis-cli -s /var/tmp/redis-multi_<customer_specific_name>_cache.sock -n <db number> flushdbredis-cli -s /var/tmp/redis-multi_<customer_specific_name>_cache.sock -n <db number> flushdb asyncLearning how to empty the cache will display content changes to your website visitors much faster
Indeed, learning how to empty the cache for Magento 2 and WordPress websites can help you propagate changes across your website much faster than if you do not empty the cache. Good website admins are aware of this fact — and you should be too!
Powerful hosting for managed applications
Discover managed hosting for the industry’s top content and commerce platforms — premium hosting products for every project.
With WordPress, you can use SSH, caching plugins, or the built-in Nexcess caching functionality. The important thing is to be proactive when emptying the various forms of cache so that your website always loads optimally.
Magento 2 is slightly different. You can flush or clear the cache using the Magento 2 cache management interface. Perhaps this is the easiest way, but just like with WordPress, you can use SSH commands in Magento 2 as well. In addition, you can also use Redis commands.
Want to avoid the hassle of having to clear your cache all the time? Check out the managed hosting plans from Nexcess for WordPress and Magento. Let us handle the intricacies of your website while you focus on managing and growing your business.


