

All Magento online store owners desire to improve the security of their Magento store. Preventing access to your Magento Admin Panel is an easy and effective way to decrease security vulnerabilities. But how do you restrict access to the Magento Admin Panel, and why would you want to do this anyway?
This article will explain how to control and limit access to the Magento Admin Panel and secure your Magento store to keep it running smoothly.
How to access the Magento Admin Panel
You can access the Magento Admin Panel by following the steps below:
1. In your browser, enter the main URL for your website that was set during the Magento installation process, followed by the base URL used to access the Magento Admin Panel, which will be one of the two URLs described below (with pseudo code representing your domain name):
- The default admin URL used to access the Magento Admin Panel is https://www.yourdomain.com/admin.
- If using a custom admin URL, your Magento Admin Panel URL will look like https://www.yourdomain.com/<Admin Path>:

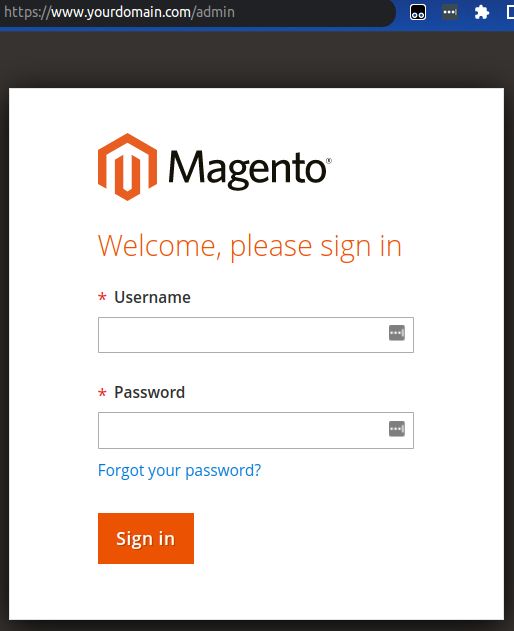
1. Enter your Magento admin username and password.
2. Click the Sign In button.
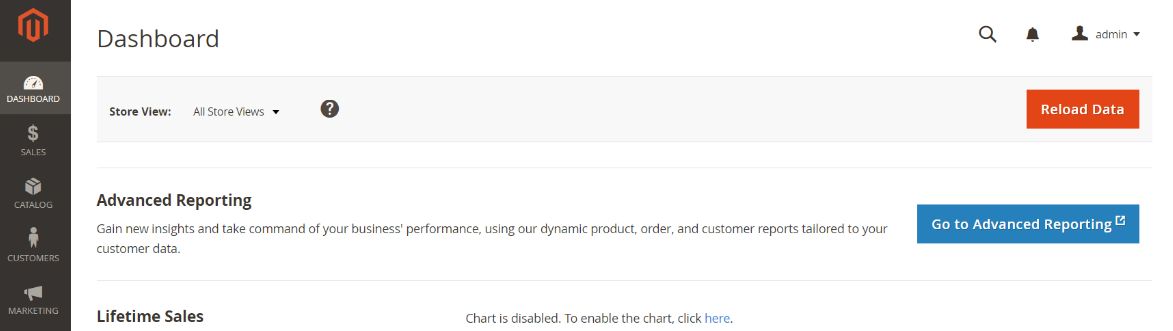
Here is what the Magento Admin Panel looks like:

Pretty easy, right? But maybe you still have questions or want to learn more. Then, we recommend taking a look at our short Magento 2 FAQ. It’ll take you through the essentials of getting your ecommerce platform up and running as soon as possible.
How to limit access to the Magento Admin Panel
One of the first things a Magento store owner should do to secure their admin panel is to modify the default admin URL used to access it.
The default admin URL is https://www.yourdomain.com/admin. However, because the Magento store's domain name is publicly visible, hackers can easily guess the store admin URL.
The default Magento store admin URL has two parts:
1. The store domain name.
2. The admin path.
The admin path is a portion of the admin URL that appears after the last slash of the default base URL, such as:
- https://www.yourdomain.com/admin
Changing the default admin URL improves Magento store security by forcing hackers to first determine the correct URL before beginning an attack.
Here are six ways to limit access to the Magento Admin Panel:
Method #1. Limit Magento Admin Panel access by configuring a custom admin path.
Method #2. Limit Magento Admin Panel access using details on the Security tab.
Method #3. Limit Magento Admin Panel access with the Restriction Mode.
Method #4. Limit Magento Admin Panel access with an IP address restriction.
Method #5. Limit Magento Admin Panel access with restrictive user roles.
Method #6. Limit Magento Admin Panel access with a Two-Factor Authorization (2FA) setup.
Method #1. Limit Magento Admin Panel access by configuring a custom admin path
You can change the Magento admin default URL by following the steps below.
1a. Open the <Magento_root_directory>/app/etc/env.php file and examine its contents.
Default admin path:
 'backend' => [
  'frontName' => 'admin'
 ],
1b. Change the value of the frontName parameter of the backend section.
New admin path:
 'backend' => [
     'frontName' => 'Mag_admin'
 ],
1c. Save the file and clear the Magento cache.
Method #2. Limit Magento Admin Panel access using details on the Security tab
You can improve your Magento Admin Panel protection using the Magento Security tab. With the options on this tab, the platform provides a variety of choices for managing admin security, including ways to change account passwords, limit the length of admin sessions, and restrict access from various devices.
Follow these steps to open the Magento Security tab and modify the details found on it:
2a. From your Magento Admin Panel, go to Stores > Settings > Configuration.
2b. Under the Advanced section, select the Admin option.
2c. Then, navigate to the Security section, found under the Admin area:

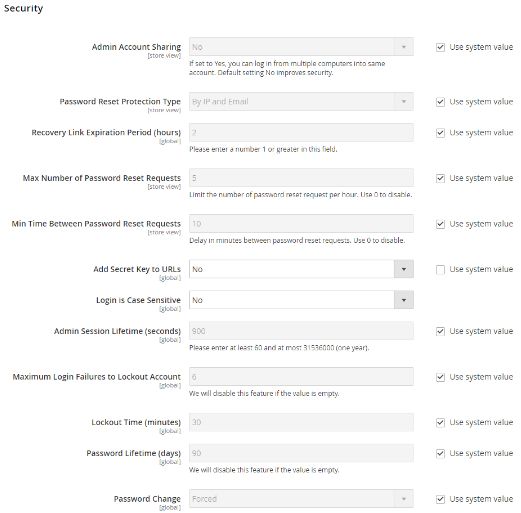
2d. Set the Admin Account Sharing field's value to No to stop anyone from using the same account to log in from many devices.
2e. Set the Password Reset Protection Type to one of the following options to specify password reset requests are handled:
- By IP and Email: After receiving a response from the notification issued to the inbox linked with the admin account, the password can be reset online.
- By IP: Resets are possible without further verification.
- By Email: Send a reply to the message sent to the admin account's associated inbox when a notification is received.
- None: Only you, as the admin. can reset the password.
2f. First, you need to set your login security options:
- Enter how long a password recovery link will be usable in the Recovery Link Expiration Period (hours).
- Enter the Max Number of Password Reset Requests to determine how often a password reset request can be submitted per hour.
- Enter the minimum amount of time (in minutes) that must elapse between password reset requests in the Min Time Between Password Reset Requests section.
- Set the Add Secret Key to URLs value to Yes to add a secret key as a security measure to the admin URL. This option is turned on by default.
- Set Login is Case Sensitive to Yes to demand that the uppercase and lowercase characters used in any login credentials entered match those that are saved in the system.
- Enter the session's duration in seconds in the Admin Session Lifetime (seconds) field to find out how long an admin session will last until it times out. The value must be at least 60 seconds.
- Enter how often a user can attempt to log in to the admin URL before the account gets locked in the Maximum Login Failures to Lockout Account area. Six login attempts is the default value for this field. For unlimited login attempts, leave the option blank.
- Enter for how many minutes an admin account will be locked after the allotted number of tries in the Lockout Time (minutes) field.
2g. Next, you’ll set your password options:
- Enter for how many days a password is valid in the Password Lifetime (days) area to restrict how long admin passwords can be used. Leave the field empty to grant an endless lifespan.
- Choose one of the following as the Password Change setting:
- Forced: Requires that admin users must change their passwords after the account setup is completed.
- Recommendation: Admin users are advised to reset their passwords after the account setup is completed,
- Once everything is added, click the Save Config button.
Method #3. Limit Magento Admin Panel access with the Restriction Mode
It is possible to restrict access to a private sale, event, or website to registered users who log in or to grant access to non-registered users who must first register.
To enable the Restriction Mode, you can follow the steps below:
3a. From your Magento Admin Panel, go to Stores > Settings > Configuration.
3b. Click on General > Click on the Website Restrictions section.
3c. Set Access Restriction to Yes.
3d. Set the Restriction Mode to Private Sales: Login Only or Private Sales: Login and Register.
3e. Set Startup Page to To login form (302 Found) or To landing page (302 Found).
3f. Choose one of the following as the Password Change setting:
- To login form (302 Found): Before gaining access to the site, users are sent to the login form.
- To landing page (302 Found): Until they log in, users are sent to the specified landing page.
3g. Select the Landing Page that will present before customers check in to the private sale site.
3h. Set HTTP Response to 200 OK to notify search engine bots and spiders that the landing page is correct and that there are no additional pages on the website to index.
3i. Enable Yes on Autocomplete on login/forgot password forms if you want the fields in the customer login and forgot password forms to be populated with information from previous entries automatically.
3j. Once everything is completed, click the Save Config button.
Method #4. Limit Magento Admin Panel access with an IP address restriction
Limiting the number of places from which the Magento Admin Panel can be accessed is an effective way to protect it from unauthorized access. Magento 2 provides capabilities for restricting access based on IP addresses. You can simply include the authorized IP addresses in an IP whitelist.
Option 4a. Restrict IP addresses in Apache
You can restrict IP addresses in Apache by adding the following code in your .htaccess file:
RewriteCond %{REQUEST_URI} ^/(index.php/)?admin(.*) [NC]
RewriteCond %{REMOTE_ADDR} !^xx\.xx\.xx\.xx
RewriteRule .* - [F,L]
If you are using a custom admin URL, you can use the following code to restrict the IP address:
RewriteCond %{REQUEST_URI} ^/(index.php/)?custom_admin(.*) [NC]
RewriteCond %{REMOTE_ADDR} !^xx\.xx\.xx\.xx
RewriteRule .* - [F,L]
Option 4b. Restrict IP addresses in NGINX
You can restrict IP addresses in NGINX by adding the following code in your nginx.conf file:
location ~* ^/(index\.php/admin|admin) {
    allow xx.xx.xx.xx;

    try_files $uri $uri/ /index.php?$args;
    location ~* \.php$ { try_files /dummy @proxy; }
    deny all;
}
If you are using a custom admin URL, you can use the following code to restrict the IP address:
location ~* ^/(index\.php/custom_admin|custom_admin) {
    allow xx.xx.xx.xx;

    try_files $uri $uri/ /index.php?$args;
    location ~* \.php$ { try_files /dummy @proxy; }
    deny all;
}
Replace xx.xx.xx.xx with your IP addresses and custom_admin with your custom admin URL.
Method #5. Limit Magento Admin Panel access with restrictive user roles
Magento 2 helps you to minimize the possibility of an attack if an unauthorized person gains access to the Magento Admin Panel.
Before adding any users to your Magento 2 store, you should perform the security procedure of creating Magento 2 user roles. It makes it easier for you to specify the level of access that specific users will be given to the various sections of the Magento Admin Panel.
Here’s how to set up a user role in Magento 2:
5a. From your Magento Admin Panel, go to System > Permissions > User Roles:


5b. You can find the list of current user roles, which you can edit:

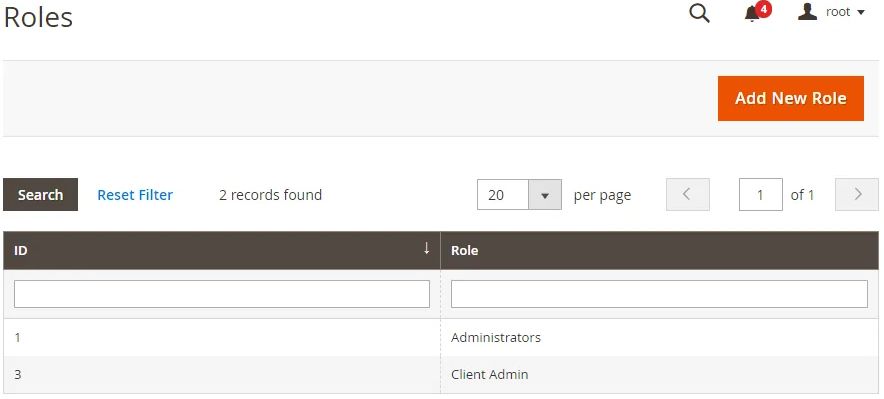
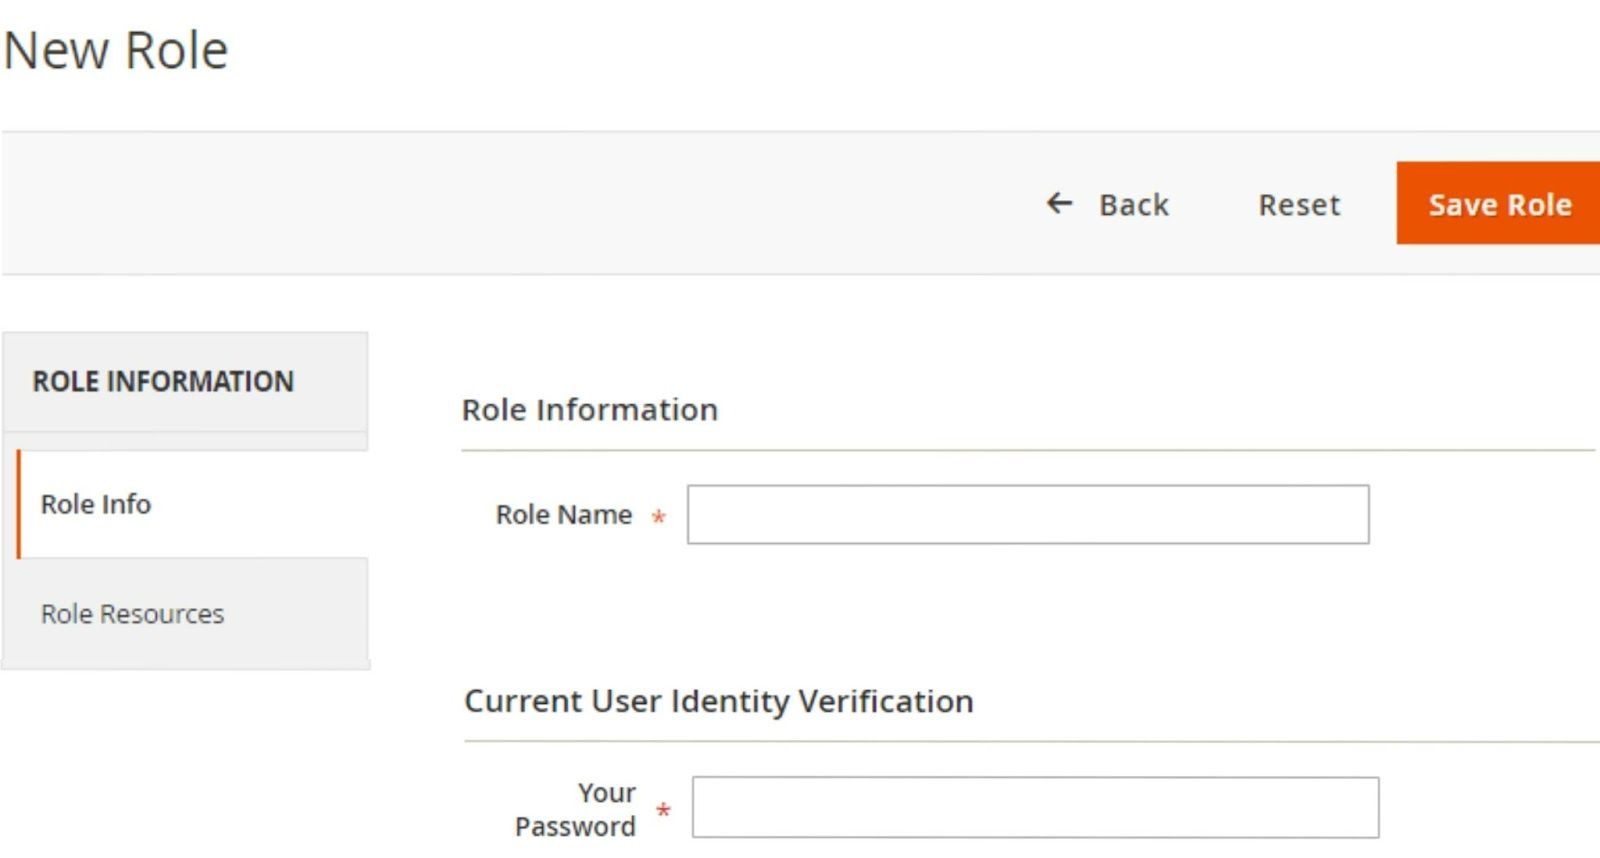
5c. Click on the Add New Role button to add a new user role. Then under the Role Information area, enter the name of the user role in the Role Name field. You will need to enter the current password of the user you are currently logged in as in the Your Password field to add this information in the system:

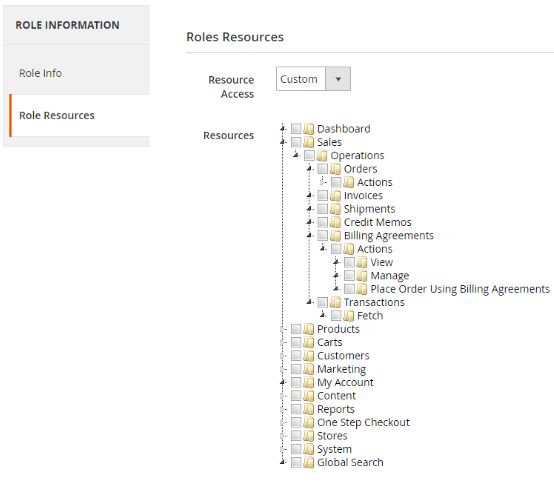
5d. Under the Role Resources tab, choose the resources that the admin user will have access to:
- If you want this user to have access to all of the admin panel's pages and features, select the All value in the Resource Access picklist.
- You can choose which interfaces you wish to grant access to by selecting Custom using the Resource Access picklist:

5e. Once everything has been completed, click the Save Role button:


Method #6. Limit Magento Admin Panel access with a Two-Factor Authorization (2FA)
One of the most effective defense strategies against unauthorized access is by configuring a Two-Factor Authorization (2FA) setup for your Magento Admin Panel.
In addition to the password, this method adds another security key that must be utilized. The presence of a second factor allows unauthorized access to be prevented even if a bad actor knows the password.
This key is typically a number or string retrieved via SMS or a special app like Google Authenticator, Authy, or Duo Security on an Android or iOS smartphone:
- Google Authenticator offers a single option for how long the one-time password (OTP) window should be displayed.
- An Integration key, Secret key, and API hostname are required by Duo Security. An API key is also required by Authy.
- You need a WebAPi Challenge Domain for U2F devices.
Store administrators can use the browser extensions of these 2FA apps if they own a smartphone that cannot run them. A store may also set up a 2FA USB device (U2F device), such as a YubiKey, which Magento supports.
To configure your required 2FA provider(s), follow the steps below:
6a. From your Magento Admin Panel, go to Stores > Settings > Configuration.
6b. Click on the Security tab and select 2FA.
6c. Under the General section, click on Provider(s) to use:

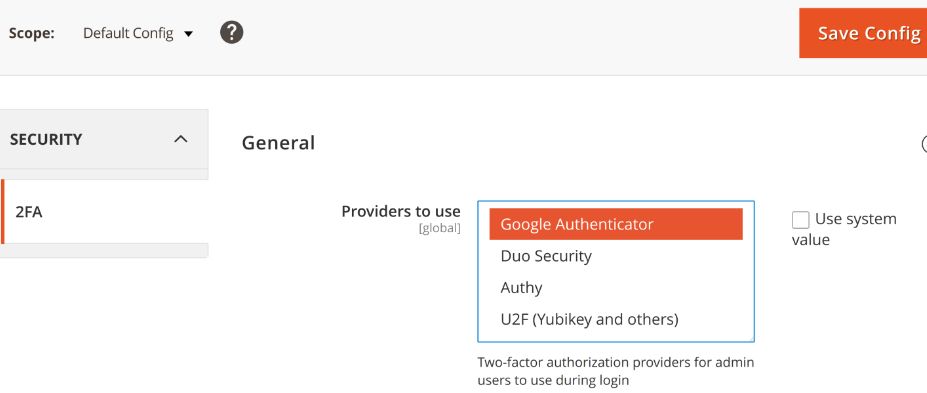
6d. Fill in the settings for each required 2FA method.
6e. Once everything has been completed, click the Save Config button.
6f. If required in the future for legitimate reasons, refer to the steps for disabling 2FA temporarily.
Protecting your Magento 2 online store from hackers is essential
Now that you’ve learned how and why to protect your Magento 2 store by restricting access to the control panel, you’re almost ready to hit publish. But before you do, you should check out our Magento 2 go-live checklist. It takes you through the essential steps you need to complete before your store can be fully operational.
Premium Magento hosting with decades of Magento experience
Feature-rich ecommerce platform that’s built for high-traffic sites with speed, security, and scalability.
Working on a complex project? Our experts work with you to build the perfect solution for your business.
Protecting your Magento store against cyberattacks can feel like a daunting task. But at Nexcess, your store’s security is our top priority. When you choose our fully managed Magento hosting plans, you’re also choosing our always-on security monitoring, as well as our 24/7/365 customer support team.
Contact us today and learn more about our products and services.
Related articles
- Magento maintenance — five tasks that will keep your store running smoothly
- Magento 2 go-live checklist — turning on your site!
- Magento 2 help — frequently asked questions


