As part of the ongoing effort to mitigate the Hosted Exchange outage, we are making Exchange Mailboxes available to download in the Outlook Data File (PST file) format for Liquid Web and Nexcess customers.
This is a manual process. Once your mailboxes are available, Support will contact you so that you can download your files. This article describes how to download your Hosted Exchange mailbox data. Hosted Exchange mailbox data is available in PST format and can be downloaded using the Premium Business Email login through the Liquid Web portal. Additionally, you can download a PDF of these directions:
Exchange PST Download and Import PDF
Download Hosted Exchange Mailbox
1. Log in to the PBE Portal.
- In the top navigation bar, click Services > Email Hosting.
- Click Dashboard > Email Control Panel.
2. Click on Mailboxes under the Hosted Exchange section.
3. Search for the mailbox you wish to download and click the Download Mailbox button:
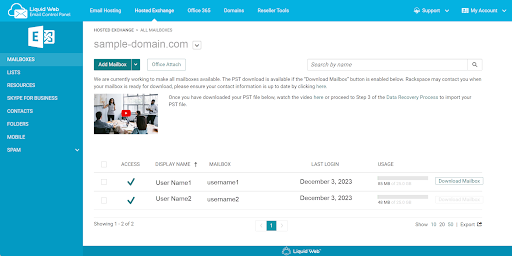
Note
The download links will be available for mailboxes as soon as they’re ready. Rackspace continues to work on making mailbox data available for download and the links will appear as soon as the mailbox data is ready for download. Check back later to see if the mailbox has become available for download.
4. Click the checkbox to agree to the terms and press the Download Mailbox button:
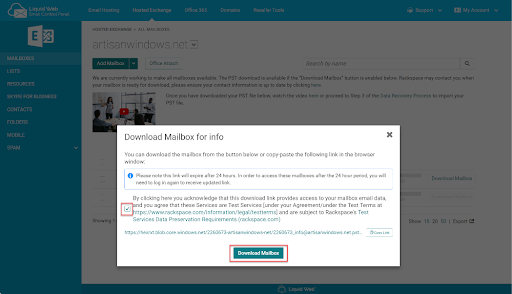
5. Your browser will download the PST file to the local device. For information on next steps and other questions related to the download process, please review these FAQs.
Note
Rackspace has provided an FAQ as well as a video walkthrough of the process for downloading the PST file from the control panel:
How to download your Hosted Exchange mailbox
How to import PST files to MS365
Importing PST files into a mailbox requires the desktop version of Microsoft Outlook on Windows.
1. Open Microsoft Outlook with your Microsoft 365 mailbox profile.
2. At the top of the Outlook ribbon, select File:

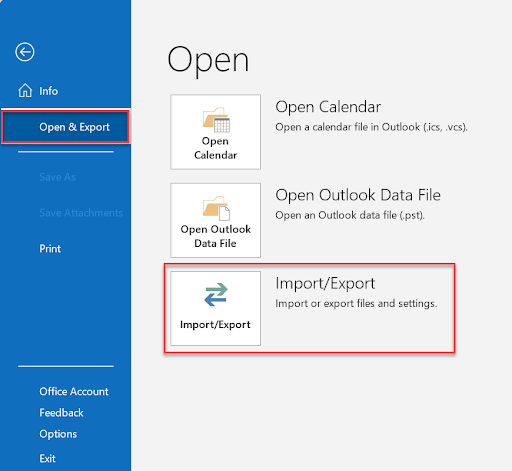
3. Select Open & Export > Import/Export. This will open the Import/Export wizard:
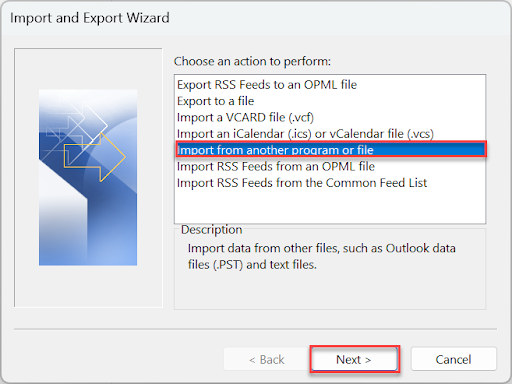
4. Select Import from another program or file, and then click Next:
5. Select Outlook Data File (.pst) and click Next:
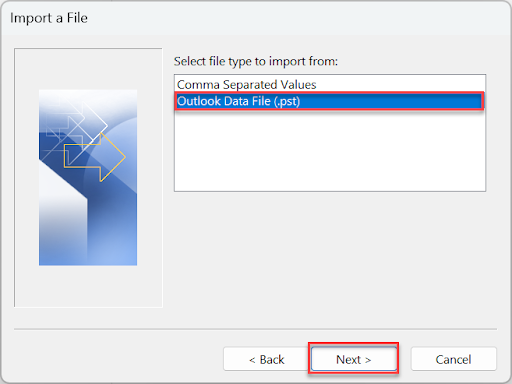
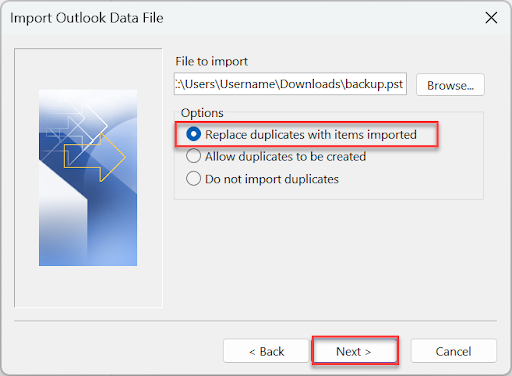
6. Click Browse to search for the .pst file you want to import. Under Options, choose how you want to handle duplicate items, then click Next:
7. Make sure the checkbox for include subfolders is checked and the Import items into the same folder in option is selected, with your new MS365 mailbox selected in the drop-down menu:
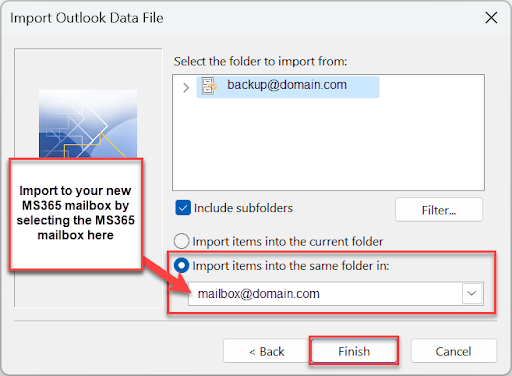
8. Click Finish. Outlook will begin importing the contents of your PST file. This process can take anywhere from a few seconds to a few hours depending on the size of the PST file.
Note
Rackspace has provided an FAQ as well as a video walkthrough of the process for importing the downloaded PST file:
How to import a .pst file into a Microsoft 365 mailbox using Microsoft Outlook
Nexcess web hosting products are built for your success
At Nexcess, your success matters.
Nexcess, a Liquid Web brand
Nexcess raises the bar on hosting. Expert support, elite performance, and ultra-flexible infrastructure.
The success of your web presence is our top priority. Partner with us to achieve outstanding results.
Recent articles
- Using HTTP security headers to avoid web vulnerabilities
- Adding Google reCAPTCHA to your WooCommerce store
- New Relic monitoring of WordPress and database performance

