Nexcess is experiencing an extended outage with our Hosted Exchange email product. The outage began December 2, 2022 and is ongoing. However, we have taken the mitigating steps outlined in this article.
Hosted Exchange mailbox data download instructions
This section describes how to download your Hosted Exchange mailbox data.
Your Hosted Exchange mailbox data is available in PST format and can be downloaded using the Premium Business Email login through the Liquid Web Account Management portal.
To save a PDF file with the entire set of Hosted Exchange mailbox data download instructions for Liquid Web and Nexcess customers, visit the following URL and select the download option for the PDF file that is viewable:
Exchange PST Download and Import PDF Instructions
Then, follow the instructions provided in the PDF file.
Our mitigating response to the Nexcess Hosted Exchange email product outage
We have developed a workaround to allow you to set up a temporary mailbox so that you can have limited email functionality until this issue is resolved.
Temporary mailbox setup details
In order to provide some email functionality during the outage, we have set up temporary mailboxes for each user with a Hosted Exchange mailbox. These temporary mailboxes will have the same username as your original mailbox, with an added "1" at the end of the username. For example, if your mailbox is mymailbox@domain.com, the temporary mailbox will be mymailbox1@domain.com.
You can retrieve the password for your temporary mailbox via a Secure Note in your Liquid Web account. For help in accessing your Secure Notes, see Using One-Time Secret for Password Protection. You will need to reset the password to strong password of your choice.
Temporary mailbox setup step #1
Now that you have retrieved the current password for your new mailbox from your secure data, log into that mailbox from webmail at webmail.liquidweb.services.
Temporary mailbox setup step #2
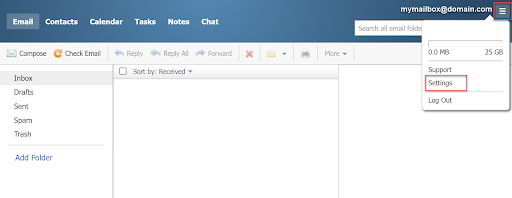
Click the hamburger icon in the top right corner, and click Settings:
Temporary mailbox setup step #3
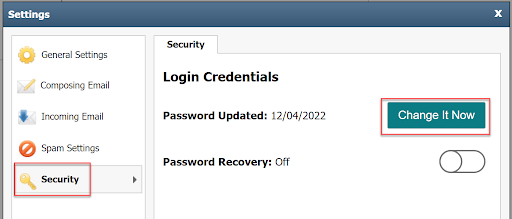
Click the Security tab, then click Change It Now:
Temporary mailbox setup step #4
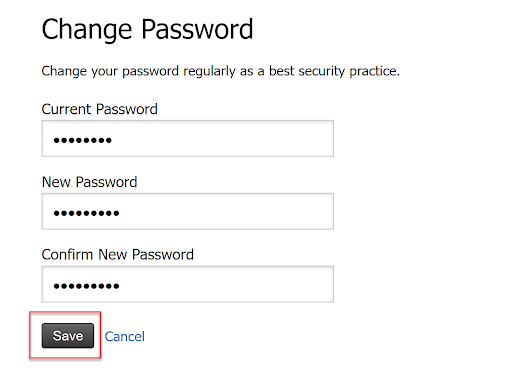
Enter the current password retrieved from your secure data, as well as the new password you would like to set it to, then click Save:
Temporary mailbox setup step #5
A popup will appear to ask you to confirm the password change, it will also notify you that you will be logged out of webmail afterwards, click OK.
Temporary mailbox setup step #6
Once you click OK, you will be redirected back to the log-in screen. You can now log in with your new password.
Your identity
Nexcess has edited the identity of your new temporary email account, so that emails sent from the temporary mailbox will appear to come from your original account, even though the temporary account is technically a different user. Additionally, emails that are sent to your original mailbox will be forwarded to your temporary mailbox.
Setting up email clients and mobile devices
We have a help tool that will provide information on connection settings depending on what mail client or mobile device you are using.
Setting up email clients and mobile device step #1
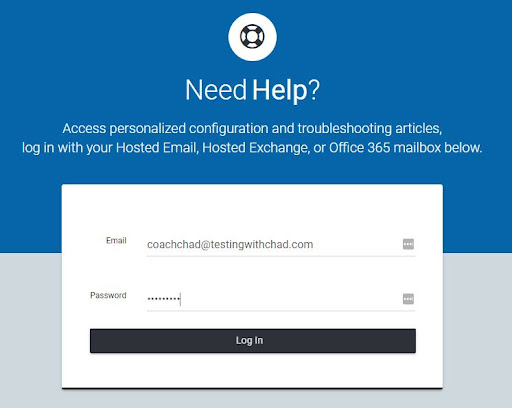
To access the help tool, log into help.emailsrvr.com using your mailbox credentials:
Setting up email clients and mobile device step #2
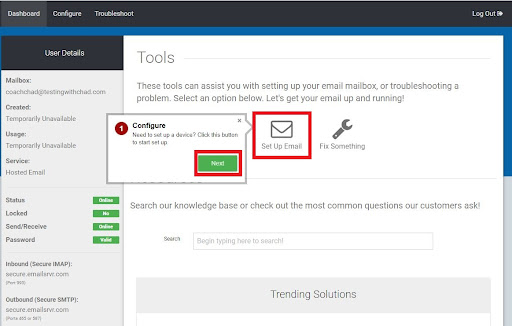
Help tips will pop up to give you a quick overview of the dashboard, you can click Next to view them. Click Set Up Email and answer a few quick questions about what you are setting up. You will be provided step by step instructions for how to set up that particular mail client or mobile device:
Setting up email clients and mobile device step #3
Typically, the host will be secure.emailsrvr.com, the incoming port 993 for IMAP (recommended over POP3), and the outgoing port either 465 or 587.
However, we encourage you to utilize the help tool to confirm these settings. The following article has additional information on what you can do with the help tool if needed:
How to: Use the email help tool for premium business email and Hosted Exchange
Workaround limitations
You will now be able to send and receive email normally with your new mailbox, however, there are some limitations with this temporary work around. You will not have access to the original mailbox and its email contents for the time being, as well as the calendars or contacts.
If you are not seeing email intended for your original mailbox reaching your temporary mailbox, please contact our support team.
Knowledge resources for your Nexcess hosting and email services
Our Nexcess Blog and Nexcess Knowledge Base can help you optimally configure your Nexcess hosting and email services. Grow your knowledge with us as you move forward.
Helpful support staff that cares
We are always here to help you with the setting up of your Nexcess hosting solution, including email services. Contact our support team by email at support@nexcess.net or through your Nexcess Client Portal whenever you need more help.
Recent articles
- What is Cloudflare CDN? How to use Cloudflare CDN?
- Nexcess hosting and Nexcess Client Portal guide
- Transfer from Bluehost hosting to Nexcess hosting

