Cloudflare was founded in 2009 by Matthew Prince, Lee Holloway, and Michelle Zatlyn with the mission of building a better Internet. If one had to summarize "what is Cloudfare CDN" in a brief few-word reply, they might state, "Cloudflare is most well known as a Content Delivery Network (CDN)."

What exactly is Time to Live (TTL) in the context of web hosting?
Time to Live (TTL) in the context of web hosting is the amount of time that a packet or unit of data should exist on a computer, system, network, CDN, or webpage before expiring and needing to be replaced with the source content. The precise meaning of TTL or data lifetime depends on the configuration settings of the specific computer, system, network, CDN, or webpage involved.
What exactly is Time to First Byte (TTFB) in the context of web hosting?
Time to First Byte (TTFB) in the context of web hosting is an end-to-end measurement for determining the responsiveness of a web server and the related network resources. Because a webpage’s performance can change its Google search rankings, TTFB has become vital in the field of Search Engine Optimization (SEO).
TTFB records the duration between creating a connection to the web server and downloading the first byte of the webpage as it is received by the client's web browser. Because TTFB includes multiple steps, each step may have latency issues that slow down the overall time value that the TTFB represents.
The "time" factored into TTFB value is the sum of the time it takes to complete the following three sequential steps:
1. The time it takes to send a HTTP request from client's web browser to the web server.
2. The time it takes to process the incoming HTTP request on the web server and to generate the appropriate HTTP response.
3. The time it takes to send the corresponding HTTP response from the web server back to the client's web browser — including the time involved with delivering the first byte of the webpage.
What is Cloudflare CDN?
Let's dive deeper into the question of "What is Cloudflare CDN?" There is much to unpack with regard to the technical details involved.
By caching static content across multiple data centers strategically located across various geographic locations, Cloudflare acts as a reverse proxy, a technique commonly used on the internet to reduce the load on internal servers.
Cloudflare offers services like Content Delivery Network (CDN), Domain Name System (DNS), DNSSEC, DDoS Protection, Secure Sockets Layer (SSL)/Transport Layer Security (TLS) Support, and many other services that allow websites to run more quickly and securely. In addition to providing most of its features for free, Cloudflare offers an easy way to install and use it. Cloudflare also provides both UI and APIs for managing your website.
The brief answer to the question, what is Cloudflare CDN?
A unique part of Cloudflare is that it's not a hosting provider. Instead, it owns and operates a massive network of servers and uses them to speed up websites and defend them against malicious attacks, such as DDoS attacks. Ultimately, Cloudflare makes websites safer and offers better browsing experiences to its users.
How does Cloudflare CDN work?
As a reverse proxy, Cloudflare routes 100% of your traffic through its servers, spread across over 200 cities worldwide. A website visitor would typically request content from a server when visiting a website without Cloudflare. However, if too many visitors were concurrently on the server, this would result in a slow or non-working website. As the website owner, you do not want to see this happening.
That is why Cloudflare developed a solution. In the form of a massive worldwide network, Cloudflare is placed between the website and the origin web server. Rather than communicating directly with the server, website visitors communicate with the Cloudflare network, which already stores the content and makes this available depending on the visitor's location:

Image source is from: Cloudflare.
What is Cloudflare CDN? An example
Let's say you have a website hosted in Singapore, and someone in the US attempts to visit it. The request to access the web content travels all the way from the US to the Singapore host server, which can result in some latency. Having Cloudflare configured on your website decreases network latency by loading content from servers closest to your website visitors, thus lowering TTFBs. Instead of connecting to the Singapore server, the website surfer from the US will connect to the nearest Cloudflare server in the United States:
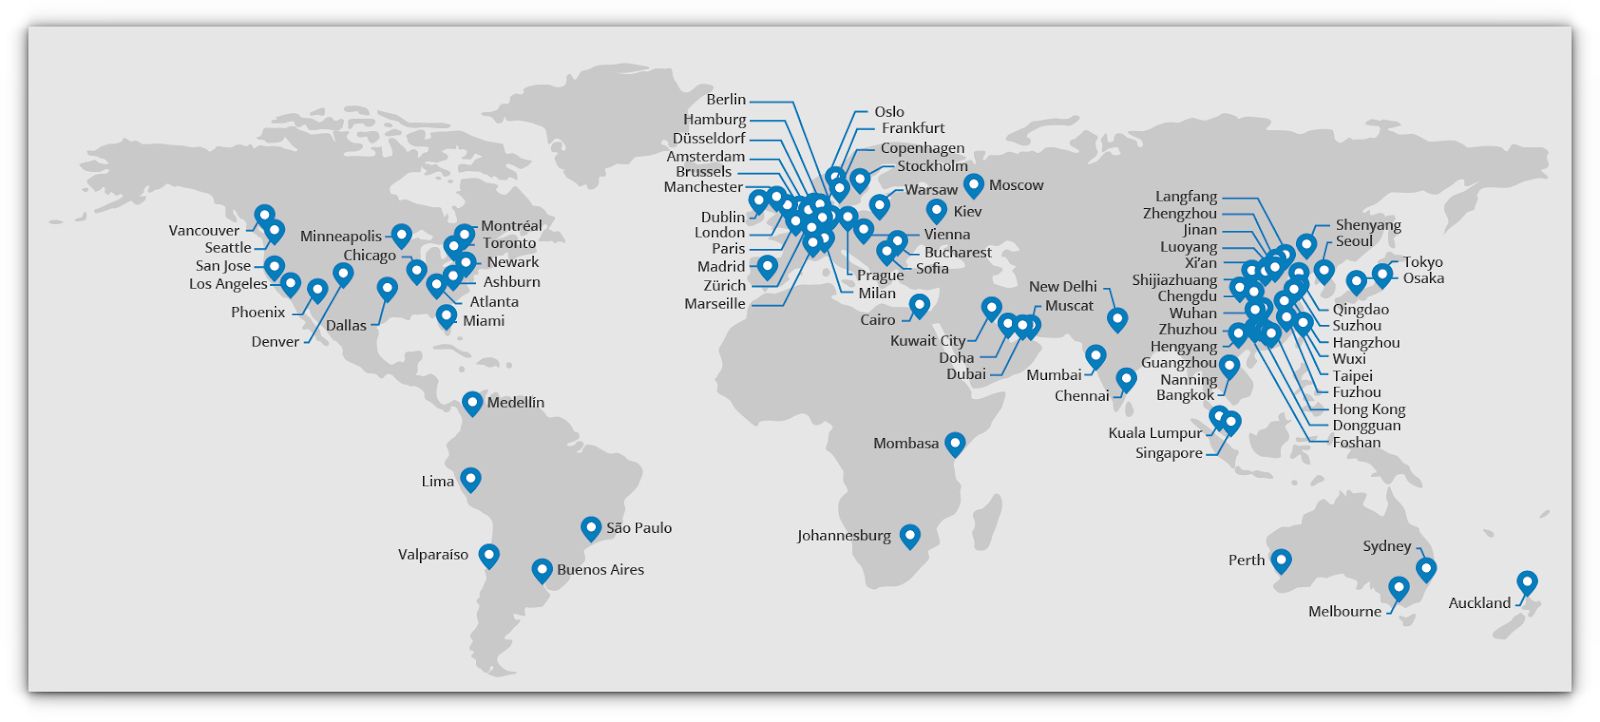
Image source is from: Cloudflare.
Cloudflare has a huge network of servers around the world in dispersed geographic locations, which reduces the distance data must travel between browsers and host servers, thereby increasing the website's page-loading performance.
What is Cloudflare CDN? Notable Cloudflare features
Cloudflare has long list of valuable features that include:
- Content Delivery Network (CDN)
- Domain Name System (DNS)
- DDoS Protection
- TLS 1.3 — fastest TLS protocol
- Web Application Firewall (WAF)
- Secure Sockets Layer (SSL)/Transport Layer Security (TLS) Support
- DNSSEC
- Accelerated Mobile Pages (AMP)
- Caching Possibilities
- Zaraz — offloads third-party scripts to Cloudflare
- Video Streaming
- Analytics
- Domain Registrar
- Workers (for developers)
- Automatic Platform Optimization (APO) — paid and caches HTML and gives you a fast TTFB worldwide
- Load Balancing — paid and reroutes traffic to healthier and faster origin servers.
What is Cloudflare CDN? Things to know about Cloudflare
Below are some important things to know before signing up for Cloudflare:
- Once you turn on Cloudflare, your server IP is masked behind the Cloudflare proxy. This masking means that only you and your server administrator know the IP address of your server. Using Cloudflare does not change your server IP address.
- To ensure Cloudflare optimizes and protects your website, updating your domain to use Cloudflare's nameservers is vital. Nameservers are your primary DNS controller, identifying the location of your site on the Internet.
- Once your domain is configured with Cloudflare and pointed to its nameservers, services like the CDN and site optimization will instantly take effect.
Cloudflare CDN setup
You can follow the six steps documented below to completed you Cloudflare CDN setup. These are details steps, so be sure to reach our Nexcess support staff if you hit any snags during the setup process.
How to use Cloudflare CDN step #1: Creating a Cloudflare account
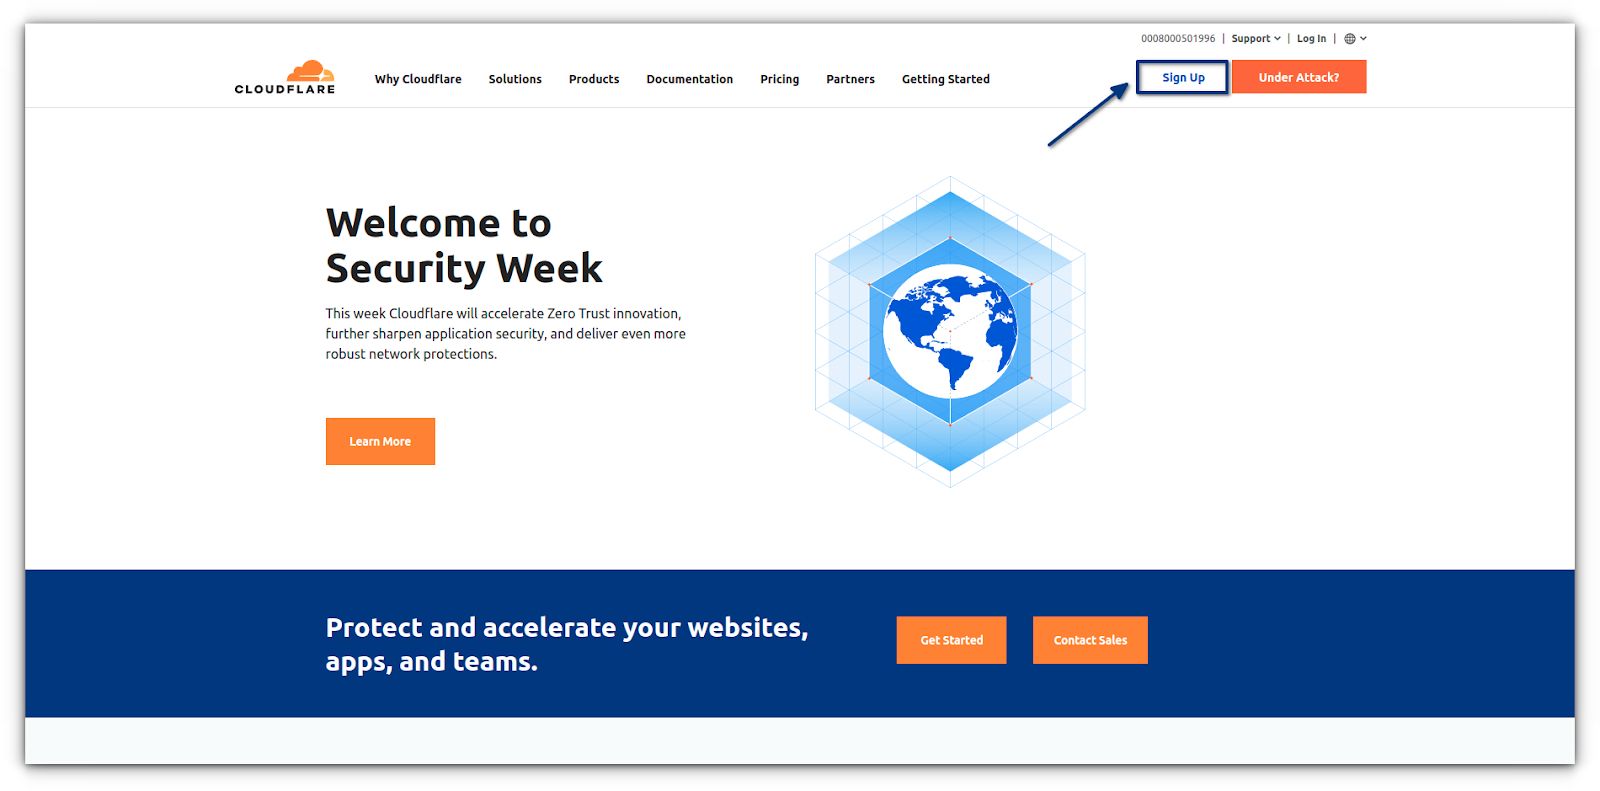
If you do not have a Cloudflare account already, then to begin, you need to visit the Cloudflare website and click on the Sign Up button:
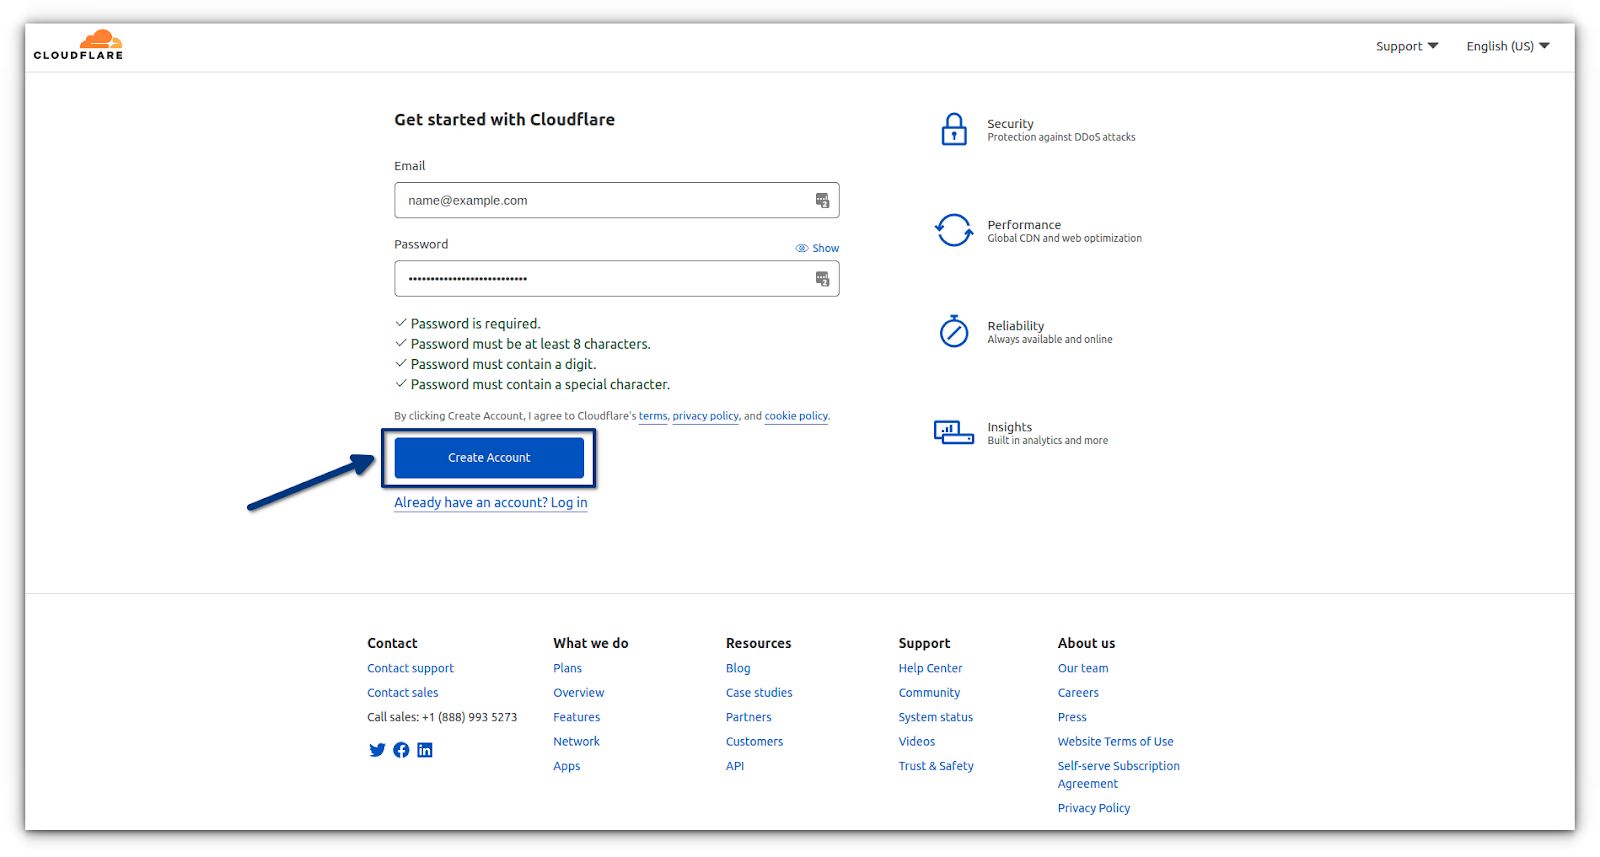
Enter your email address and password on the next page to create a Cloudflare account. Simply enter the information required, and then click on the Create Account button:
You now have a Cloudflare account, but you will still need to add your website to access the services.
How to use Cloudflare CDN step #2: Adding domain name to Cloudflare
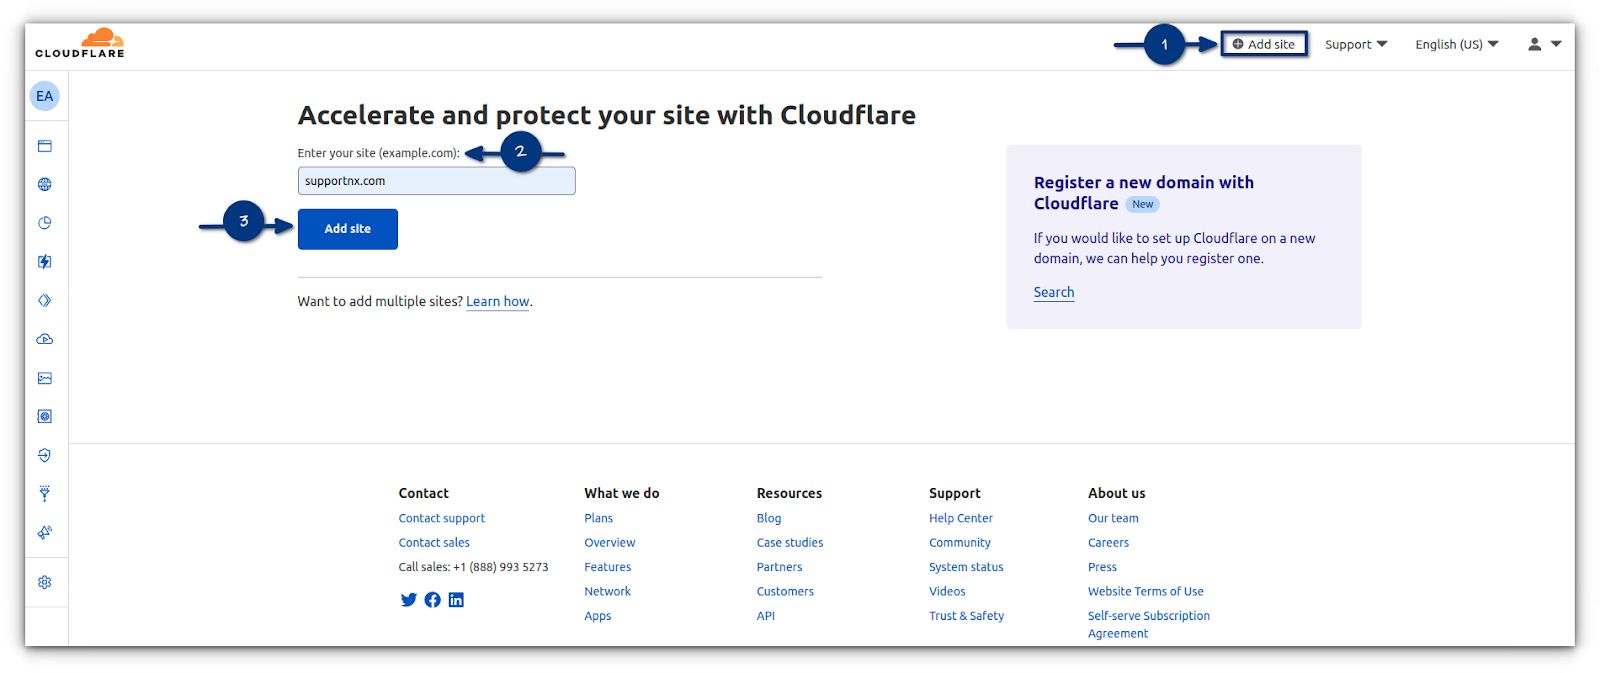
Once you have created an account at Cloudflare, find the +Add Site button at the top right of the screen. Enter your domain name into the box. If you are pasting it, remove the http:// and www parts from the front of the domain. Cloudflare allows users to add as many websites as they want, even for the free version:
How to use Cloudflare CDN step #3: Choose your plan
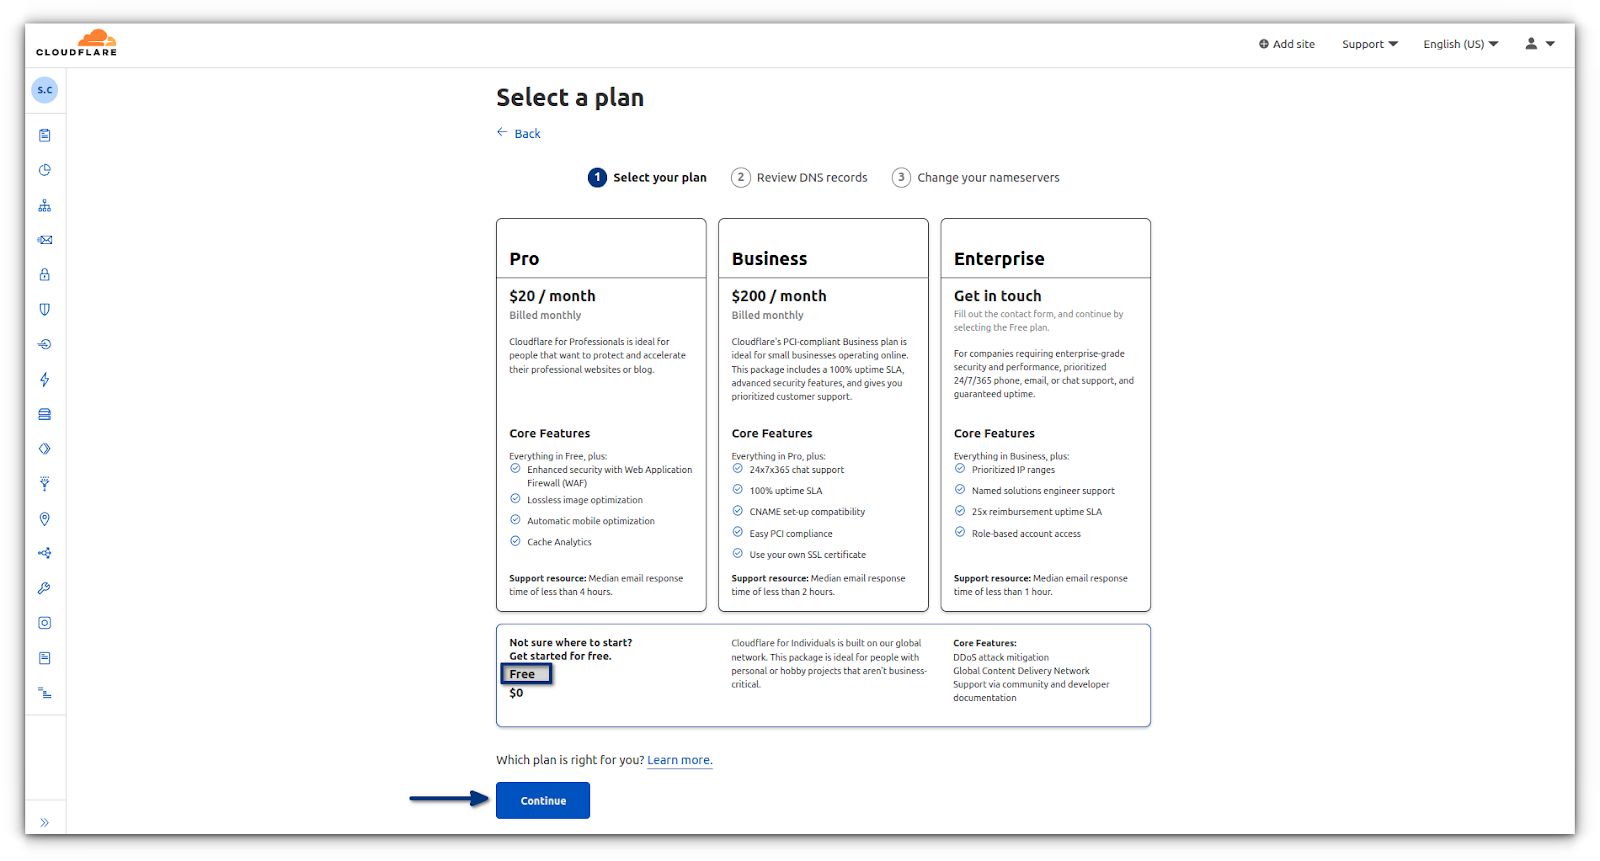
We recommend choosing the Free Version as it comes with all the needed basic features like SSL, DDoS Protection, etc., to protect your website from online threats and enhance its loading speed. A high-traffic website or online store can benefit from Cloudflare's Pro or Business plans, which include automatic website updates and more security features.
You can review the various Cloudflare plans using the corresponding URL on their website at https://www.cloudflare.com/plans/:
How to use Cloudflare CDN step #4: Review DNS settings
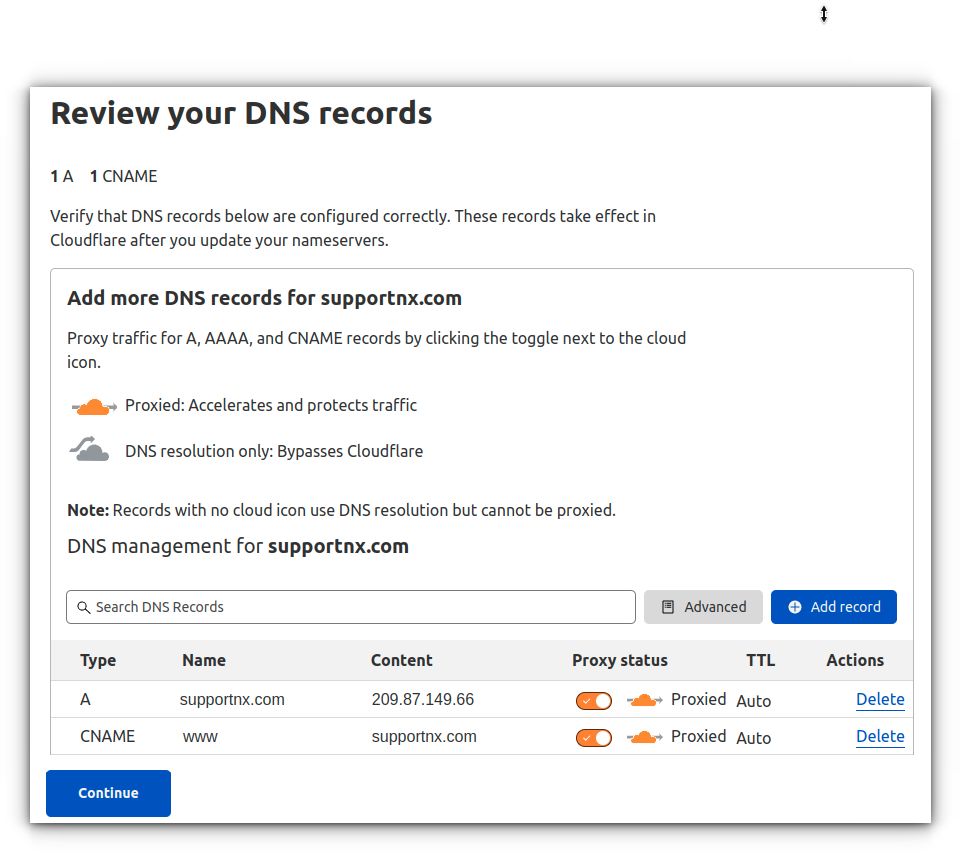
Upon adding the domain to your Cloudflare account, their system will show you a list of DNS records found. This will include subdomains as well. DNS records that you want to be routed through Cloudflare will have an orange cloud icon. A gray cloud icon will identify DNS records bypassing Cloudflare:
How to use Cloudflare CDN step #5: Change your nameservers
Lastly, you need to point your domain name to the Cloudflare nameservers. These should be done at your current domain registrar. If Nexcess hosts your domain, follow our guide on how to configure nameservers:
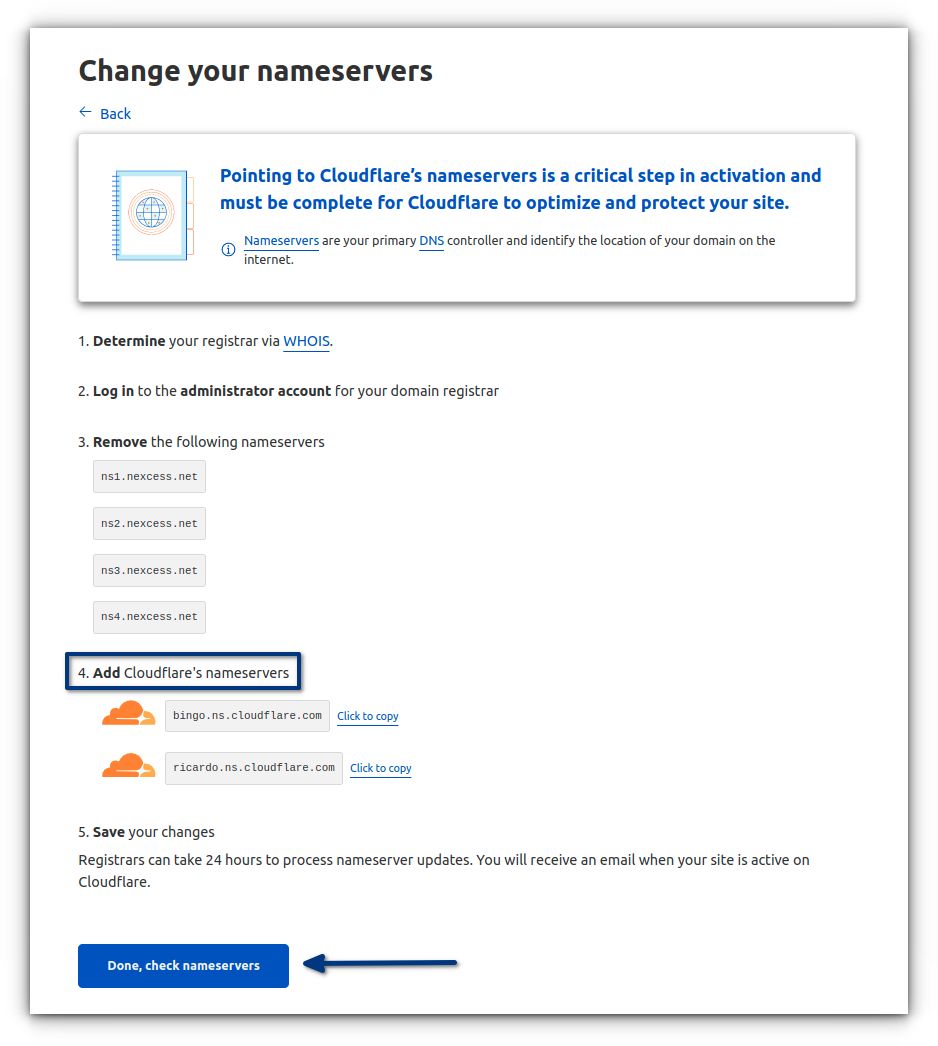
Do not panic at this stage! It usually takes 24 hours for nameservers to update. Cloudflare periodically checks nameserver updates. To initiate a check, click on the Done Check Nameservers button. During this process, your page will not face any downtime.
How to change nameservers at the most popular domain registrars
Here is a list of webpages which explain how to change nameservers at some of the most popular domain registrars:
You're done! Now it will take a few minutes for Cloudflare to update your domain nameservers and activate them. Once activated, you'll see the success message on your Cloudflare dashboard:

How to use Cloudflare CDN step #6: Setup Hypertext Transfer Protocol Secure (HTTPS)/Secure Sockets Layer (SSL) with CloudFlare
Once your domain name is proxied behind Cloudflare, we recommend you follow this extra step to force all traffic over HTTPS. The Hypertext Transfer Protocol Secure (HTTPS) encryption method protects website data through an SSL certificate.
It is essential to set this up to protect website data from data breaches. Cloudflare offers you a free SSL certificate that you can use to defnd and switch your website from HTTP to HTTPS:
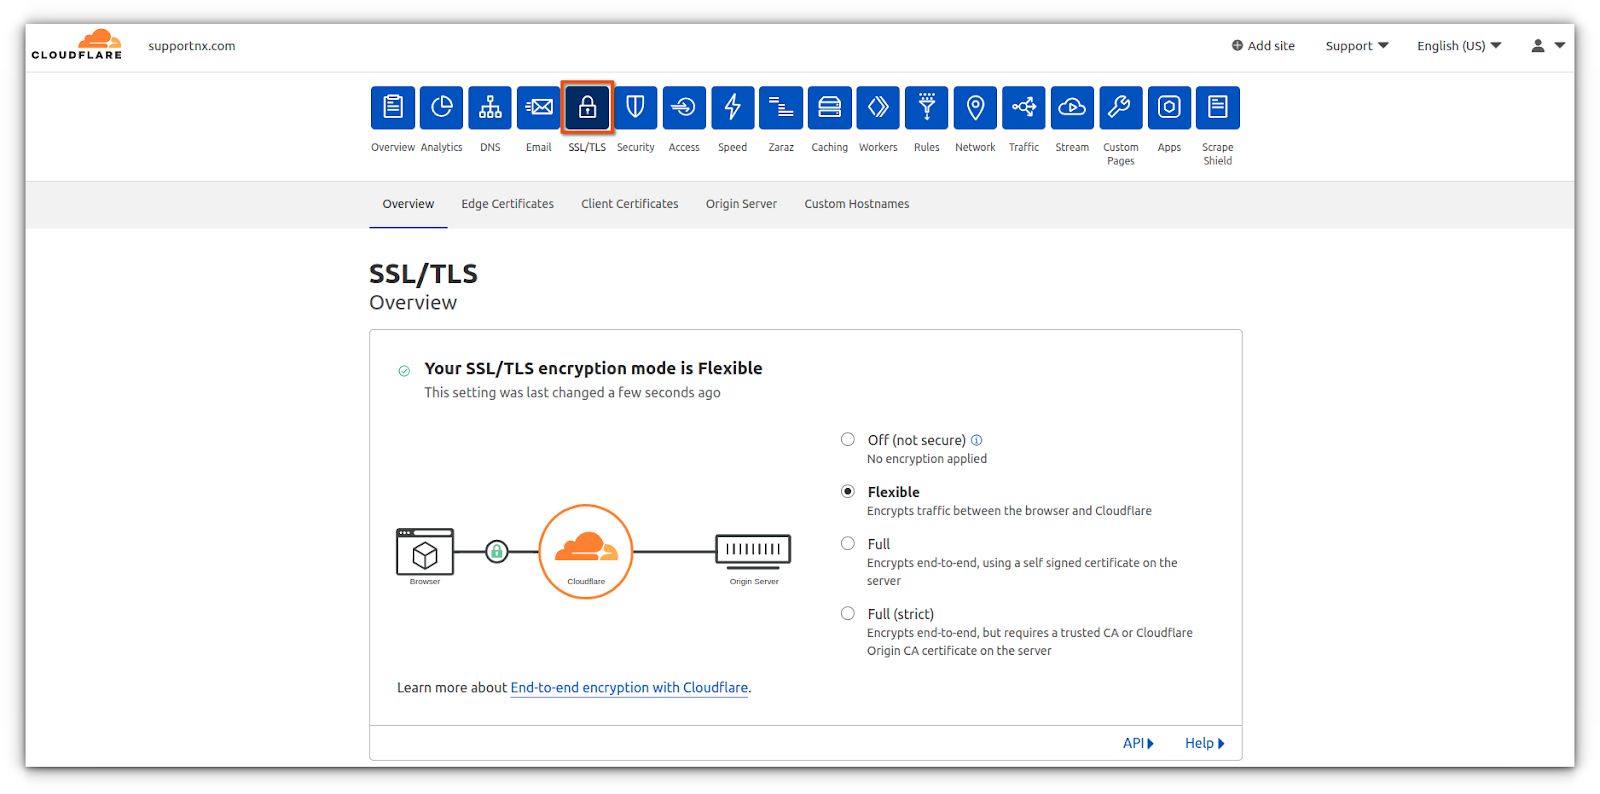
Activating your SSL certificate
Follow these steps to activate your SSL certificate:
- To activate an SSL certificate for your website, go to the SSL/TLS tab on your Cloudflare dashboard. There you can see four modes of SSL/TLS encryption mode.
- Choose the Full option if you already have an SSL certificate installed on your domain or Flexible if you don’t.
- If you plan to go with the Full option and you want to cover your domain with the Free Let's Encrypt SSL that Nexcess provides, you will need to temporarily disable Cloudflare protection until the Let's Encrypt SSL certificate is deployed.
- Head to the Edge Certificates section and turn on the Always Use HTTPS toggle. The changes might take a while to be visible, so check them after a few hours. Once you see a confirmation message and a padlock icon near the site’s URL, you’ll know that your changes are active.

How to inspect and configure the Cloudflare page rule to change the page response header value for cf-cache-status from DYNAMIC to HIT
You will want to inspect Cloudflare page rule and webpage response header value. Then you will want to modify the Edge Cache Time to Live (TTL) page rule to be Cache Everything Page Rule. See guidance below.
Inspecting the Cloudflare page rule and webpage response header value
To inspect the Cloudflare page rule and webpage response header value for cf-cache-status, follow these steps:
- You can view response headers with Google Chrome inspector. Within the website page, right-click (for PC users) or command-click (Mac users) to view options, and then click Inspect from the list.
- Select the Network tab. You may need to reload the page again to view all of the requests made for the page.
- Select any HTTP request on the left panel, and the corresponding HTTP response headers will be displayed on the right panel under the Header section.
- In the Header section, scroll down to find the cf-cache-status response header and its value.
Configuring the Cache Everything Page Rule in Cloudflare
To configure cache everything page rule in Cloudflare, follow this guidance. To cache additional content at Cloudflare, you must add a Cache Everything Page Rule. Unless you create a cache everything page rule, dynamic assets are not cached even if they return a public Cache-Control header.
In addition, the Cache Everything Page Rule removes cookies from the origin web server response when combined with an Edge Cache > Time to Live (TTL) > 0 (greater than zero):
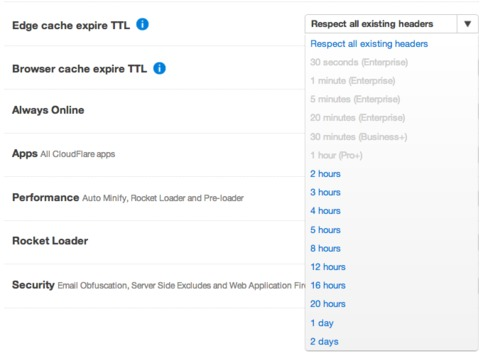
Image source is from: Cloudflare > Edge Cache Expire TTL.
To configure Cache Everything Page Rule in Cloudflare, follow these steps:
- Log into your Cloudflare account and select the domain where you want to add the page rule.
- Click Rules > Page Rules > Click on Create Page Rule.
- Under the “If the URL matches” section, enter the URL or URL pattern that should match the rule (for example, https//:yourdomain.com/*).
- Under the “Then the settings are” section, choose Cache Level and Cache Everything in the Cache Level drop-down list.
- Click on Save and Deploy button to save the Page rule.
- When multiple page rules are in place, the top page rule in the page rule list will be triggered first. So, you will need to select the page rule trigger to order the selection list.
- Now your website page header should show cf-cache-status as MISS or HIT. Then, verify the headers by checking the cache response returned by Cloudflare.
Conclusion
What is Cloudflare CDN? How to use Cloudflare CDN? These are the questions we set out to explore and explain in this article.
Content Delivery Networks are essential to improving your website's speed. Out of the many options available, we recommend Cloudflare, which offers a reliable CDN service with excellent security and performance improvements.
The Cloudflare CDN can be set up for free on your website. Here's a brief recap of the setup steps involved:
- Create a Cloudflare account.
- Add your domain name to your Cloudflare account
- Choose a plan.
- Review DNS settings for both the apex (non-www) and the www domains.
- Point your domain name to the Cloudflare nameservers.
- Configure your HTTPS/SSL settings.
Consider web hosting solutions with Nexcess
Not a Nexcess customer yet? Check out our fully managed hosting solutions. Nexcess offers a fully Managed WordPress cloud, Managed WooCommerce hosting, and Managed Magento hosting services built for speed, security, and scale.
You'll be quick to find that our web hosting platform is suitable for both small and large businesses, with different-sized plans to suit your needs. Our Nexcess plans include Varnish for Magento and Performance Monitor for WordPress, PHP 8+, an integrated CDN, and image compression for top-tier performance.
Hosting focused on your website performance
Hosting optimized for the industry's leading platforms.
Nexcess fully managed hosting means you’re in good hands — the technical part of your website is covered, enabling you to focus on the core of your business. Nexcess also offers 24/7/365 customer and technical support for all your questions or issues.
Check out the fully managed hosting plans from Nexcess to get started today.
Helpful resources for CDN setup with Nexcess
Here are some useful resources when working with CDNs and your Nexcess hosting account:
- How to configure the Nexcess CDN with WordPress and WP Rocket
- How to configure the Nexcess CDN with WordPress and Swift Performance
- How to configure the Nexcess CDN with WordPress and WP Fastest Cache
- How to reconfigure your site from using CDN
- Magento 2 CDN configuration: setting up CDN access
- What does purge the CDN mean? Purging the Nexcess CDN
- How does a CDN work to speed up your ecommerce site?
- How to configure the Nexcess CDN with WordPress and CDN Enabler
- How to resolve CORS errors in Magento 1 or 2 multi-stores using a CDN
- How to access your CDN from your Nexcess Client Portal
- How to configure CDN access for Magento
- How to configure the Nexcess CDN with WordPress and W3 Total Cache
- How to install the Nexcess CDN with ExpressionEngine
- What is a Content Delivery Network (CDN)?
- How to find IP address of website, server, domain
Knowledge library resources
Learn and grow with Nexcess as your technology partner for enhancing your day-to-day web operations. Our Nexcess Blog and Nexcess Knowledge Base can help you mature your site over time. Enhance website performance as you build on our strong hosting platform.
Get a team of helpers
Our support teams are filled with helpful technologists and talented system administrators with intimate knowledge of multiple web hosting technologies, especially those discussed in this article. In addition, our skilled team provides 24/7/365 support and monitoring services so that you can focus on your websites. Contact our team today to learn more.
Our support crew is full of the most "helpful humans" in web hosting and are committed to offering "beyond support" to keep your website looking good!
Recent articles
- Nexcess hosting and Nexcess Client Portal guide
- Transfer from Bluehost hosting to Nexcess hosting
- Transfer from HostGator hosting to Nexcess hosting

