

The "ERR_TOO_MANY_REDIRECTS" error (caused by a WordPress redirect loop) is one of the most common error messages faced by WordPress users.
What is the root cause of the WordPress redirect loop ("ERR_TOO_MANY_REDIRECTS") error condition?
The browser tries to visit one URL, which points to another URL, which points back to the first URL. The browser is stuck in an infinite loop and can’t figure out which URL to load. As a result, it displays the “too many redirects” error message.
With the right resources, a WordPress redirect loop is pretty easy to resolve. Once you know what to do, you can fix a redirect loop, even as a WordPress beginner. Read on to explore all the different reasons for your website’s redirect loop issues and the actions you can take to fix them.
About the possible reasons for the WordPress redirect loop error condition occurring
If you find an "ERR_TOO_MANY_REDIRECTS" error message while trying to access your website, the entire page or content is unavailable to website users.
Here are the main reasons for too many redirects in WordPress:
- Migrating the website or domains improperly.
- Misconfiguring WordPress, the .htaccess file, or HTTPS settings.
- Overloading one server by hosting multiple websites.
- Using incorrect settings with third-party services, like a Content Delivery Network (CDN).
- Conflicting WordPress plugin settings.
How to fix the too the many redirects error condition for your WordPress site
To identify the source of your WordPress redirect loop issue, you can implement each recommendation separately. Just be sure to note your progress so you can undo any modifications later on.
Clear browser cookies and cache
Websites will store cookies in your browser cache to speed up your browsing experience. However, your browser cache and cookies may sometimes expire and get corrupted.
Before you make changes to your WordPress website, start your troubleshooting process by clearing the cache and cookies stored on your browser.
Clear the WordPress cache
The next thing to try is clearing the WordPress cache. WordPress redirect loops caused by server responses can be cached. So, even if you've fixed the error, the cache won't reflect the changes. You must clear your WordPress cache after making changes to your website or server.
There are several popular WordPress caching plugins, including W3 Total Cache, WP Fastest Cache, WP Super Cache, and WP Rocket. No matter which plugin you use, the process of clearing the WordPress cache is quite similar.
W3 Total Cache plugin
You can clear the cache with W3 Total Cache by following these steps:
1. Go to your WordPress Admin Dashboard.
2. Navigate to Performance and then Dashboard:


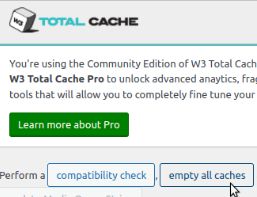
3. Go to the W3 Total Cache dashboard and select Empty all caches:

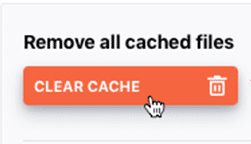
WP Fastest Cache plugin
To clear the cache using WP Fastest Cache, just follow these steps:
1. Log in to your WordPress dashboard and go to WP Fastest Cache.
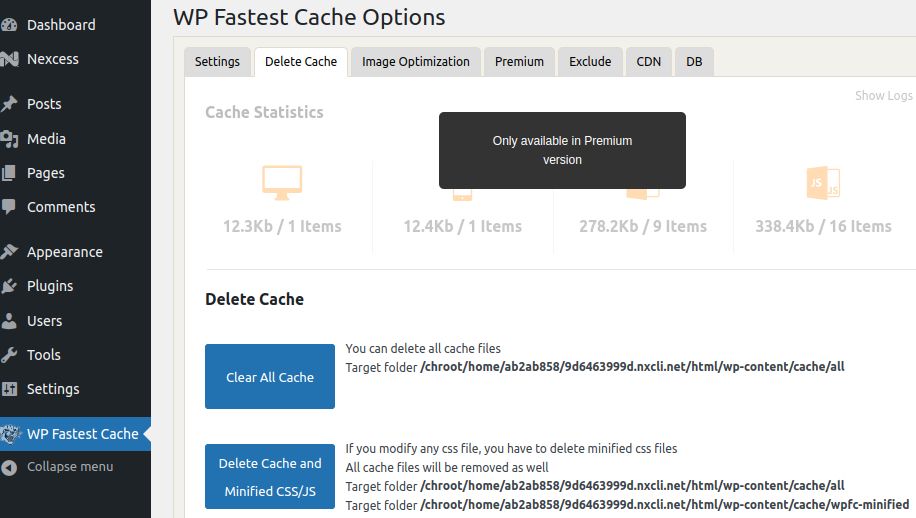
2. Go to the Delete Cache tab.
3. Click on Clear All Cache to delete all cache files or Delete Cache and Minified CSS/JS to delete minified CSS files and all cache files:

4. You'll get the following "All cache file have been deleted" message once it’s done:


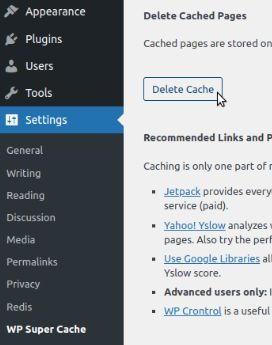
WP Super Cache plugin
You can clear the cache in WP Super Cache by following these steps:
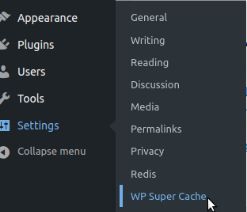
1. Log in to your WordPress dashboard and go to Settings > WP Super Cache:

2. Click the Delete Cache button:

WP Rocket plugin
To clear the cache in WP Rocket, follow these steps:
1. Go to your WordPress Admin Dashboard.
2. Navigate to Settings > WP Rocket:


3. Locate Quick Actions and clear the cache:

4. Once you’re done clearing your cache, refresh your website.
Check your WordPress home and site URL settings
If your WordPress Address (home URL) and Site Address (site URL) don’t match, you’ll get a WordPress redirect loop error. You can verify the URL settings in the WordPress Admin Panel if you still have access:
1. Go to Settings > General panel.
2. Change the values of the URLs in the WordPress Address (home URL) and Site Address (site URL) text boxes if needed:


3. You can also change your home and site URLs in phpMyAdmin or by using the command line.
4. If you can’t access your dashboard because of a redirect loop, you can adjust the URL settings in the wp-config.php file. Here’s an example of what your result may look like:
define('WP_HOME','https://testdomain.com');
define('WP_SITEURL','https://testdomain.com');
5. If you plan to change the domains on a WordPress multisite network, you must check the wp_blogs table beforehand. Improper search and replacement will lead to an infinite redirect loop because the subsites won’t match the network site.
6. You can update the home and siteurl settings for each subsite in its wp_#_options table (note that the # value should correspond with your blog_id).
Verify your HTTPS settings
A Secure Sockets Layer (SSL) certificate is an excellent way to improve the security of your website. But if you install an invalid certificate or configure it poorly, you may cause a redirect loop.
Also, forcing your website to use the secure HTTPS protocol if you don’t have an SSL certificate may cause a similar issue. A redirect loop occurs as all requests to the hosting server are sent over HTTP, but your server has to redirect to HTTPS repeatedly. Ensuring your SSL certificate is installed, configured correctly, and renewed when needed is essential.
You can use an SSL verification tool to verify that your SSL configuration is installed, valid, and trusted in just a few minutes.
Inspect your .htaccess file
If none of the above recommendations fixed the "too many redirects" error, you should check your server for any internal issues.
The .htaccess file plays an essential role in controlling page redirects. So, any misconfiguration in the file can cause problems with the redirect routine.
A faulty variable, conflicting redirect rules, or a corrupted file could cause a WordPress redirect loop error. You can disable your .htaccess file and check your website to troubleshoot the error.
If your website loads fine while the file is disabled, review the file. Remove unwanted rules or correct the redirection rules to fix the error. You can also replace the .htaccess file with the default file and see if that fixes the error.
Here’s the default .htaccess file configuration for WordPress websites:
# BEGIN WordPress

RewriteEngine On
RewriteRule .* - [E=HTTP_AUTHORIZATION:%{HTTP:Authorization}]
RewriteBase /
RewriteRule ^index\.php$ - [L]
RewriteCond %{REQUEST_FILENAME} !-f
RewriteCond %{REQUEST_FILENAME} !-d
RewriteRule . /index.php [L]

# END WordPress
Check your plugins
A corrupted, outdated, or incorrectly configured plugin can interfere with redirection rules and cause WordPress redirect loop errors. Sometimes, specific WordPress redirection plugins or their settings or updates might conflict with your server’s redirects.
1. To check whether a plugin is the source of the problem, you can disable all your plugins by renaming your plugin folder via the File Transfer Protocol (FTP), Secure Shell (SSH), or WordPress Admin Panel.
2. To disable the plugins via the WordPress Admin Dashboard, go to Plugins. Select all the plugins, choose Deactivate from the dropdown, and click Apply:


3. If that solves the issue, reactivate all the plugins. Then, deactivate your plugins one by one to find your culprit.
4. If you experience a fatal WordPress error that prevents you from using your WordPress Admin Dashboard, you can instead use FTP or SSH to deactivate the plugins. First, rename the plugin folder in the wp-content directory.
5. Often, that resolves the issue. If so, then you should revert the folder name change. Next, tweak each individual plugin’s name until you discover the problematic extension.
6. If the issue isn’t fixed, you can enable PHP error_reporting to analyze it even deeper. Using this function will display all your PHP errors and warning messages, making it easy to identify and resolve all the root causes of your redirect issues.
Inspect your CDN and other third-party services
The Cloudflare CDN and other third-party services can sometimes cause WordPress redirect loop errors. You can troubleshoot the issue by purging the cache and checking the HTTPS settings on the CDN.
If your website already has an SSL certificate, using the flexible encryption option can cause internal conflicts and send your website into a redirect loop. When the flexible option is selected, all requests to your hosting server are sent over HTTP. A redirect loop error will occur if the hosting server already has a redirect from HTTP to HTTPS.
Changing your CDN’s SSL settings to “Full” or “Full (strict)” could solve the problem. But you must first confirm that your CDN is causing the error by temporarily disabling it. Here’s how:
1. From the Cloudflare dashboard, go to Overview.
2. Navigate to the Advanced Actions section at the bottom right of the page.
3. Click on Pause Cloudflare on Site.
The “Always Use HTTPS” page rule from Cloudflare can also be used to redirect all visitors to HTTPS without creating a loop.
Resolving redirect loops in WordPress with help from Nexcess
Dealing with too many redirects in WordPress can be frustrating. But with these troubleshooting tips, you should be able to identify and resolve the issue on your website.
Get better results
With fully managed hosting from Nexcess, better is built in. Discover managed hosting for the industry’s top content and commerce platforms.
First, clear your browser's cache and cookies to rule out browser-related issues. If the problem remains, you can try more WordPress-specific fixes. For instance, you can view error and access logs in the Nexcess Client Portal.
And if you're looking for server-based WordPress hosting, we recommend looking at Liquid Web's WordPress VPS and dedicated servers for WordPress.


