Although Magento is a powerful ecommerce solution, it can be complex and resource intensive. Because of this, you likely have spent time improving the performance and loading speed of your Magento content management software.
However, it would be best if you had a high-quality Content Delivery Network (CDN) running seamlessly behind the scenes in support of your Magento ecommerce store. A CDN is essential if you have many website visitors from across the globe, far away from your hosting server.

Let’s look at how to set up a Magento Content Delivery Network (CDN) with Cloudflare.
What is a CDN and how will it benefit your Magento content strategy?
A CDN caches your website and provides multiple points from which your customers can access your content efficiently. A CDN's multiple servers store your data files closer to your audience and deliver them on demand once your visitors make site requests.
You need a reliable CDN solution, especially when selling products globally on an ecommerce store like Magento. Ideally, your servers should be as close to your target audience as possible to reduce latency and speed up page load times.
Suppose your web origin server is in the United States, but Singapore is one of your best markets. Unfortunately, the distance between these countries dramatically slows your website loading times. And slow websites cause bounce rates to increase.
However, with a Magento CDN, it will be as if the server is in your visitors’ backyards. As a result, data access will feel instantaneous to them.
How does implementing a Cloudflare CDN benefit your Magento site?
You can improve the Magento content management software’s performance by integrating Cloudflare. Cloudflare is a Content Delivery Network (CDN) that acts as an intermediary between your website and the hosting origin server.
You can free up your server with Cloudflare by transferring static content — such as images, JavaScript, and CSS — from the closest Cloudflare server to your end users. Then, when a user accesses your site, the servers work together to fetch the content, which speeds up page load times.
Magento Content Delivery Network (CDN) solution: how to implement Cloudflare on your site
Now that you know the benefits of using Cloudflare as your Magento Content Delivery Network (CDN), the next step is to integrate it. The sections below are broken up by version of Magento. They cover how to set up Cloudflare on Magento 1 and Magento 2 websites.
Magento 1 CDN setup
Although Magento 2 came out in 2015, some websites still use Magento 1, the first version of the software. If your site is on Magento 1, the following steps document how would you implement Cloudflare.
Magento 1 CDN setup step #1: create a Cloudflare account
If you don’t have a Cloudflare account, create one and add a domain.
Magento 1 CDN setup step #2: navigate to the web console
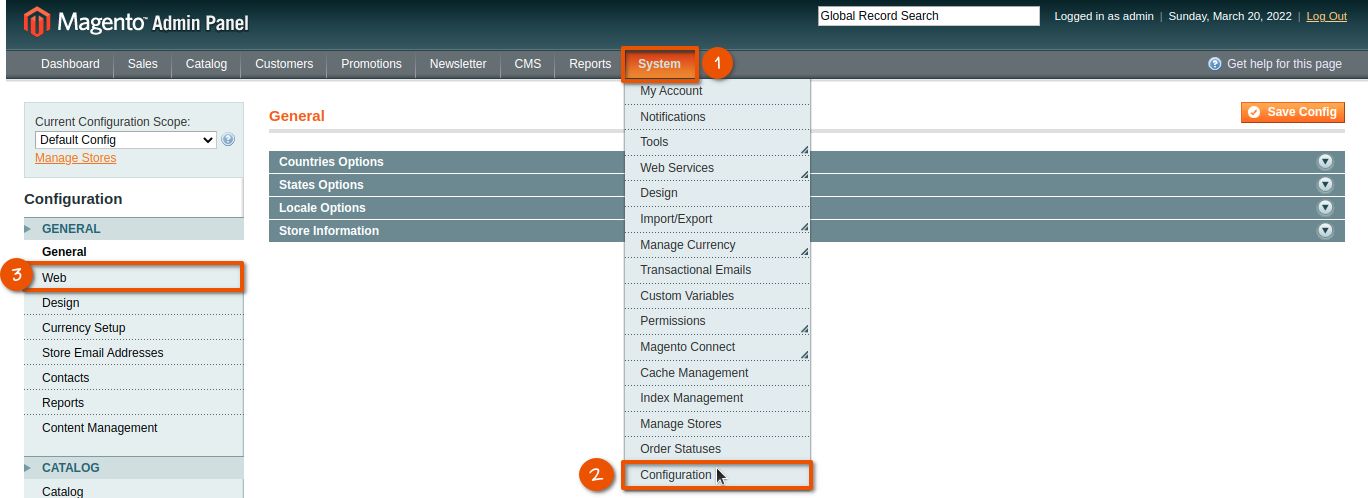
To configure your Magento 1 base URLs, navigate to System > Configuration > General > Web:
Magento 1 CDN setup step #3: adjust Magento 1 base URLs
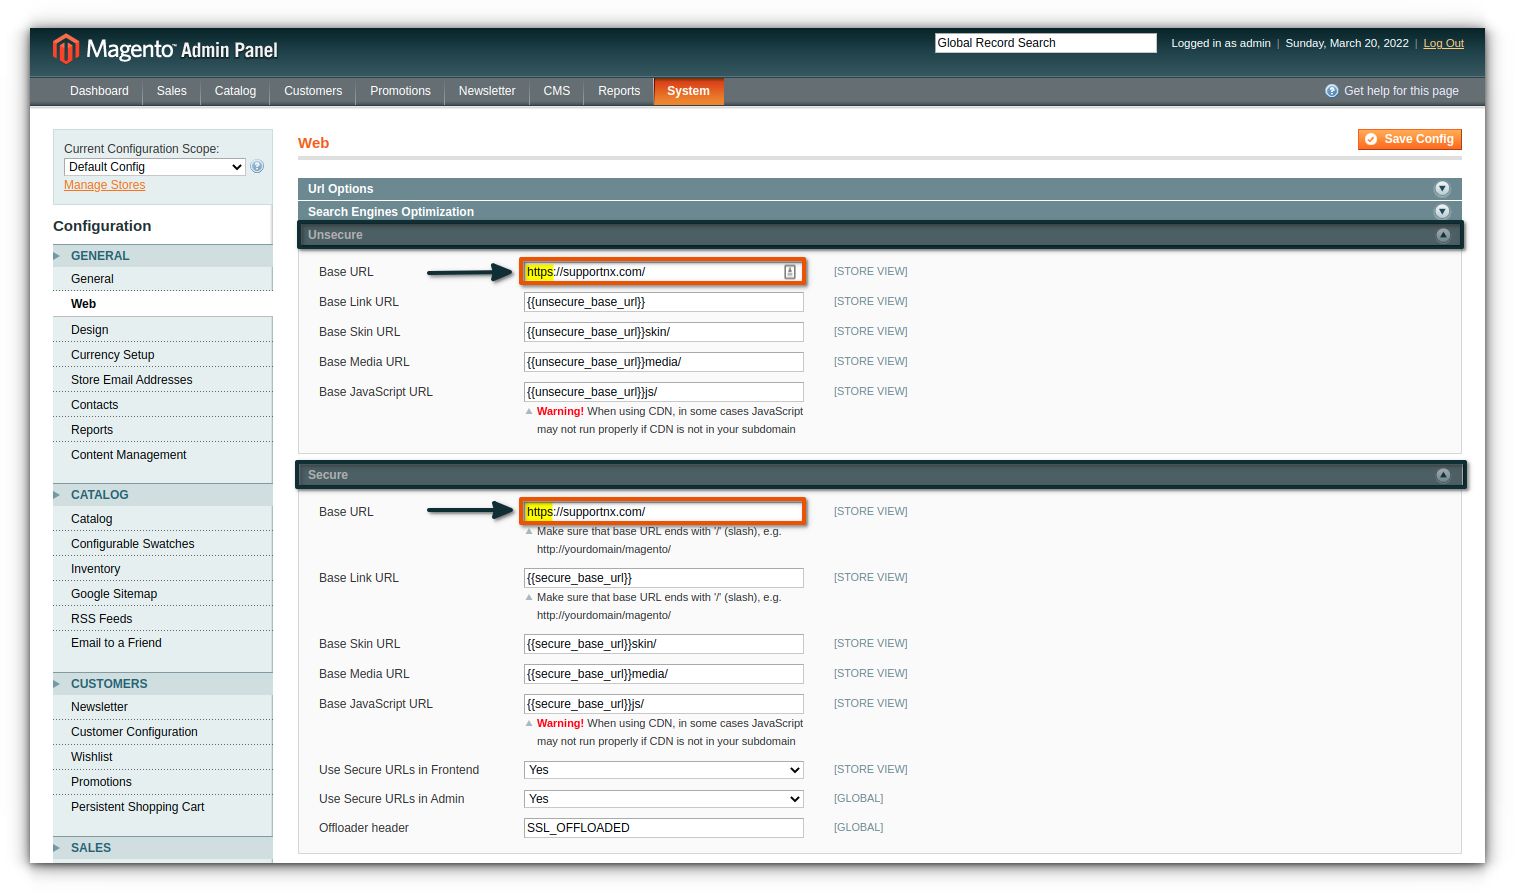
Under Web, expand the Unsecure and Secure dropdown sections. Next, set the Magento base URLs to use the HTTPS instance of your domain (for example, https://yourdomain.com).
Once you’ve adjusted the URLs, save the configuration:
Magento 1 CDN setup step #4: flush Magento cache
When you have saved your adjusted base URL config, navigate to System > Cache Management and click Flush Magento cache:

Magento 2 CDN setup
If your site uses Magento 2, the steps are slightly different. The following sections covered those differences.
Magento 2 CDN setup step #1: create a Cloudflare account
If you don’t have a Cloudflare account, create one and add a domain.
Magento 2 CDN setup step #2: navigate to the web console
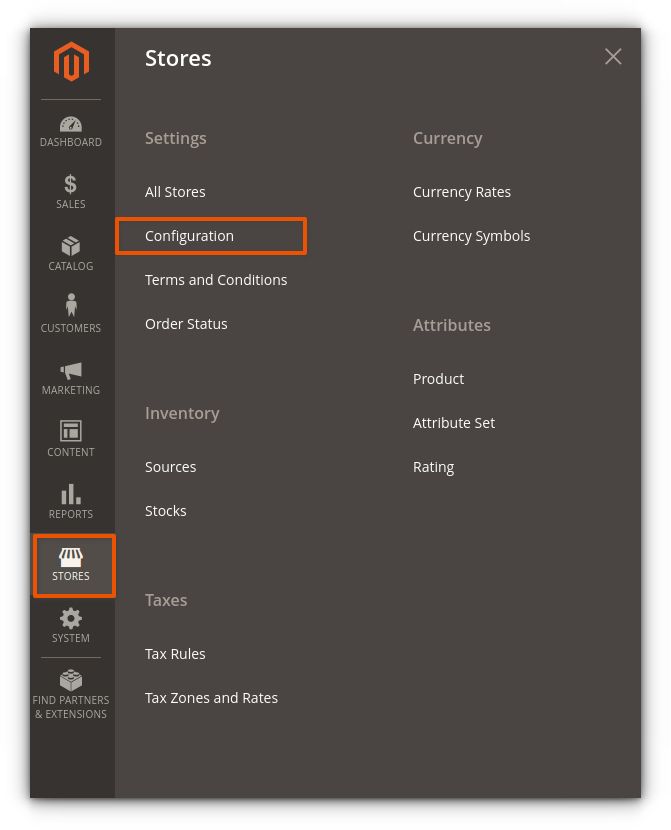
To configure your Magento 2 base URLs, log in to your Magento Admin Area. Now, navigate to Stores > Configuration:
Magento 2 CDN setup step #3: adjust Magento 2 base URLs
From the configuration menu, select General > Web:
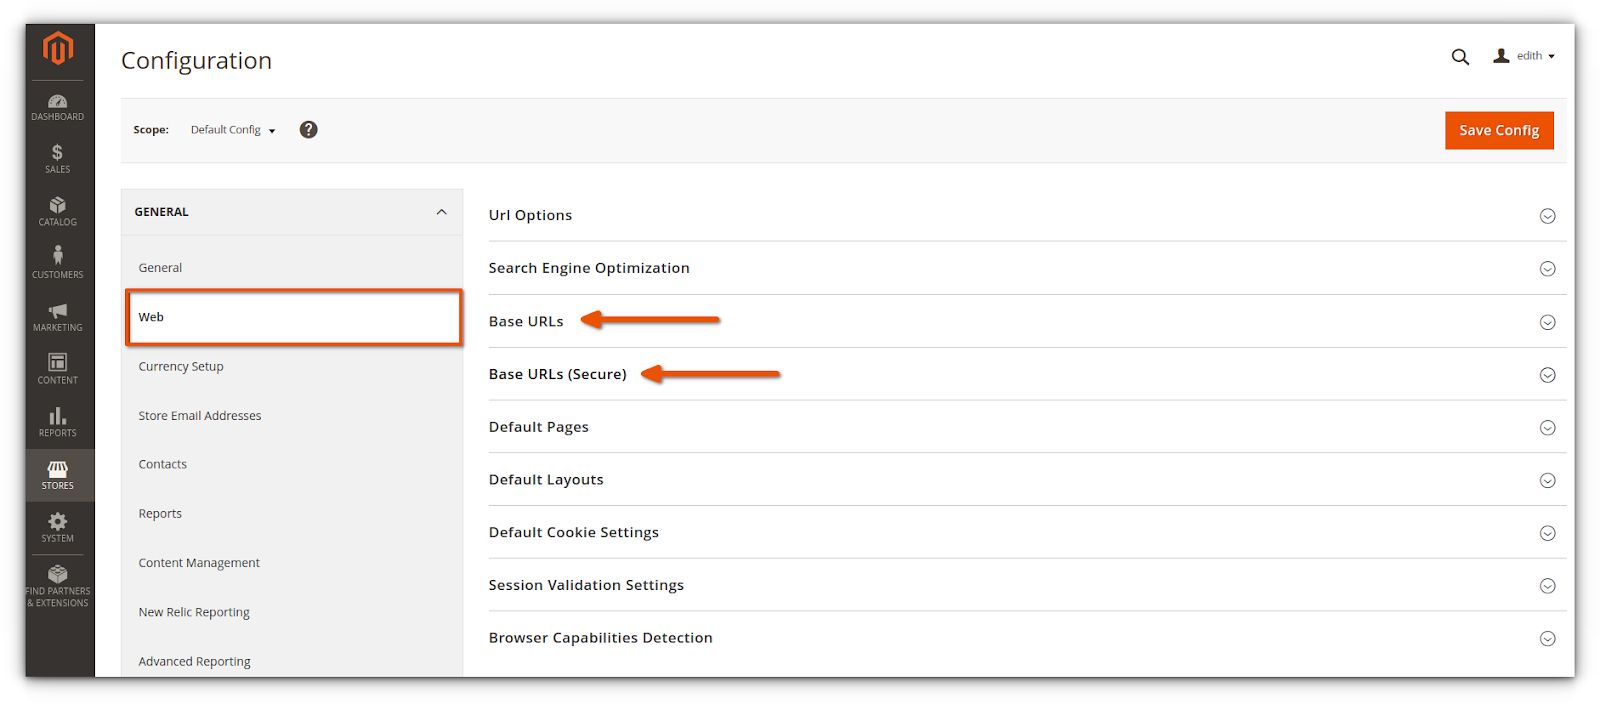
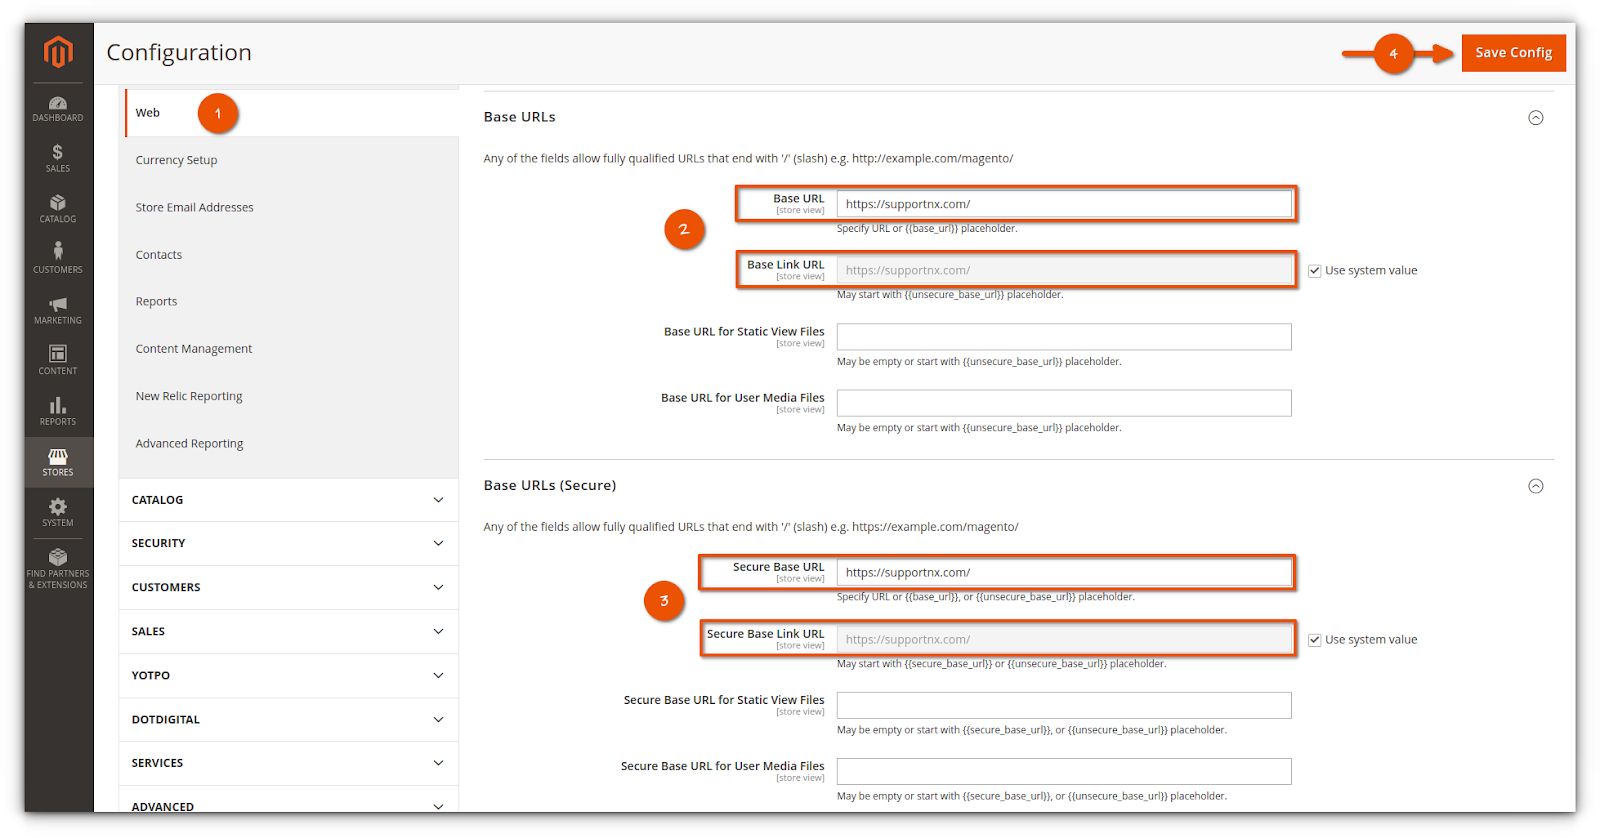
Expand the Base URLs and Base URLs (secure) dropdown sections from the page. Then, set the Magento base URLs to use the HTTPS instance of your domain (for example, https://yourdomain.com).
Once the URLs are adjusted, click Save config:
Magento 2 CDN setup step #4: flush Magento cache
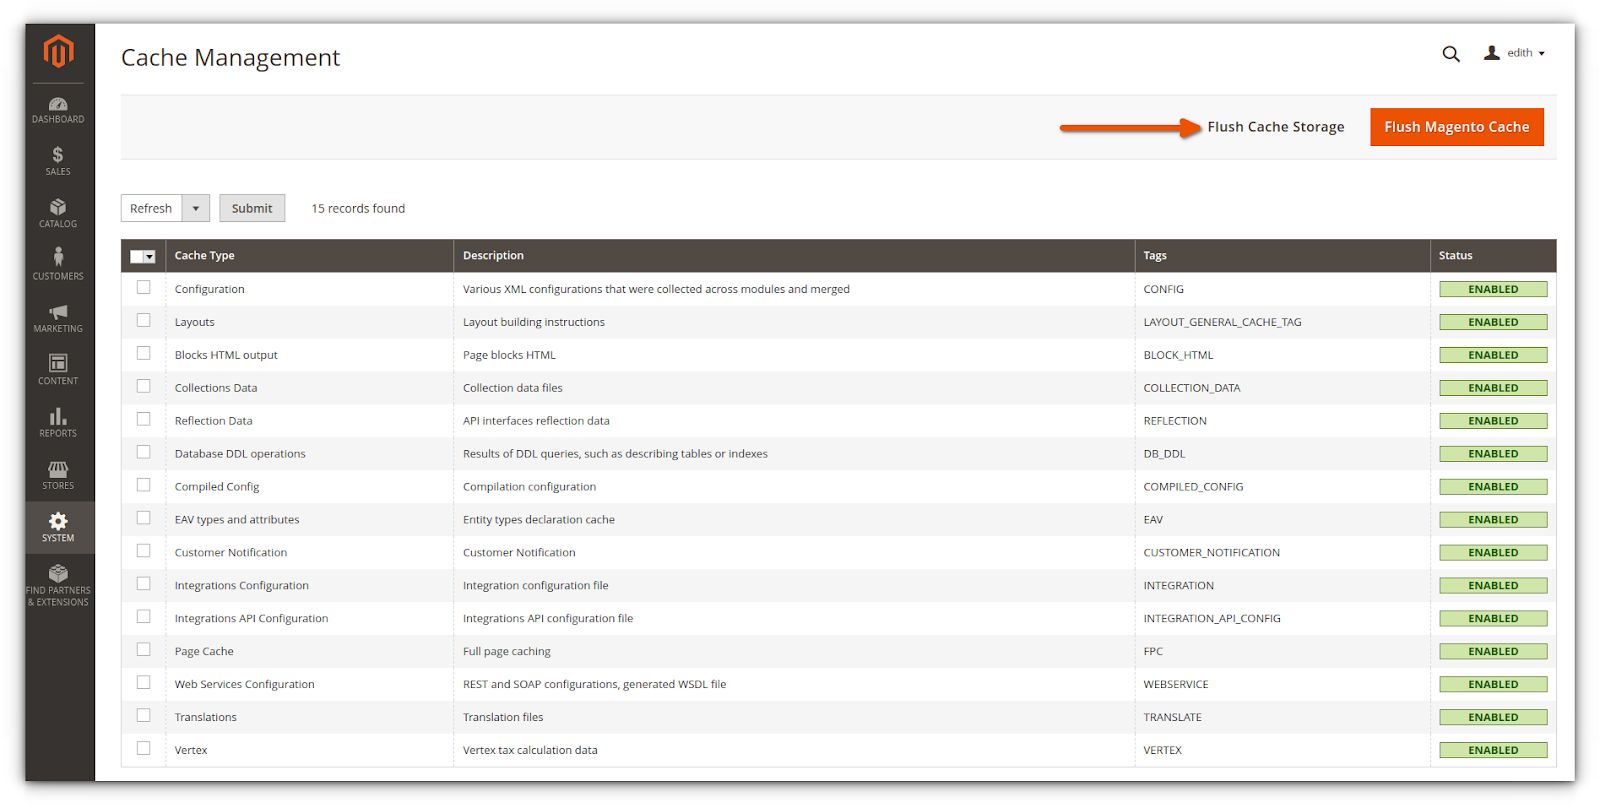
After saving your adjusted base URLs config, flush the Magento cache by navigating to System > Cache management and clicking Flush Magento cache:
At this stage, Cloudflare serves the static content for your Magento 2 store. To see the difference, check your primary server. You’ll notice a decrease in bandwidth usage and load times, which means Magento will speed up and perform better.
Optimized Magento content management strategy with a CDN solution like Cloudflare
Using a CDN on your ecommerce store can massively improve its performance. It can speed up your website and make it easier to access for your audience worldwide.
You can optimize static and dynamic content delivery, minimize bandwidth costs, and protect your website from distributed denial of service (DDoS) attacks — all with Cloudflare. The benefits begin to pile up as you assess them for your website.
Using Cloudflare’s CDN and unmetered DDoS protection, your Magento website will deliver content from data centers closer to your visitors and load your website faster with reduced latency.
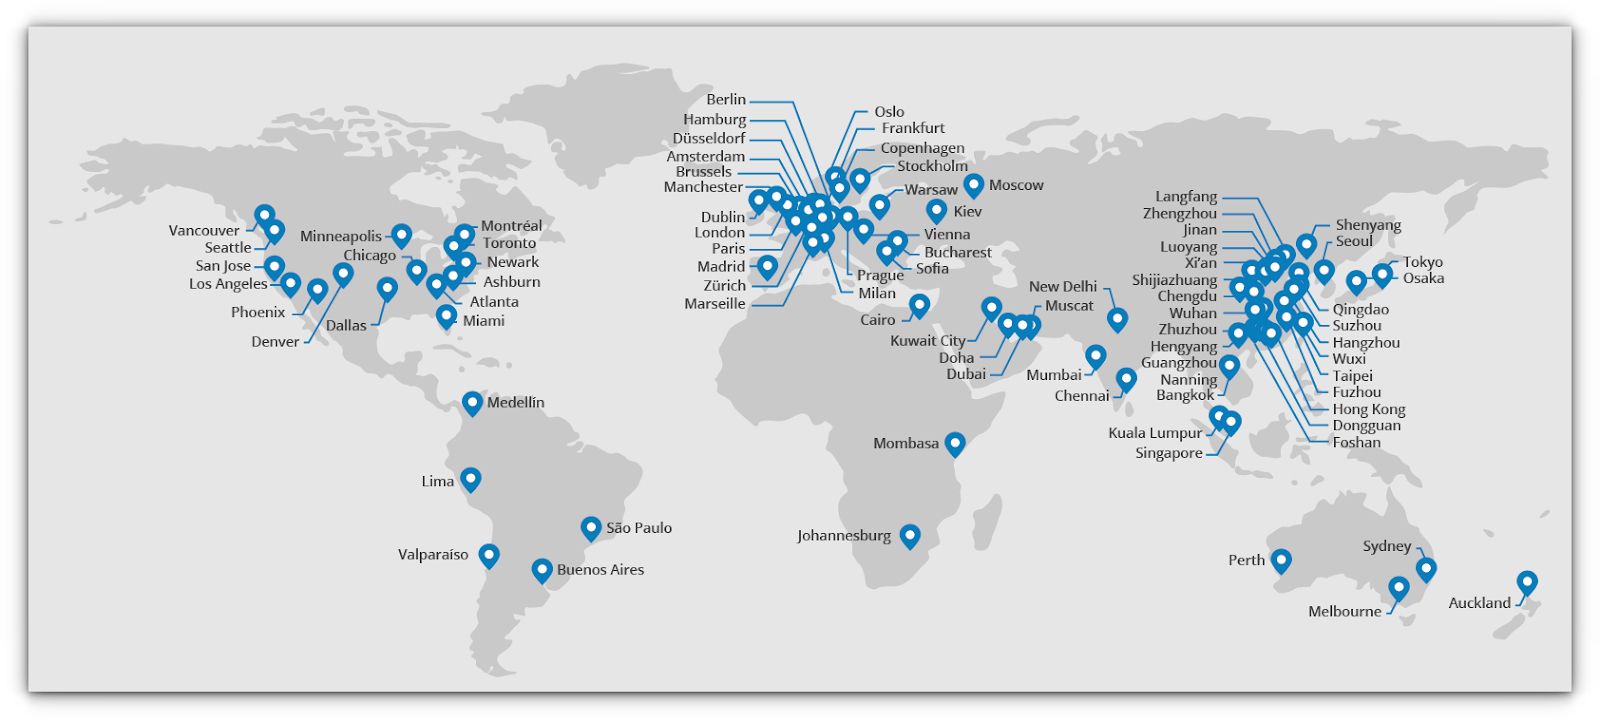
So, how do you configure your Cloudflare CDN for optimum results and security? Let’s explore that below.
Magento content: SSL/TLS settings
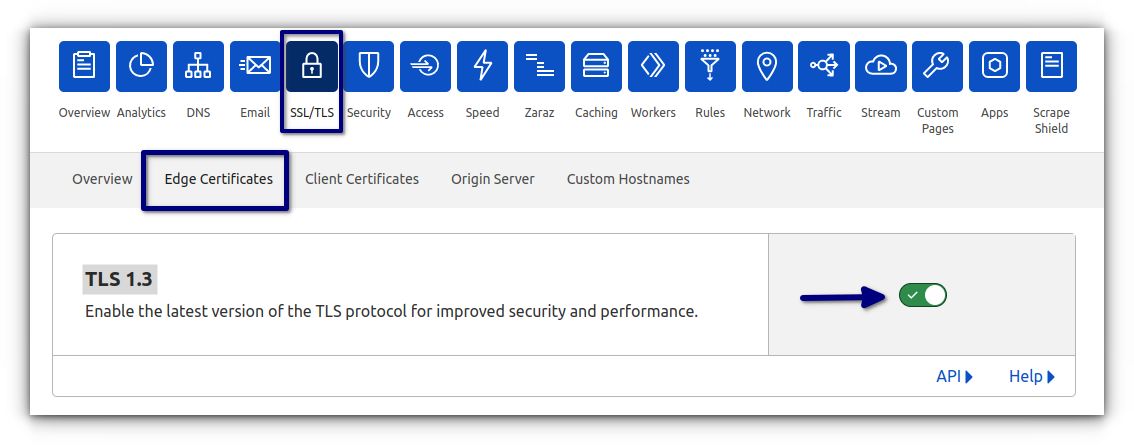
With TLS 1.3 enabled, HTTPS connections are faster and more secure, improving the overall user experience on your website. You can enable this by navigating to the SSL/TLS tab > Edge Certificates > TLS 1.3 option and toggle it on:
Magento content: security settings
The next step in configuring your Cloudflare CDN is to choose your security settings. Let’s go over your options and our recommendations.
Security level
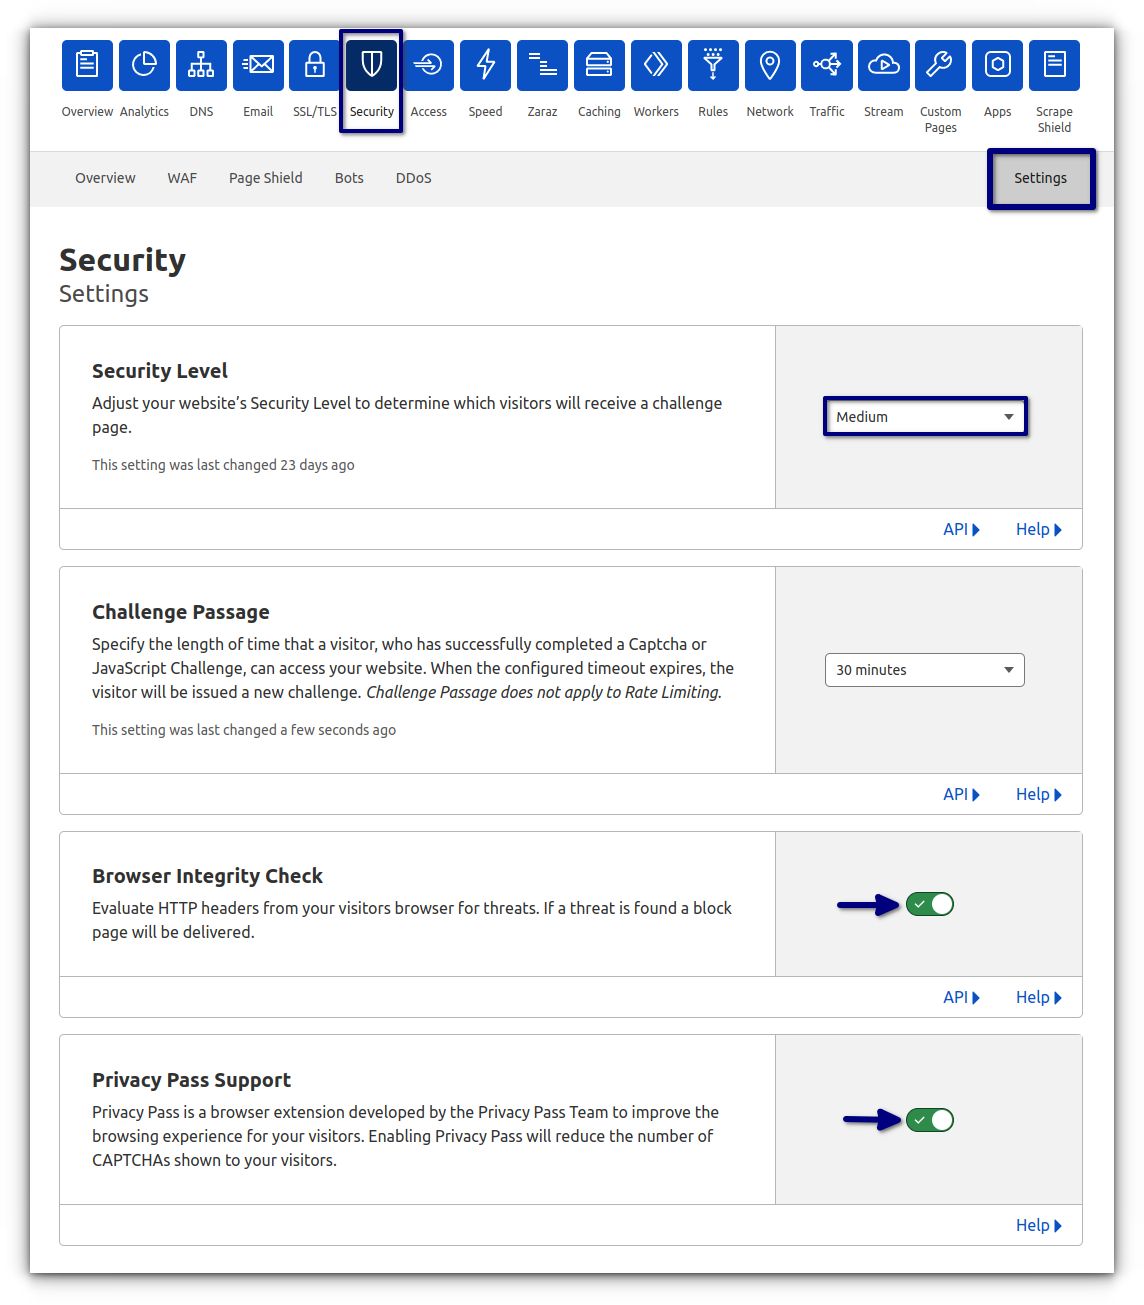
Your security level — Essentially Off, Low, or Medium — will determine which visitors you expose to the challenge page. Cloudflare's recommended value for this setting is Medium, which offers full protection without inconveniencing visitors. Anything above Medium will impact your site performance and degrade the user experience.
Additional security settings
The additional security settings are recommended:
- Challenge Passage: Recommended setting is between 15 to 45 mins
- Browser Integrity Check: Enabled
- Privacy Pass Support: Enabled
To apply the above settings, go to the Security Tab > Settings:
Cloudflare's Bot Fight Mode
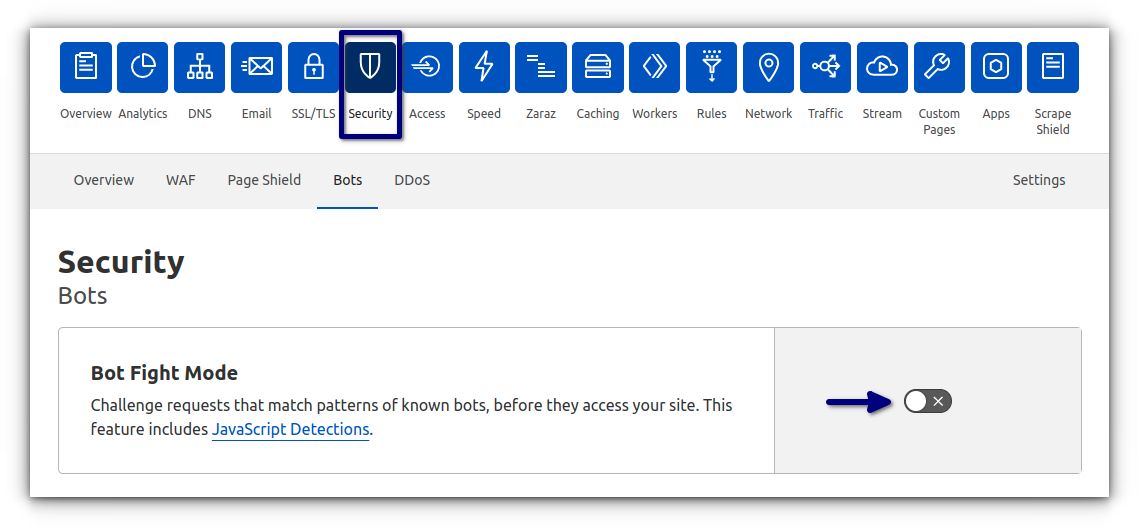
Bot Fight Mode detects and mitigates bot traffic on your domain. When enabled, it identifies known bot traffic patterns.
Keep this option disabled unless you are dealing with massive security issues. If you enable Bot Fight Mode, you may experience poorer website performance and significantly increase your CPU usage.
To activate Bot Fight Mode, go to the Security Tab > Bots > Bot Fight Mode > Toggle > On Position:
Web Application Firewall (WAF)
Cloudflare's WAF monitors all incoming web traffic and automatically blocks malicious traffic. The firewall uses a ruleset that identifies patterns and signals to filter unwanted traffic.
To create firewall rules, go to the Security Tab > WAF > Firewall Rules section and click on Create Firewall Rule:
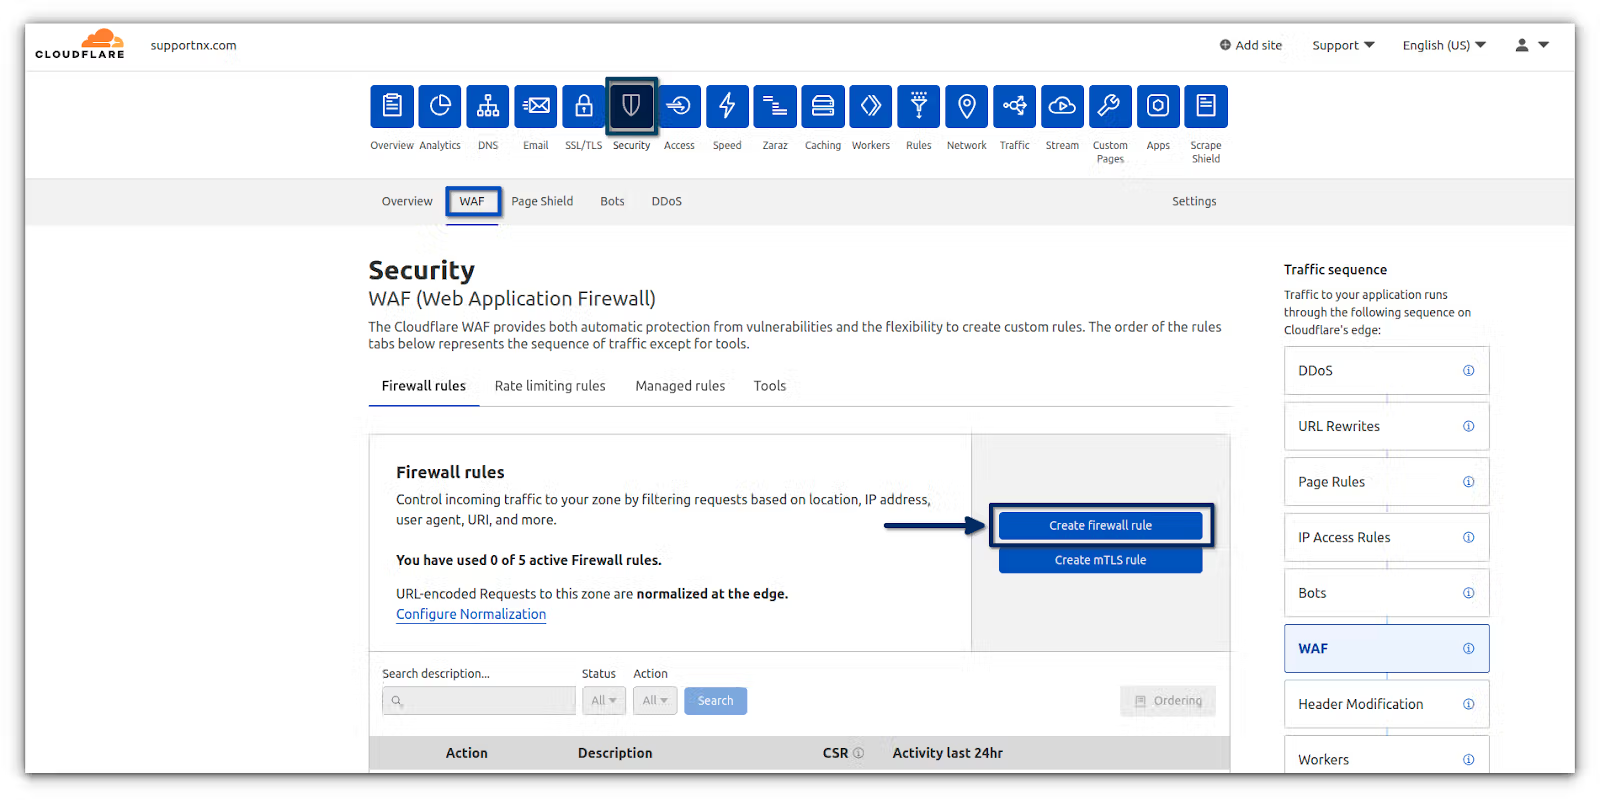
Here you can start adding new customized firewall rules.
DDoS attack protection
Cloudflare can help combat DDoS attacks on your website. To enable this option, go to Overview Tab > Quick Actions > Under Attack Mode > Toggle > On Position:

If you enable this option, your website performance may significantly deteriorate. Each visitor to your website will meet a processing page for several seconds as Cloudflare verifies and confirms if the hit originated from a legitimate visitor or a bot.
Magento content: network settings
The next step in configuring your Magento CDN is to choose your network settings. Let’s look at your options.
HTTP/3
HTTP/3 is the next version of the HTTP protocol. Although it has not been widely adopted, its usage is growing exponentially.
HTTP/3 differs from previous protocol versions primarily by using a user datagram protocol (UDP) called QUIC instead of a transmission control protocol (TCP). The protocol is fast and secure, especially for today's Internet.
HTTP/3 can establish a secure session much faster than HTTP/2, which uses TCP and transport layer security (TLS). In general, your website users will benefit from significant improvements in performance, reliability, and security with HTTP/3 and QUIC.
0-RTT Connection Resumption
With 0-RTT Connection Resumption, the client and server can use cached information from a previous TLS session to establish a new one without needing to renegotiate their parameters.
Ensure you enable both HTTP/3 (QUIC) and 0-RTT. These options are under the Network section on your Cloudflare dashboard:

Magento content: caching configuration
After you choose your network settings, you need to decide how your website will cache. Your options are discussed in the next sections.
Magento content: Purge Cache setting
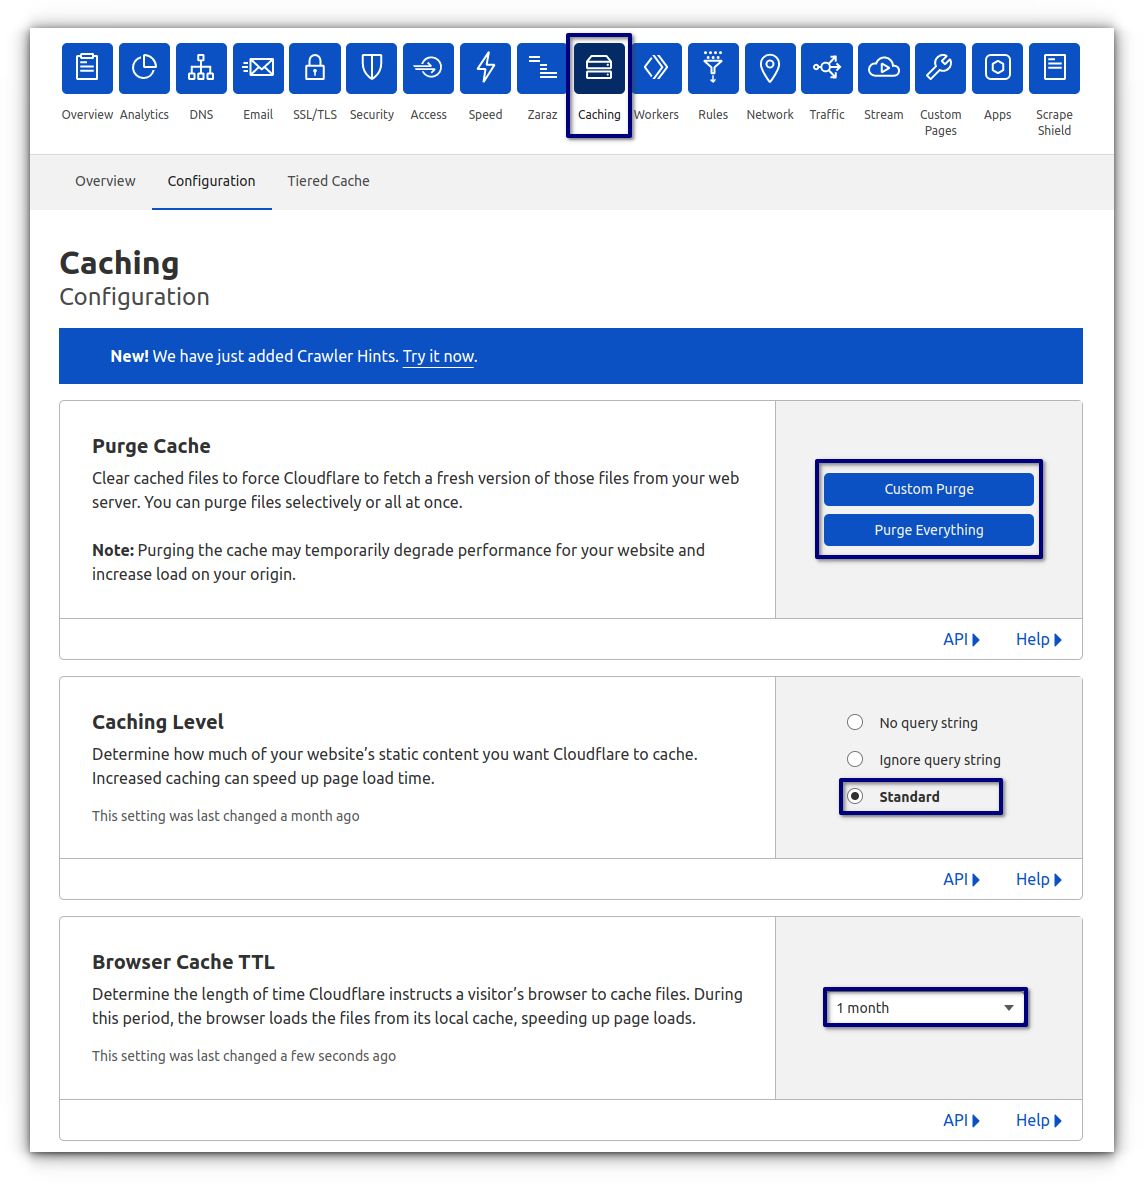
The Purge Cache section allows you to purge the Cloudflare cache in the manner you configure. This setting is useful when making changes to your website or content.
Magento content: Caching Level setting
The Caching Level section determines how much static content Cloudflare will cache. The recommended level is standard because it is the safest to cache content with or without a query string.
Magento content: Browser Cache TTL setting
The Browser Cache TTL section specifies how long cached files will stay in your visitor's browser cache. Recommended length of time is one month or more. Setting the browser cache Time to Live (TTL) over a month can help you with the following warning:
Page Speed Insights
"Serve static assets with an efficient cache policy'."
Please note that Google requires that your cache headers be at least 30 days old or older.
To enable the above settings, navigate to the Caching Tab > Configuration:
Magento content: Cloudflare Page Rule settings
To cache additional content at Cloudflare, you must add a Cache Everything Page Rule. Without this rule, dynamic assets would not be cached even if they return a Public Cache-Control Header.
The Cache Everything Page Rule removes cookies from the origin web server response when combined with an Edge Cache > Time to Live (TTL) > 0 (greater than zero):
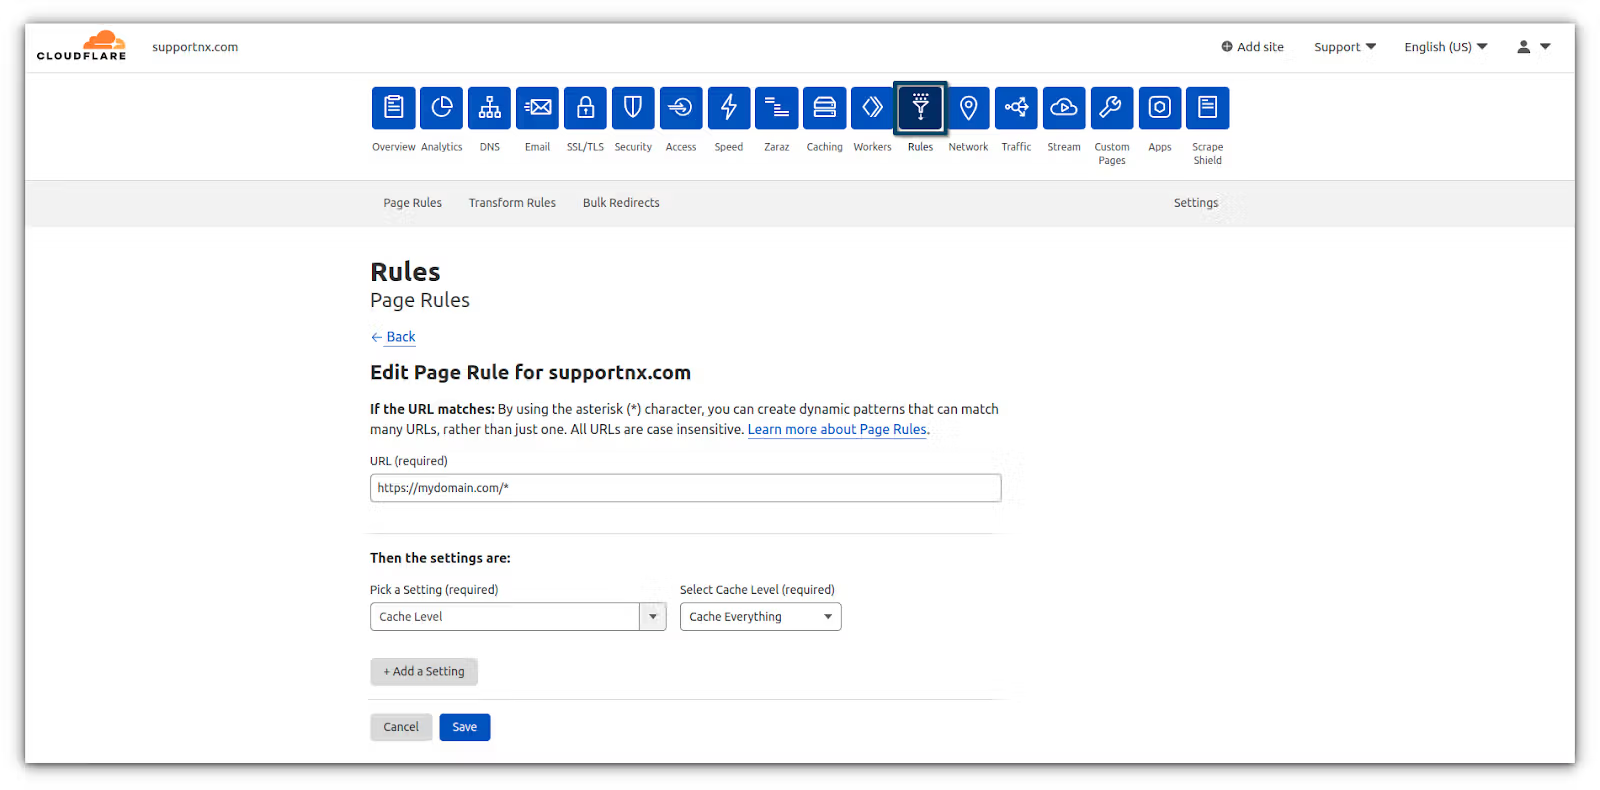
Here is how you enable the Cache Everything Page Rule in Cloudflare:
- Log into your Cloudflare account and select the domain where you want to add the page rule.
- Click Rules > Page Rules > Create Page Rule.
- Under the "If the URL matches" section, enter the URL or URL pattern that should match the rule (for example, https//:yourdomain.com/*).
- Under the "Then the settings are" section, choose Cache Level and then Cache Everything in the Cache Level dropdown list.
- Click on the Save button, and then the Deploy button to save the page rule.
- When multiple page rules are in place, the top page rule in the list will be triggered first. So, you will need to select the page rule trigger to order the selection list.
- Now, your website page header should show cf-cache-status as MISS or HIT. Verify the headers by checking the cache response returned by Cloudflare.
Magento content: Speed settings
Magento content: Auto Minify
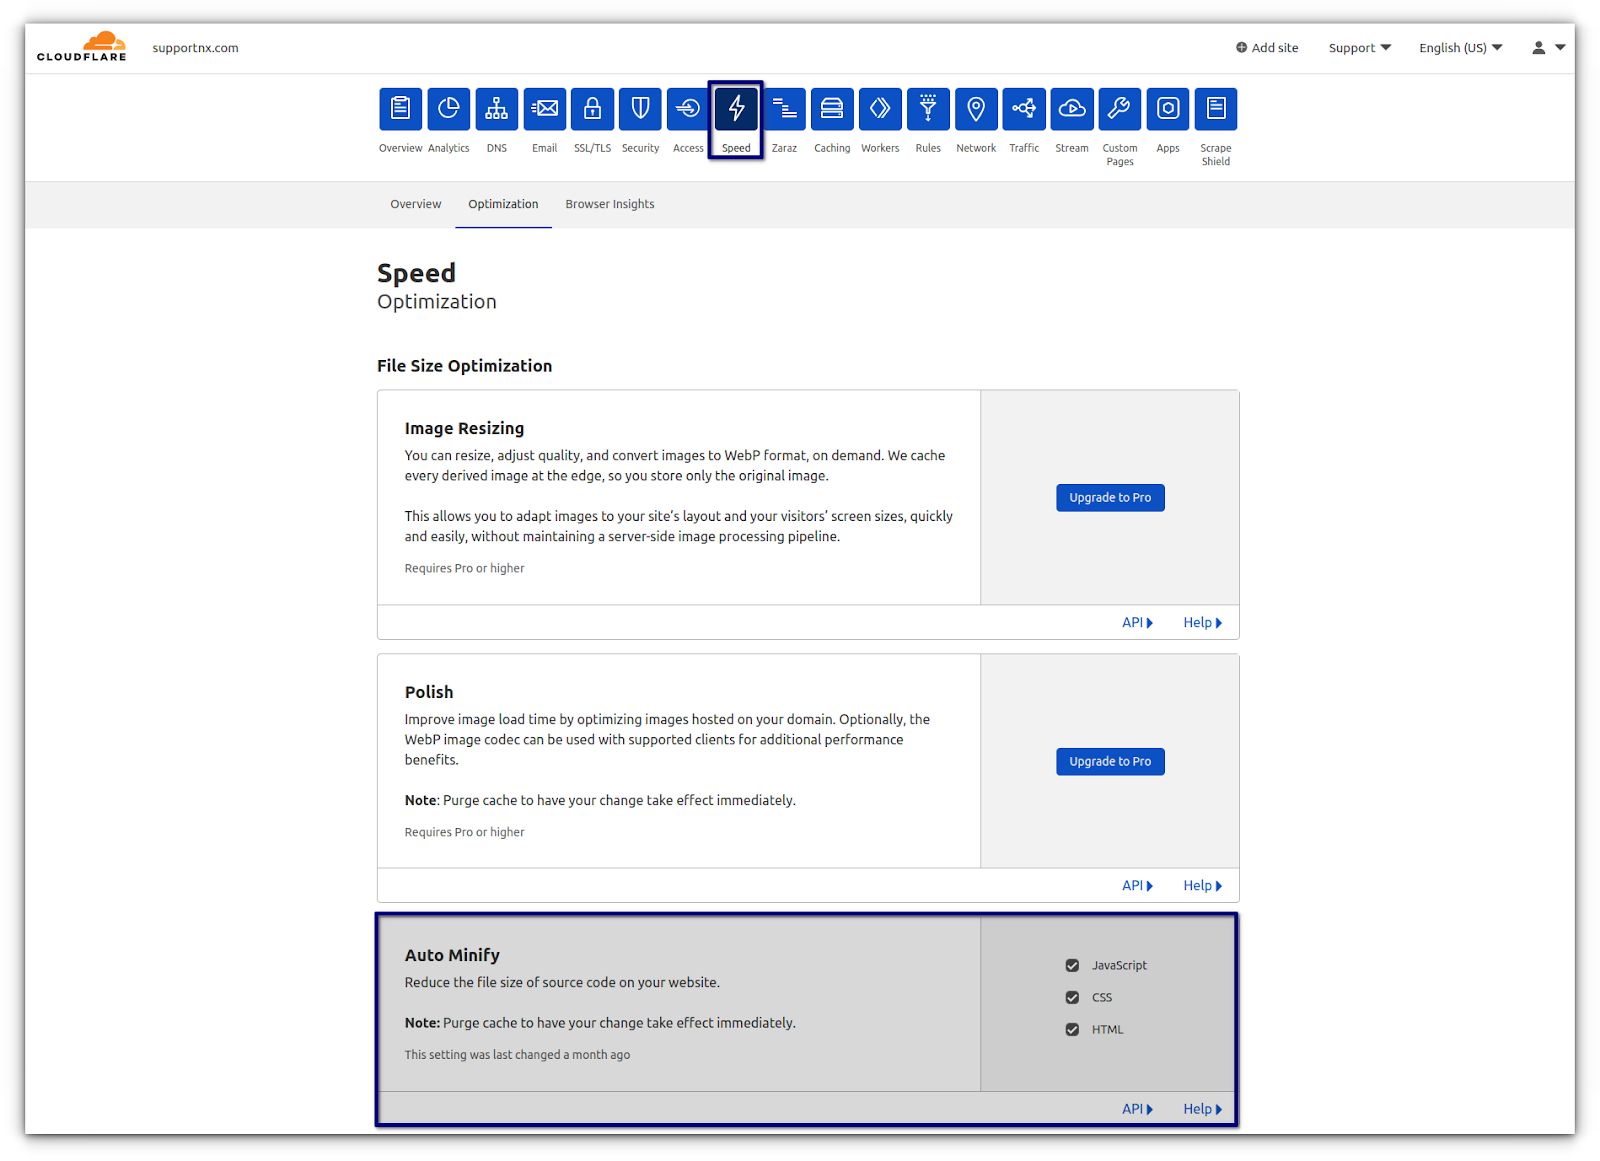
You can minify your JavaScript, CSS, and HTML to load your website faster. Minifying removes spaces, comments, newlines, and block delimiters from the code. Removing these unnecessary characters reduces the file size, which speeds up the load time.
To set up the Auto Minify feature, go to Speed > Optimization > Auto Minify and check the boxes to the left to choose the options you want to enable:
Magento content: Brotli
We recommend you enable Brotli. It’s a new form of compression that is faster than GZIP. With Brotli compression, your files can transmit to users' devices faster:

Setting up Let’s Encrypt SSL for your Magento site with Cloudflare
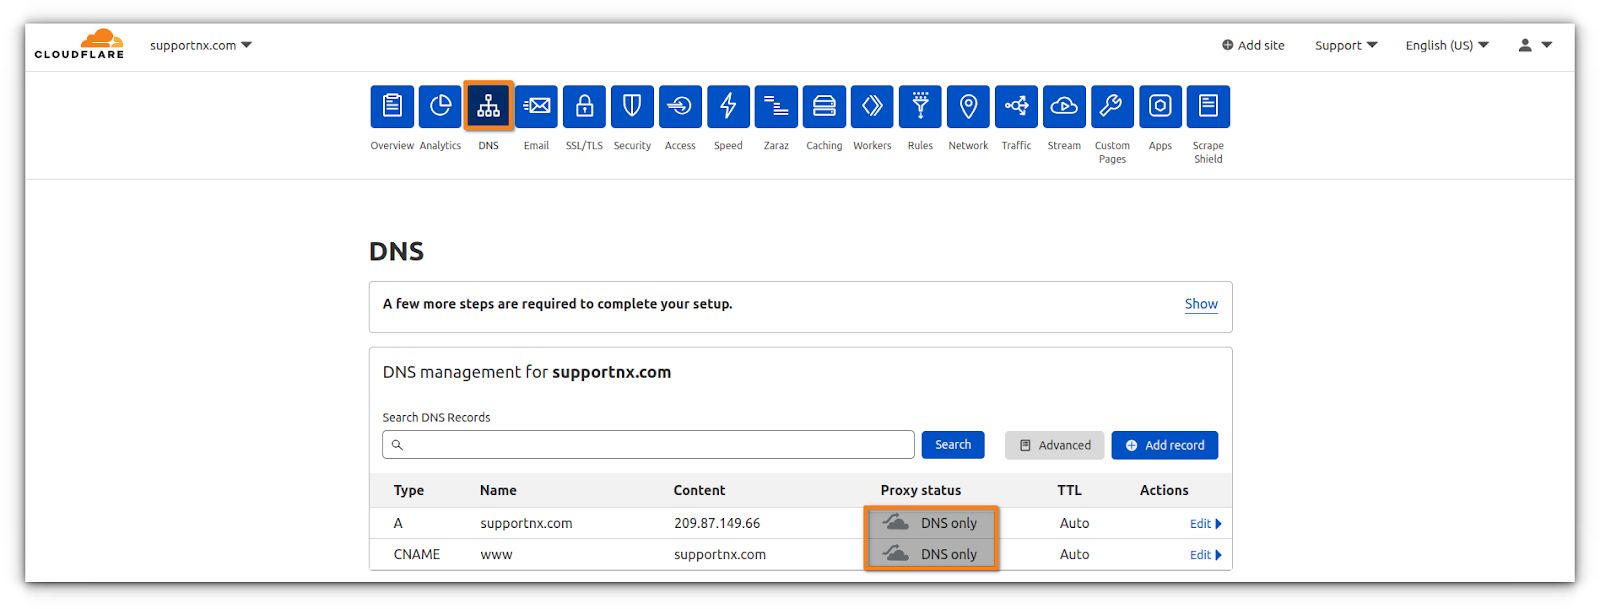
If Nexcess hosts your Magento website, you can enable free Let's Encrypt SSL on your domain. However, you will not be able to enable this SSL while Cloudflare is proxying your site:
Follow these steps to enable Let's Encrypt:
- Log into your Cloudflare dashboard and select DNS (domain name system).
- Disable the Cloudflare proxy status for both www and non-www domain names. When the Cloudflare proxy is off, you'll see a gray cloud instead of an orange one.
- On your Nexcess Client Portal, select Plans > choose the Plan dashboard > Sites and select the domain name on which you want to install SSL.
- Choose SSL from the menu options.
- Enable the Auto Let's Encrypt certificate option by toggling the switch to the right.
- Enable the SSL toggles for www and non-www domain names.
- Hit Issue Certificate to issue a new Let's Encrypt certificate.
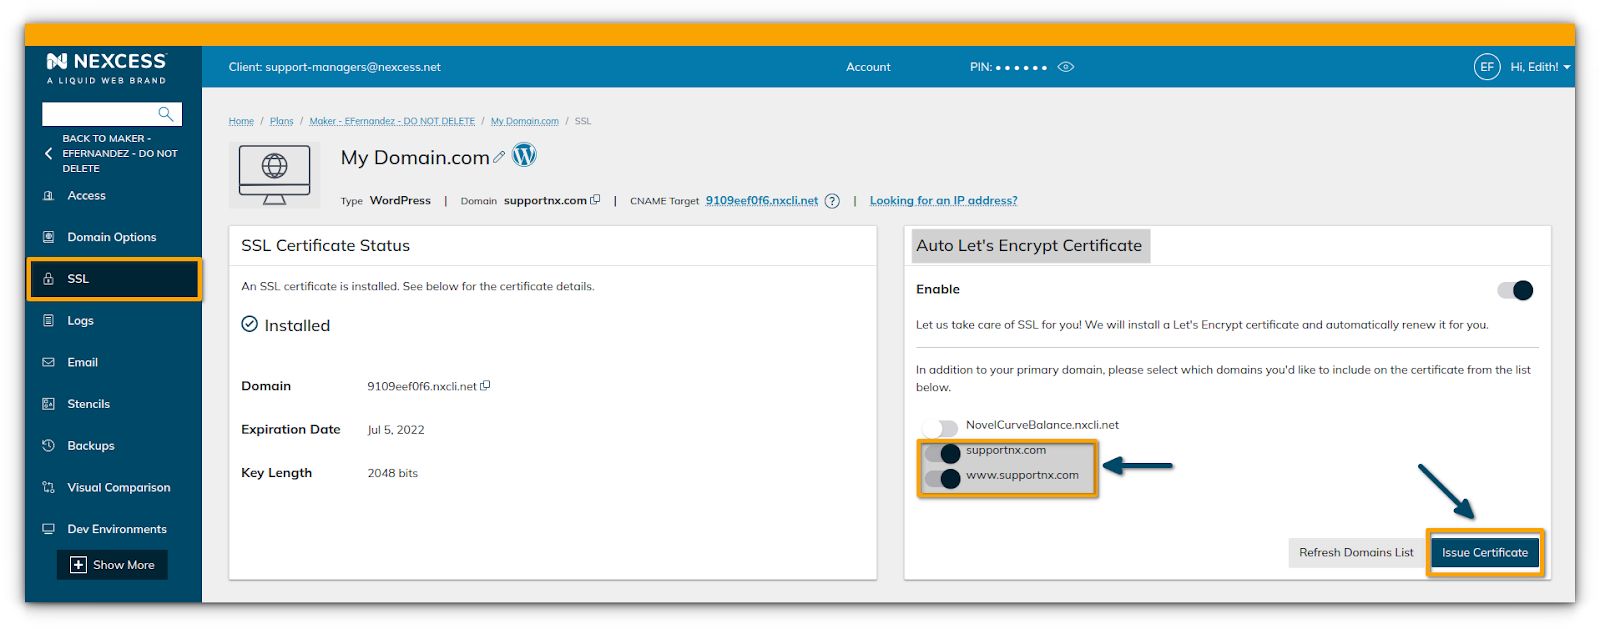
Installing your Let's Encrypt SSL certificate should take at most a few minutes. Once the SSL is enabled on your domain, reactivate the Cloudflare proxy for your domain.
Using a Cloudflare origin certificate
Suppose you want to avoid buying a commercial authority SSL certificate or having trouble renewing Let's Encrypt SSL every 90 days. In that case, you can choose Cloudflare's free certificate of origin.
Looking to take your Magento content strategy to the next level?
Are you looking to take your online store to new heights? If so, check out the Nexcess managed hosting solutions. Depending on your unique business needs, speed, security, and scale, you can choose between managed WordPress hosting and managed Magento hosting.
Regardless of your business’s size, Nexcess has a tailored plan to suit your needs. Each plan features access to Varnish, PHP 7+, an integrated CDN, and image compression for top-tier performance.
Built for speed and scale
Powerful Magento hosting that accelerates your store's potential, without the ongoing maintenance.
With Nexcess hosting plans, you’re in safe hands. The technical team covers every part of your website, so you can focus on growing and scaling your business. You also can access customer and technical support 24/7 if you face any issues.
Magento CDN resources at Nexcess
Below are some useful resources when working with Magento and CDNs at Nexcess:
- How to resolve CORS errors in Magento 2 multi-stores using a CDN
- How to resolve CORS errors in Magento 1 or 2 multi-stores using a CDN
- Magento 2 CDN configuration: setting Up CDN access
- Magento 2 admin panel: optimizing loading speeds for sdmins
General CDN resources at Nexcess
In addition to the resources listed above, the following list contains more general CDN resources:
- How does a CDN work to speed up your ecommerce site?
- How to reconfigure your site from using CDN
- What does purge the CDN mean? Purging the Nexcess CDN
- How to access your CDN from your Nexcess Client Portal
- What is a Content Delivery Network? CDN benefits and features
SSL-Related Resources at Nexcess
See the following list of SSL-related resources that you may find useful:
- What are SSL certificates?
- How to enable Let’s Encrypt
- How to purchase SSL certificates from your Nexcess Client Portal
- How to install SSL certificates in SiteWorx
- How to install SSL certificates in Nexcess Cloud
- How to import SSL certificates in your Nexcess Client Portal
- How to cancel an SSL certificate
- Standard SSL: What is a standard SSL certificate?
Find our blog and help articles
Learn why industry experts choose our Nexcess platform on a consistent basis. Our hosting infrastructure was architected for performance and reliability. Power up and select Nexcess as your technology partner for enhancing your website every day. The Nexcess Blog and Nexcess Knowledge Base can help your do so.
Nexcess support team
Nexcess support team help you optimize your online store today! Our support teams have in-depth ecommerce knowledge of multiple web hosting applications, especially Magento.
You’re in good hands with Nexcess. We provide 24/7/365 technical support for all your questions, issues, or migrations.
Check out the fully managed hosting plans from Nexcess to get started today.
Recent articles
- Cloudflare WordPress setup for your CDN solution
- Cloudflare SSL with Cloudflare origin certificate
- What is Cloudflare CDN? How to use Cloudflare CDN

