


How Nexcess clients on physical (non-cloud) servers can use SiteWorx to create email accounts for their domain.
ATTENTION: This method only works for Nexcess clients on physical (non-cloud) servers. If you are a Nexcess Cloud client, see instead How to create and modify email accounts in Nexcess Cloud.
The number of email accounts that can be created for your domain depends on your service plan. Contact our support team if you have questions regarding the number of email accounts that you can configure for your hosting account.
After you have created an email account, you will be able to modify specific properties, such as password or quota. However, you will not be able to change the actual email address, for example, joe@example.com. If you need to change the email address, you will have to create a new email account with the desired name and then delete the original email account.
Creating mailboxes
- Log in to SiteWorx.
- If you do not know your password, click Forgot your password on the login page.
- If you do not know the web address for your SiteWorx login page, either refer to your Welcome Email or contact our 24-hour Support Team for assistance.
- From the SiteWorx main menu, click Hosting Features > Email > Mailboxes.

- Type the desired name for your email address in the Email Address field.
Attention: Your domain name will be automatically appended next to the Email Address field.
- Type your password in the Password field and re-enter it in the Confirm Password field (see above).
- By default, the value for Disk Space Quota is set to Unlimited (see above). If you would like to set a specific quota for the email account, clear the Unlimited check box and then enter the desired amount in megabytes.
- If you want to send a copy of all messages to a different email address, type that email address in the Send Copy To field. New messages will be delivered to this email account.
- If one or more email groups exists for your domain, they are listed under the Send Copy to field. If you want to assign the new email address to a group, click the corresponding check box. For more information about email groups, refer to How to create and manage email groups.
- Click Add.
Editing and deleting mailboxes
After you have successfully created an email account, you can modify the settings by clicking Edit. You can also delete email accounts my clicking Delete.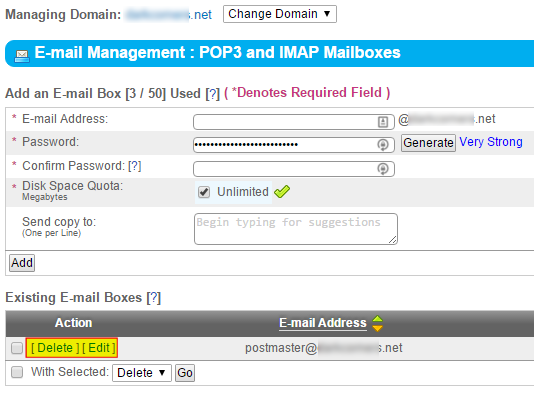
For 24-hour assistance any day of the year, contact our support team by email or through your Client Portal.


