

This guide provides a concise walkthrough on setting up Sylius hosting at Nexcess.
In this article, we explore the two approaches of either leveraging the flexible cloud platform or a non-cloud solution for traditional "Nexcess Classic" hosting.


Overview of the Sylius hosting options at Nexcess
Read on to find the best fit for your ecommerce needs.
Method #1: How to use Sylius at Nexcess via flexible cloud hosting
Nexcess is a hosting platform renowned for its vast selection of hosting options, including flexible cloud hosting plans. The Nexcess Client Portal is a user-friendly platform that allows you to manage your website and hosting services easily:


Though Nexcess no longer provides a Sylius-specific plan, the adaptable cloud hosting options remain a great fit for Sylius users:


These plans shine in their scalable nature and flexibility, with various configurations that can be customized to meet your unique hosting needs— making them a prime choice for deploying Sylius.
Understanding the flexible cloud hosting plan
Nexcess offers six different flexible cloud hosting plans, each with varying resource allocations:


Each tier increases the available resources, such as the number of sites, disk space, bandwidth, etc. The cost of these tiers ranges from $52.00 to $894.00 per month, depending on the plan:

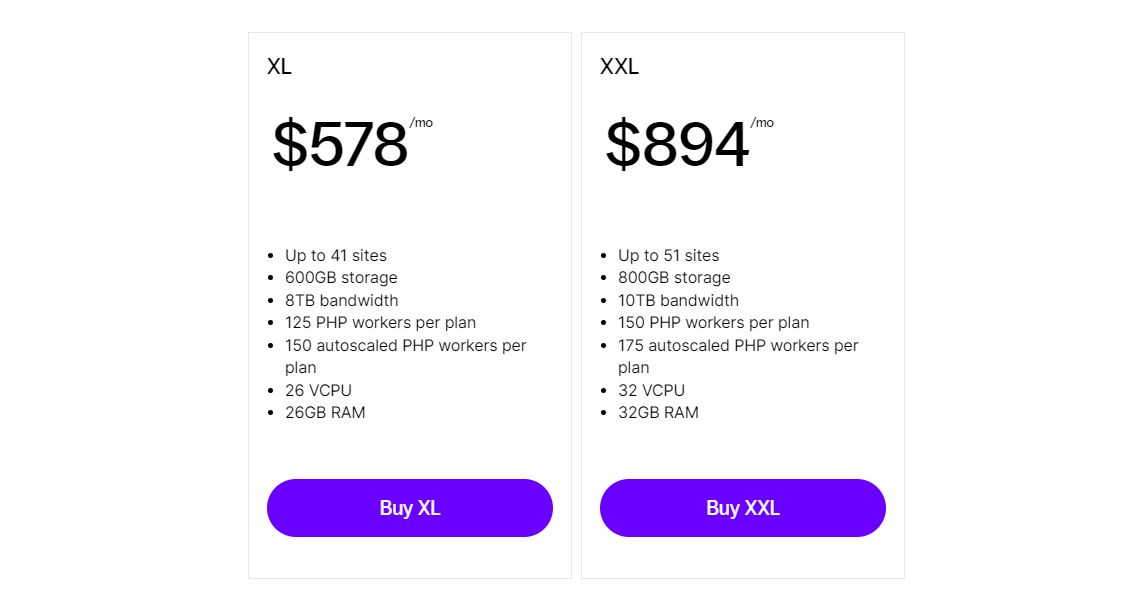
The most significant advantage of the flexible plan is the ability to cater to various hosting needs. If you're running smaller sites, the XS or S options may be sufficient. However, as your online presence grows, you might be interested in plans up to XXL that can take up to 51 sites:


Installing Sylius using a flexible cloud hosting plan
Now, let's dive into the specifics.
Once you've chosen your preferred plan on the Nexcess website and completed the checkout process, you'll have a plan set up where you can proceed with the manual Sylius installation steps.
Step 1. PHP for Sylius
To upgrade your PHP version for running Sylius, which requires a minimum PHP version of 8.0, you need to follow these steps in the control panel:
1a. Go to Plans area by navigating to the Plans section in your control panel.
1b. Select the Flexible Plan. From the available plans, select the newly created flexible plan:


1c. Go to Sites. In the flexible plan options, find and click on the Sites section:


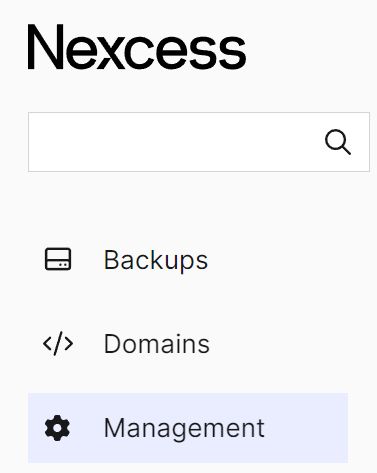
1d. In the left sidebar of the site's settings, click on Management option:

1e. Scroll down until you find the PHP section.
1f. In the PHP section, click Change PHP version:


1g. Select PHP Version 8.2: Since Sylius requires a minimum PHP version of 8.0, and the latest version available is 8.2, select PHP 8.2 to ensure compatibility and the latest features.
If you see the “We detected incompatibilities with changing your PHP version to 8.2. Would you like to proceed?” message, you can skip it as it won’t affect anything on your system.
After completing these steps, your PHP version should be updated, and you should be able to install Sylius.
Step 2. Adding a new Sylius site
Once you've set up a flexible plan, by default, you'll already have one "Flexible" type site created.
2a. If you wish, you can utilize this pre-existing site to proceed with the Sylius installation:


2b. To better distinguish websites, you can change its name by clicking the three dots on the right, followed by Change Site Name:


2c. Alternatively, Nexcess offers automated installation options for several platforms, such as BigCommerce for WordPress, CraftCMS, Expression Engine, Magento, WooCommerce, and WordPress:

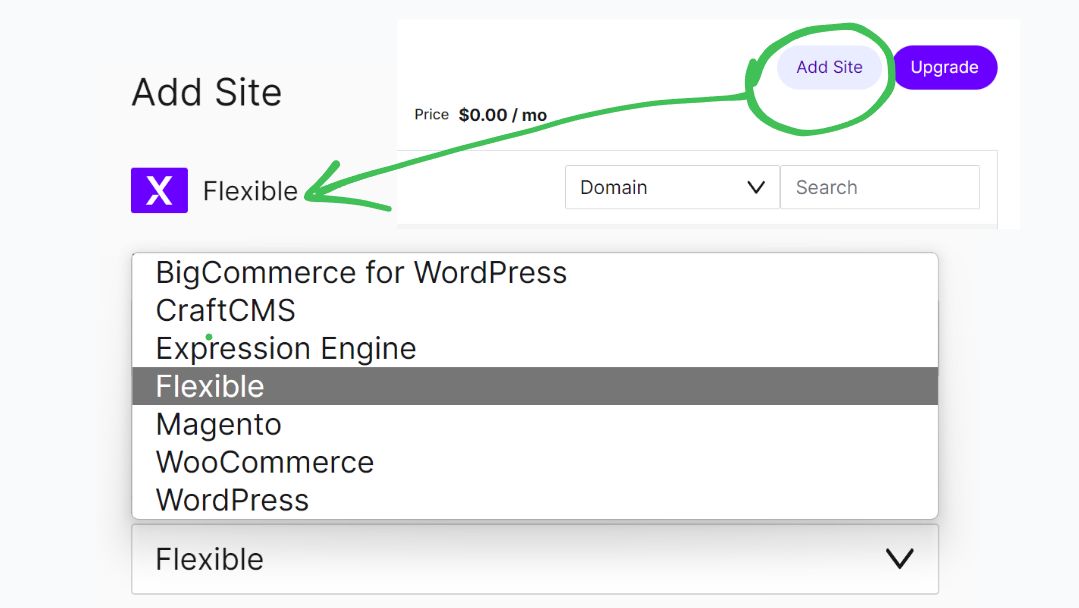
This means you can host multiple types of websites under the Flexible Plan.
Step 3. Site Dashboard
Now, let's go to the Site Dashboard by clicking the corresponding option in the user interface.
3a. The dashboard is your hub for controlling and managing your new Sylius site. It shows key settings, including site type, domain, DNS setup target, SSH/FTP access details, server hostname, FTP port and username, and IP address:


3b. This includes viewing and modifying your site's credentials, managing and scheduling backups, adding or removing domains, adjusting management settings, handling SSL certificates for secure connections, and even checking logs for any issues or activities:


Step 4. DNS
Upon entering your dashboard, the first thing you might notice is a warning:


4a. This alerts you to the need for completing your DNS settings.
4b. The DNS, or Domain Name System, ties your domain name to your server, i.e., your website. You need to add a DNS zone for your Sylius site, essentially a set of DNS records that guide visitors to the right location.
A step-by-step guide on setting up your DNS is provided in the How to point your domain name to Nexcess DNS Services article.
Step 5. SSH
SSH, or Secure Shell, is a protocol that allows secure remote access to your server.
5a. On your dashboard, navigate to the Credentials section and find the Secure Shell (SSH / SFTP) subsection.
5b. Click on the link in "To view Secure Shell details for this site, go to the plan Credentials section here."
5c. This will take you to a section with your unique SSH credentials. It looks something like this:
Secure Shell (SSH / SFTP)
Hostname	643734865ba7ae.nxcli.io
Port	      22
Username	a4cb2dc0_1
Password	••••••
Command	ssh 53463dc0_1@ed1e46237ae.nxcli.io
5d. To connect to your server, you'll need to copy the “Command” into your terminal.
5f. As for the password, it's hidden by default for security reasons. To view it, click View Password next to the password field.
Step 6. Installing Sylius
Now let's install the Sylius web application.
6a. Upon initiating SSH into your server, execute this command:
composer2 create-project sylius/sylius-standard MyFirstShop
cd MyFirstShop
6b. Here’s a simple breakdown of what the command does:
- composer2 create-project — signals Composer, a PHP package manager, to start a new project. The number “2” indicates the version of the Composer in use.
- sylius/sylius-standard MyFirstShop — denotes that the new project should be built on the Sylius standard edition, and the project is to be placed in a directory called MyFirstShop.
- cd MyFirstShop — go inside of the folder MyFirstShop.
Make sure you do all the following commands inside of the MyFirstShop directory.
Step 7. Symfony
Depending on your Sylius version, different Symfony versions might be supported. To install the correct Symfony version (for example, Symfony 6.0), specify it before starting the installation.
7a. Here are the commands to set Symfony to version 6.0:
composer2 config extra.symfony.require "^6.0"
composer2 update
7b. Here’s a simple breakdown of what the command does:
- The first command instructs Composer to require a specific version of Symfony, which in this case is 6.0. The caret symbol (^) indicates compatibility with versions up to, but not including, the next major release.
- The second command, composer update, will update all the Symfony packages to the required version as specified.
Step 8. Database
Setting up a database is a vital step in installing Sylius as it’s necessary for data storage and management. The database will hold essential data, such as product information, customer details or order histories.
8a. Having said that, let’s proceed with the database setup:
- Navigate back to your main dashboard and find the “BACK TO FLEXIBLE NC.SMALL PL section.
- Within this, look for the Databases option and click on it.
- Here, you'll find an option labeled Quick Add Database & User:

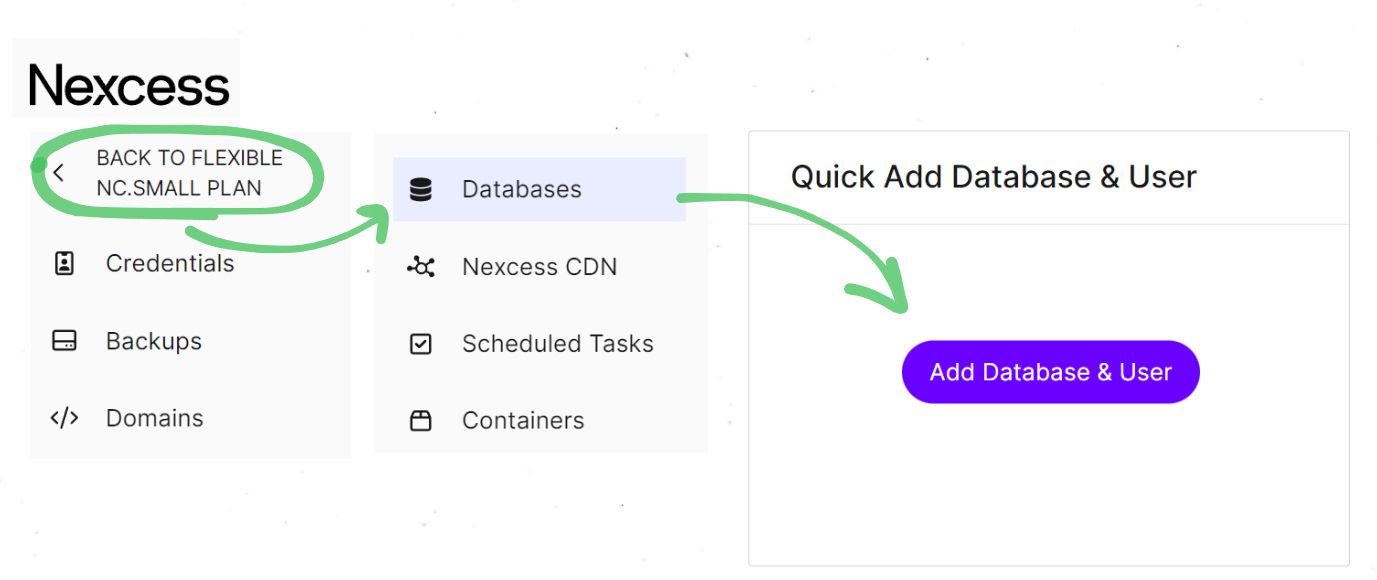
8b. Click on the Quick Add Database & User button and enter a database name and username of your choice:


8c. Next, scroll down the same page until you find the Users section:

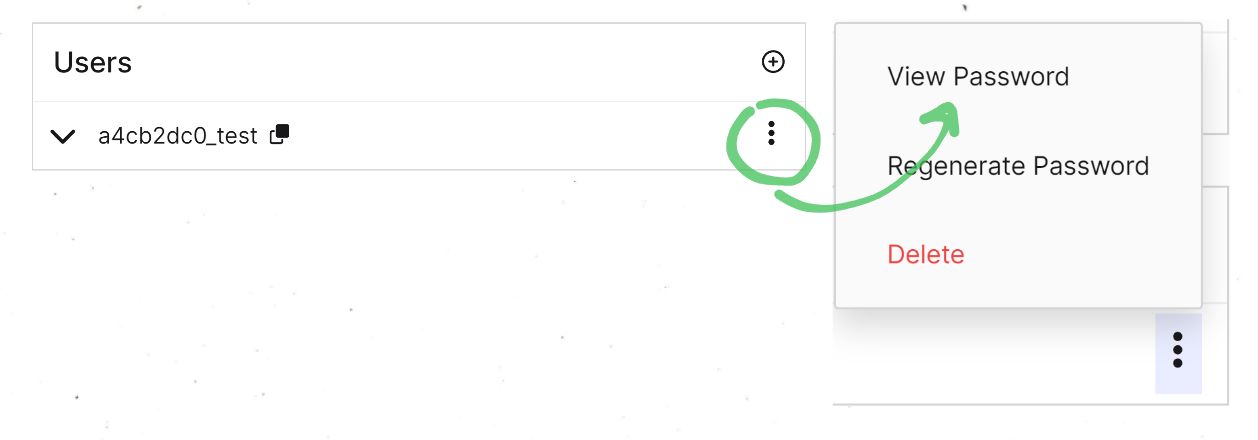
8d. On the right side of the listed users, you'll notice a three-dots icon. Click on this icon and choose View Password.
8d. Be sure to save this information safely as it will be required later when we modify the .env file for your Sylius application.
Step 9. Editing the .env file
This .env file is used to store environment variables that configure the behavior of your application. It’s located in the MyFirstShop directory.
9a. Open it to edit:
vim .env9b. In the .env file, you'll see a line that starts with DATABASE_URL. This is a structured string that specifies how to connect to the database:
DATABASE_URL=mysql://root@127.0.0.1/sylius_%kernel.environment%?serverVersion=8&charset=utf8mb49c. You’ll need to adjust it with the credentials you saved earlier. As an example, here’s the test credentials:


9d. This is how you modify it:
- Username — Replace root with your database username, mine test username is a4cb2dc0_test.
- Password — Insert your password right after the username. This represents the password for your database. Mine is DipperDebunkShaverGulps.
- Database Name — Substitute sylius_%kernel.environment% with a4cb2dc0_test, which is your database name.
9e. After these changes, your new line will look like this:
DATABASE_URL=mysql://a4cb2dc0_test:DipperDebunkShaverGulps@127.0.0.1/a4cb2dc0_test?serverVersion=8&charset=utf8mb49f. With this, your Sylius application now knows where and how to access its database. Make sure to save your changes in the .env file before proceeding.
Step 10. Issuing the bin/console sylius:install command
Following the database setup and the necessary changes in the .env file, it's time to install Sylius.
10a. For this step, you will run the command:
bin/console sylius:install

Installing Sylius...

           ,
         ,;:,
       `;;;.:`
      `::;`  :`
       :::`   `          .'++:           ''.   '.
       `:::             :+',;+'          :+;  `+.
        ::::            +'   :'          `+;
        `:::,           '+`     ++    :+.`+; `++. ;+'    ''  ,++++.
         ,:::`          `++'.   .+:  `+' `+;  .+,  ;+    +'  +;  ''
          ::::`           ,+++.  '+` :+. `+;  `+,  ;+    +'  '+.
   ,.     .::::             .++` `+: +'  `+;  `+,  ;+    +'  `;++;
`;;.:::`   :::::             :+.  '+,+.  `+;  `+,  ;+   `+'     .++
 .;;;;;;::`.::::,       +'` `++   `++'   `+;  `+:  :+. `++'  '.  ;+
  ,;;;;;;;;;:::::       .+++++`    ;+,    ++;  ++, `'+++,'+' :++++,
   ,;;;;;;;;;:::`                  ;'
    :;;;;;;;;;:,                :.:+,
     ;;;;;;;;;:                 ;++,
10b. The bin/console sylius:install command executes the installation of Sylius in your server environment, displayed with an interactive ASCII art.
10c. It begins with the system requirements check. The command will ensure that your system is fully compatible with the Sylius requirements.
Step 1 of 5. Checking system requirements.
------------------------------------------

Success! Your system can run Sylius properly.
10d. It proceeds to the database setup. During this stage, it acknowledges the existence of the database we created earlier and asks for your permission to drop all tables, ensuring a clean slate for the Sylius installation:
Step 2 of 5. Setting up the database.
-------------------------------------

Creating Sylius database for environment dev.
The database a4cb2dc0_test exists and it contains some tables.
Warning! This action will erase your database.
Do you want to drop all of them? (y/N)
10e. Next comes the shop configuration. This is where you set up your shop's basic configurations, such as the currency, language, and administrative account details.
Step 3 of 5. Shop configuration.
--------------------------------

Currency (press enter to use USD):
Adding US Dollar currency.
Language (press enter to use en_US):
Adding English Language.
Adding en_US locale.
Create your administrator account.
E-mail:
. . .
. .
10f. The fourth step is JWT token configuration. Here, the command will generate a JWT token for the Sylius API, a crucial part of ensuring secure data exchanges between your shop and any integrated applications:
Step 4 of 5. Configuring JWT token.
-----------------------------------

Generating JWT token for Sylius API
Do you want to generate JWT token? (y/N)
10g. Lastly, it carries out the installation of assets. Sylius will install necessary asset files, such as images, stylesheets, or JavaScript files, that your shop will use. The command also indicates the successful completion of each step, keeping you informed throughout the process. The successful completion message signifies that your Sylius installation is ready to be accessed:
Step 5 of 5. Installing assets.
-------------------------------

Installing Sylius assets for environment dev.
Created "/chroot/home/a4cb2dc0/MyFirstShop2/public/assets" directory.
 1/1 [░░░░░░░░░░░░░░░░░░░░░░░░░░░░] 100%


 [OK] Sylius has been successfully installed.
Step 11. Yarn
Yarn is next. Here are the steps involved.
11a. You need to run these two commands:
yarn install
yarn build
Here’s a simple explanation of what each command does:
- yarn install — This command is used to fetch all the dependencies for your project and install them onto your local machine.
- yarn build — It initiates a build process that compiles, bundles, and optimizes your JavaScript and CSS assets for production using a module bundler like Webpack, resulting in ready-to-serve static assets.
Step 12. Symlink
If you navigate to your domain through the Nexcess dashboard, you will see the content from the /home/user/domain/html directory, as this is set as the default document root for the server:


However, you want your new Sylius website to be what users see when they visit your domain. You can accomplish this by creating a symlink. A symbolic link, or symlink, is a type of file that points to another file or directory.
For example, if you have a Sylius website in the /home/a4cb2dc0/MyFirstShop/public directory and want to make it accessible from a domain that is currently pointing to /home/a4cb2dc0/ed1e4ba7ae.nxcli.io/html, you can create a symlink to do this.
12a. Go to the directory where the domain is pointing:
cd /home/a4cb2dc0/ed1e4ba7ae.nxcli.io12b. Rename the existing html directory:
mv html html_bak12c. Create a symbolic link from the domain's directory to the Sylius website:
ln -s /home/a4cb2dc0/MyFirstShop/public htmlNow, when someone visits your domain, they will see the Sylius website instead of the default index.html page:


Congratulations! Your Sylius website is done! Learn how to configure your application on the official Sylius website.
Method #2: How to install Sylius at Nexcess via a non-cloud account
This part of the tutorial will guide you on performing this task using a non-cloud Nexcess account. Because this section is exclusively designed for non-cloud accounts, if you hold a Nexcess Cloud account, please use Method #1 above or contact our support team for further help.
Installing Sylius via non-cloud account
Non-cloud accounts at Nexcess are often referred to as "Nexcess Classic" accounts. Let's get to the specifics of setting up Sylius hosting on a Nexcess Classic account.
Step 1: Connect to your server via SSH
SSH, short for Secure Shell, is a network protocol that provides a secure way to access a remote computer.
1a. Use the terminal to run a Unix-based OS like Linux or MacOS. For Windows users, software like Putty would be appropriate:
ssh username@server-ip-address1b. Ensure to replace username with your and server-ip-address with the actual IP address of your server.
Step 2: Update your system
Before you start, ensure your system is up to date.
2a. You can do this by running the following command:
sudo yum update -yStep 3: PHP versions
To ensure that Sylius functions optimally, you need to ensure that your PHP version is 8.0 or higher.
3a. To verify this, execute the following command in your terminal:
[root@sample ~]# php -v
PHP 8.1.20 (cli) (built: Jun 23 2023 04:17:29) (NTS)
Copyright (c) The PHP Group
3b. If your PHP version is lower than 8.0, you'll need to update or install the correct version of PHP.
3c. This is crucial to ensure the proper operation and optimal performance of your Sylius installation.
Step 4: MySQL server
Sylius requires a MySQL server for data storage.
4a. To check if you have a MySQL server already installed on your system, use the following command:
systemctl status mysql4b. You should see an output similar to this:
[root@sample ~]# systemctl status mysql
● mariadb.service - MariaDB 10.5.21 database server
   Loaded: loaded (/usr/lib/systemd/system/mariadb.service; enabled; vendor preset: disabled)
  Drop-In: /etc/systemd/system/mariadb.service.d
           └─migrated-from-my.cnf-settings.conf
   Active: active (running) since Thu 2023-06-22 07:21:15 EDT; 1 weeks 0 days ago.
4c. If your MySQL server is installed and running, you will see a status output similar to the one above. If not, you will need to install and start the MySQL server.
4d. To install the MySQL server, use the following commands:
sudo yum install -y mysql-server4e. After the installation is complete, you need to start the MySQL service and confirm that it is enabled to start at boot time (it should be enabled by default, but it is always good to check/test your work). You can do this using the following commands:
sudo systemctl start mysqld
sudo systemctl enable mysqld
4f. Once the MySQL server is up and running, you can move to the next step of installing Sylius.
Step 5: Composer
Composer is a dependency management tool for PHP, and it's a crucial component for installing and managing Sylius. However, running Composer as the root user is not recommended due to potential security risks.
You may encounter a warning message like this:
[root@sample ~]# composer create-project sylius/sylius-standard MyFirstShop
Do not run Composer as root/super user! See https://getcomposer.org/root for details
This warning is Composer's way of reminding you that running it with root permissions can have serious security implications. The recommended approach is to create a non-root user and run Composer using that user's permissions.
Here's how you can create a new user and switch to it:
5a. Add a new user (we'll call this user syliususer for this example):
sudo adduser syliususer5b. Set a password for the new user:
sudo passwd syliususer5c. To give syliususer the necessary permissions, add the user to the wheel group, which will give them sudo access:
sudo usermod -aG wheel syliususer5d. Finally, switch to the new user:
su - syliususer5e. You are now logged in as syliususer and can run Composer commands without triggering the root user warning.
5f. Now, let's check if you already have composer installed:
[syliususer@sample ~]$ composer --version
Composer version 2.4.4 2022-10-27 14:39:29
5g. If you don't let's install it. Download the Composer installer. Switch to the root:
sudo su - 5h. And run this command:
curl -sS https://getcomposer.org/installer | php5i. This command will download the Composer installer script using curl and execute it with PHP. Make Composer globally accessible. To use Composer from any directory, move the composer.phar (PHP Archive) file to /usr/local/bin/ and rename it to composer:
sudo mv composer.phar /usr/local/bin/composer5j. Verify the installation. Switch back to the user and run:
[syliususer@sample ~]$ composer --version
Composer version 2.4.4 2022-10-27 14:39:29
Step 6: Installing Sylius
The procedure for installing Sylius on a system involves several steps.
6a. Project Initialization.
Use the create-project command from Composer to initiate a new Sylius project. This will generate a new directory called MyFirstShop containing a fresh Sylius installation:
composer create-project sylius/sylius-standard MyFirstShop6b. Composer.
Different Sylius versions support various Symfony versions. To ensure Symfony 6.0 installation, specify this before installing. To set Symfony to version 6.0, use these commands:
composer2 config extra.symfony.require "^6.0"
composer2 update
The first command sets Symfony to version 6.0. The caret (^) indicates compatibility up to the next major release, excluding it. The second command updates Symfony packages to the set version.
If skipped, you risk incorrect Symfony version installation, possibly causing compatibility issues and errors.
6c. Database.
Previously you created a new user: syliususer with the command sudo adduser syliususer. This command creates a new user in the operating system (in this case, a Linux user).
Now, you need a MySQL user for Sylius to interact with your MySQL databases. If you're currently logged in as a user and facing issues due to forgotten password or access rights, you can switch back to the root user, which generally has full privileges.
If you're using a system like Unix or Linux, you can switch to the root user with the su command:
su -You'll be prompted to enter the root user's password. Once you do that, you should be switched to the root user.
Then enter the following commands:
mysql

CREATE USER 'syliususer'@'localhost' IDENTIFIED BY 'password';
GRANT ALL PRIVILEGES ON syliususer.* TO 'syliususer'@'localhost';
FLUSH PRIVILEGES;
Replace password with a secure password.
Here's a breakdown of what these commands do:
- mysql — Starts MySQL command-line client.
- CREATE USER 'syliususer'@'localhost' IDENTIFIED BY 'password'; — Makes a new MySQL user syliususer with password password.
- GRANT ALL PRIVILEGES ON syliususer.* TO 'syliususer'@'localhost'; — Gives syliususer all permissions on syliususer database.
- FLUSH PRIVILEGES; — Reloads the grant tables, making the permissions changes active.To check if a user exists in MySQL, you can query the mysql.user table. Here's how to check for syliususer:
MariaDB [(none)]> SELECT User, Host FROM mysql.user WHERE User = 'syliususer';
+------------+-----------+
| User       | Host      |
+------------+-----------+
| syliususer | localhost |
+------------+-----------+
1 row in set (0.001 sec)
This will return a list of all hosts for which 'syliususer' exists. If 'syliususer' doesn't exist, it will return an empty set.
6d. .env file.
The .env file in your MyFirstShop directory stores environment variables for your application. To edit, use:
vim .envFind the DATABASE_URL line in .env file:
DATABASE_URL=mysql://root@127.0.0.1/sylius_%kernel.environment%?serverVersion=8&charset=utf8mb4Alter it using your credentials:
- Replace 'root' with your database username (for example, 'syliususer')
- Insert your password after the username
- Substitute 'sylius_%kernel.environment%' with your database name (for example, 'syliususer')
Resulting in:
DATABASE_URL=mysql://syliususer:password@127.0.0.1/syliususer?serverVersion=8&charset=utf8mb4Save the .env file after updating. This lets Sylius know how to connect to its database.
6e. sylius:install
Now that the database and .env file are prepared, it's time to install Sylius inside of the recently created folder MyFirstShop via:
bin/console sylius:installThis command begins the installation process, confirmed by ASCII art. It follows a five-step procedure.
System requirements check, ensuring Sylius compatibility:
Step 1 of 5. Checking system requirements.
------------------------------------------
Success! Your system can run Sylius properly.
Database setup, recognizing the previously created database. It asks for permission to drop all tables for a fresh installation:
Step 2 of 5. Setting up the database.
-------------------------------------
Creating Sylius database for environment dev.
The database a4cb2dc0_test exists and it contains some tables.
Warning! This action will erase your database.
Do you want to drop all of them? (y/N)
Shop configuration for basic settings like currency, language, and admin account:
Step 3 of 5. Shop configuration.
--------------------------------
Currency (press enter to use USD):
Adding US Dollar currency.
Language (press enter to use en_US):
Adding English Language.
Adding en_US locale.
Create your administrator account.
E-mail:
...
JWT token configuration, generating a JWT token for the Sylius API, key for secure data exchanges:
Step 4 of 5. Configuring JWT token.
-----------------------------------
Generating JWT token for Sylius API
Do you want to generate JWT token? (y/N)
Installation of assets like images, stylesheets, or JavaScript files:
Step 5 of 5. Installing assets.
-------------------------------
Installing Sylius assets for environment dev.
Created "/chroot/home/a4cb2dc0/MyFirstShop2/public/assets" directory.
 1/1 [░░░░░░░░░░░░░░░░░░░░░░░░░░░░] 100%
Each step's completion is indicated, and success confirms your Sylius installation is accessible:
[OK] Sylius has been successfully installed.6f. Yarn.
You should run the following commands next:
yarn install
yarn build
Here is an explanation of the two commands:
- yarn install — Fetches and installs your project's dependencies listed in package.json.
- yarn build — Triggers a build process, compiling, bundling, and optimizing your JS and CSS assets, making them ready for production. This includes tasks like minification and transpilation.
If it’s not installed, switch to the root and install it using:
curl --silent --location https://dl.yarnpkg.com/rpm/yarn.repo | sudo tee /etc/yum.repos.d/yarn.repo
sudo yum install yarn
Then switch back to the previous user, navigate back to your MyFirstShop2 directory and try running the Yarn commands again.
6g. Testing with Symfony
After successfully running yarn install and yarn build in the Sylius application, you might want to test the application locally. The quickest way to achieve this is by using the Symfony binary.
Install Symfony CLI
If the Symfony CLI tool isn't installed on your server, install it using the following command:
wget https://get.symfony.com/cli/installer -O - | bashThis command downloads the Symfony CLI installer and runs it, which installs Symfony CLI in the /usr/local/bin directory.
Update PATH
Next, ensure Symfony CLI is available in your system's PATH. You can achieve this by running:
export PATH="$HOME/.symfony/bin:$PATH"Move Symfony CLI
Sometimes, Symfony CLI might get installed under a different directory, for example, /root/.symfony5/bin/symfony. If that's the case, move it to /usr/local/bin/symfony:
mv /root/.symfony5/bin/symfony /usr/local/bin/symfonyVerify that the move was successful by checking the contents of /usr/local/bin:
ls /usr/local/binUpdate Session Save Paths
Finally, for the session handling, create a new session directory in your application. For instance:
mkdir -p /home/syliususer/MyFirstShop/var/sessions/
chown syliususer:syliususer /home/syliususer/MyFirstShop/var/sessions
chmod 700 /home/syliususer/MyFirstShop/var/sessions
Update the session save_path in your Symfony application configuration (in this case, config/packages/framework.yaml). Point it to the newly created session directory:
vim config/packages/framework.yamlYou need to replace all instances of save_path:
After following these steps, your application should be ready for local testing using the Symfony server, which you can start by running:
framework:
    ...
    session:
        handler_id: session.handler.native_file
        save_path: '/home/syliususer/MyFirstShop/var/sessions/'
After following these steps, your application should be ready for local testing using the Symfony server, which you can start by running:
symfony serveThis command will start a local web server, typically accessible at http://127.0.0.1:8000/. To see your application in action, open a web browser and enter this address into the browser's URL bar:
Conclusion
Kudos on your successful installation of Sylius!
Cloud done your way
We believe in the promise of cloud: scalability, security, performance, and ease of use. Together with our team, clients, and partners, we’ve built better cloud hosting.
Should you wish to delve deeper into customizing your Sylius application, the official Sylius documentation stands as a comprehensive guide.


