


How Nexcess clients can use their Client Portal to configure their Nexcess CDN service for use with their Magento 2 store.
Many businesspeople wonder How Does a CDN Work to Speed Up Your Ecommerce Site? but they will discover that the reasons are remarkably straightforward. Review the content, resources, and links in this article to learn more about those reasons in full detail.
What you need
- A functioning Magento store on your Nexcess server.
- Your Client Portal username and password. If you cannot locate this information, click the Forgot Password link on the Client Portal login menu or contact our support team.
Exception for media assets
Certain types of content, such as images, video, and audio media assets like JPG, MP3, MP4, and so on, are already compressed. Additional compression to these types of assets will not significantly diminish file size.
Method
1: Access the portal
- The Nexcess CDN is provided at no cost for your Magento store.
- Log in to the Client Portal. From the dashboard, click Plans > Plan Dashboard.

- In order to be able to use the Nexcess CDN you will need to enable it from the Performance tab.
- Click on Configure CDN on Your Site in the Content Delivery Network section to Enable CDN. A popup will display you will need to click on the ENABLE button.


- Once the CDN has been enabled the CDN origin URL will now show in the Content Delivery Network section of the performance tab.

- Locate the Nexcess CDN information from the Performance tab in the portal.

2: Verify settings
ATTENTION: Allow the CDN service at least one hour to cache your data before you attempt to verify the new settings as outlined below. A good test would be to use just visit the CDN endpoint and see if your website loads.
- From the example URL shown in the above image, the CDN URL would read: https://eadn-wc02-876771.nxedge.io/cdn.
- Enter the CDN URL into your web browser. If the page loads, your assets have successfully propagated to the CDN, and you may proceed to Step 2. If you have already completed Step 2, proceed to the next section.
- Update your Magento 2 installation
- Update your Magento install to use the CDN origin URL by selecting Stores > Configuration > Web.

- From the General tab, select Web.

- From the Store View drop-down list, select your desired store.

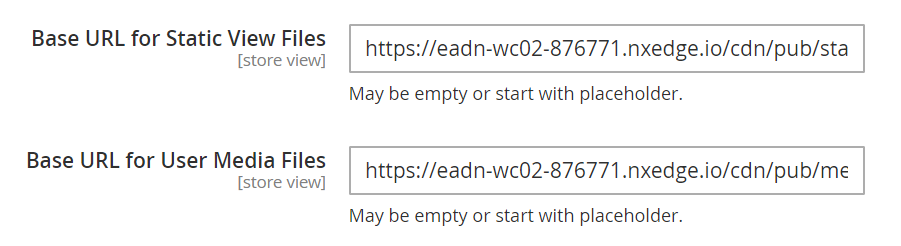
- In the Base URL (Secure) section, in the Base URL for Static View Files and Base URL for User Media Files fields, enter the CDN origin URL. The static view file and user media files will depend on how your Magento 2 store is installed with or without pub in the path.
- If your Magento 2 store is installed with pub, then use:
https://eadn-wc02-876771.nxedge.io/cdn/pub/static/
https://eadn-wc02-876771.nxedge.io/cdn/pub/media/
If your Magento 2 store is installed without pub, then use:
https://eadn-wc02-876771.nxedge.io/cdn/media/
https://eadn-wc02-876771.nxedge.io/cdn/static/
- In the same section, in the Base URL for User Media Files field, the origin URL.
- Flush the Magento 2 cache:
- From the main menu, select System > Cache Management.

- On the upper right, click Flush Magento Cache.
 If you do need to purge the content being stored in the Nexcess CDN you can purge the CDN directly from the portal in the performance tab.
For 24-hour assistance any day of the year, contact our support team by email or through your Client Portal.
- From the main menu, select System > Cache Management.


