


This method works only with Magento 1.x. For Magento 2, see How to configure Magento 2 storefronts.
A Magento website may consist of one or multiple storefronts. These storefronts manage showcase products, categories, and search functionality. It is possible to configure multiple Magento storefronts for the same website.
Explore the Magento website for more information.
1. Create the storefront
The first step in setting up multi-store functionality is to create the new store or stores in the Magento Admin Panel.
- Log in to the Magento Admin Panel. If you want your stores to share the same catalog and products, skip to Step G.
- In the top menu, go to Catalog > Manage Categories.
- Click Add Root Category.
- In the Name field, enter your new store name.
- Under Is Active, select Yes.
- Under Display Settings, in Is Anchor, select Yes, and select Save Category
- Go to System > Manage Stores.
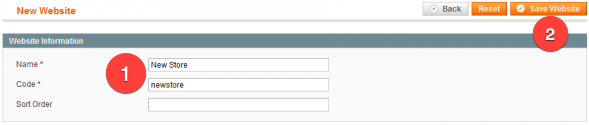
- Click Create Website.
- In the Name field, enter your new store name. In the Code field, enter a unique string without spaces and write this code down for later use. Click Save Website when ready.

10. Click Create Store.
11. In the Website field, select the website that you just created. In the Name field, type a name for your store. In the Root Category field, select the root category that you created above, or use the default Root Category if you skipped to Step G earlier. Click Save Store when ready.
12. Click Create Store View.
13. In the Store field, select the store you just created. In the Name field, give your view a name. This is typically "English." In the Code field, enter a unique string to identify the store view. Change the Status to Enabled. Click Save Store View when ready.
14. Go to System > Configuration.
15. In the Current Configuration Scope drop-down list, select the website that you just created.

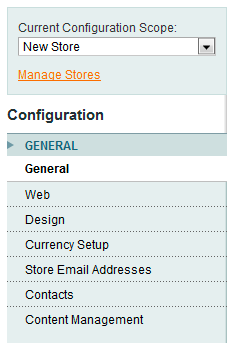
16. Select the Web menu option, and click to expand the Unsecure and Secure sections, respectively.
17. For each section, clear the Use Default check box next to the Base URL and type the URL for your store, including the trailing slash. Click Save Config.
18. You have successfully set up a Magento store. Repeat the steps above for any additional stores you wish to create.
2: Configure server to load the storefront
After store creation, you must configure the server to load the correct store. There are several methods for doing this. The two most popular methods are presented below. The first method is the older of the two and will work for any version of Magento. The second method takes advantage of changes made to the index.php file introduced in version 1.4.0.1.
Method 1: Using separate directories for each store using secondary domains
- Verify your chosen domain name points to the server.
- Follow the instructions provided in How to create a secondary domain to create a secondary domain for your new store.
- Using either FTP or SSH, copy the .htaccess and index.php files from your Magento installation to the document root of your new domain.
- Open the index.php file that you just copied over and edit the last line of the file as follows:
ATTENTION: Change newstore to the code that you wrote down when you created the new website above.
Mage::run(’newstore’,’website’); - Finally, using SSH, create the following symbolic links in the document root of your new domain, and replace the path below with the full path to the document root of your Magento Installation:ln -s /home/example/example.com/html/app/ app ln -s /home/example/example.com/html/includes/ includes ln -s /home/example/example.com/html/js/ js ln -s /home/example/example.com/html/lib/ lib ln -s /home/example/example.com/html/media/ media ln -s /home/example/example.com/html/skin/ skin ln -s /home/example/example.com/html/var/ var ln -s /home/example/example.com/html/404/ 404 # this is only in 1.3x ln -s /home/example/example.com/html/reports/ reports # this is only in 1.3x
- You have successfully configured your secondary domain to work with Magento. You may now load your new domain in your browser and begin developing your new store.
Method 2: Using shared directory for all stores using pointer domains
If you are configuring a multi-store on a server running the PHP-FPM service and use the pointer domain method outlined below, you will likely require support from the our support team.
We will adjust the server’s Apache vhost configuration file to properly redirect your site to the correct storefront. We generally refer to this as the "FPM fix," and we suggest contact our support team to request this fix if you are experiencing issues with your Pointer Domain multi-store on a PHP-FPM server.
ATTENTION: This method works only for Magento versions 1.4.0.1 and higher.
- Follow the instructions provided in How to create a pointer domain to create a server alias pointer domain for your new store. The pointer domain will be pointing at the primary domain of your Magento installation.
- Edit the .htaccess file in the document root of your Magento installation and enter the following just above the line RewriteEngine On:
- Replace .*newstore.* with the domain name of your new store, keeping the dots and stars.
- Ensure that MAGE_RUN_CODE matches the code you wrote down when you created the new website above. Newstore specifies the domain name of your new store, and websitecode specifies the store code created in Magento.
SetEnvIf Host .*newstore.* MAGE_RUN_CODE=newstore SetEnvIf Host .*newstore.* MAGE_RUN_TYPE=website or store - You have successfully set up your pointer domain to work with Magento. You may now load your new domain in your browser and begin developing your new store.
If SetEnvIf fails
On some servers, particularly those running Litespeed Web Server, the SetEnvIf directive does not get recognized in the .htaccess file. If method 2 fails to configure multiple storefronts, try the following:
- Edit the .htaccess file in the document root of your Magento Installation.
- Type the following text just below the line #RewriteBase /magento/:
- Verify .*newstore\.com matches the domain name of your new store.
- Verify MAGE_RUN_CODEmatches the code you wrote down when you created the new website above.RewriteCond %{HTTP_HOST} .*newstore\.com [NC] RewriteRule .* - [E=MAGE_RUN_CODE:newstore] RewriteCond %{HTTP_HOST} .*newstore\.com [NC] RewriteRule .* - [E=MAGE_RUN_TYPE:website]
Explore the Magento website for more information or check out our Magento hosting options.


