


A Magento storefront is the customer-facing view of a Magento eCommerce website. These storefronts manage showcase products, categories, and search functionality. It is possible to configure multiple Magento storefronts for the same website. Explore the Magento website for more information.
Separate directories for each store using secondary domains works for all versions of Magento.
Shared directory for all stores using pointer domains works for versions higher than 1.4.0.1.
Step 1: Create a storefront
The first step in setting up multi-store functionality is to create the new store or stores in the Magento administrator application:
- Log in to the Magento Administrator Panel. If you want your new stores to use your existing catalog and products, skip to Step 5.
- From the main menu, click Products > Categories.
- Click Add Root Category.
- In the Category Name field, enter your new store name, then click Save.
- Navigate to Stores > All Stores.
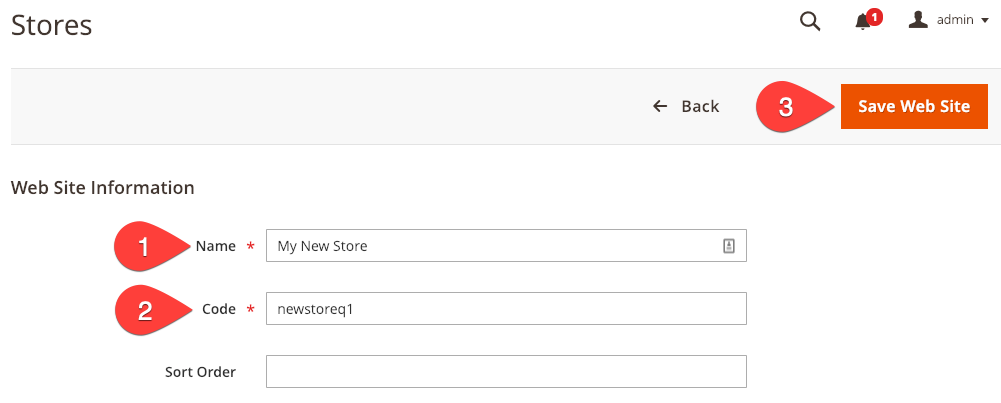
- Click Create Website.
- In the Name field, enter your new store name. In the Code field, enter a unique string without spaces and note this code for later use in Step 2: Configure the server to load the storefront. Click Save Web Site when ready.

8. Click Create Store.
9. On the Store Information page:
- From the Web Site drop-down list, select your newly created store.
- In the Name field, enter a name for your store.
- In the Code field, enter a unique string without spaces.
- From the Root Category drop-down list, select the category you created in Step 4. If you skipped to Step 5 earlier, use the default.
- Click Save Store when ready.
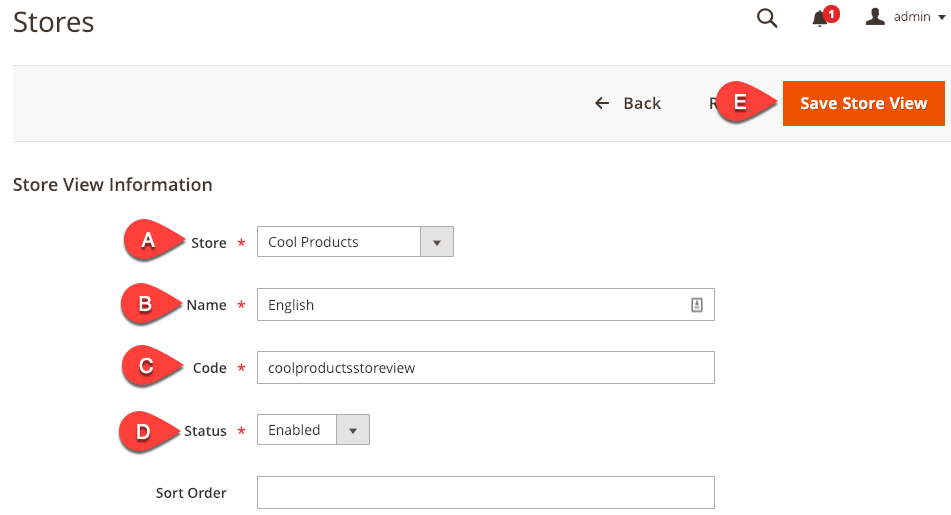
10. Click Create Store View.
11. On the Store View Information page:
- In the Store field, select the store you just created.
- In the Name field, give your view a name, such as "English."
- In the Code field, enter a unique string without spaces to identify the store view. Change the Status to Enabled.
- Click Save Store View when ready. If prompted, click OK to confirm.

12. Click Stores > Configuration.
13. From the Store View drop-down list, select the store view you created in Step 11. Click OK if prompted.
14. Click General > Web.
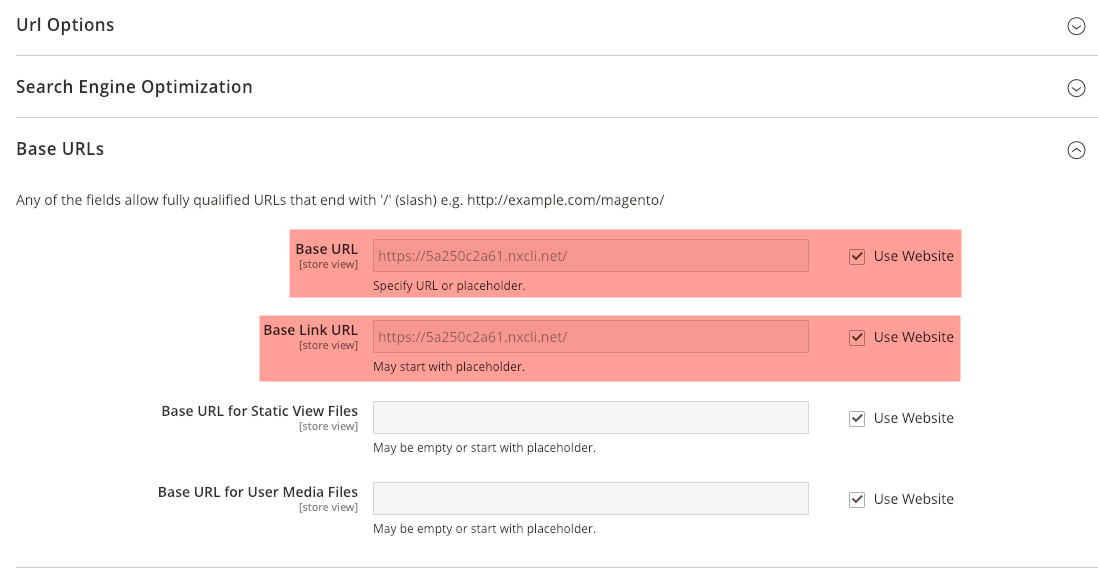
15. Click Base URLs and Base URLs (Secure).
16. In the Base URLs section, if you prefer to use your main store URL, verify the Use Website check box is selected near the Base URL and Base Link URL fields. If you wish to designate another URL, clear the Use Website check box, for both fields, and enter your desired URL.

17. In the Base URLs (Secure) section, if you prefer to use your main store URL, verify the Use Website check box is selected near the SecureBase URL and Secure Base Link URL fields. If you wish to designate another URL, clear the Use Website check box, for both fields, and enter your desired URL.
18. Click Save Config.
Step 2: Configure the server to load the storefront
After creating the store, configure the server to load the correct store. There are several methods, but the two most popular methods follow.
Method 1: Separate directories for each store using secondary domains
This method requires SSH access and an SFTP client. If you are a Nexcess client, only clients on Cloud accounts have SSH enabled by default and may generate passwords as needed. Nexcess clients on physical (non-cloud) servers must first enable SSH access. For details about how to use SFTP, see How to transfer files to a server with SFTP.
- Verify your desired domain name points to the server.
- Create a secondary domain for your new store. If you are on a physical (non-cloud) server, see How to add a secondary domain in SiteWorx. If you use Nexcess Cloud, see instead How to create secondary domains in Nexcess Cloud.
- Using either SFTP or SSH, copy the .htaccess and index.php files from your Magento installation to the document root of your new domain.
- Open the index.php file that you just copied and edit the last lines of the file as follows:
ATTENTION: Change newstore to the code you noted when you created the new website in Step 1: Create a new storefront.
Replace:$bootstrap = \Magento\Framework\App\Bootstrap::create(BP, $_SERVER); /** @var \Magento\Framework\App\Http $app */ $app = bootstrap->createApplication('Magento\Framework\App\Http'); $bootstrap->run($app);With:require __DIR__ . '/app/bootstrap.php'; $params = $_SERVER; $params[\Magento\Store\Model\StoreManager::PARAM_RUN_CODE] = 'newstore'; $params[\Magento\Store\Model\StoreManager::PARAM_RUN_TYPE] = 'website'; $bootstrap = \Magento\Framework\App\Bootstrap::create(BP, $params); /** @var \Magento\Framework\App\Http $app */ $app = $bootstrap->createApplication('Magento\Framework\App\Http'); $bootstrap->run($app); - Using SSH, create the following symbolic links in the document root of your new domain, and replace the path below with the full path to the document root of your Magento Installation:ln -s /home/example/example.com/html/app/ app ln -s /home/example/example.com/html/lib/ lib ln -s /home/example/example.com/html/pub/ pub ln -s /home/example/example.com/html/var/ var
- If you have successfully configured your secondary domain to work with Magento, your new domain will load in your browser, and you may begin developing your new store.
Method 2: Shared directory for all stores using pointer domains
ATTENTION: These instructions work only for Magento versions 1.4.0.1 and higher.
- Verify your desired domain name points to the server.
- Create a server alias pointer domain for your new store. The pointer domain will be pointing at the primary domain of your Magento installation. See How to create a pointer domain with SiteWorx for details.
- Edit the .htaccess file in the document root of your Magento installation and enter the following just above the line RewriteEngine On:SetEnvIf Host .*newstore.* MAGE_RUN_CODE=newstore SetEnvIf Host .*newstore.* MAGE_RUN_TYPE=website or store
- Replace .*newstore.* with the domain name of your new store, keeping the dots and asterisks.
- Confirm that MAGE_RUN_CODE matches the code you wrote down when you created the new website above. Newstore specifies the domain name of your new store, and websitecode specifies the store code created in Magento.
4. If you have successfully configured your pointer domain to work with Magento, your new domain will load in your browser, and you may begin developing your new store.
Explore the Magento website for more information or check out our Magento hosting options.


