

When it comes to website performance, the way your database is structured, including how data is stored and what queries are running on the website, is of vital importance. Hosting a WooCommerce website or using any other ecommerce platform takes the matter of database performance to a whole new level.
Your product information, orders, and customer session data (such as carts) — all of those data points essential to the success of your business are stored within the database. The way data is read from and written to the database and how fast and reliable these processes are, is one of the crucial factors defining your website's long-term success.
Overview of MyISAM vs. InnoDB storage engines for databases
MyISAM and InnoDB are one of the most popular storage engines in MySQL and MariaDB. A storage engine is essentially a software module used by a database management system like MySQL to add and retrieve data from the database itself — or update it. InnoDB became the default storage engine a while ago. Before that, MyISAM was the engine of choice. While both storage engines have advantages, InnoDB was introduced as one intended for high-performance databases and soon became widely used.
MyISAM vs. InnoDB — understanding the main differences
Before we can understand where one storage engine can outperform the other and why you would want to convert MyISAM to InnoDB, let’s dive into what really sets the two engines apart. In short, MyISAM and InnoDB utilize different types of locking - table and row-level.
Table and row-level locking
Simply put, in the world of database management systems, locking means protecting data from being accessed in any way to ensure the integrity of stored information. When locking happens, data cannot be modified in any way except by the query that initially applied the lock. Let’s look at the two types of locking used by InnoDB and MyISAM.
Table locking
Table locking presents the technique locking an entire table when one or more cells in it need to be modified or removed. The MyISAM storage engine employs this method.
Row-level locking
Row-level locking is a technique of locking a range of specific rows within a table when one or more cells in the range need to be updated or deleted. InnoDB uses row-level locking in high-performance databases.
As you see, when it comes to database performance, locking as a mechanism makes a whole lot of difference. A seemingly minor thing is what sets the storage engines apart and makes the debate of MyISAM vs. InnoDB performance not that simple — the two storage engines can outperform each other in different situations.
Comparing MyISAM vs. InnoDB performance
Although the way InnoDB and MyISAM work is different, ultimately, there is really no definite answer to the question of which storage engine is better. Instead, the question we should have been:
"When do we need to use each storage engine to ensure maximum database performance?"
MyISAM vs. InnoDB — when to use each storage engine?
In short, a website or an application with frequently changed tables works perfectly using the InnoDB storage engine by addressing certain difficulties that table-locking creates. However, MyISAM will outperform InnoDB greatly when your website relies on huge tables that store data that does not change frequently. So, let’s see when we need to use MyISAM vs InnoDB.
Strengths of the MyISAM storage engine
MyISAM will outperform the InnoDB engine when used on enormous tables that experience considerably more read activity than write activity. It means when a table is huge and static — we do not change data in it frequently but need to read this data a lot — MyISAM is the engine of choice. It happens because locking the whole table is much quicker than first figuring out what rows may be locked by other queries running. Scanning a large table is not fast, and just locking the whole table from the start will save a great deal of time, resulting in better performance.
Strengths of the InnoDB storage engine
InnoDB will outperform MyISAm when it comes to tables that store data that frequently changes. Such tables, on the other hand, require vastly more writing activity than reading activity. When the whole table is locked, we cannot perform any changes to the data; it slows down the process and results in weaker performance. InnoDB can keep up with many requests easier, as it does not have to lock the entire table for each one.
MyISAM vs. InnoDB in the context of modern Content Management Systems (CMSs)
When you develop an application of your own, you know exactly how your database is structured and can easily determine which ones need to use a certain storage engine. But, when a website is built on WordPress, WooCommerce, or Magento, it is not that clear.
In modern CMSs, converting MyISAM to InnoDB is considered a best practice to tune your MySQL database for performance. Most difficulties table locking presents while using most CMS can be addressed by changing the storage engine of the database tables to InnoDB. This is what we recommend doing to improve your WooCommerce store performance.
Four methods for converting MyISAM to InnoDB
Now that we know why we would want to convert tables from MyISAM to InnoDB let’s see how we can do it — spoiler, it's fast and easy! Keep in mind that the instructions for both the MySQL and MariaDB database platforms are identical. In this case the procedures and all queries/commands used are the same.
We can convert MyISAM to InnoDB in a few different ways. We will focus on learning how to convert one table at a time. There is a good chance that most of the tables in your database already use InnoDB, as it has been used as the default storage engine in MySQL and MariaDB for a while.
The first two methods presented work for all CMSs and custom websites. The other two methods are WordPress-specific, and they will also work for WooCommerce, therefore.
Warning!
Before converting your database tables to another storage engine or making any other changes to them, we strongly recommend getting your database backed up! This is the first and very critical step that cannot be skipped regardless of your method used.
Method 1. Using the phpMyAdmin utility
The phpmyAdmin utility is a database management tool for MySQL and MariaDB that can also be used to convert MyISAM to InnoDB.
Step 1. Open phpMyAdmin and choose your database from the list
In the screenshot below, you can see that we chose our learnlin_wptest database from the list on the left and are presented with all of its tables:

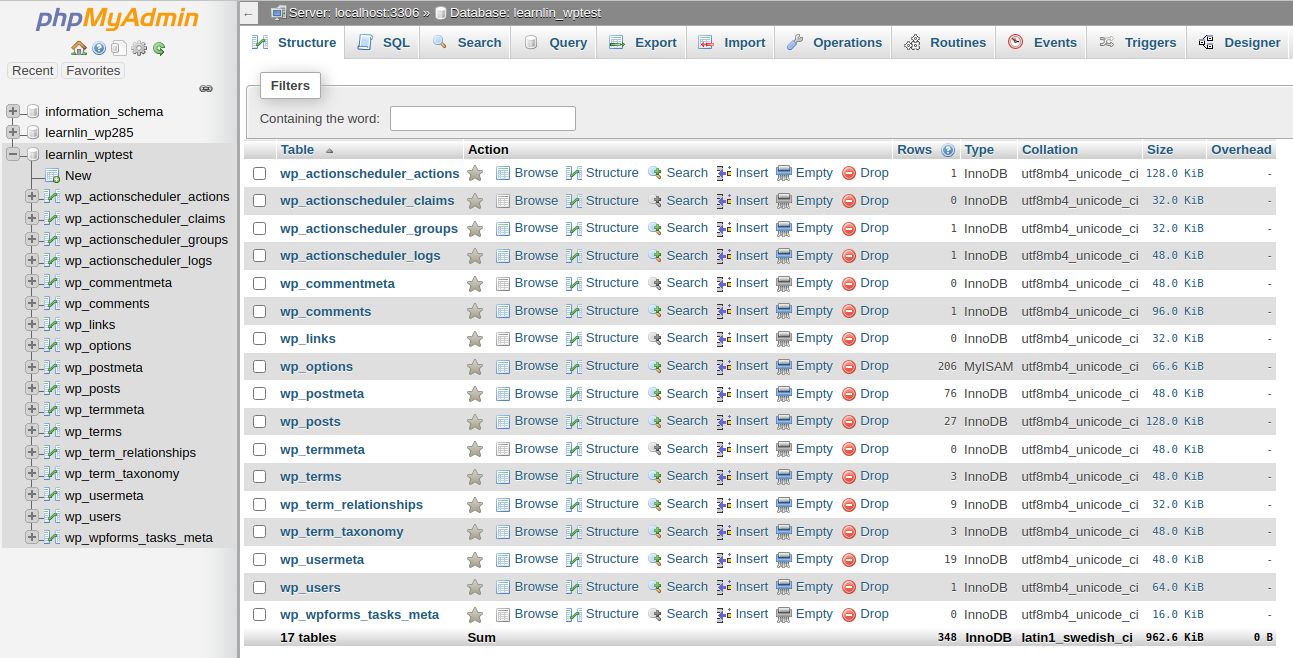
Step 2. Check what tables are using MyISAM
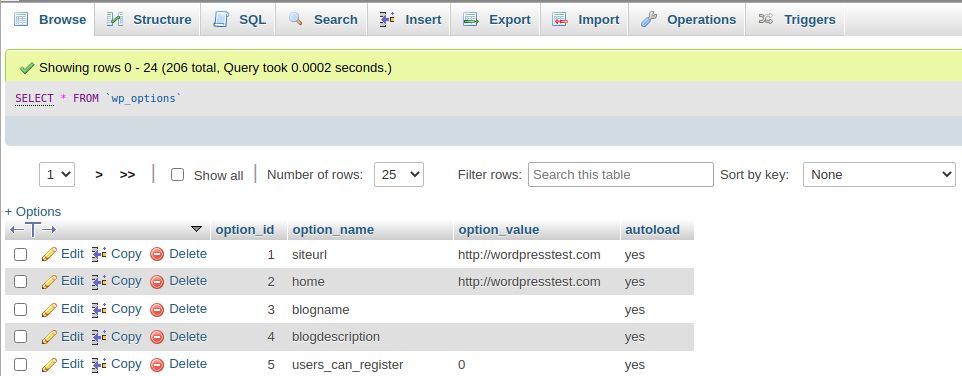
You can find the storage engine of each table in the Type column. As you can see, our database has the wp_options table using MyISAM:


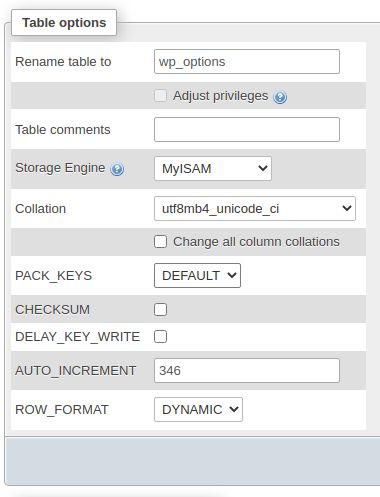
Step 3. Click on the table name and choose Operations from the top menu
We need to click on the table name to see its data and be able to perform some operations on it, including changing the storage engine:

Step 4. Convert MyISAM to InnoDB
Once we open the Operations menu, we can convert the table to InnoDB by selecting it as the storage engine in the list provided under Table options and clicking Go:

Once we do it, we should get a message that the conversion was completed successfully:


After that, we can go back to the All Tables view and notice that the table was successfully converted to InnoDB. We will see the storage engine changed in the Type column:


Method 2. Using the MySQL or MariaDB command line interface
Depending on the database management system in use, MySQL or MariaDB are simple structured query language shells that can be used to perform different database operations. Let’s see how we can convert MyISAM to InnoDB using MySQL or MariaDB commands, which are the same for both Database Management Systems (DBMSs).
Step 1. Open the interface
You can do it by logging in with your database user and password. First, make sure the user has all privileges defined:
[root@host html]# mysql -u wpadmin -p
Enter password:
Welcome to the MariaDB monitor.  Commands end with ; or \g.
Step 2. Choose your database
Choose the database you need to perform operations on with the use command:
MariaDB [(none)]> use wptest;
Database changed
MariaDB [wptest]>
Step 3. Check what tables are using MyISAM
To perform this check, let’s run a simple query and only choose the tables with MyISAM as their storage engine to be shown:
MariaDB [wptest]> SHOW TABLE STATUS WHERE Engine = 'MyISAM';

| Name       | Engine | Version | Row_format | Rows | Avg_row_length | Data_length | Max_data_length | Index_length | Data_free | Auto_increment | Create_time         | Update_time         | Check_time          | Collation          | Checksum | Create_options | Comment |
+------------+--------+---------+------------+------+----------------+-------------+-----------------+--------------+-----------+----------------+---------------------+---------------------+---------------------+--------------------+----------+----------------+---------+
| wp_options | MyISAM |      10 | Dynamic    |  206 |            221 |       45680 | 281474976710655 |        21504 |         0 |            346 | 2022-03-24 09:55:44 | 2022-03-24 09:55:44 | 2022-03-24 09:55:44 | utf8mb4_unicode_ci |     NULL |                |         |
Step 4. Convert MyISAM to InnoDB
Another simple query will help us convert our table to the InnoDB storage engine. If you want to revert the change and choose MyISAM, you can run the same query, but this time define the engine as MyISAM:
MariaDB [wptest]> ALTER TABLE wp_options Engine = 'InnoDB';
Query OK, 206 rows affected (0.01 sec)
Records: 206  Duplicates: 0  Warnings: 0
Method 3. Using the WordPress Command Line Interface (WP-CLI)
WP-CLI presents a powerful set of tools to manage your WordPress database. It can also be useful if you need to convert some or all tables within your database to InnoDB. The commands we will use are the same queries we ran from the MariaDB command line interface in the previous method. Please note that all WP-CLI commands should be run from the directory of your WordPress installation.
Step 1. Check what tables are using MyISAM
First, we need to check if any tables in our database are using MyISAM. Run the command below to get the list of MyISAM tables:
wp db query "SHOW TABLE STATUS WHERE Engine = 'MyISAM'" You will see a result similar to the result shown below. In addition, you can see that we have just one table using MyISAM, which it the wp_options table:
| Name       | Engine | Version | Row_format | Rows | Avg_row_length | Data_length | Max_data_length | Index_length | Data_free | Auto_increment | Create_time         | Update_time         | Check_time          | Collation          | Checksum | Create_options | Comment |
+------------+--------+---------+------------+------+----------------+-------------+-----------------+--------------+-----------+----------------+---------------------+---------------------+---------------------+--------------------+----------+----------------+---------+
| wp_options | MyISAM |      10 | Dynamic    |  206 |            229 |       73900 | 281474976710655 |        22528 |     26672 |            346 | 2021-09-19 11:32:53 | 2022-03-24 06:57:23 | 2021-09-19 11:32:53 | utf8mb4_unicode_ci |     NULL |                |         |
Step 2. Convert MyISAM to InnoDB
To convert a table, we can run the following query. For example, below we have converted our wp_options table to InnoDB:
wp db query "ALTER TABLE wp_options ENGINE = 'InnoDB'"Method 4. Using the Simple MyISAM to InnoDB plugin for WordPress
It’s no surprise that there is a plugin for WordPress that can help you convert your database tables to InnoDB. You can do it in a few clicks with the Simple MyISAM to InnoDB plugin.
Step 1. Install and activate the plugin
Once the plugin is installed and activated, you can open its interface from the left menu in your WordPress Dashboard:

Step 2. Open the plugin interface
You can open the plugin interface from the menu by clicking on the plugin name, as shown below:

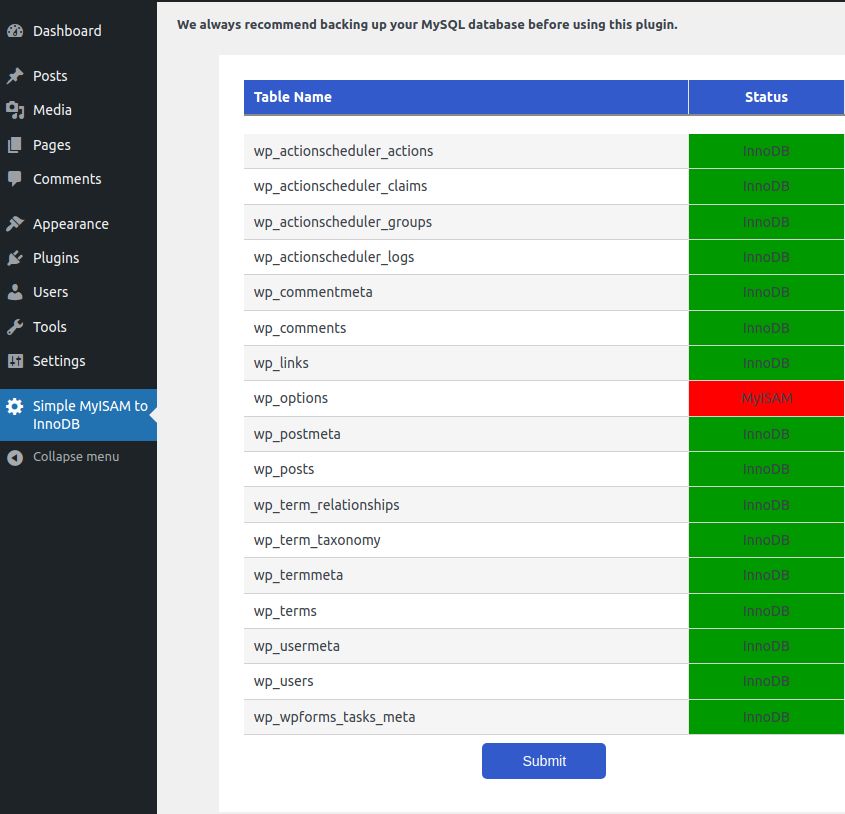
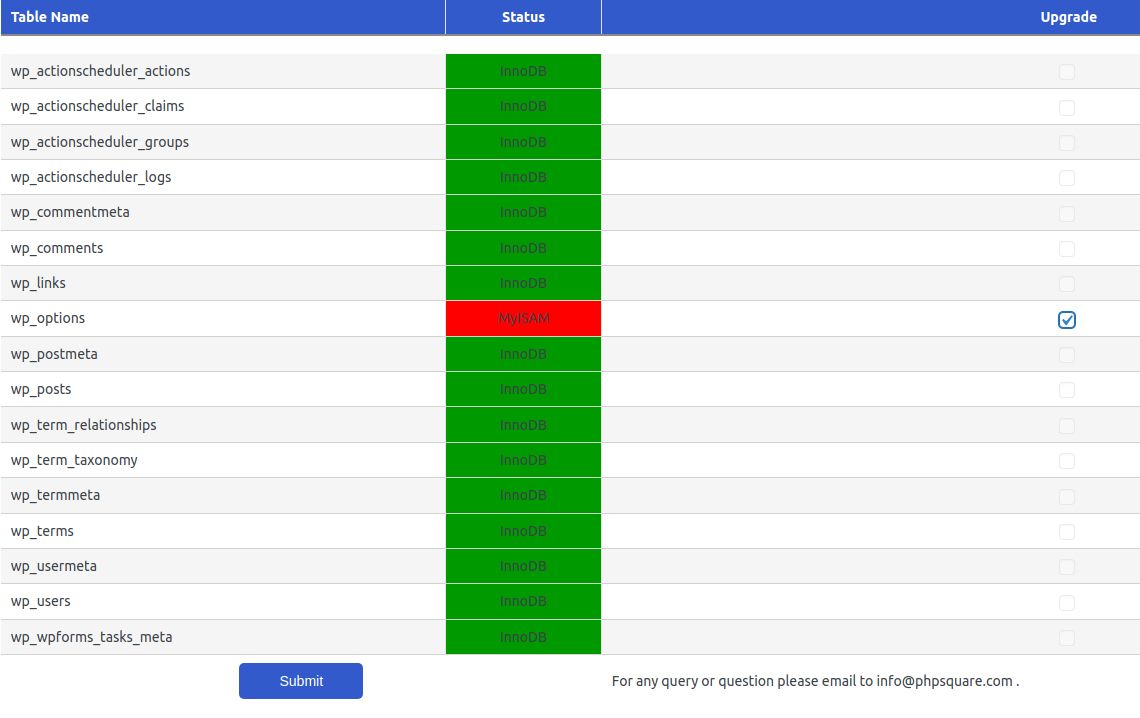
Step 3. Convert MyISAM to InnoDB
Check the table you would like to convert and click Submit. The plugin will convert the table to the InnoDB storage engine and reload the list of your database tables:

Closing thoughts on maximizing your database performance by selecting the optimal storage engine based on usage
Your website performance relies heavily on the way the database is structured. Knowing when to use each storage engine — MyISAM vs. InnoDB — will help you improve your database performance and as a result, website loading speed. If you are using a CMS, most of the time, converting your database tables to InnoDB will have a beneficial effect.
Your personal web application experts
Expert support, elite performance, and ultra-flexible infrastructure. Nexcess raises the bar on hosting.
Nexcess is here to provide everything you need to run your online business. Managed hosting means that we take care of all technical aspects while you build and expand your presence online. Our web hosting experts are here for you 24/7 and every step of the way to help you make your journey smooth and enjoyable.
Our managed hosting plans are optimized for your platform of choice. You no longer have to search for the best solutions — they are already included and made easy to take advantage of. Check out our managed hosting plans to start today!
Recent articles
- WordPress email setup — changing sender name/address
- How to optimize Magento performance
- Adding a secondary domain in the Nexcess Client Portal


