

Speed up your WooCommerce checkout process with CheckoutWC! Delight your customers with a streamlined checkout using the CheckoutWC plugin for efficiency.
WooCommerce Checkout Process Enhancements with the Checkout WC Plugin: A Detailed Step-by-Step Guide
One of the best things to improve the user experience on your WooCommerce powered website is to speed up the WooCommerce checkout process. This article will walk you through how to enhance the WooCommerce checkout process using CheckoutWC — an optimized checkout page for WooCommerce. It works by replacing your WooCommerce checkout page with beautifully designed and optimized checkout templates.
Picking the Right Plan
The plans come with the critical features required for WooCommerce checkout optimization, such as mobile-friendly templates with frictionless account creation and login.
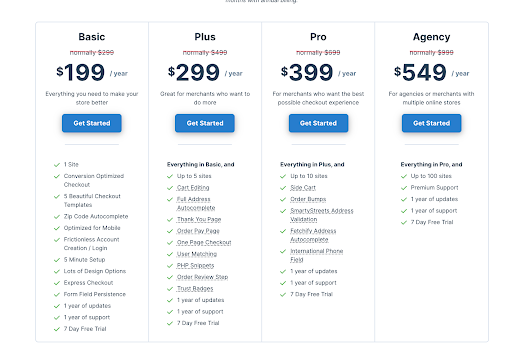
If you are selling digital products, you'll want to consider signing up for the Plus Plan, as this plan includes a one-page checkout template to make it easy for your customers to checkout. It also offers a handy User Matching feature that automatically connects guest orders to user accounts on purchase and user registration.
If you are selling internationally and it is essential for you to have an accurate number on file, then we recommend you sign up for the Pro Plan. With the Pro Plan, you will get an International Phone Field which will automatically validate and store phone numbers in the correct format.
Before You Get Started
Make sure you meet all the minimum requirements to use CheckoutWC successfully. Here's what we recommend you have before using CheckoutWC:
We highly recommend you use a Managed WooCoomerce Hosting provider so you can be sure your system is continuously optimized, secure, and up to date.
Getting Started with CheckoutWC
Once you have confirmed you meet all the minimum requirements, you can now begin setting the CheckoutWC plugin on your website.
Downloading CheckoutWC
To install the plugin on your WooCommerce website, you must first download the plugin and get the license key to activate it.
There are two ways to do this:
- Obtaining Your License Key Method #1: From your purchase receipt
- Obtaining Your License Key Method #2: Log into your CheckoutWC account page
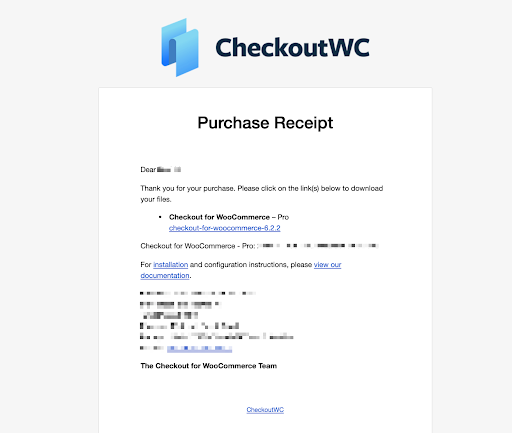
Obtaining Your License Key Method #1: From your purchase receipt
Check your inbox for the purchase receipt, which will have a download link for the plugin as well as your license key.
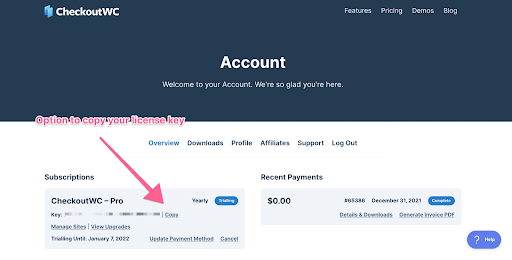
Obtaining Your License Key Method #2: Log into your CheckoutWC account page
If you cannot find your purchase receipt, you can go to the CheckoutWC website and log in to your account. Once logged in, you'll be able to copy your license key right from the account overview page.
Now that you know where to find your license key, you can go to the downloads tab and download the plugin to install on your WooCommere website.
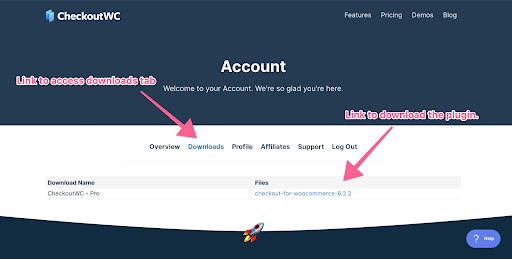
Download the plugin and save it in an easily accessible folder for the next step, where we will upload it into your WooCommerce website.
Installing and Activating CheckoutWC
You can do this by navigating to your WP-Admin Dashboard ▸ Plugins ▸ Add New ▸ Upload Plugin option in the user interface, and then uploading the CheckoutWC plugin you downloaded.

To add your license key, go to WordPress Admin ▸ CheckoutWC ▸ General.
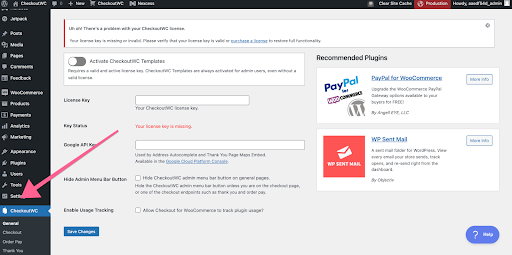
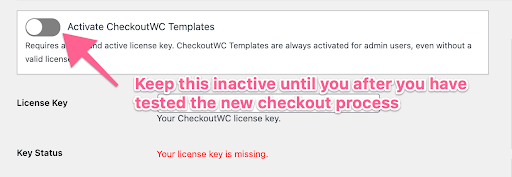
Here you can add your license key and your Google API Key to enable the Address Autocomplete feature on the checkout page. At this point, if you are installing CheckoutWC on a production website, it's best if you leave the template inactive so that you can test the checkout process before making it available to your customers.
Pick Your CheckoutWC Template and Colors
After activating the plugin, we recommend selecting an appropriate template for the checkout and ensuring the colors match your brand.
To choose your template, go to CheckoutWC ▸ Appearance.
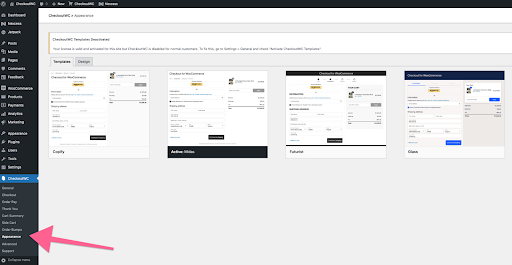
When selecting your template, you'll want to make sure you consider a few essential things that can help with the WooCommerce checkout optimization:
Progress Indicator
Website Title
Logo Placement
Color contrasts
Pick a template that will fit your brand's overall style and feel. For example, some templates are bolder, and others have more color contrast which may or may not work with your brand.
You can further style the template color scheme and upload your company logo via the design tab. Again, make sure to upload a high-quality logo with a transparent background. When selecting your colors, try to stick to your brand as much as possible, but consider making the button stand out with an accent color.
Additional Settings to Optimize
At this point, you are ready to enable your new and optimized WooCommerce checkout process. However, before doing that, a few more beneficial options are offered with CheckoutWC to help you optimize your page even further.
Optimize the WooCommerce Checkout Page
CheckoutWC allows you to streamline the checkout page depending on the products you sell or what information you need from your customers. You can find all the options to modify the checkout page by going to CheckoutWC ▸ Checkout.

Tt's best to keep as few fields on the checkout page as possible. Here's a list of things to consider disabling:
Order Notes: If you do not need or expect additional customer information, consider disabling this.
Address Autocomplete: Use the power of Google Maps to help your customers fill in their addresses.
International Phone Field: If you do not need phone numbers from your customers, you can disable this, but if you do, this will help ensure you have the correct number on file.
Shipping Step: If you are not shipping physical products, you can disable this.
Making these adjustments can speed up the WooCommerce checkout process.
Testing Your Checkout Page
With your WooCommerce checkout now optimized, before you activate the template for all your customers, you'll want to do some testing to ensure it's working as expected.
The simplest and most effective test method is to try the entire checkout process using an admin account and an actual credit card. Then, CheckoutWC will automatically work with your existing payment gateway.
Ideally, you'll want to set up the plugin on your staging website, and once you have tested the process, you can move the changes from your staging website into the production website.
Here at Nexcess, all of our WooCommerce Hosting plans come with staging websites to allow you to test and implement new features with vetted release process.
Activate the New Checkout Page
You can enable the template by going to CheckoutWC ▸ General ▸ Toggle the option to “Activate CheckoutWC Templates” and remember to hit save after you are done.
Congratulations on setting up a beautiful checkout page, powered by CheckoutWC — an optimized checkout page for WooCommerce! If you are looking to enhance your WooCommerce website further, check out our guide on how to Supercharge your WooCommerce website with Hubspot.
For all WooCommerce websites and especially high-traffic websites, consider automated testing for WooCommerce to ensure all the critical parts are working as expected. The automated tests will run daily so that if anything does not work as expected, you can be notified right away.
The helpful Nexcess support team is ready 24/7 with any questions that you may have regarding your WooCommerce site.
Next Steps?
Read more about the Fully Managed WooCommerce Hosting and its benefits for your business.
Fully Managed WooCommerce Hosting
Radically improve load times, keep secure and be ready to scale.
Smart Monitoring built-in to every WooCommerce plan ... FREE
We also have a variety of Nexcess support articles about WooCommerce, including how to get your site going with a number of different configuration options. These resources include a great article on setting this up for Migrating to Nexcess with managed WordPress and managed WooCommerce hosting.
24-Hour Assistance
If you need any assistance with the above-mentioned, don't hesitate to reach out. For 24-hour assistance any day of the year, Nexcess customers can contact our support team by email or through your Client Portal.
Useful YouTube > Nexcess Channel Links
- https://www.youtube.com/watch?v=OAHwmysUd-8
- https://www.youtube.com/c/nexcessnet-1/
- https://www.youtube.com/c/nexcessnet-1/featured
- https://www.youtube.com/c/nexcessnet-1/videos
- https://www.youtube.com/c/nexcessnet-1/playlists
Resources for More Information
Need more help? The Applications, WooCommerce, and WordPress sections within the Nexcess Knowledge Base are important resources for those seeking additional knowledge. Or, check out our related articles below.
New Customers: Fully Managed Hosting Solutions
Not a Nexcess customer yet? Check out our fully managed hosting solutions. The option to chat with an expert is also available.
Related Articles
-
WooCommerce - Nexcess
- Managed WooCommerce Hosting | Nexcess
- Supercharge WooCommerce with HubSpot | Nexcess
- Speed Up Your WooCommerce Checkout with the Right Plugin - Nexcess
- What is WooCommerce? How It Works and 10 Reasons to Choose WooCommerce | Nexcess


