


For Nexcess clients, this is not the preferred method. We instead recommend choosing an auto-install option when selecting your service.
1: Download the Magento installer
![]() Read Magento 1 End of Life: What You Need to Know.
Read Magento 1 End of Life: What You Need to Know.
- Navigate to the Magento download page.
- Log in to your account or create a new one under My Account.
- Under Full Release, locate the Select your format list, click the first option, and click Download.
2: Configure FTP credentials to transfer the Magento files
If you already have Nexcess FTP credentials, you may skip this section.
- Log in to your SiteWorx control panel:
- If you do not know your password, click Forgot your password on the login page.
- If you do not know the web address for your SiteWorx login page, either refer to your Welcome Email, or contact our support team.
- As shown below, click Hosting Features > FTP > Accounts.

- In the Add an FTP Account section, fill in the FTP Username, Password, and Confirm Password fields. Click Add.
- Save these credentials in a convenient, secure location for future use.
3: Prepare the Magento files for transfer
- Navigate to the location of the Magento download.
- Right-click on the Magento zip file, and choose Extract All…
- A box will appear; choose a memorable location for the extraction and click Extract.
- Once the files are extracted, open the new folder, likely entitled Magento. If you see another folder inside of this one, delete it.
4: Use FTP to transfer the Magento files to your Nexcess server
ATTENTION: FTP is no longer considered the ideal method. We recommend SFTP instead. See How to transfer files to a server with SFTP for guidance.
- Start your preferred FTP client, and in the Host, Username, and Password fields, type the Nexcess server name, the username and password you created earlier within SiteWorx.
- In the remote site panel, select the html directory. If you have trouble finding it, look in the folder matching your domain name.
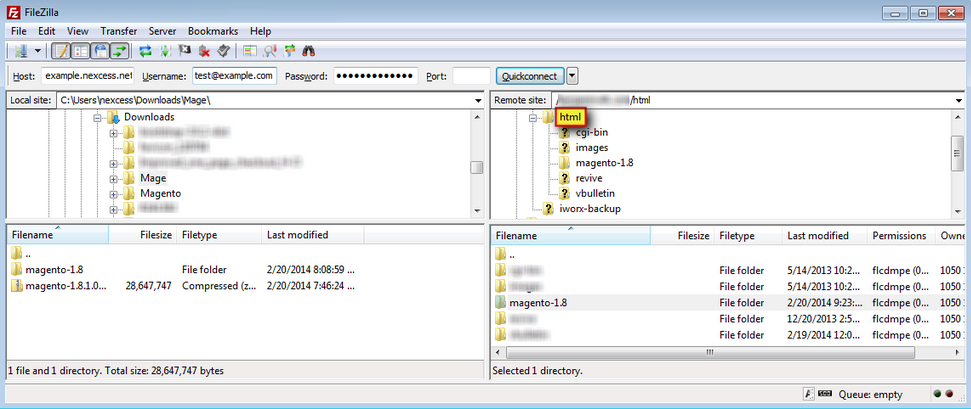
- In the local site panel, select the Magento directory.

- In the panel below the remote site panel, select all files from within the magento directory.
- Click and drag the selected files into the html directory to the immediate right. The package will take some time to fully transfer; you may proceed to the section while you wait.
5: Configure the database
- Log in to your SiteWorx account:
- If you do not know your password, click Forgot your password on the login page.
- If you do not know the web address for your SiteWorx login page, either refer to your Welcome Email, or contact our support team.
- From the main menu, click Hosting Features > MySQL > Databases.
- In the Database Name field, enter a name for your Magento database.

- Select the Create User check box.
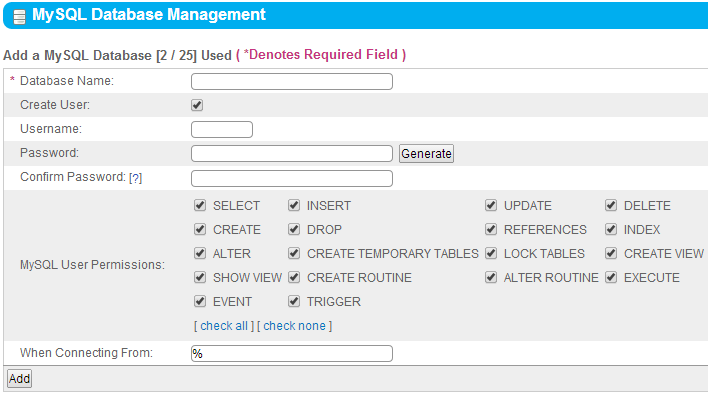
- Enter a username in the username field. We recommend you match it to the Database Name.
- Within the Password and Confirm Password fields, either provide your own password or click Generate. Copy this password to your clipboard or write it down; you will need this password in Step 5 of the "Configure Magento" section below.
- Store your login credentials in a safe and secure location for future use.
- In the Existing Databases panel, within the Database Name column, note the prefix before the "_" in the database name. You will need this prefix in Step 5 of the "Configure Magento" section below.

- Verify all MySQL User Permissions check boxes are selected and click Add.
6: Configure Magento
- If you installed Magento to the html directory as directed in the "Use FTP to transfer the Magento files to your Nexcess server" section, then navigate to your domain in your web browser.
- Read the license agreement. If you agree, click the check box and then click Continue.
- The next menu displays the localization settings for your store. Select the appropriate settings for your store and click Continue.
- Configure Magento to work with your database. Leave the Database Type and Host fields on the default settings.

- Enter the Database Name, User Name, and User Password in the corresponding fields. For Database Name and User Name, use the prefix generated in Step 8 of the "Configure the database" section above.
- Leave the Tables Prefix field blank or you can enter your own prefix. This is useful if you plan to use one database for multiple stores in Magento.
- As shown below, the Web access optionsmenu controls how you access your store and administration panel. Do not change the base URL,or your Magento store will not render correctly. You may, however, change your administrator path.
- Select Enable Charts if you want to use the charting feature.
- Select Skip Base URL Validation Before the Next Step.
- Leave Use Web Server (Apache) Rewrites unchecked.
- Unless you already have an SSL installed, leave Use Secure URLs (SSL) unchecked.
- Under Save Session Data In, set it to File System.
- Click Continue.

- As shown below, the next page allows you to configure your administrator settings.
- In the Personal Information fields, type your first and last name and an email address. Magento will contact you regarding future updates.
- In the Login Information fields, type a username and password. Refer to How to generate a secure password for more information.
- Leave the Encryption Key section blank.
- Click Continue to complete installation. Note the encryption key provided.

For 24-hour assistance any day of the year, contact our support team by email or through your Client Portal.


