


How Nexcess clients on physical (non-cloud) accounts can create an .htaccess file for the entire domain as well as a specific directory.
Before the .htaccess file features can be used, such as setting Access Control, creating custom error pages, and setting up MIME types, an .htaccess file must be created
Options set here will affect the entire site, including sub-domains. The .htaccess file will be installed into the webroot of your site.
Creating a domain-specific .htaccess file
Log in to your SiteWorx account.
- If you do not know your password, click Forgot your password on the login page.
- If you do not know the web address for your SiteWorx login page, either refer to your Welcome Email or contact our 24/7 support team for assistance.
From the main menu, click Hosting Features > Htaccess.
ATTENTION: In Step 3, if you do not see the Add button referenced in the following instructions, a domain-wide .htaccess file already exists.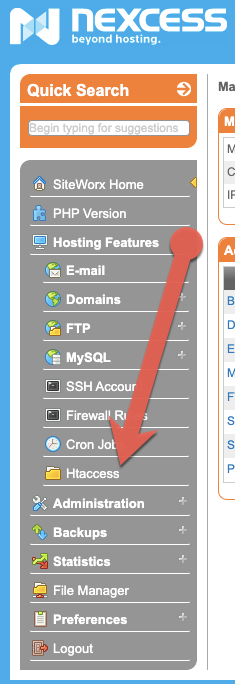
In the Global Directory Options section, click Add. When prompted, click Add again to confirm.

- The following message displays at the top of the page: "The .htaccess file was added: <directory path name>".
Creating a directory-specific .htaccess file
These options will affect only the files within the corresponding directory and its sub-directories.
Log in to your SiteWorx account.
- If you do not know your password, click Forgot your password on the login page.
- If you do not know the web address for your SiteWorx login page, either refer to your Welcome Email or contact our 24/7 support team for assistance.
On the main menu, click Hosting Features > Htaccess.

In the Per Directory Options section, click Add.

select the directory in which to create the .htaccess file from the Directory drop-down menu (1). If you would like the new .htaccess file to be enabled immediately upon creation, select Enabled from the Status drop-down menu (2). Click Add when ready.

You will see the following message: "The .htaccess file was added: [directory path name]".


