What's Under the Hood
» Nexcess Portal vs WP Admin
The Nexcess client portal allows you to administer your hosting environment, view invoices, submit support requests, setup DNS, and much more. Watch a 3-minute tour of the portal if you’d like to learn more!
» Finding Your Credentials
To find your WP Admin login/credentials you will need your Client Portal login. If you cannot locate them, click the Forgot Password? Link on the portal login page.
Once logged in click on Plans > Your Domain Name > Environment to see the login option for WP Admin. For other easy navigation options, please use our Admin Credentials walkthrough.
» What is this temporary URL?
Your membership site isn’t online yet -- it’s live on one of our temporary URLs. This temporary URL serves as a place to set up your membership site before the world sees it, letting you fine tune your settings in a production environment until you’re ready to launch.
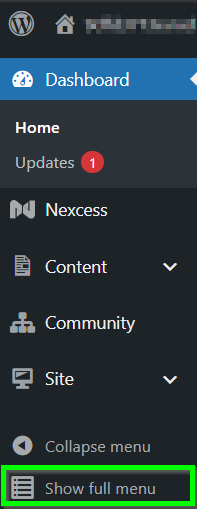
» Why does my WordPress Admin look like this?
As powerful as WordPress is, the admin area can get cluttered and complex. So we’ve taken extra steps to simplify the experience, giving you instant access to what matters most and pushing the rest into the background.
If you would like to revert back to the classic WordPress Admin, simply click the "Show Full Menu" on the left hand side:
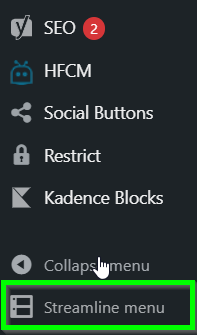
To revert back to the simplified view, click the “Streamline Menu” on the left hand side:
» What is Restrict Content Pro?
Restrict Content Pro is the engine powering WPQuickStart Membership’s site functionality. With built-in integrations for all the major payment processors, unlimited subscription packages, intuitive member management, excellent reporting, and more, it’s ready to help you grow your community and deliver the premium experience your members are looking for.
» What is Stripe?
Stripe is the world’s leader in credit card processing. Since credit cards are super-ultra-sensitive information, eCommerce regulations require that information to be on absolute lockdown. This is where Stripe comes in. Your customers’ financial data will never live on your WPQuickStart Membership site. It will live in Stripe and communicate via a secure protocol between the two services.
If you don’t have a Stripe account already, you’ll want to head over to Stripe.com to set one up. Follow the prompts until you get your test keys.
Getting Started
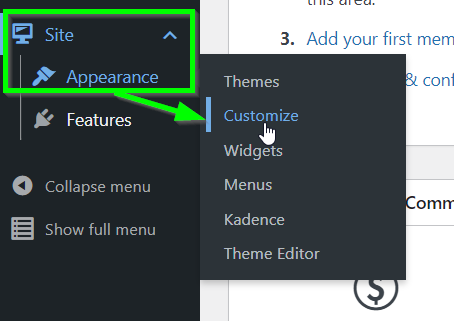
» Update Your Site's Homepage
We've created a template to get you started. Use the QuickStart guide at the top of your dashboard or navigate to Site > Appearance > Customize on the left hand side.
» Incorporate Your Unique Brand Colors To Your Membership Site
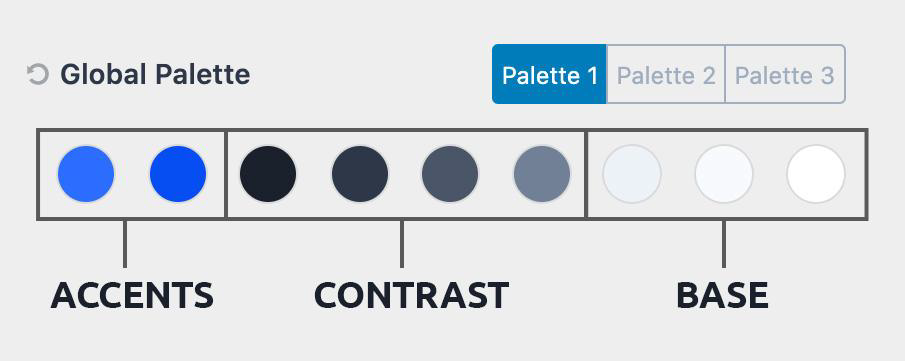
WPQuickStart Membership templates begin with standard defaults, but you’ll want to select your own colors to create your custom designs. Find your global palette by navigating to Appearance > Customize > General > Colors, and choose colors for your membership site that you love and/or represent your brand.
» Edit Your WPQuickStart Membership Product Catalogs, Testimonials and More
The wizard has worked its magic, generating a design and format especially for you. Here’s where you make your site your own. Under your left sidebar, find Content > Pages. Here you will see all of the modules that make up your membership site, and it’s here where you can edit copy and colors as you see fit using the editor/ toolbox.
To learn how to click through your drag-and-drop interface, check out the video below from our friends at Kadence WP.
Configure Your Membership Plans
» The Difference Between Membership and Access Levels
Through Restrict Content Pro, the premium plugin powering your membership functionality, your website can have any number of membership levels. Each level can have its own price, duration, access level, and user role. Content on your membership site can be restricted to specific levels, so site owners often create multiple membership levels and then use the restriction settings to determine what members of each level can access.
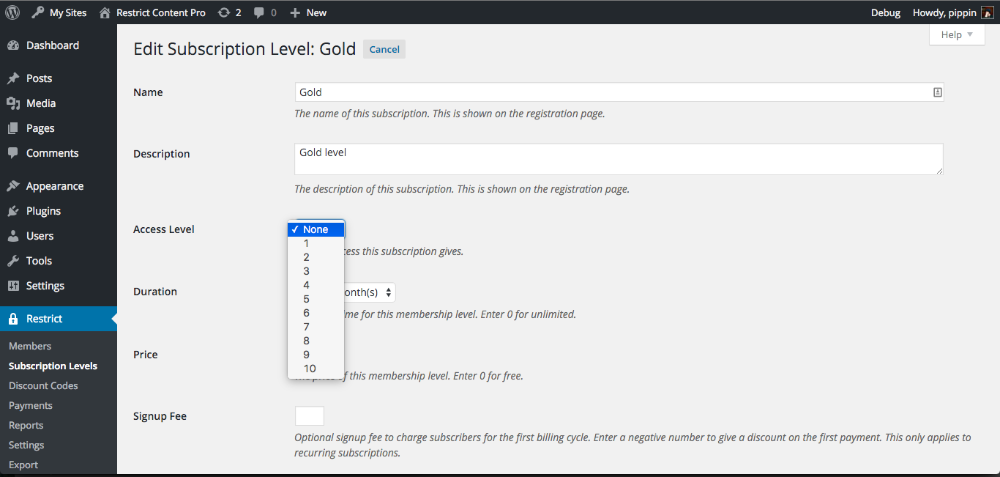
Access levels are tied to member levels. You can select from 1 through 10, or none. For example, when you assign a membership level of 5, subscribers at that level will have an access level between 1-5. As a tiered system, if a member has an access level of 3, they can view content at levels 3, 2 and 1 but not 4 or higher. You can name your membership level something recognizable and user friendly. Access levels are numerical data only.
In your WordPress Admin, scroll down the left sidebar to find the Community menu. Once you hover over Community, you will see Membership Levels. Here you will be able to add and edit subscription levels.
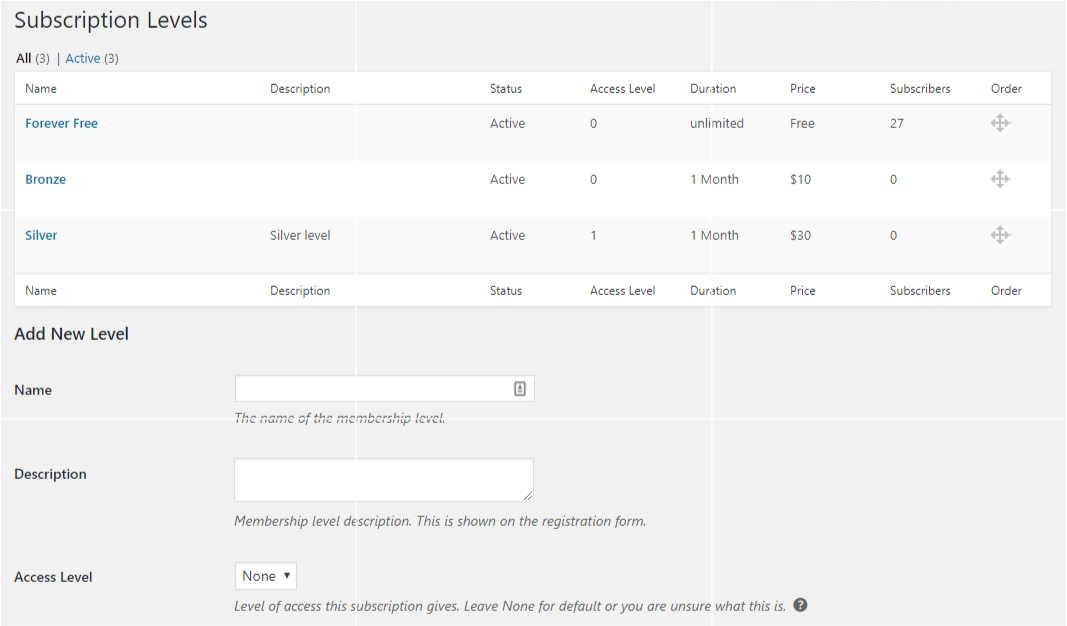
In order to add a new level, you will need to populate several fields including name, access level, duration, user role, and other attributes.
» Name Your Membership Levels
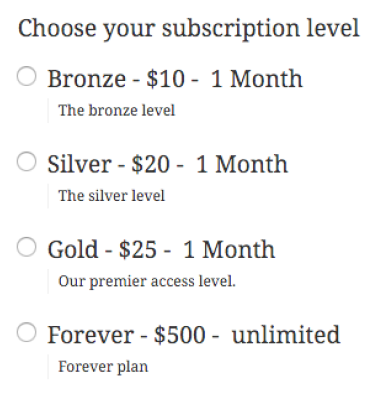
If you haven’t created unique membership level names yet, you can always go with the familiar favorites:
» Assign Access Levels to your Member Level
Select the appropriate access level for your member level. Your highest tier should have the highest access level. This will ensure all of your members are getting exactly what content they pay for. This can be edited in the original “Membership Level” menu, or you can go back and edit it later by editing an existing level.
After filling out all of the fields ( including access level), click “Add Membership Level” and repeat these steps for as many levels as you need for your membership site. You can also rearrange the order that’s displayed on your registration page by dragging the cross-hair icon to drag and drop the levels into the order you would like them in.

» Restricting Post and Page Content
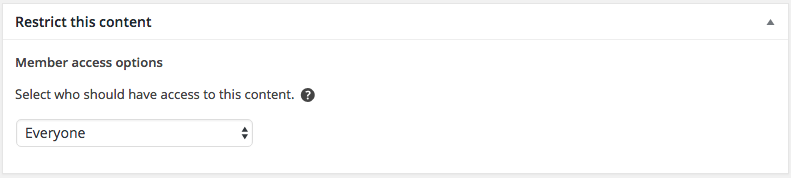
You can easily restrict the content of individual posts or even entire pages by selecting the audience in the “Restrict this content” box.
By default, pages are not restricted.
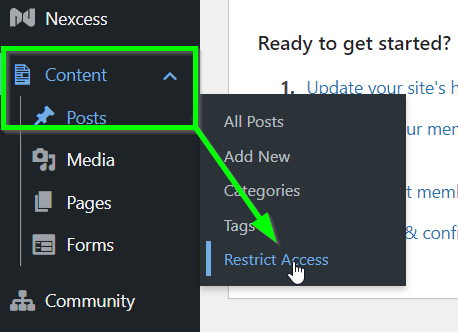
» Restrict Content by Category
An easy way to create gated content is to restrict by category. If you’ve set up content categories by using our tutorials already, navigate to your WPQuickStart Membership Dashboard > Posts > Categories. Select the category you’d like to set up restrictions for.
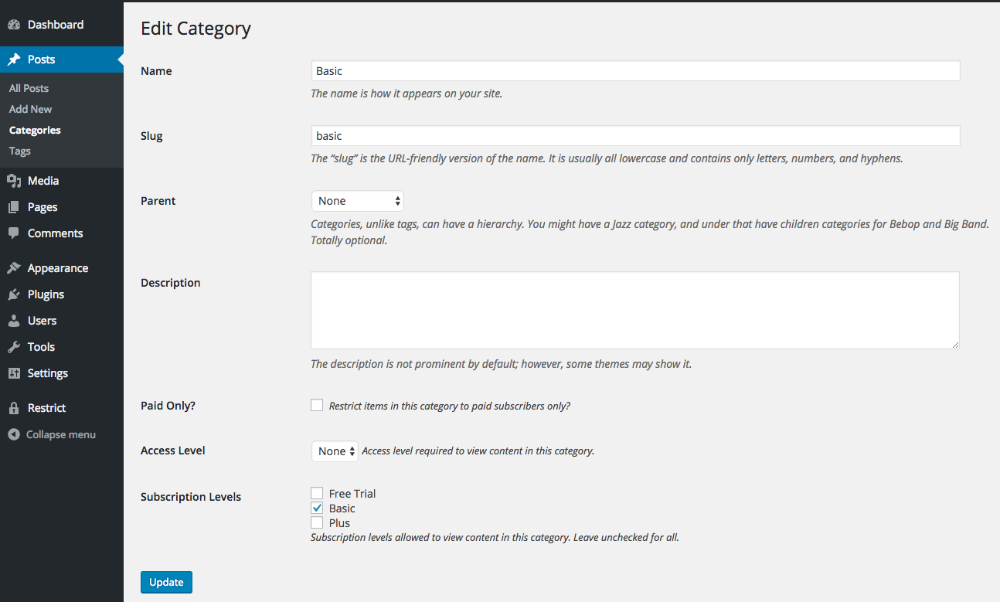
On the ‘Edit Category’ page, you can change the access level for content tagged with that category so that only subscribers with that access level (or below) can view it. Here, you can also restrict content to paid accounts only and different subscription levels.
Members-Only Content
» Add your first members-only content
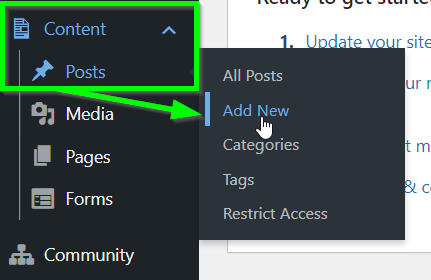
Navigate to Content > Posts > Add New on the left hand side of the WP Admin portal.
Once you have set your title, follow the options to set member access options. You also have the ability to set a drip schedule as well by membership level.

Configure Payments
» How do I set up payments?
When you log into WPQuickStart Membership for the first time, you’ll be greeted with a tutorial that takes you through WPQuickStart Membership and its underlying engine, Restrict Content Pro.
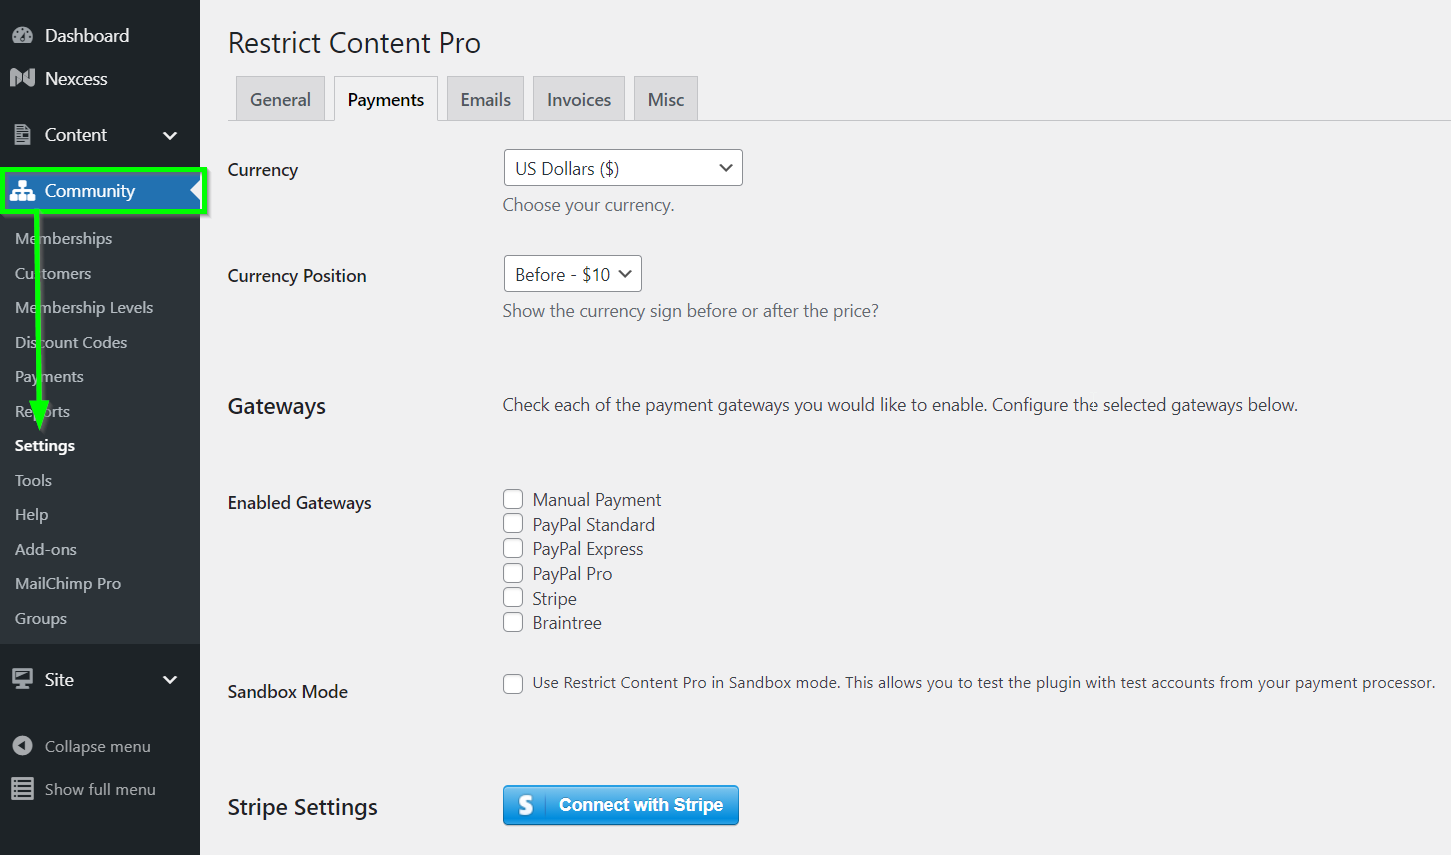
Connecting your Stripe account is part of your WPQuickStart Membership tutorial. If you need to check on your connection, navigate to the WooCommerce menu on the left sidebar menu, and then to Settings > Payments.
Go Live!
» Get Your Membership Site’s Real Name And Home Online
You may not have realized it, but you’ve been creating your site on a temporary URL. Now, it’s time to get your real membership site name. You don’t necessarily have to have a .com URL. We love .co, .biz, .club… all of these are called TLDs, and we don’t care what TLD you choose. The point is to find an online home that your customers will remember, trust, and enjoy.
You’ll have to purchase this URL/name separately from any domain registrar. Buy a domain from Nexcess, or you can purchase a domain from any registrar.
» Tell Your Domain Name Registrar Your Site Is A Nexcess Site
Your domain registrar will have instructions on configuring your name servers. Look through their documentation and then set them as follows:
ns1.nexcess.net
ns2.nexcess.net
ns3.nexcess.net
ns4.nexcess.net
That’s all there is to it! In 24-48 hours, your membership site will be live for the world to see.
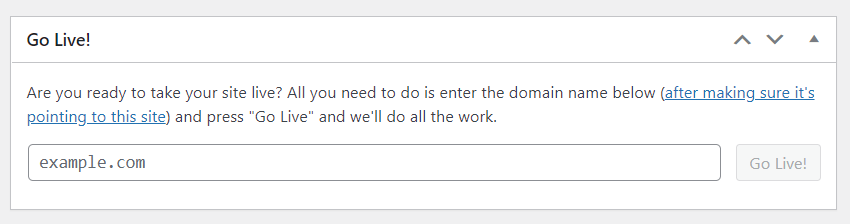
» Tell Us Your Domain
Once you have your domain registered and ready, simply add the domain name in the Go Live! box on your dashboard to take your site live.