
WordPress Multisite is a powerful feature that allows you to create multiple websites using a single installation of WordPress.
It can be incredibly useful for managing a network of sites, especially when those sites share common elements such as plugins, themes, or users.
In this article, we will discuss how to set up domain mapping with WordPress Multisite and how to troubleshoot common Multisite network problems.
To learn more, keep reading or use the links below to jump ahead.
- What is domain mapping in WordPress?
- Why use WordPress Multisite with domain mapping?
- How to set up WordPress Multisite with domain mapping step-by-step
- Troubleshooting common Multisite network problems
- Domain mapping in WordPress
What is domain mapping in WordPress?
WordPress Multisites allow you to establish a network of sites that are all powered by the same WordPress installation. These network sites, by default, employ subdomains or subdirectories of your primary domain name.
For example, if your primary domain name is ilikepie.com, the domains would be arranged as: website1.ilikepie.com, website2.ilikepie.com, website3.ilikepie.com, and so on.
Another way to access them would be via pages:
ilikepie.com/website1, ilikepie.com/website2, ilikepie.com/website3, and so on.
Thanks to the domain mapping feature in WordPress Multisite, different domains can be mapped to each website instead of using subdomains.
For instance, site1.com, site2.com, and site3.com. This way, while having distinct domain names, each site would be powered by the same WordPress installation.
Despite using a single WordPress Multisite with multiple domains on the backend, it will look like each website has an entirely different WordPress installation.
This will also have no effect on the user experience of your website visitors. Instead, people will regard your websites as distinct entities.
Get fully managed WordPress hosting
Power your site with the industry's most optimized WordPress hosting
Why use WordPress Multisite with domain mapping?
Mapping WordPress Multisites to different domains is handy in a variety of situations. So here are a few of the most common examples:
- You’re in charge of a huge corporate or enterprise website with multiple products. If each product/service has its own subsite, giving each one a custom domain can help with branding.
- You don’t want to set up a separate WordPress installation for each website.
- Your service requires clients to create their own websites. Thanks to domain mapping, they can easily establish custom-branded websites using their own domains. At the same time, you can monitor everything from one place without buying custom software.
- International websites can use different localized top-level domain names, such as .es, co.uk, etc., and manage them all from the same admin panel.
- Freelancers employ WordPress Multisite multiple domain mapping to simplify administration tasks. There are some limits to this, however, so consider the downsides before implementing this solution for your clients.
Put simply, you can benefit from mapping WordPress Multisites to different domains whenever you want to manage multiple custom-domain websites from a single place.
How to set up WordPress Multisite with domain mapping step-by-step
Next, let’s walk through the steps of setting up a WordPress Multisite with domain mapping.
1. Register the domains you want to use
Like with any new website, the first step starts with buying a domain name. To do this, you need to use a domain registrar such as Nexcess, GoDaddy, or NameCheap.
Go to the registrar’s website and type your desired domain name in their search bar. For example, you can use our Nexcess domain search feature. Then, if the domain name is available, buy it by following the checkout process.
If not, try to find a good alternative by experimenting with name ideas. There’s no lack of services that can help you with this, including Nameboy, Domain Wheel, and more.
Repeat this process until you’ve registered all the domains you need for your Multisite.
To learn more about this process, you can read our official guide on purchasing and registering domain names. We also compiled a list of frequently asked questions about domain registration.
Now that you acquired the domain, it’s time to buy the right hosting for your website.
2. Set up a hosting plan that supports multiple domains
The second step in any website creation journey is getting a server that you will host it on. This service is provided by businesses called hosting companies.
Today, there are plenty of hosting companies and plans to choose from, so it’s important that you pick the one that best meets your needs.
Here are some questions you should ask yourself before deciding on a hosting provider.
- Does the hosting provider support Multisites?
- Does the hosting plan support multiple domains?
- Do I need a fully managed WordPress solution?
- Should I consider annual pricing to get one free domain name?
- How much storage space will I need for multiple websites?
- What kind of backup features does the hosting come with?
Once you pick a hosting provider and plan, just follow the checkout process to acquire it. For example, take a look at our Nexcess WordPress hosting plans.
Alright, now let’s connect the domain with the hosting.
3. Add your main domain and set up its DNS records
Next up, you might need to add your domain via your hosting provider's interface to associate it with the website. This process is different depending on which hosting provider you pick.
In some cases, you need to add the domain via cPanel, and in others, you would add it to your hosting account once you log in and go to the domains section.
After that is taken care of, it’s time to set up the DNS. While there are multiple ways of doing this, we will show you the two most relevant.
The first method is to set or update the A record at your domain’s registrar (or authoritative nameserver). To do this, you will first need to retrieve the server IP from your hosting account.
After obtaining the IP, you need to log into your registrar’s account and go to the DNS settings for your domain. Once in, just edit the A record by replacing it with the server IP.
The second method is to change your domain’s nameserver (NS) records at the registrar by replacing them with your hosting provider’s nameservers. This will in turn make your hosting provider the DNS authority for your domain.
So, any further DNS changes will need to be made in your hosting account.
If your domain’s A record doesn’t update to the server’s IP automatically after changing the nameservers, you will need to update it manually in your hosting provider’s DNS settings.
Since DNS propagation takes time, it’s best to check for changes using a DNS checker tool such as our Nexcess DNS checker.
4. Set up a WordPress Multisite network
If you are building a WordPress Multisite on a new website, you will first need to install WordPress. Thankfully, the majority of WordPress hosting providers today include a one-click installer. For more information, see our guide on how to install WordPress step-by-step.
After you've installed WordPress, you'll need to enable the WordPress Multisite feature. This feature is built-in, but it’s disabled by default. That’s why you must activate it first in order to proceed with setup.
To do this, there are some manual changes that you need to make in WordPress files. We will show you what to do in the next step.
5. Update wp-config.php and .htaccess
The WordPress configuration file, wp-config.php, contains all of the critical parameters for your WordPress installation. You can make changes to it using FTP clients or with file management software that comes with your hosting account's control panel. Both this file and .htaccess are located in your website's root directory (often named public_html).
Open the files and go to your WordPress admin panel > Tools > Network Setup. Once you’re there, follow the given instructions. They will look similar to the ones in the image below.

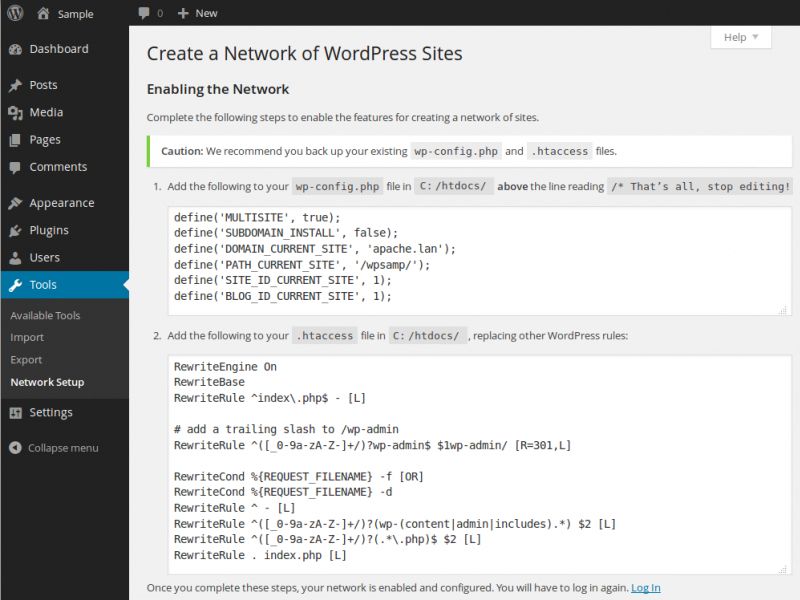
After that, remember to save the changes you made and re-upload the files if necessary.
6. Add subsites from the network admin account
After you've configured your WordPress Multisite network, you can begin adding the subsites to the network. You can only add each network site as a subdomain or subdirectory of your main network site when you first add it. It’s just the way WordPress Multisites work.
However, once you've added the site, you can change it to include the real domain name that you wish to utilize. This step will be covered later in the article.
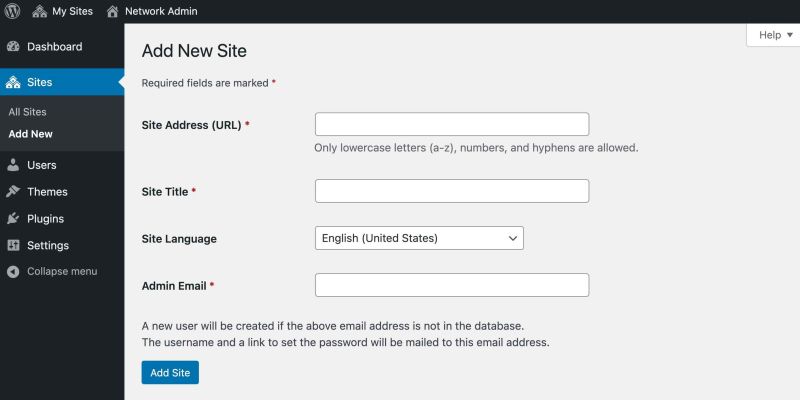
To add a new network subsite, open your Network Admin page by navigating to My Sites > Network Admin > Sites > Add New.
To begin, fill out the Site Address field. As mentioned, you can’t use a custom domain yet. Instead, simply enter some temporary name.
Additionally, you need to fill out three more fields: Site Title, Admin Email, and Site Language (optional). Once done, click the blue Add Site button at the bottom. After you've filled out all of the fields, click the Add Site button at the bottom of the page.
See the image below for reference.

7. Map each subsite to its domain
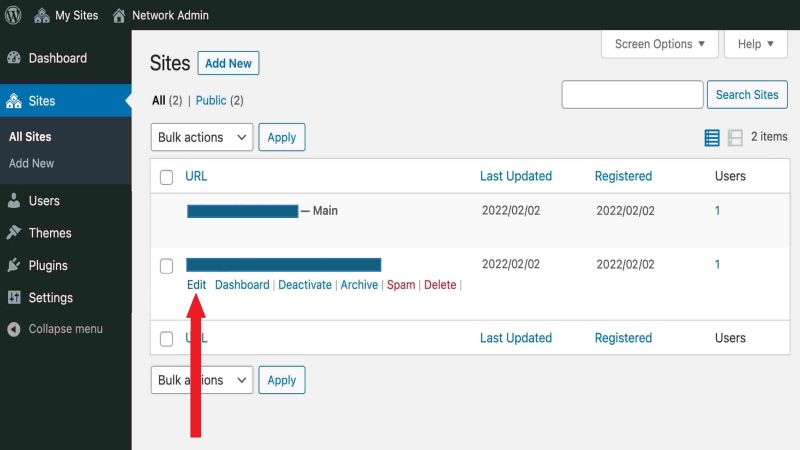
After you've created your network subsites, go back and edit their domain names to match the domain mapping scheme you wish to utilize.
On the Network Administrator page, navigate to Sites > All Sites. Then, under the network site that you want to map to a custom domain name, select Edit.
You should now be able to fully change the site address to include a direct link to the custom domain name you want to use for this subsite. After that, make sure to click the Save Changes button.
The process will then need to be repeated for each other subsite. When you're done, each network site should have its own domain name when you navigate to Sites > All Sites under Network Admin.
See the image below for reference.

8. Set up DNS records for each domain
In step three, we explained how you could add the main domain to your hosting account and set up the DNS. Now it’s time to do the same for each of your network subsites. Just follow the existing instructions outlined earlier to complete this step.
To keep things simple, we suggest that you use a single domain registrar for both your main Multisite domain and all the subsite domains. The same goes for the nameservers. In this way, you will be able to manage all DNS records in one place.
That’s the whole point of WordPress Multisites — to make things as easy as possible and avoid repetitive tasks such as logging in to different accounts.
Note: on Nexcess, you can add pointer names when using our name servers.
9. Set up SSL certificates for each subsite
Finally, now that you have finished setting up WordPress Multisite different domain mapping, it’s time to take care of the SSL certificates for your domains.
SSL certificates improve security by enabling your websites to move from HTTP to HTTPS. They encrypt sensitive information transferred over the internet so that only the intended recipient can receive it.
The process of installing an SSL can differ depending on your hosting provider, so there isn’t a single way to explain it. If you’re a Nexcess hosting user, we recommend that you read our guide on how to install SSL certificates in Nexcess Cloud or how to install SSL certificates in SiteWorx.
Congratulations, you just configured domain mapping for your WordPress Multisite, and everything should run smoothly.
Troubleshooting common Multisite network problems
In case everything isn’t running smoothly and you’re experiencing issues, don’t worry. We will explore some common errors and solutions below.
Network subsite login error
One of the most typical problems encountered with WordPress Multisites is the inability to log in to a subsite. You'll almost certainly see an error message about blocked cookies, and in some cases, you may fail to log in without even getting an error.
Normally, this is easy to fix by adding the following code to your wp-config.php file.
define('COOKIE_DOMAIN', $_SERVER['HTTP_HOST']);You might need to clear the cache after that for the changes to take effect. But if the issue persists, you should contact your hosting support.
“Error establishing a database connection” error
You might experience database errors after setting up your WordPress Multisite, so here’s what you can do to resolve them.
- Check and verify the database credentials for each subsite in your wp-config.php file are correct.
- In case you used a subdomain for this subsite in the past, run a search and replace command on the database to make sure the new custom domain is set properly.
- Repair your database by adding “define('WP_ALLOW_REPAIR', true);” to wp-config.php and opening yourdomain.com/wp-admin/maint/repair.php in the browser.
- Make sure your database server is online.
If the issue persists, you should contact your hosting support.
Domain mapping in WordPress
In this article, we covered what WordPress Multisite domain mapping is and how you can benefit from it. Thanks to WordPress Multisites, multiple domains can be mapped to each subsite under a single WordPress installation.
This feature can save you a lot of time and take your website management to a whole other level. So take advantage of our nine-step guide and set it up for yourself.
If you need a fully managed WordPress solution that works perfectly with WordPress Multisites, look no further. Nexcess fully managed WordPress hosting plans are optimized specifically for WordPress. Check out our plans and get ready to experience premium managed hosting.

