

Getting your Magento 2 store backed up regularly is one of the most important aspects of ensuring that it stays protected from the consequences of unwanted events.
Failed updates, server hardware or software issues, various security threats — you need to be prepared for everything, knowing all your data can be easily recovered.
Below we are going to learn how to backup Magento 2 stores using three different methods. To learn more about Magento 2 backups, just keep reading.
The types of backups
Magento is an ecommerce platform that can provide unlimited opportunities to store owners, which makes having a backup strategy even more vital.
Magento 2 became a successor to the Magento 1 content management system when the latter reached its end of life, and essentially extended the functionality of the previous version.
All products added, customers’ orders, session data like carts, and a large amount of other information — all of this is stored within the Magento 2 database, and we can not allow any of that to be lost. That’s where a backup comes in.
Get fully managed Magento hosting
Accelerate your store's potential, without the ongoing maintenance
There are three types of Magento 2 backups we can create:
- System backup. This type of backup saves everything, including the Magento 2 file system, the media folder, and the database.
- Database and media backup. As the name suggests, you can create a backup of your media folder and the Magento 2 database.
- Database backup. If you would like to save a backup of your database only, that is also possible.
We can backup Magento 2 websites from the admin panel, command line, making use of the Magento commands, or by creating a Magento 2 backup manually.
The process of creating a backup manually can be applied to any other content management system.
Via the command line
Magento 2 backups can be created from the command line using certain Magento commands.
Backups created are stored in the var/backups folder inside your store installation directory and can be used to restore the website at any time.
Let’s see how to backup Magento 2 from the command line.
Step 1: Log in to the server via SSH and go to your Magento 2 store installation directory
To create a backup, we need to be logged in via SSH with the account user. Once we are logged in, let's move to the document root of our store where our Magento 2 installation resides.
As you can see in the screenshot below, we have logged in as the magentotest user, which is the owner of our Magento installation, and public_html is our current working directory.
The user we are logged in as

[magentotest@newvps public_html]$ whoami
magentotest

Our current working directory

[magentotest@newvps public_html]$ pwd
/home2/magentotest/public_html
Step 2: Create a backup
Using the magento setup:backup command, we can backup our Magento 2 store fast and easily. With the help of the flags we can apply to the commands, we can specify what type of a backup we would like to create.
Please note that the backup command will put the store into maintenance mode. When your store is put into maintenance mode, its front page will display a message saying that the website is currently unavailable.
Once a backup is complete, the store will be operational again.
Related reading: How to create a custom Magento 2 maintenance page without using an extension >>
In the example below, we have created a full system backup containing our Magento 2 file system, the media directory, and the database; you can see the corresponding flags --code, --media, --db we used.
magentotest@newvps public_html]$ magento setup:backup --code --media --db
Enabling maintenance mode
Code backup is starting...
Code backup filename: 1648215256_filesystem_code.tgz (The archive can be uncompressed with 7-Zip on Windows systems)
Code backup path: /home2/magentotest/public_html/var/backups/1648215256_filesystem_code.tgz
[SUCCESS]: Code backup completed successfully.
Media backup is starting...
Media backup filename: 1648215256_filesystem_media.tgz (The archive can be uncompressed with 7-Zip on Windows systems)
Media backup path: /home2/magentotest/public_html/var/backups/1648215256_filesystem_media.tgz
[SUCCESS]: Media backup completed successfully.
DB backup is starting...
DB backup filename: 1648215256_db.sql
DB backup path: /home2/magentotest/public_html/var/backups/1648215256_db.sql
[SUCCESS]: DB backup completed successfully.
Disabling maintenance mode
Step 3: View the backups you created
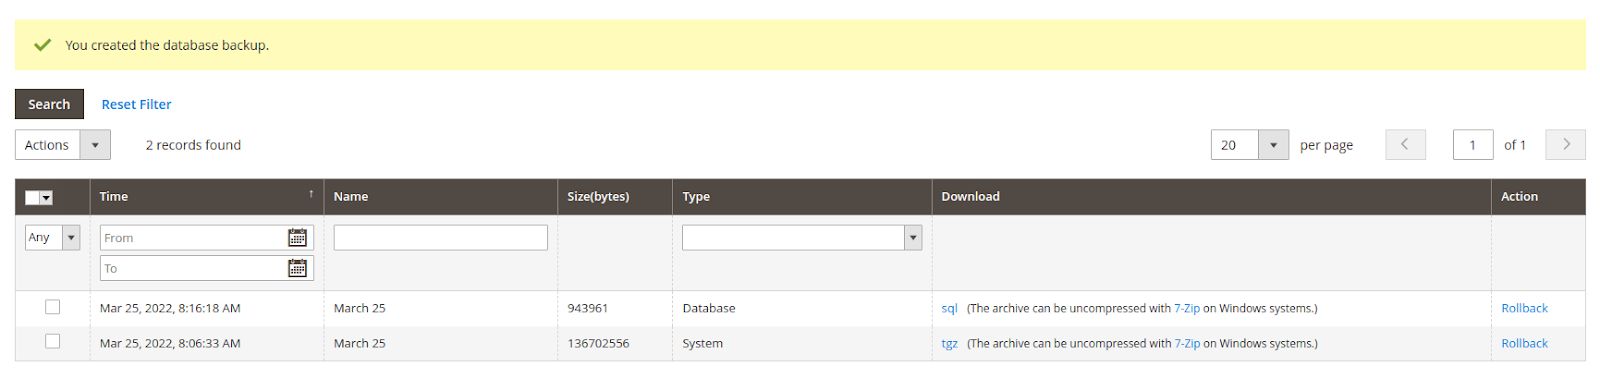
We can find all the backups we created both from the command line and the admin panel in the var/backups directory.
Let’s take a look at the list below.
We have 2 backups that we created from the admin panel, and the full backup we just created, which consists of 3 files: the database backup, Magento 2 file system, and the media files archives.
The backups created from the admin panel

-rw-rw-r-- 1 magentotest magentotest 136702556 Mar 24 16:14 1648209993_snapshot_March_25.tgz
-rw-rw-r-- 1 magentotest magentotest    943961 Mar 24 16:16 1648210578_db_March_25.sql

The full backup we created from the command line

-rw-rw-r-- 1 magentotest magentotest   1113288 Mar 25 12:38 1648215256_db.sql
-rw-rw-r-- 1 magentotest magentotest 133462787 Mar 25 12:38 1648215256_filesystem_code.tgz
-rw-rw-r-- 1 magentotest magentotest    110237 Mar 25 12:38 1648215256_filesystem_media.tgz

The backup directory

[magentotest@newvps backups]$ pwd
/home2/magentotest/public_html/var/backups
Restoring from a backup via command line
You can restore your website from any of the backups saved from your admin panel or using the magento setup:rollback command.
For example, below we have restored our Magento store from the full system backup we created earlier from the command line, but skipped the restoration of the database.
The flags that can be used are -m, -c, and -d for media, file system, and database restoration accordingly. All flags need to be followed by the backup file we are restoring from.
[magentotest@newvps backups]$ magento setup:rollback -c 1648215256_filesystem_code.tgz -m 1648215256_filesystem_media.tgz
Enabling maintenance mode
You are about to remove current code and/or database tables. Are you sure?[y/N]y
Do you want to keep the backups?[y/N]y
Code rollback is starting ...
Code rollback filename: 1648215256_filesystem_code.tgz
Code rollback file path: /home2/magentotest/public_html/var/backups/1648215256_filesystem_code.tgz
[SUCCESS]: Code rollback completed successfully.
Media rollback is starting ...
Media rollback filename: 1648215256_filesystem_media.tgz
Media rollback file path: /home2/magentotest/public_html/var/backups/1648215256_filesystem_media.tgz
[SUCCESS]: Media rollback completed successfully.
Disabling maintenance mode
Via the admin panel
We can easily create a Magento 2 backup from the admin panel.
This method does not require connecting to the server directly via SSH as we did when we created a backup using the Magento command line interface.
Below we are going to learn how to backup Magento 2 from the admin panel.
Step 1: Log in to your Magento 2 admin panel
Log in to the Magento admin panel using your admin user credentials.

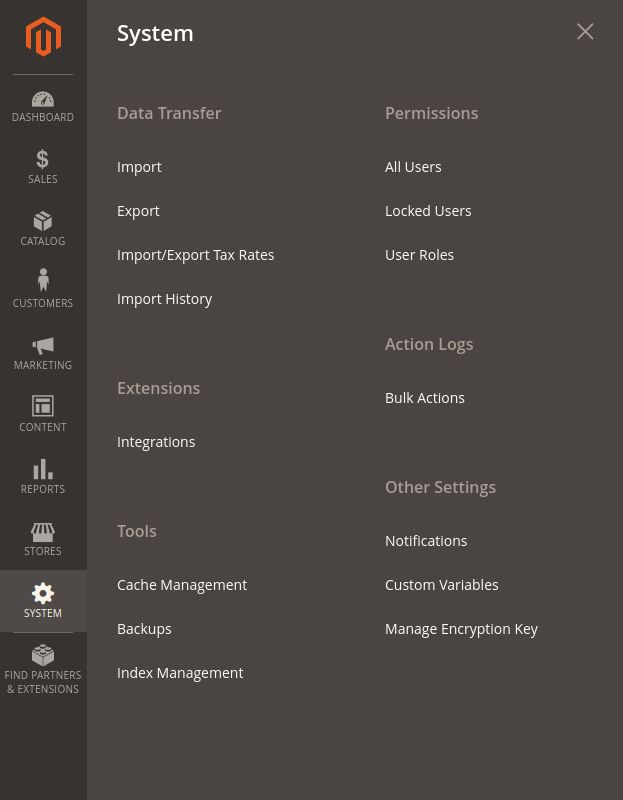
Step 2: Choose system > backups from the left menu
You can find backups under the tools section of the system menu.

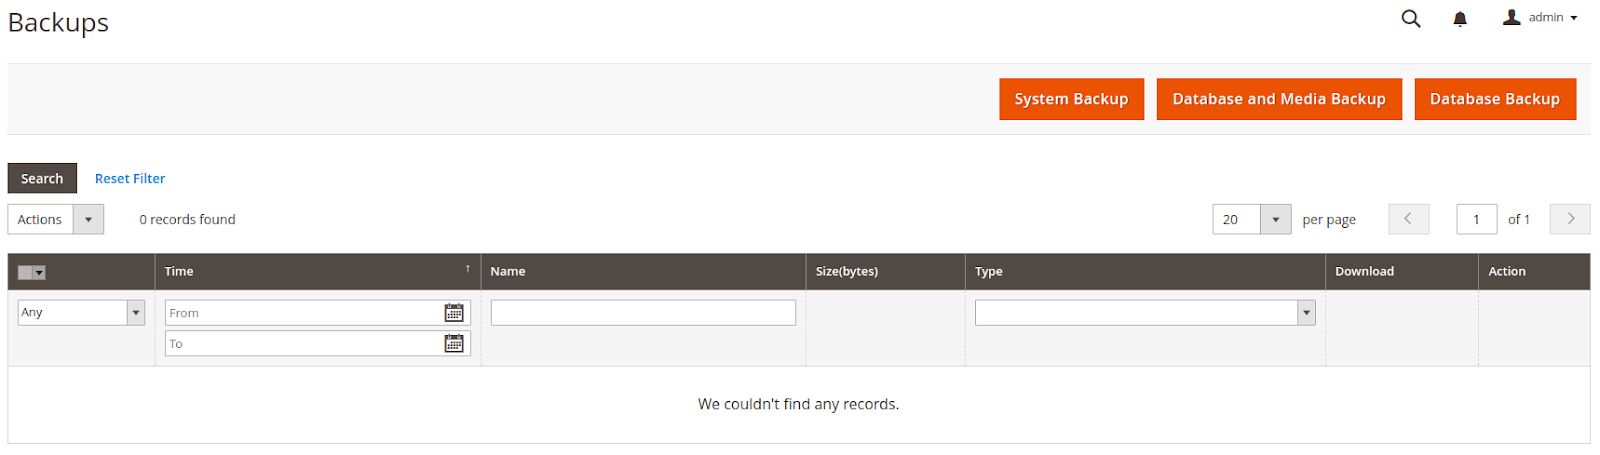
Step 3: Choose the backup type and run a backup
Once you open the backup menu you will be able to see the backups you have saved to the disk, or run a new backup.

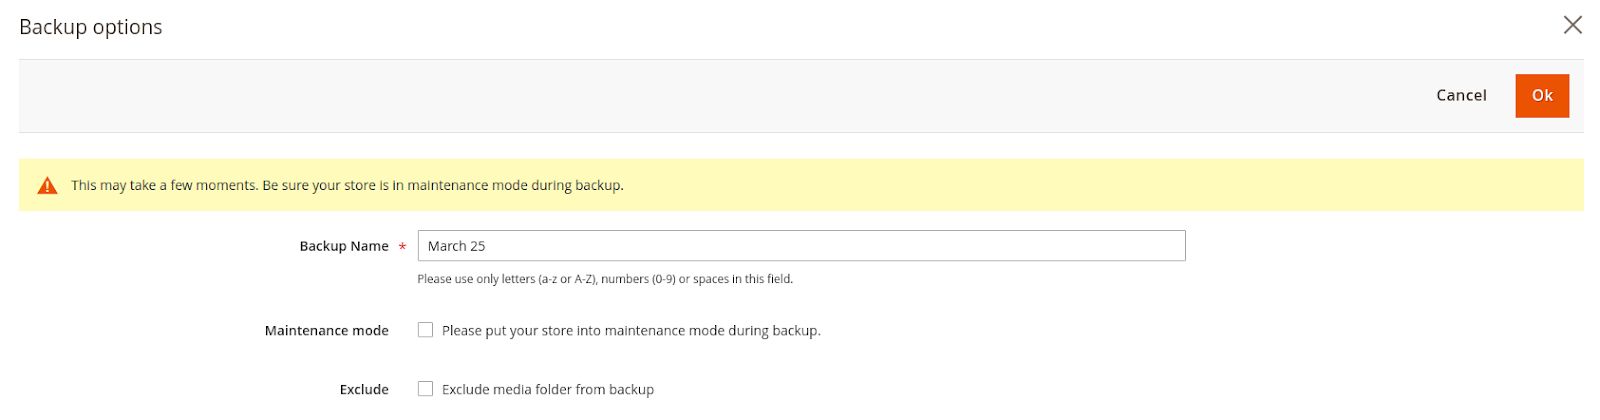
For example, let’s run a system backup. We will be asked to name the new backup, and choose whether we would like to put the store into maintenance mode.
We strongly recommend doing so for a backup to run without any issues, and make sure no new data gets added or modified while a new backup is being saved.
There is also an option to exclude the media folder from being backed up.
Once you are ready, click Ok, and a backup will start running.

Step 4: Verify the backup completed successfully
Once a new backup is created, it will be added to the list of available backups.
You can download a backup to your computer or restore your Magento 2 store from the same interface.

Configuring regular backups from the admin panel
A new backup of your Magento 2 store can be created from the admin panel anytime, but the process can be automated. We can configure backups to be running at a certain time daily, weekly, or monthly.
If you still do not have backups saved regularly, let’s see how we can enable this option from the admin panel.
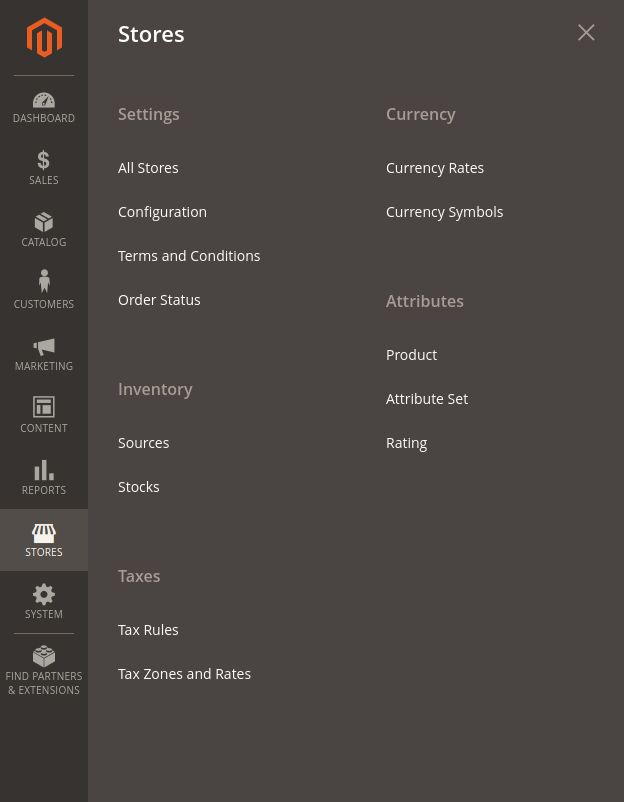
Step 1: Choose stores from the left menu and click on configuration
Configuration can be found under settings in the stores menu.

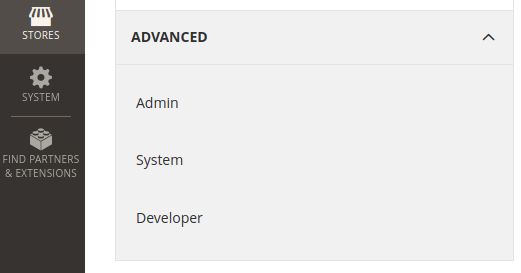
Step 2: Choose the advanced tab and click on system under it
There we will be able to see some of the advanced system settings, including the backup schedule.

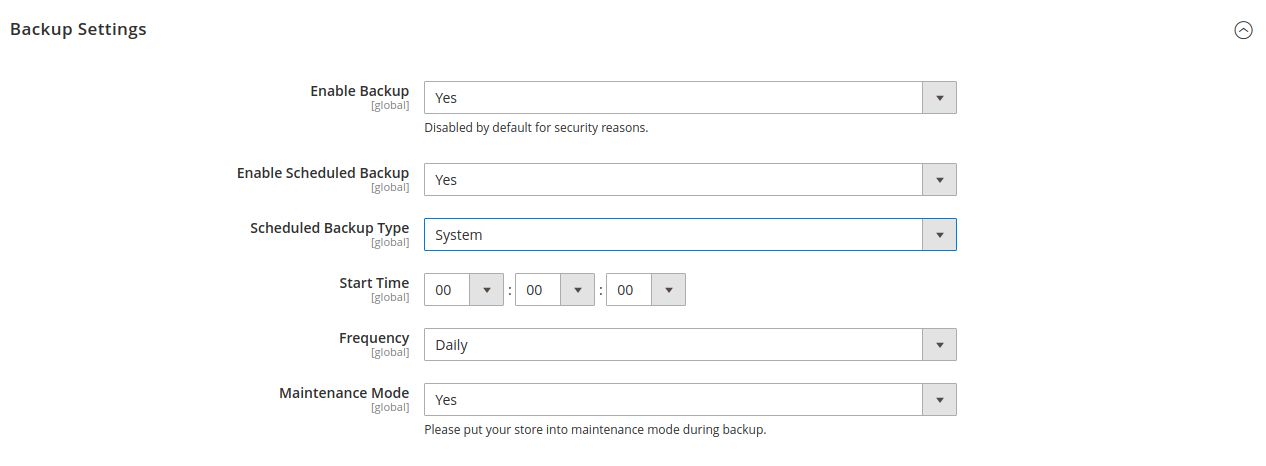
Step 3: Configure the backup frequency
We can enable scheduled backups from the backup settings menu, along with the backup type, frequency, and the time you would like backups to run at.

Manual backup
The process of creating a manual backup of a Magento 2 store is the same as saving one of any website using a different content management system. We need to backup the website database and all its files.
Let’s review the process of creating a backup manually that can help us understand how to backup Magento 2 websites if we for some reason can not do it using the two methods we covered previously.
Step 1: Create a backup of the database
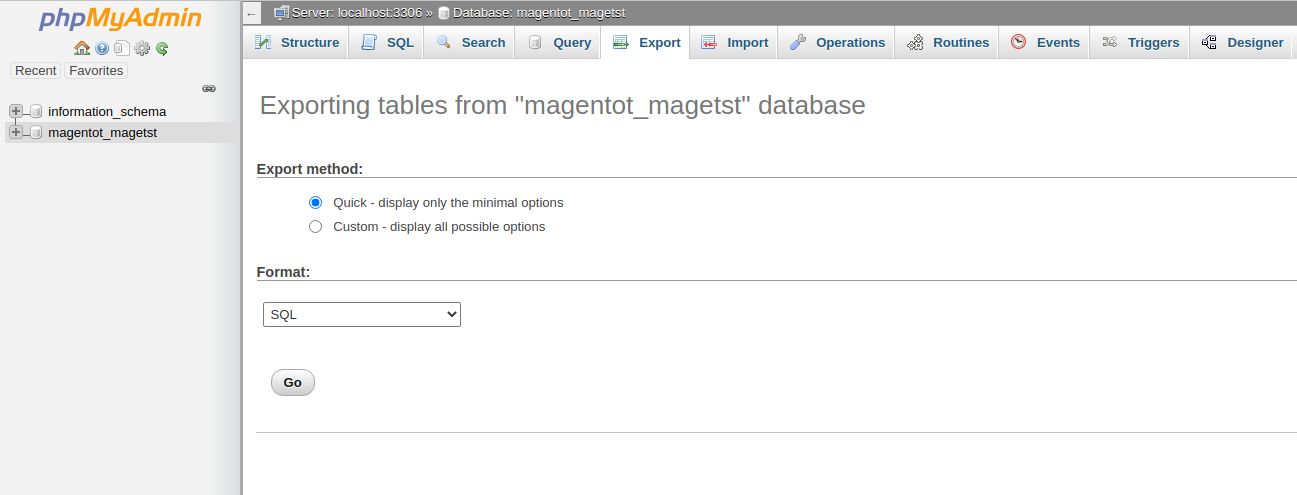
Creating a database backup can be done in different ways. We can do it using a popular database management tool like phpMyAdmin.
Once we open phpMyadmin we can choose our Magento 2 database from the list on the left and choose the Export option from the top menu. Quick export method can be used, unless you would like to customize the database backup.
Click on Go once ready, and an SQL file containing your database backup will be downloaded to your computer.

Step 2: Backup the store files
You can download a backup of your Magento 2 store files from the file manager interface or by connecting to the files via SFTP.
As you see below, we have connected to our store files via SFTP using FileZilla, and downloaded the whole directory containing our Magento 2 store files.


You can create an archive from the database backup and the files you downloaded, and store it on your computer.
If you need to restore your website from a backup you manually created, you can just upload it to the server and overwrite the existing files and the database yourself, or contact your hosting provider's technical support for assistance.
Now you know
Backing up your Magento 2 store is of primary importance to ensure all data is safe and can be easily recovered.
Now that we have learned how to backup Magento 2, we can see that the process does not require much time or effort. We can create backups using at least three different methods: via the Magento command line interface, admin panel, or by saving a backup manually.
Automatic backups can also be configured to run regularly which is another great option.
Consider managed Magento hosting with Nexcess
Taking care of all technical aspects of your online business can be exhausting, and you as a business owner can not allow your website to be managed by anyone but a team of experts.
Managed hosting can help you delegate most tasks to the system administration professionals, keeping your store safe and secure.
Nexcess managed Magento hosting plans come prepackaged with all the best solutions and are optimized for security, performance, and scalability.
Check out our managed Magento plans to get started today.

