

Magento multi-store empowers you to create websites and store views with different languages, products, and currencies from a single Magento instance. It’s the perfect tool to personalize the shopping experience for your customers as you expand globally.
Curious to learn how to set it up? Read the rest of our guide to find out.
We’ll explain the benefits of setting up multiple websites with Magento 2 and share the steps to configure Magento multi-store correctly.
Introduction to setting up Magento 2 with multiple stores & domains
Let’s explore how Magento multi-store helps your online business grow.
What is Magento 2?
Magento 2 is an open source platform that provides tools such as customer, catalog, and inventory management required to build and run an online store. Whether you’re a small brand selling locally or an enterprise selling globally, Magento can support your online operations.
Benefits of setting up Magento 2 with multiple stores & domains
Here’s how Magento 2 multi-store helps your online business.
1. Multiplies your reach without increasing costs
With Magento multi-store you don’t need to build a new store from scratch. You can sell on multiple sites using the same hosting, theme, and extensions.
2. Enables you to diversify your business model
Magento multi-store makes it easy to diversify your business model using existing assets and resources. For example, if you’re selling B2C, you can set up a B2B website that offers wholesale pricing easily.
3. Helps you expand into new markets efficiently
As you expand your business, multiple storefronts allow you to create localized shopping experiences. You can use websites to offer separate delivery and payment methods for each market or add store views to present content in different languages.
4. Empowers you to offer market-based products and pricing
Magento lets you use separate catalogs with dedicated inventories and pricing for each website. That simplifies managing logistics and payments for new markets.
5. Simplifies data-driven decisions
With everything running from the same platform, you have a unified data source for essential business decisions. You can track sales, manage products, and plan inventory for all sites and stores without leaving the admin panel.
Get fully managed Magento hosting
Accelerate your store's potential, without the tedious maintenance
Setting up Magento 2 with multiple stores & domains
Follow these steps to set up Magento with multiple stores and websites.
1. Choose a managed Magento 2 hosting plan
Choose a managed Magento hosting plan that gives you the resources to run multiple websites. Some important factors to look for in a Magento hosting provider include:
- Speed and website performance features.
- Storage and bandwidth allocation.
- Scalability.
- Value-added services.
- Support options.
Pro tip: Nexcess is a Magento host that meets those requirements. We provide free SSL certificates and on-demand staging sites to help you test changes without breaking your store. Browse our Magento hosting plans to learn more.
2. Configuring multiple stores in the admin panel

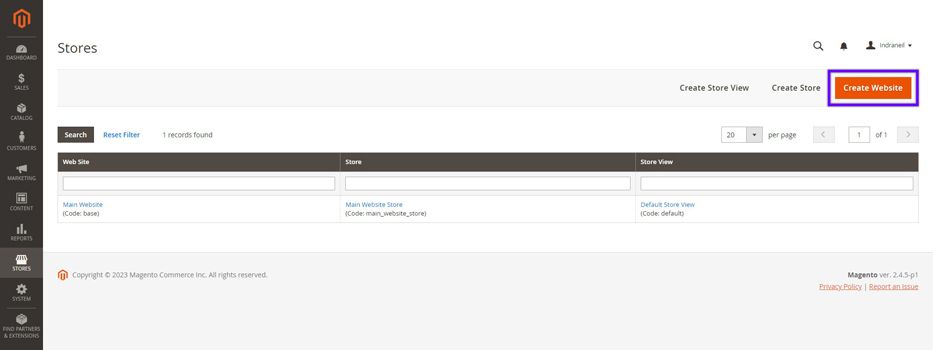
Log in to the Magento admin, navigate to Stores > Settings > All Stores, and click Create Website on the Stores page.

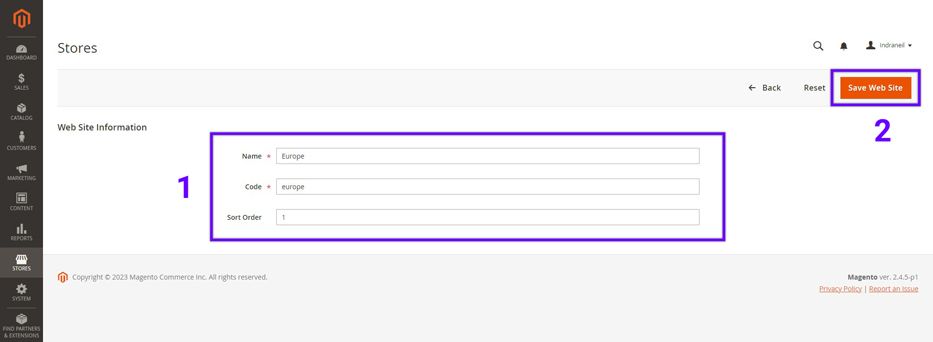
Enter the following information:
- Name: Assign a name to your website.
- Code: Enter a unique code for your website.
- Sort Order: Enter a number to set the display chronology.
Click Save Web Site to create your website.

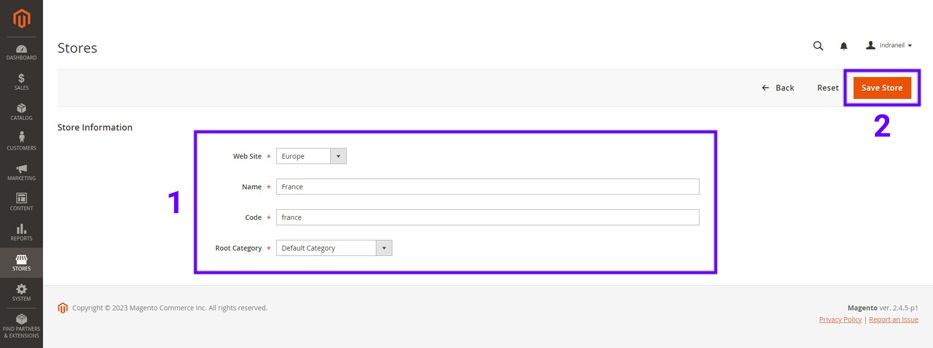
Next, click Create Store on the Stores page and configure the following details:
- Web Site: Use the dropdown to associate a website with your new store.
- Name: Enter the store name.
- Code: Set a unique identifier for the store.
- Root Category: Select a root category for the store.
Note: If you want a separate catalog for your store, follow Adobe’s guide to set up a new root category.
Click Save Store to create the store. Repeat the above steps to create more websites and stores.
3. Assigning store views to each store

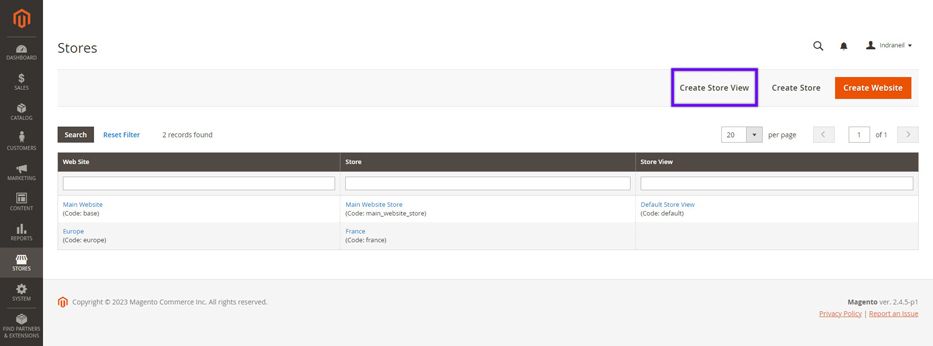
Return to the Stores page and click Create Store View.

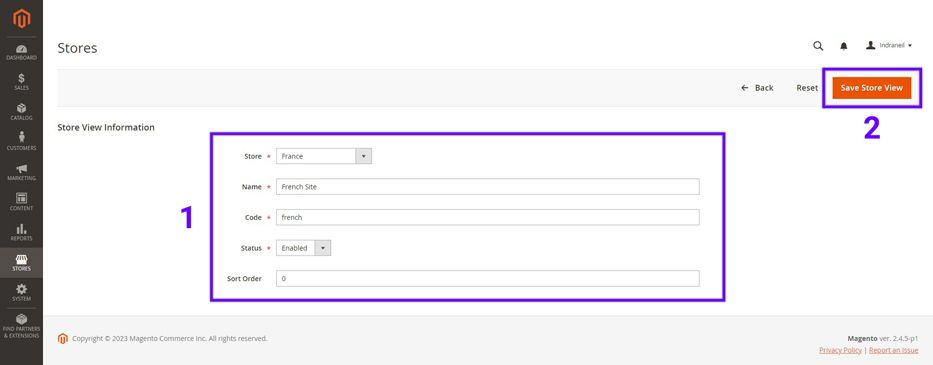
On the Store View Information page, enter the following details:
- Store: Choose a store from the dropdown to associate with this store view.
- Name: Enter the store view name.
- Code: Enter a unique identifier for the store view.
- Status: Set to Enabled.
- Sort Order: Assign a number to organize the chronology of multiple store views.
Click Save Store View. Repeat the process to add more store views.
4. Creating custom URLs for each store
You need to update the base URL for each website so you can access the website using a subdomain.

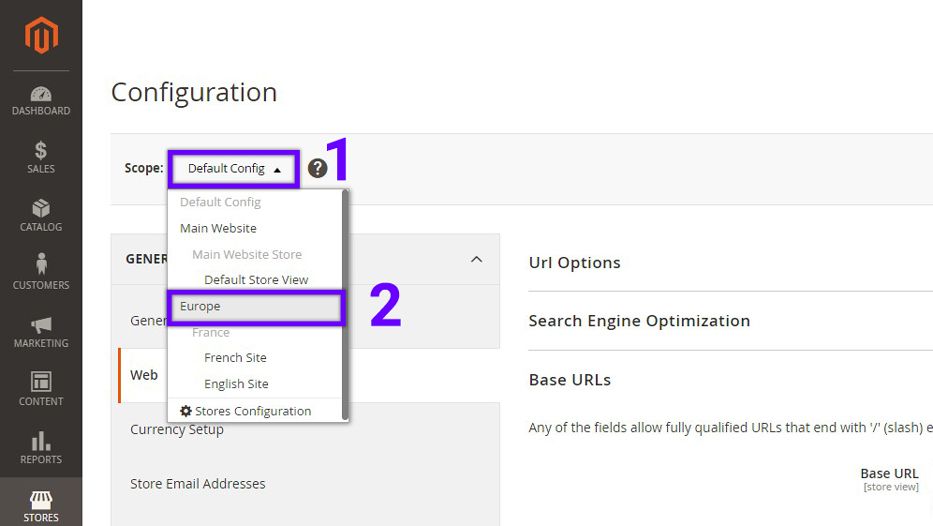
Go to Stores > Settings > Configuration > General > Web and select a website from the Scope dropdown in the upper left corner.

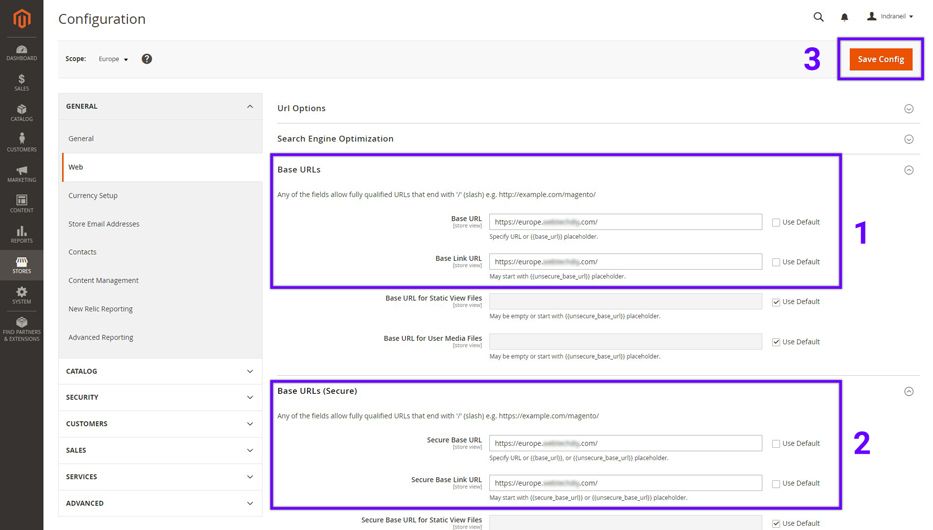
Expand the Base URLs section and uncheck Use Default. Now enter your complete subdomain URL for that website with the “https://” protocol in the Base URL and Base Link URL fields.
Repeat the above steps for the Base URLs (Secure) section.
Once you’re done, click Save Config.
5. Add the store code to the website base URL
Adding the store code at the end of the website base URL makes it easier to set up and manage multiple stores in two ways:
- You don’t need to create separate index.php and .htaccess files for each store.
- Your Magento store’s index.php and .htaccess files remain in sync with the codebase when you update Magento in the future.
To add the store code to your website’s base URL, go to Stores > Settings > Configuration > General > Web and set the Scope on the upper left corner to Default Config.
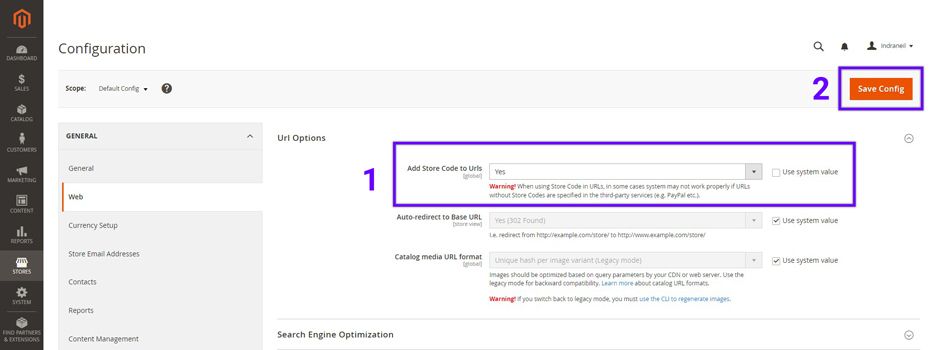
Expand the URL Options section and uncheck Use system value next to the Add Store Code to Urls setting. Set the value for Add Store Code to Urls to Yes.
Click Save Config and flush your store cache from the System > Cache Management admin page.
6. Configure your web server
To access your new website in a browser, you need to update your web server’s configuration file to pass the values of the $MAGE_RUN_TYPE and $MAGE_RUN_CODE variables to the web server.
The steps to do that will vary depending on whether you’re using Apache or Nginx as your web server. Adobe has detailed guides for Apache and Nginx that show you exactly how to set it up.
Note: If you’re a Nexcess customer, contact our Magento support experts via chat, email, or phone, and we’ll help set this up for you.
After that, go to your DNS management account and point your subdomain(s) to your Magento server. You’ll be able to access your new Magento multi-store sites once the DNS information propagates.
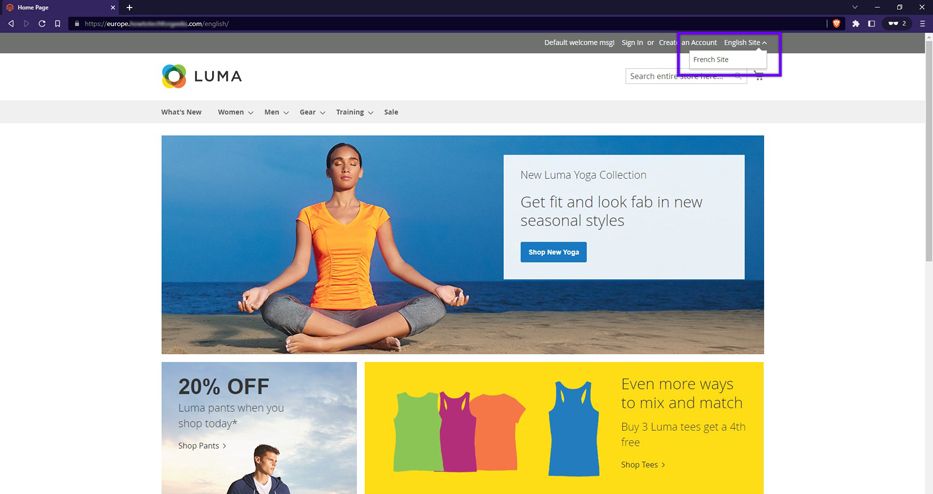
Here’s how our new Magento website looks with the store view switcher menu:

Bottom line
We’ve explained the benefits of setting up Magento multi-store and showed you the exact steps you need to follow to set it up.
Remember that multiple websites and stores, even on the same Magento installation, need more resources than a single website. That’s why choosing a reliable hosting provider that offers auto scaling features and lets you upgrade your hosting plan easily is essential.
Managed Magento hosting with Nexcess gives you all that and more. All plans include 24hrs of free autoscaling each month, an Nginx-based Cloud Accelerator, and an integrated global CDN, so your Magento store is prepared for viral moments at all times.
Browse our Magento hosting plans to get started today.

