According to a 2022 report by Veeam, 76% of businesses suffered at least one ransomware attack within the past year. More importantly, over one-third of the compromised data (36%) was unrecoverable after the attack.
Fortunately, if you’re a Magento store owner, you don’t need to worry about data loss because Magento offers a built-in backup tool that simplifies on-demand backups.
In this guide, we’ll explain everything you need to know about Magento 2 backup, including how it works and how to back up Magento 2 correctly.
Here’s everything we’ll cover:
- The basics of Magento 2 backup
- How to backup Magento 2
- How to restore a Magento 2 backup
- Final thoughts: How to backup Magento 2 using the in-built backup tool
The basics of Magento 2 backup
Magento 2 Open Source offers an in-built backup module that lets you back up different parts of your store in two ways:
- From the admin panel.
- Using the Magento command line interface (CLI).
Adobe Commerce Cloud users can use the above methods and also create a snapshot of their application environment using the Project Web Interface. The snapshot creates a complete backup of all services running on the server, such as Redis, MySQL, and Magento.
In contrast, the methods for Magento Open Source let you backup the following three parts of the system:
- File system (excluding the var/ and pub/static directories).
- Database.
- Media files stored in the pub/media directory.
When you backup Magento 2 using the built-in backup system, Magento creates a .sql file for the database and a .tgz compressed archive file for the file system and media backup files. It places the backup files inside the var/backups directory until you delete them manually.
How to backup Magento 2
- Enable the Magento 2 backup tool.
- Set the open files’ limit value.
- Backup Magento 2.
- Schedule Magento 2 backups (Optional).
- Verify the Magento 2 backup.
Note: Adobe deprecated the built-in backup feature of Magento 2, starting with version 2.3.0 and above. Make sure you test the Magento 2 backup functionality in a staging environment before using it on a production server.
Step 1: Enable the Magento 2 backup tool
Log in to your Magento server as the filesystem owner and navigate to the project root directory. Then, run the following CLI command to enable the Magento backup utility:
$ bin/magento config:set system/backup/functionality_enabled 1Step 2: Set the open files’ limit value
Before creating a backup, make sure you update the open files’ limit value for the Magento file system user. A low open files limit value can lead to failed backups and rollbacks using the Magento backup tool.
Adobe recommends setting the open files limit value to 65536 or more. However, you can use a larger value if your system supports it.
Run the following command as the Magento filesystem user to update the open files limit:
$ ulimit -s 65536Verify the ulimit is updated using:
$ ulimit -nStep 3: Backup Magento 2
You can backup Magento 2 from the terminal using the following CLI command syntax:
$ php bin/magento setup:backup [--code] [--media] [--db]
You can also specify one or more options to back up different parts of your Magento store. For instance, you can create a backup of the database and file system using the following command:
$ php bin/magento setup:backup --code --dbOnce the command executes successfully, you should see the following output:

Alternatively, you can also backup Magento 2 via the admin panel by navigating to System > Tools > Backups and selecting one of the following three options:
- System Backup.
- Database and Media Backup.
- Database Backup.

On the Backup options page, enter a name for your backup and tick the Maintenance mode checkbox to switch your online store to maintenance mode during the backup process. Once you’ve configured the backup options, click Ok to initiate the backup.
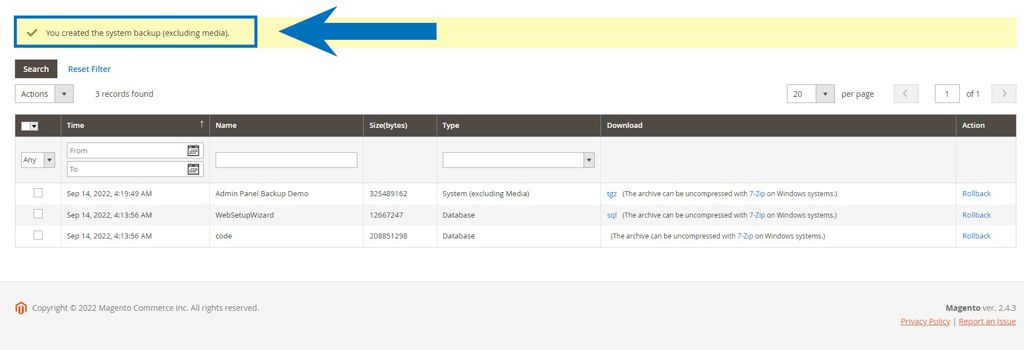
The backup process can take anywhere from a few seconds to several minutes, depending on the size of your store, your server configuration, and the type of backup you’ve selected. Once it completes, you’ll see a message confirming the backup is complete as follows:

Step 4: Schedule Magento 2 backups (optional)
Optionally, you can schedule daily, weekly, or monthly Magento 2 backups on a predefined schedule from the admin panel.
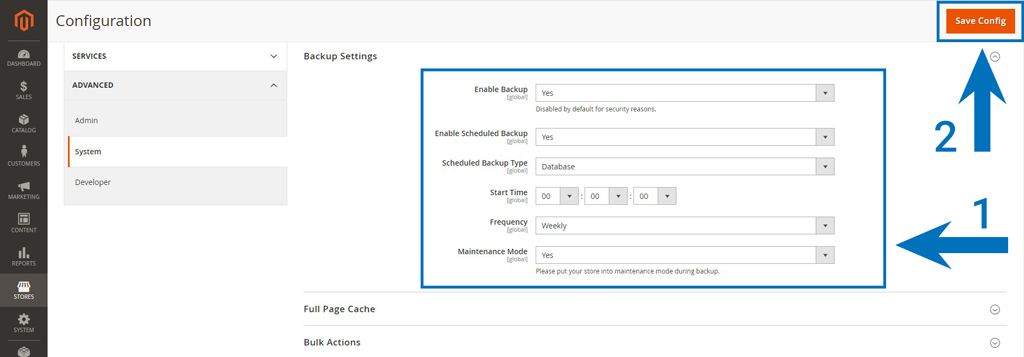
Log in to the Magento admin panel and navigate to Stores > Settings > Configuration > Advanced > System.

Expand the Backup Settings section and update it as follows:
- Enabled Schedule Backup: Set it to Yes.
- Scheduled Backup Type: Select the backup type.
- Start Time: Set the time to create the backup.
- Frequency: Set it as Daily, Weekly, or Monthly.
- Maintenance Mode: Set it to Yes.
After that, click Save Config to update your settings.
Step 5: Verify the Magento 2 backup
Once you create a Magento 2 backup, you can verify it from the admin panel by navigating to System > Tools > Backups. The newly created backup will display inside a grid as follows:

Alternatively, you can verify it in your terminal using the following Magento CLI command:
$ php bin/magento info:backups:listYou should see the following output:

How to restore a Magento 2 backup
Warning: Restoring a Magento 2 backup erases all the data generated by your ecommerce store after the backup was created. This action is permanent, and you cannot reverse it.
You can roll back to a Magento 2 backup from the admin panel by navigating System > Tools > Backups and clicking on the Rollback hyperlink of your preferred backup.
On the next page, configure the following settings:
- User Password: Enter your Magento admin password.
- Maintenance mode: Click the checkbox to enable maintenance mode during the rollback.
- FTP: This setting is optional. Tick the checkbox to use the FTP connection.
Finally, click Ok to proceed.
Alternatively, you can restore a Magento 2 backup via the command line. To do that, log in to your server as the Magento file system owner, navigate to the Magento project root, and execute the following command to output a list of existing backups:
$ php bin/magento info:backups:listThe command to restore a backup varies based on the backup type. For instance, you can restore a database backup using:
$ php bin/magento setup:rollback -d <backup_filename>Similarly, you can roll back the file system backup using:
$ php bin/magento setup:rollback -c <backup_filename>And finally, to restore the media folder backup you can use:
$ php bin/magento setup:rollback -m <backup_filename>When you execute a command, Magento will prompt you to verify if:
- You want to proceed with the backup.
- You want to keep the backup file after the rollback completes.
Respond “y” or “N” to both prompts. As the rollback completes, you should see an output similar to:

Final thoughts: How to backup Magento 2 using the in-built backup tool
We’ve explained the basics of the Magento 2 backup tool and the steps to back up Magento 2 in two ways. Although Adobe has only deprecated the tool in Magento version 2.3 and later, it’s possible that it might remove the tool in a future release.
Don’t wait until then to explore an alternative backup solution for your Magento store. Sign up for managed Magento hosting with Nexcess today and access on-demand and automated nightly backups at no extra cost.
Browse our plans to get started today.

