

Operation modes are a unique feature of Magento 2. They modify the configuration and behavior of the Magento application to suit your deployment and use case.
For instance, you can use production mode to improve performance on a production server and developer mode to accelerate your development workflow in a staging environment.
This guide will explain everything you need to know about Magento modes, including what they are, how they work, and how to use them.
Here’s what we’ll cover:
- Magento 2 Modes Explained
- How To Check the Operation Mode in Magento
- How To Change the Magento Mode
- Final Thoughts: A Beginner’s Guide to Magento 2 Modes
Magento 2 Modes Explained
Magento 2 supports three primary operation modes and a maintenance mode. Here’s a brief overview of all four modes.
Default Mode
The default mode in Magento 2 is how Magento 2 operates when no other mode is specified, such as when it’s first installed on a single server. It isn’t optimized for use in a production environment since its purpose is to help you use Magento 2 without additional configuration.
In the default mode, Magento generates static content such as images and CSS files dynamically instead of serving them from the cache. That results in slower page load speeds which can impact the online shopping experience.
Put simply, the default mode is useful when setting up a Magento store. But once you’re familiar with the application, you should switch to either developer or production mode.

Developer Mode
The developer mode in Magento 2 is ideal for development tasks such as debugging errors and installing Magento 2 extensions. In this mode, static view files aren’t cached to the filesystem. Instead, they are generated and written to the pub/static folder on demand.
While real-time code compilation leads to poor frontend performance, it speeds up development as you don’t need to compile Magento code each time you install or update a custom module. You only need to run the setup:upgrade command to update changes.
The developer mode generates verbose logs in the var/report folder, outputs errors on the front end, and throws exceptions in the error handler instead of log files. This way, you can troubleshoot errors and debug extension conflicts without digging into log files.
Enabling developer mode in Magento 2 also adds a “Developer” section in the Magento admin panel under Stores > Settings > Configuration > Advanced. This section includes advanced configuration options such as:
- Frontend Development Workflow.
- Template Settings.
- Debug.
- JavaScript Settings.
- Caching Settings.

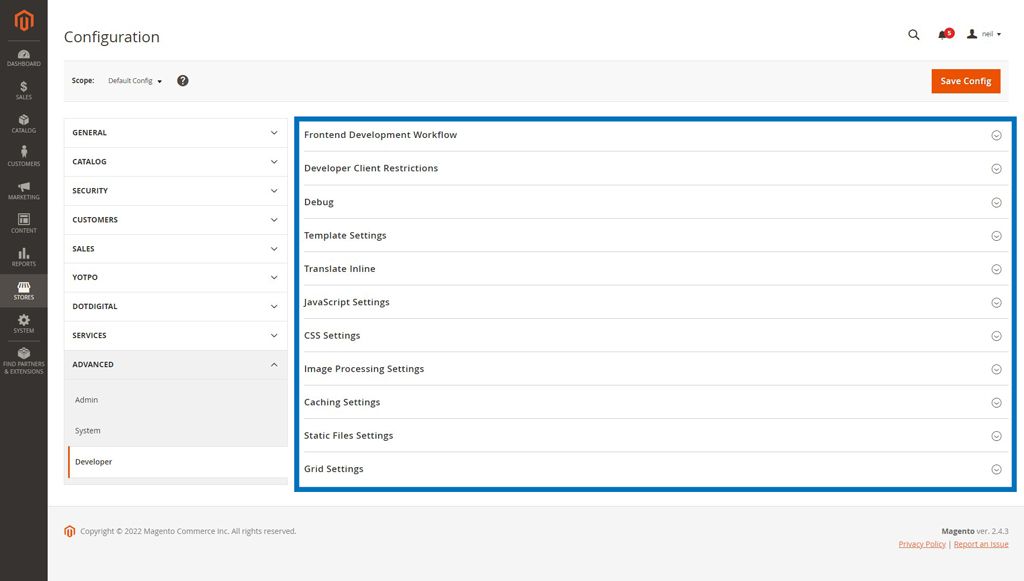
You can use these setting options for tasks such as optimizing Magento store performance and enabling template path hints on the front end.
Production Mode
The production mode in Magento is optimized for live store deployments. In this mode, Magento writes static files to the pub/static directory in the project root and serves them from the cache.
Moreover, in the production mode, you can’t enable or disable the cache from the admin. You can only refresh it. You’ll need access to the Magento command line interface (CLI) to enable or disable one or more cache types.
These measures lead to improved performance and a seamless online shopping experience. The only downside is that you need to deploy static view files manually from the CLI when you install a Magento 2 theme or extension in production mode.
Besides optimizing performance, the production mode logs errors to the filesystem instead of displaying them on the front end. That ensures your customers don’t see a page full of error messages when things go wrong.
Maintenance Mode
Unlike the other three Magento modes, the maintenance mode only restricts access to the front end instead of modifying the functioning of the core application. That makes this mode ideal for maintenance tasks like upgrading Magento 2 or updating the front-end design.
Enabling maintenance mode in Magento 2 creates a .maintenance.flag file in the var/ directory of the project root.
When a customer visits your store, Magento runs initialization tasks and checks for that file in the var/ folder. If the file exists, it terminates bootstrapping and redirects visitors to a Service Temporarily Unavailable page.
The Magento 2 maintenance mode is helpful since you can configure it to allow specific IP addresses. That way, you can access the front end and verify changes before disabling the maintenance mode.
Moreover, you can also create a custom maintenance mode page to match your branding and encourage customers to return to your store.
How To Check the Operation Mode in Magento
Log in to your Magento server over SSH, switch to the file system owner, and navigate to the project root directory.
Then, check the current application mode using the following CLI command:
$ php bin/magento deploy:mode:showYou should see an output similar to:


Note: Environment variables such as those set in the Magento env.php file may override the current Magento mode displayed on your screen.
How To Change the Magento Mode
You can change the Magento mode using the following command syntax:
$ php bin/magento deploy:mode:set {mode} [-s|--skip-compilation]In the above command:
- {mode}: This is a required parameter that can either be developer or production. You cannot enable maintenance mode using this command.
- --skip-compilation: This is an optional parameter you can use to skip code compilation when enabling production mode.
When you change the Magento mode to production or developer, Magento clears the contents of the following directories:
- pub/static.
- var/cache.
- var/view_preprocessed.
- generated/metadata.
- generated/code.
However, it doesn’t delete .htaccess files or any version-specific files inside the pub/static folder.
Now that you understand the basics, let’s explore how to change the Magento mode using two different examples.
How To Change From Developer to Production Mode in Magento 2
Log in to your server as the Magento file system owner, navigate to the project root directory, and run the following command:
$ php bin/magento deploy:mode:set productionYou should see the following output as the command executes successfully:

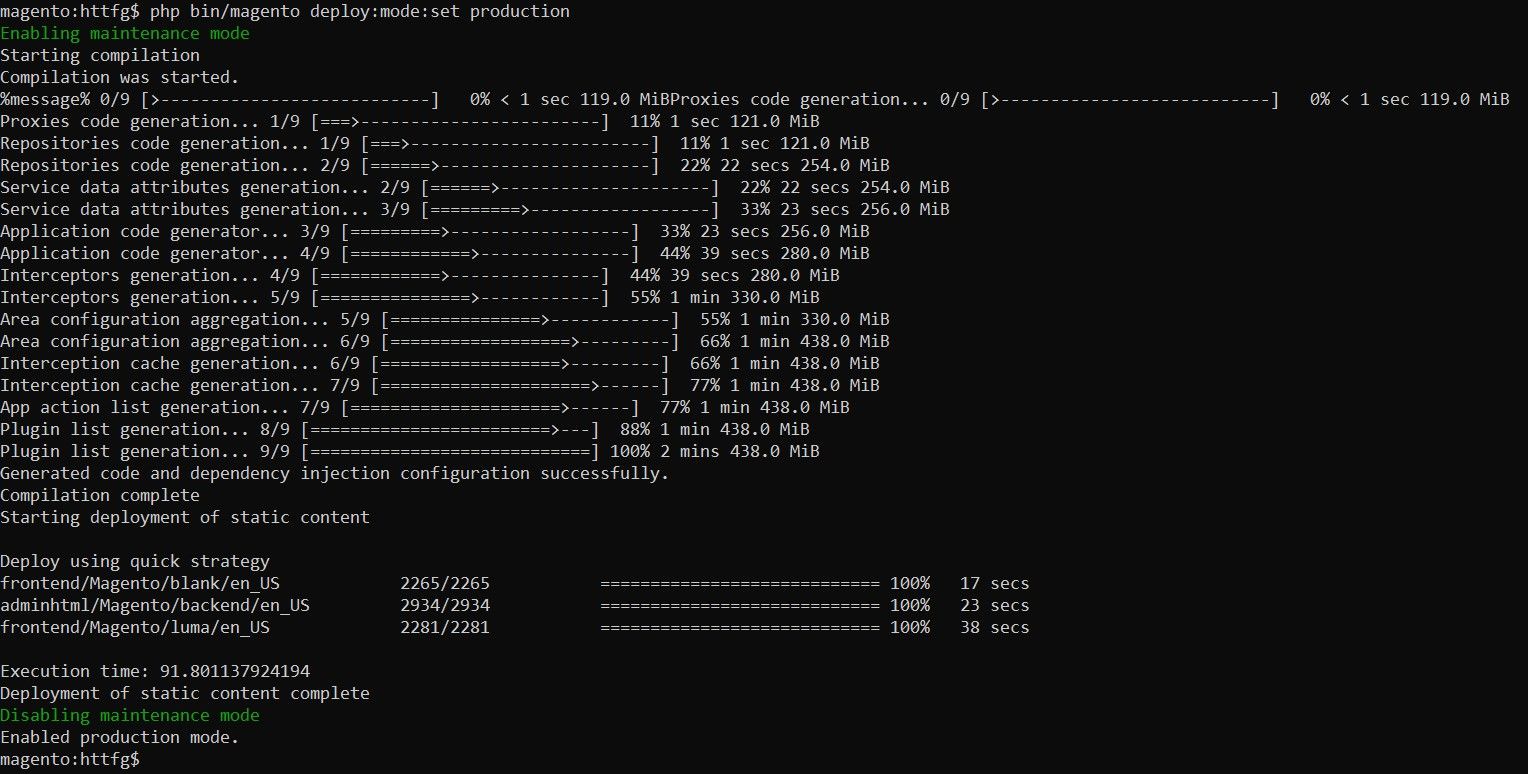
Note: As of version 2.0.6, Magento no longer sets filesystem permissions when you enable the production mode. Therefore, you may need to set filesystem permissions manually. We recommend reading Adobe’s guide on setting filesystem permissions for more information.
How To Change From Production to Developer Mode in Magento 2
Log in to your Magento server as the filesystem owner and navigate to the project root.
To prevent unexpected errors after you enable developer mode, delete previously generated classes and proxies inside the generated/code and generated/metadata directories using:
$ rm -rf <magento_root>/generated/metadata/* <magento_root>/generated/code/*After that, run the following command to enable developer mode:
$ php bin/magento deploy:mode:set developerYou should see the following output:


Final Thoughts: A Beginner’s Guide to Magento 2 Modes
Learning how Magento 2 modes work and how to use them is essential for Magento store owners. Each Magento mode serves a unique ecommerce use case and helps you get the best value from your Magento installation — just like Managed Magento Hosting with Nexcess.
With high-performance, PCI-compliant Magento servers, we help you get the best from your Magento store. Our Magento hosting includes a free site migration, proactive security measures, and 24/7/365 support from Magento experts.
Browse our plans to get started today.

