
Whether you��’re trying to create a mailing list or move users from one WordPress website to another, WP All Export allows you to quickly and easily export what you need. You can:
- Target specific groups of WordPress users with precise filters.
- Include as much or as little user information as you like.
- Rearrange, combine, or even customize user data fields using a convenient drag and drop interface.
- Export your WordPress user data to a CSV file, Excel spreadsheet, or a custom XML file.
- Download a special export bundle file that makes migrating users quick and painless.
- Automatically export WordPress users on a schedule and integrate your exported data with external applications using Zapier.
This article covers everything you need to get started, and you can follow along on a free demo site here.
Create a New WordPress Users Export
Exporting WordPress users is easy. To perform a simple user export, go to All Export > New Export. This will bring you to the New Export screen:

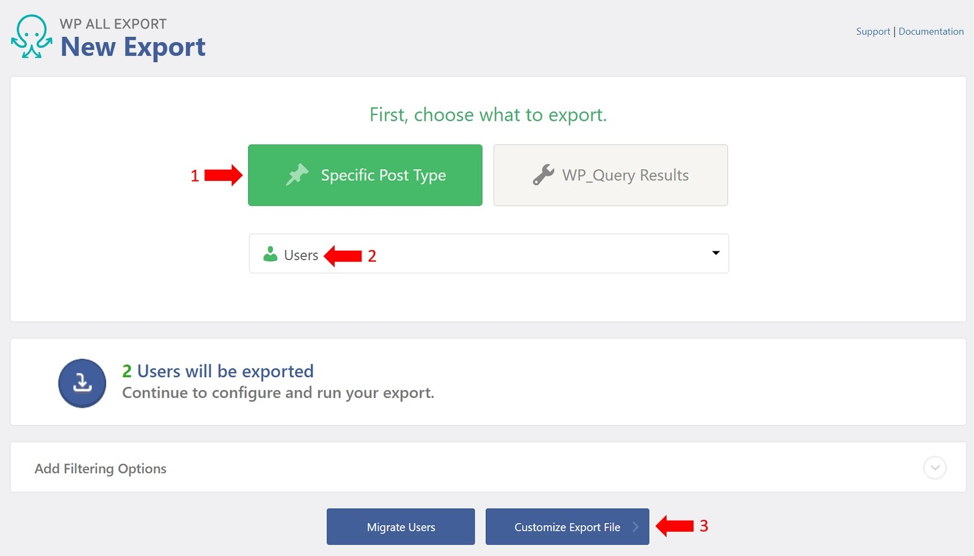
1. Select Specific Post Type.
2. Choose Users.
3. Click the blue Customize Export File button at the bottom of the screen.
Customize the Export File
The Drag & Drop interface allows you to select, arrange, and modify the fields for your user export:

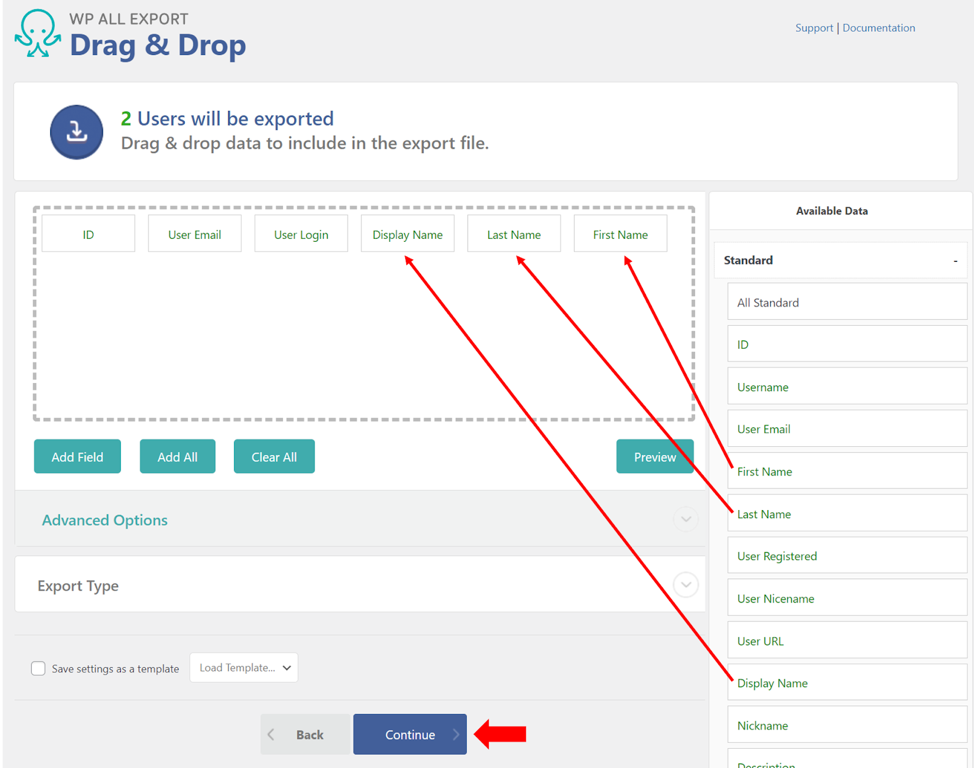
In this example, do the following:
- In the Available Data panel on the right, expand the Standard data section.
- Drag the Display Name, Last Name, and First Name fields into the column selection area.
- Click the blue Continue button.
WordPress User Export Settings
The Export Settings screen can be used to schedule your user exports and also for managing advanced settings. In this case, we’re going to skip these options by simply clicking the green Confirm & Run Export button.


Complete the User Export
When your export process has finished, WP All Export will present you with this screen:

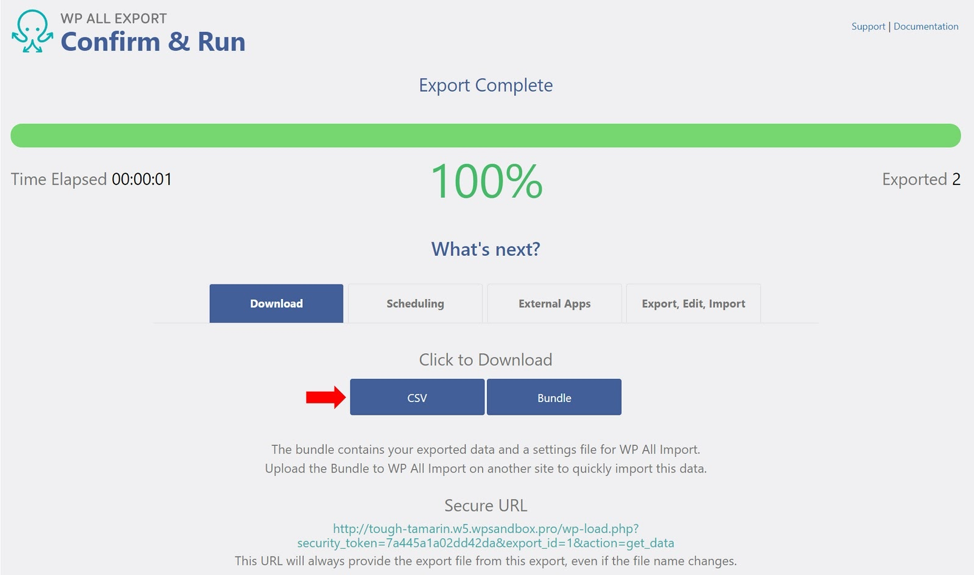
To complete your export, click the CSV button in the Click to Download section. This will download a CSV file to your local computer.
That’s it! That’s how simple it is to export WordPress users with WP All Export.
Working with Other User Export File Types
To export WordPress users in one of the Microsoft Excel file formats, do the following back in the Drag & Drop Interface:

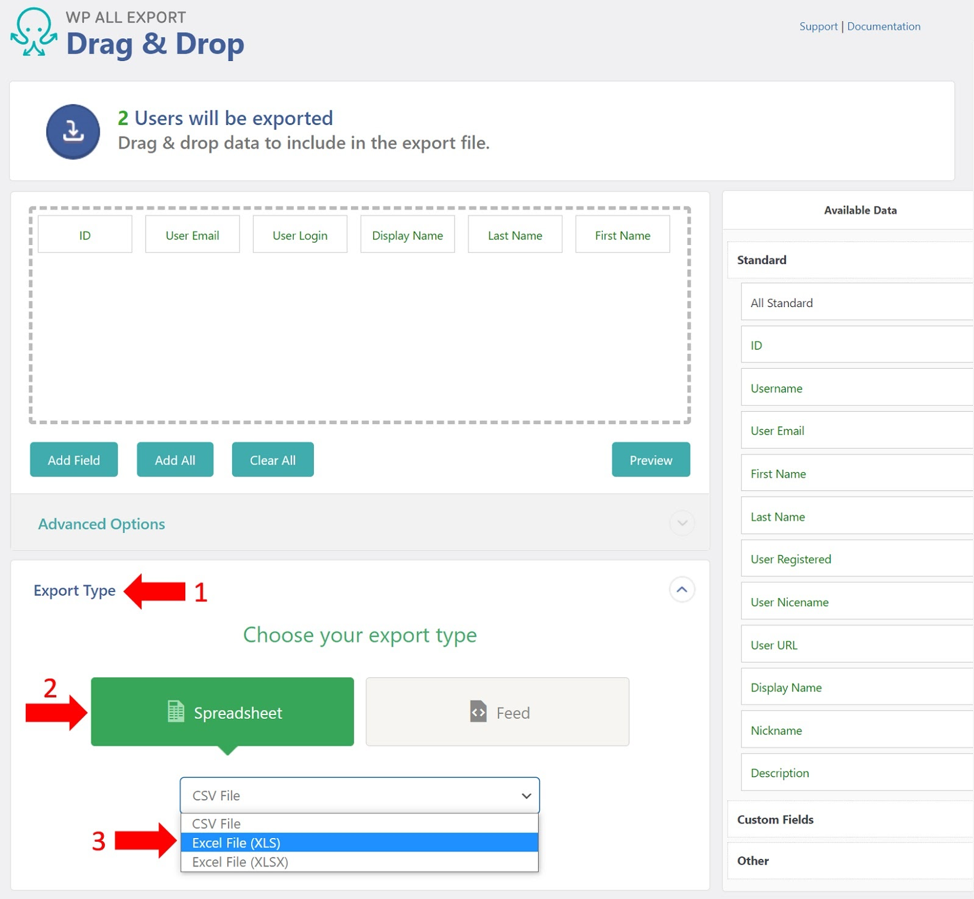
1. Expand the Export Type section.
2. Choose Spreadsheet.
3. Select the desired Excel format.
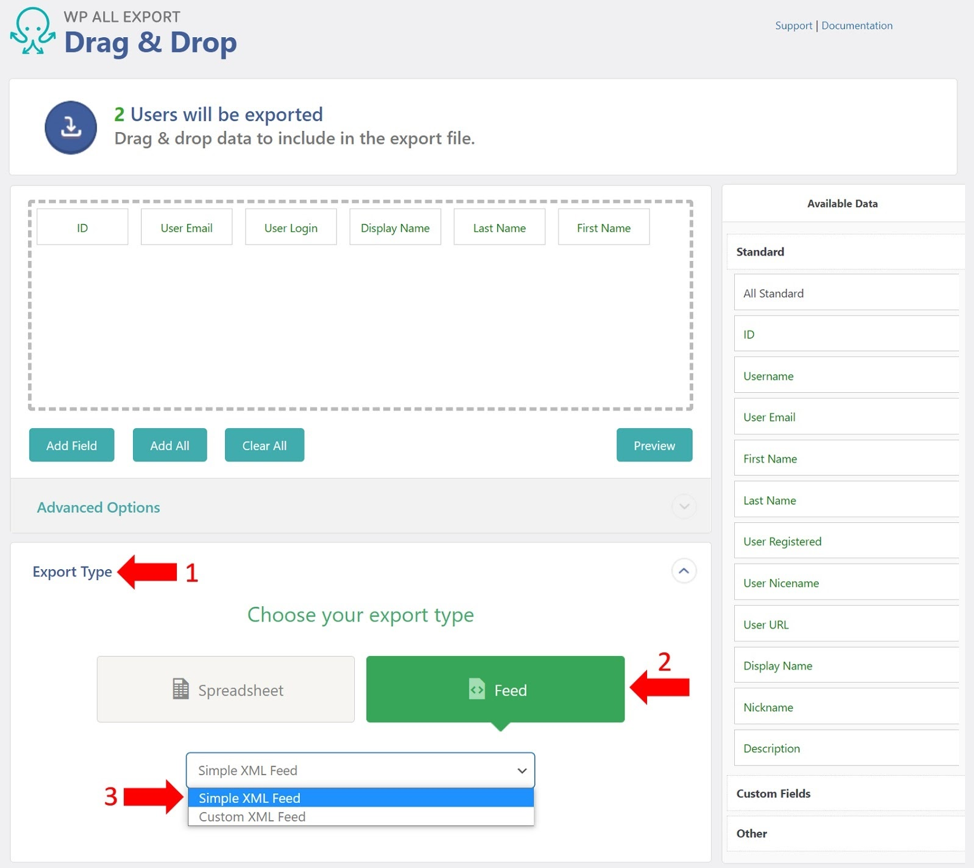
If you wanted to export an XML file, you:
1. Expand the Export Type section.
2. Choose Feed.
3. Select the desired XML format.
XML exports can be either simple or custom.
Filtering WordPress User Exports
In some cases, you only want to export a subset of users. To achieve this, you must add filters in the bottom section of the New Export screen (the first screen in the export process):

For example, to select only users from Texas, you:
- Expand the Add Filtering Options section.
- In the Element box, select “billing_state.”
- In the Rule box, select “equals.”
- In the Value box, select “TX.”
- Click the Add Rule button.
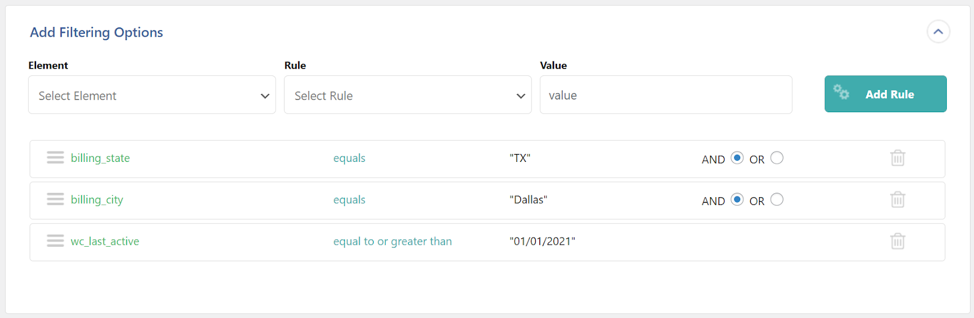
To apply multiple filters, just add more filter rules. For example, to select users from Dallas, Texas who have been active since January 01, 2021, you would set your filters as follows:

Handling WordPress User Passwords
To export WordPress user passwords, simply include the User Pass export field from the Available Data > Other section of the Drag & Drop interface:

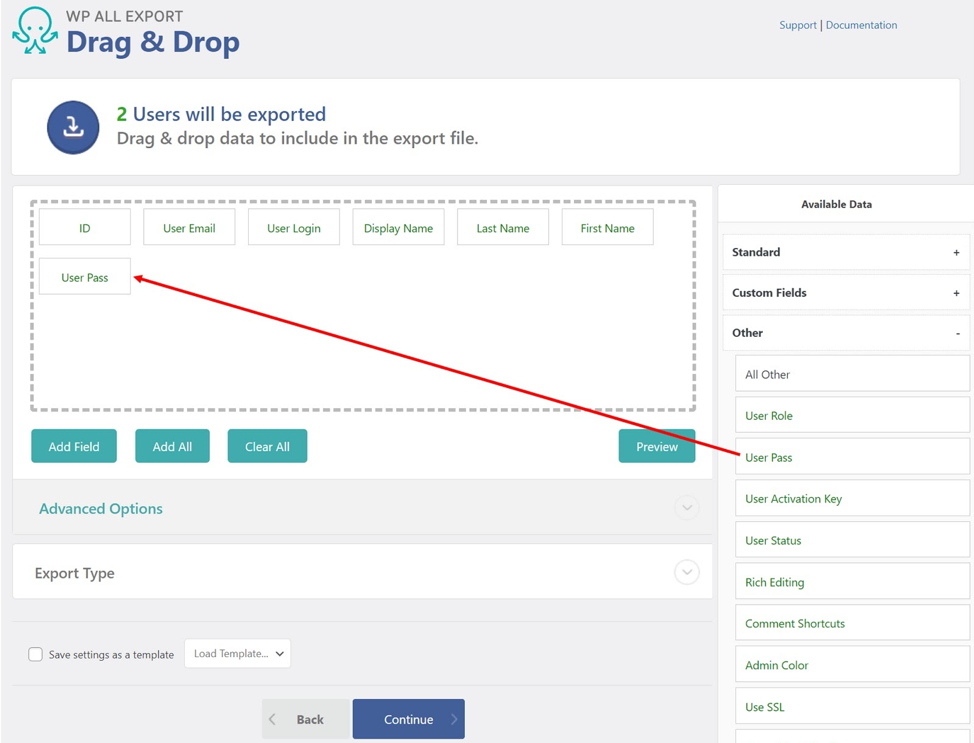
Note that what gets exported are the hash values for the passwords, not the text versions. This is a security feature in case the export file is intercepted.
However, if you import the hashed passwords back into WordPress, users will still be able to log in using their old passwords.
Other Advanced Options
Custom Fields
WP All Export allows you to export any fields associated with users, not just the built-in WordPress fields. This means that if you have enhanced your user information with custom fields or through an add-on, extension, or plugin, you can export these fields, also.
Function Editor
If you need to manipulate the outgoing user data during the export process, you can create PHP functions to assist in this manipulation. For example, if you want to create a new field called “Days Since Active,” you can use PHP to calculate how many days have passed since each user was last active.
Scheduling Options
If you need to run a user export process on a schedule, you can do so through the Scheduling Options section of the Export Settings page. This is particularly useful if you need to keep an external system synchronized with your WordPress user data.

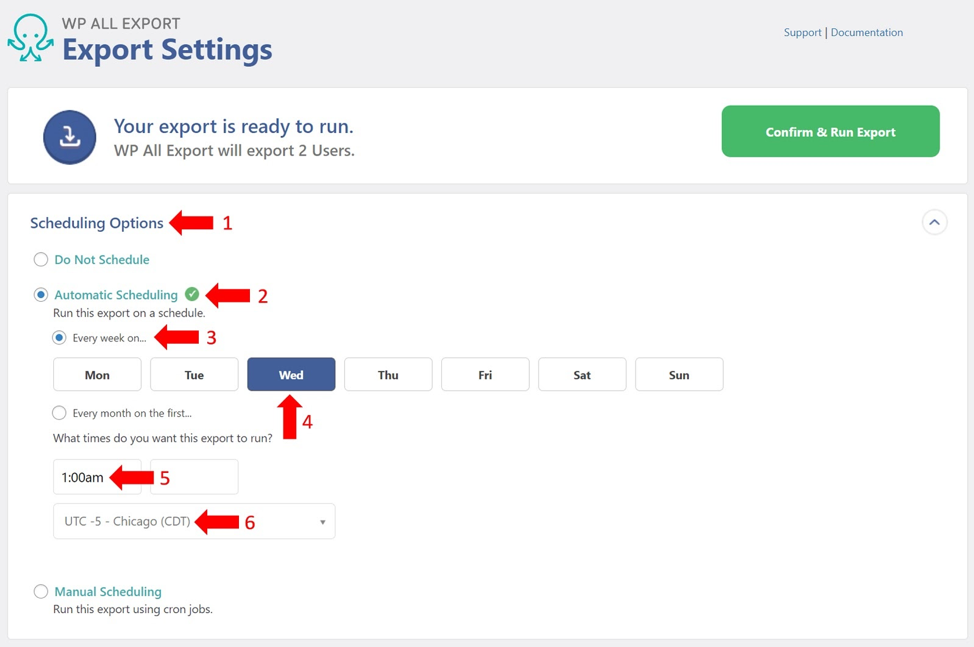
For example, to export WordPress Users every Wednesday at 1:00 a.m. Chicago time, you:
- Expand the Scheduling Options section.
- Choose Automatic Scheduling option.
- Choose the Every week on… option.
- Select Wed for Wednesday.
- Select 1:00am in the edit box below the What times do you want this export to run? prompt.
- Choose the UTC -5 - Chicago (CDT) timezone option.
Advanced Settings
Exporting an especially large user file? No problem. WP All Export provides an Advanced Options section on the Export Settings page. These options allow you to break exports into more manageable processing chunks, or to limit exports to only new or changed users since the last export, etc.
Finishing Up
As you can see, WP All Export makes it easy to Export WordPress Users. Give it a try with the steps outlined in this article.
With Nexcess WooCommerce Hosting, Better Is Built In
Nexcess offers fully managed hosting for WooCommerce designed for fast, high-performing stores. Nexcess also:
- Offers high performance and site speed.
- Dynamically scales and optimizes.
- Secures your store with always-on monitoring.
Check out our fully managed WooCommerce hosting plans to get started today.

