
With loading speed being one of the crucial factors that make or break the success of a WordPress website, WordPress caching plugins are all over the place these days.
There are free caching plugins and premium ones. Companies bombard us with their marketing, explaining why their WordPress caching plugin is the best one.
Ever wonder:
- How do those WordPress caching plugins actually work?
- Why do they make our sites load faster?
- Why do they sometimes break the entire layout of our websites?
In this article, I’m walking you through the actions performed by caching plugins in the background. Don’t worry, I’m not going to lose myself in tech speak. You’ll be able to understand this article just fine if you cannot write code.
To set a standard for slow loading times, I mean sites that take more than three seconds to load. Based on data collected by Pingdom, the average loading time of websites in 2017 was 3.21 seconds. Google said in a study made in 2018 that 53% of mobile visitors will leave a website that takes longer than three seconds to load.
If your site is taking longer than three seconds to load, chances are that you could double your mobile traffic by making it load faster.
Why WordPress Sites Load Slow
Let’s start with why WordPress sites actually are loading slow. This problem is actually coming down to how WordPress works. Let me explain.
WordPress is nothing more than a collection of files and a database located on your web hosting account. The files somewhat magically create your website, and the database contains all the texts, logins, settings, etc.
You can think of the database as an Excel spreadsheet (just a bit more complicated).
When a visitor comes to your website, your web host starts sending some of those files to the browser of your visitor and loads the data that makes up your website from the database. If the visitor opens your Home page, the web host will load all data that builds the home page. If the visitor goes onto your Contact page, the web host will load the contents on your Contact page from the database and will send that to the browser of your visitor.
Now, this is where the potential for slow loading times begins. If your web hosting company is not optimized for WordPress (or if you are on shared hosting), loading the contents from the database can take a long time.
Let me walk you through this step by step so that you understand how WordPress caching plugins can speed up this process:
- Your website visitor clicks on a link to your website (e.g. she found you in Google’s search results or saw one of your ads on social media).
- The browser of your visitor now sends a request to your web hosting company. It’s as if the browser was saying “Hey, please send me the website of Jan Koch.”
- Your hosting company says back “Ok, let me grab all the data necessary to load Jan’s website and send it over to you.”
- At this point, your web host starts processing the files that make up your website, searches for the contents in your database and packages it up nicely in the form of your website.
- Once your web host loaded all files and found all contents, the website gets sent to your visitor.
- Finally, the browser of your visitor receives the data and can display the website.
Even though this process is very simplified, I hope it illustrates multiple problems that potentially make your website load slowly. There are three metrics you’ll see in most speed analysis tools, which summarize how well a website is loading: the number of requests, the page size, and finally the load time itself.
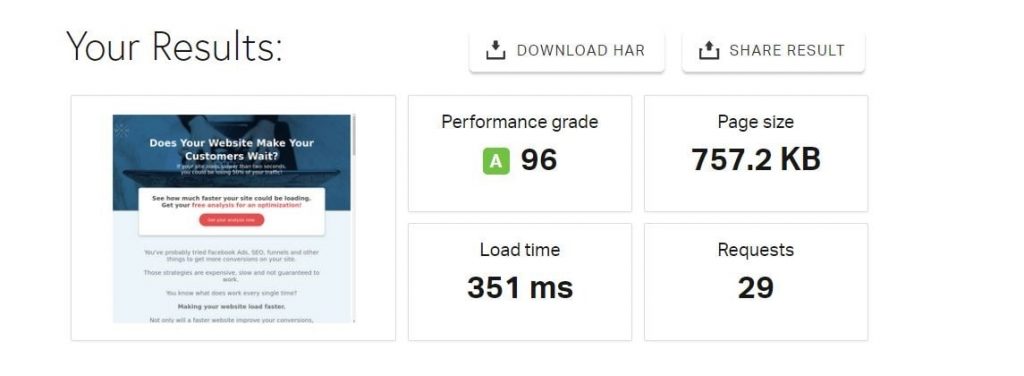
This is a screenshot of a speed test I ran against my site using the Pingdom Website Speed Test. You can see that the load time of my page is 351 ms, the page size is 757.2KB, and it takes 29 requests to load the website. Those results are pretty good and what I consider to be the optimum of what’s possible with reasonable efforts. I tested many WordPress caching plugins to get to these results, settling with Swift Performance. I use their paid version but Swift Performance Lite is pretty good too!
What I’ve done to achieve these numbers is pretty simple. Let me show you how.
How WordPress Caching Plugins Work
Whenever you try to make your WordPress site load faster, you’ll inevitably touch WordPress caching plugins at one point. That’s because those plugins can intercept and improve the loading process I described above quite heavily!
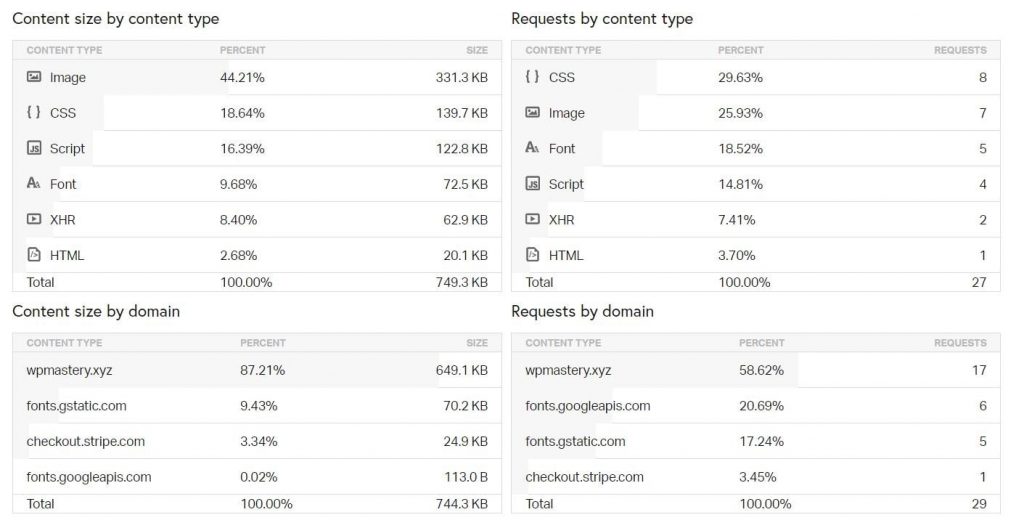
This graphic shows the types of files a website consists of. It’s part of the speed analysis with Pingdom I shared above.
You can see that my website (like yours) consists of:
- Image files
- CSS files (those control how your site looks)
- Scripts (those control how your site works and sometimes parts of the designs)
- Fonts (your text should look beautiful)
- XHR data (data being transferred between your host and a browser)
- HTML (the structural code of your website)
Each of these file types adds to the loading time of your site.
You can see that most of the page size for WP Mastery are images. Though not exactly a caching issue, I want you to know that I use Imagify to optimize my images for fast loading times.
Page Caching and Preloading
Let’s start with two of the most important features of WordPress caching plugins: page caching and cache preloading. Don’t worry, you don’t need to be a rocket scientist to understand how they work.
Remember my explanation on how your website gets loaded when a visitor accesses your domain? That whole process of loading the data from the database, gathering all files, and all the other stuff gets circumvented when a page cache is enabled and the cache is preloaded.
Instead of loading all information from the database, your website now has a copy of every single page ready to send to your visitors directly. Your web host doesn’t have to look for the correct information in the database anymore, it can simply send the data directly.

This is my current page cache status at WP Mastery. You can see that I have 559 individual pages on my site, including blog posts, archives, and other contents. My website has preloaded every single content piece into a cache so that it can deliver the website quickly to visitors who access the page.
Preloading the page cache is a highly automated process, in which you don’t have to do anything other than to start it. You’ll want to check the cache status occasionally and restart the preloading if something went wrong.
But that’s all. The magic happens in the background.
File Minification and Combination
Similarly to how Imagify reduces the file size of the images on a website, caching plugins can reduce the size of CSS files, JavaScript files, and HTML content. Those functions are called “minification” and included in most WordPress caching plugins. By minifying files, caching plugins remove whitespaces, line breaks, and other unnecessary markups automatically.
With just the necessary code and no styling to make the code more readable for humans, WordPress caching plugins can reduce your overall page size.
I always start my optimization processes by reducing the page size of the website I’m working on. So if you can set up your caching plugins with minification, you’ll have a head start already.
One word of caution though, minification can sometimes cause problems and break your layout! Be very careful when applying minification to your website and enable one option at a time.
Here’s a screenshot of my settings for minifying and optimizing CSS delivery in Swift Performance Pro:
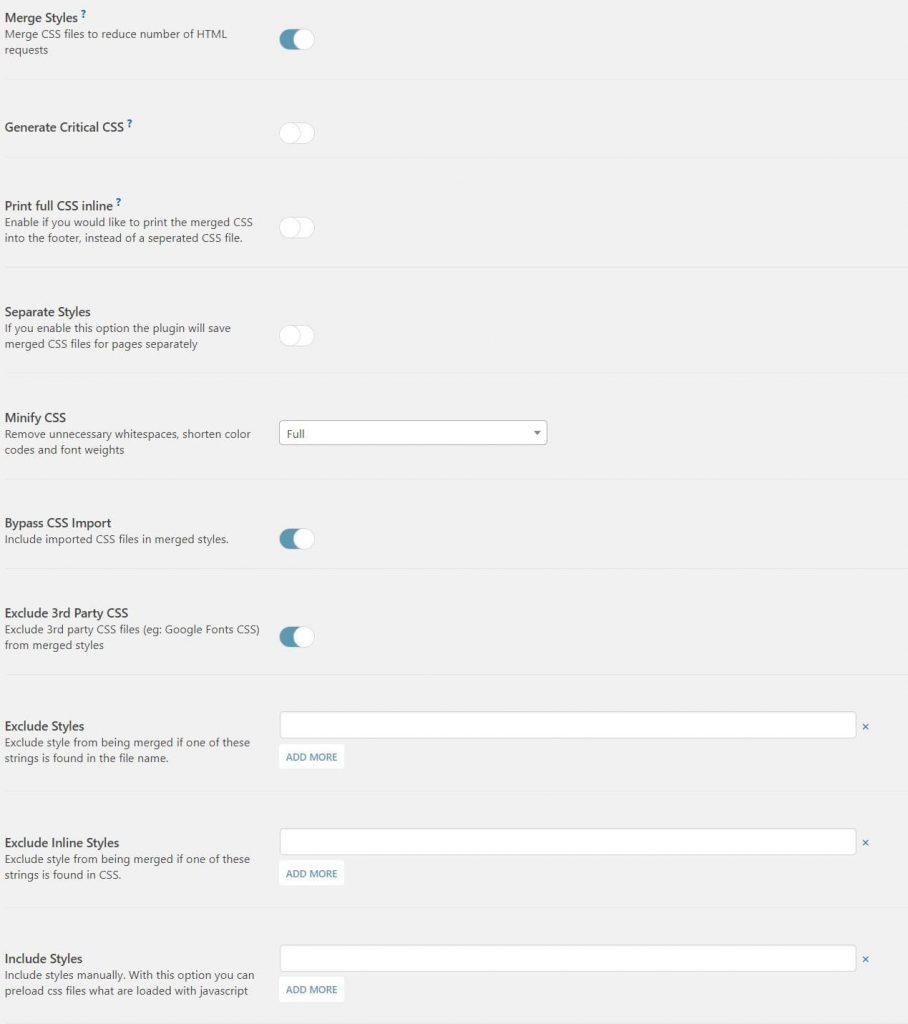
You’ll likely see similar options in your WordPress caching plugin if you’re using a different one. Activate just one option at a time, clear the cache, and then test your site in multiple browsers to ensure it loads correctly. Almost every WP caching plugin will allow you to exclude stylesheets or JavaScript files from minification. Make good use of this option in case your layout breaks when minifying all files.
Alongside minifying files, most WordPress caching plugins will also allow you to merge multiple files into one, especially when working on CSS and JavaScript files. That function is a fantastic way to reduce the number of requests needed to load a website. Without that merging of files, it would take more than 100 requests to load my site. But by enabling the merging of JS files and CSS files, I got it down to 29 requests.
Setting Expires Headers
Another very useful and core functionality in WordPress caching plugins is to set so-called “Expires” headers. These are snippets of information that tell web browsers whether a file has changed since the browser last visited a website. Most often, these Expires headers are set for files that don’t change often. Images, JavaScript, and CSS files are common examples.
These headers work as follows:
- The first time a visitor comes to your site, the browser downloads all files necessary to display the page.
- When the visitor opens a new page on your site (say, from your Home page to your Services page), her browser knows that some files don’t need to be downloaded again – because those files are marked with Expires headers.
- The browser then loads the new data and thus can load the new page faster.
From the definition of MDN web docs (Mozilla):
The Expires header contains the date/time after which the response is considered stale.
Browsers know that, if an Expires header did not expire yet, the information contained in the file is still valid. Since you usually would set Expires headers to at least one month (sometimes even one year), those headers deliver great results for recurring visitors on your website.
Expires headers are a simple way to improve your website speed, I highly encourage you to give them a try!
What Caching Plugins to Use
After highlighting just three of the main features WordPress caching plugins bring to your website, I want to leave you with a few recommendations and tips on choosing a caching plugin for your site.
Ultimately, it’s a decision of free plugins vs. paid ones. Popular free caching plugins are:
- W3 Total Cache (1+ million installs)
- WP Super Cache (2+ million installs)
- WP Fastest Cache (900,000+ installs)
My favorite free caching plugin, however, is Swift Performance Lite with a mere 10,000+ installations. I’ve received the best speed results with this plugin.
When it comes to paid caching plugins, there are really just two plugins to be taken seriously: WP Rocket and Swift Performance Pro. Asking which plugin is better is similar to asking whether you like Windows or Mac more. It’s almost a religious debate in the WordPress world.
Nexcess recommends WP Rocket in their Knowledge Base and I’ve personally been able to make WooCommerce shops load in less than one second using WP Rocket. My own site is running Swift Performance Pro and also loads extremely fast. So you cannot go wrong with either of them.
Try Managed WordPress for Better Results
Managed WordPress Hosting takes care of image compression, automatic updates for plugins and the platform, automatic daily backups, automatic SSL, and staging environments, as well as access to developer tools and no pageview/traffic limits.

