

The Magento cron module is one of the most important features in Magento 2 because it automates tasks like:
- Reindexing.
- Sending emails.
- Catalog pricing updates.
- Currency rates updates.
Here, we’ll explain everything you need to know about Magento cron, including what it is, how to install it, and the steps to secure it.
Here’s what we’ll cover:
- An Introduction to Magento Cron
- How To Install Cron in Magento 2
- How To Run Magento 2 Cron Manually
- How To Secure Magento 2 Cron
- How To Customize the Magento Cron Schedule
- Final Thoughts: The Only Magento Cron Configuration Guide You'll Ever Need
An Introduction to Magento Cron
Magento uses cron, a time-based task scheduling utility for Unix systems, to perform repetitive tasks such as updating catalog pricing and inventory on a schedule. Without the Magento 2 cron module, you’ll need to execute those tasks manually.
Magento cron relies on a configuration file called the crontab, short for cron table, that specifies shell commands and scripts and their execution schedule. Here’s the default crontab file in Magento 2.4.


One crontab can contain multiple tasks, or cron jobs, related to a specific user or application.
Each cron job is listed as a time string consisting of five variables that define the frequency of each task, separated by a blank space and followed by the command to be executed. The following table describes the acceptable values for each variable.
| Variable Position | Descriptor | Acceptable Values |
| 1 | Minute | 0 to 59, or * (no specific value) |
| 2 | Hour | 0 to 23, or * (no specific value) in UTC time. |
| 3 | Day of the month | 1 to 31, or * (no specific value) |
| 4 | Month | 1 to 12, or * (no specific value) |
| 5 | Day of the week | 0 to 7 (both 0 and 7 represent Sunday), or * (no specific value) |
All cron jobs inside the crontab must use an acceptable value as listed above. Without it, the crontab won’t run. The only exception is a forward slash (/) that you can use to execute a task at a regular interval, irrespective of the time.
For example, to run a command every Wednesday at 6 pm, you can enter the cron schedule as 0 6 * * 3. And if you want to run the task every six hours, you can set the cron schedule as * */6 * * *.
Magento 2 Open Source categorizes cron jobs into three groups:
- index: Containing all indexer-related tasks.
- consumers: Containing tasks related to message queue consumers.
- default: Containing all other cron jobs.
However, other Magento 2 extensions may add cron jobs and groups to your store. You can view the list of cron jobs for your Magento store by logging into the Magento database and entering the following command:
$ select job_code from cron_schedule GROUP BY job_code;Magento logs all cron job information in a dedicated magento.cron.log file in the var/log/ folder and also writes it to the cron_schedule table in the Magento database with information such as:
- Job ID and code.
- Status.
- Created date.
- Scheduled date.
- Executed date.
- Finished date.
You can view the information in the Magento database using the following command:
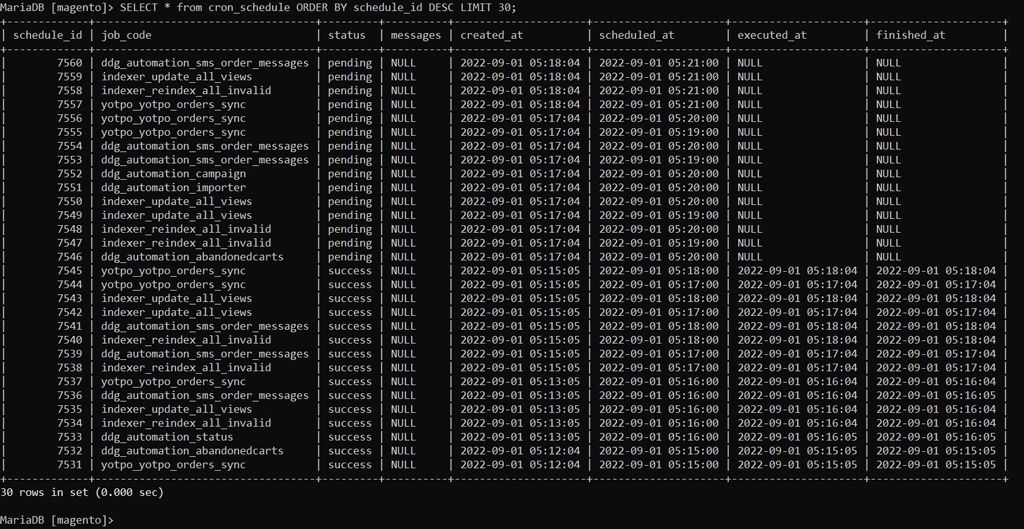
$ SELECT * from cron_schedule;That command will output all rows from the Magento cron_schedule database table. Instead, you can use the following command to output the 30 most recent rows.
$ SELECT * from cron_schedule ORDER BY schedule_id DESC LIMIT 30;
Now that you understand what Magento cron is, let’s explore the steps to install it.
How To Install Cron in Magento 2
As of Magento version 2.2, you can install Magento 2 cron using the cron:install command. Here’s how you can do it from the Magento command line interface (CLI).
Step 1: Log In to Your Server and Run the cron:install Command
Log in to your Magento server as the filesystem owner and run the following command from the Magento root directory:
$ bin/magento cron:installStep 2: Verify the Magento Crontab
Verify the crontab using the following command:
$ crontab -lYou’ll see an output similar to:


That’s it. You’ve successfully installed Magento 2 cron.
How To Run Magento 2 Cron Manually
Log in to your Magento server over SSH, navigate to the project root, and run the following command as the Magento filesystem owner to run cron jobs manually:
$ bin/magento cron:runMake sure you run the command at least two times: first to discover cron tasks and then to run them.
Optionally, you can also run Magento cron for a specific group using:
$ bin/magento cron:run --group <group-name>Replace the <group-name> placeholder with a cron group name such as index or default to run the cron tasks for those groups.
How To Secure Magento 2 Cron
Magento restricts access to the cron.php file by default. Although you can override it by editing the .htaccess file in the pub/ folder, we don’t recommend doing it on a production store as it may leave your store vulnerable to exploits.
However, if you’re working in a development environment, running cron from your browser can help you speed up development.
Follow these steps to secure the Magento cron.php file before you access it from a web browser.
Note: Unless specified otherwise, you must execute all commands in this section as a user with root privileges.
Step 1: Set Up Basic HTTP Authentication
The steps to set up HTTP authentication will vary based on your web browser. Follow these steps to set up HTTP authentication with Apache:
Create a new directory to store your password file using:
$ mkdir -p /usr/local/apache/passwordThen create a password file inside that directory using:
$ htpasswd -c /usr/local/apache/password/passwords <username>Follow the prompts in the terminal to set a password for the user. Once you’re done, proceed to the next step.
Step 2: Secure Cron in Your Web Server Configuration File
The steps to update your web server configuration file vary based on your web server application.
To secure cron for Apache, switch to the Magento filesystem user and navigate to the Magento root. Edit the .htaccess file inside the pub/ folder using your preferred text editor and replace the default <Files cron.php> directive with the following text:
<Files cron.php>
   AuthType Basic
   AuthName "Cron Authentication"
   AuthUserFile /usr/local/apache/password/passwords
   Require valid-user
</Files>
Save the .htaccess file and proceed to the next step.
To secure cron for Nginx, switch to the Magento filesystem user and navigate to the Magento root. Edit the default nginx.conf.sample file in the project root and add the following text to it:
#Securing cron
location ~ cron\.php$ {
   auth_basic "Cron Authentication";
   auth_basic_user_file /etc/nginx/.htpasswd;

   try_files $uri =404;
   fastcgi_pass   fastcgi_backend;
   fastcgi_buffers 1024 4k;

   fastcgi_read_timeout 600s;
   fastcgi_connect_timeout 600s;

   fastcgi_index  index.php;
   fastcgi_param  SCRIPT_FILENAME  $document_root$fastcgi_script_name;
   include        fastcgi_params;
}
Save the file, switch back to the root user, and restart Nginx using:
$ sudo systemctl restart nginxAfter that, proceed to the next step.
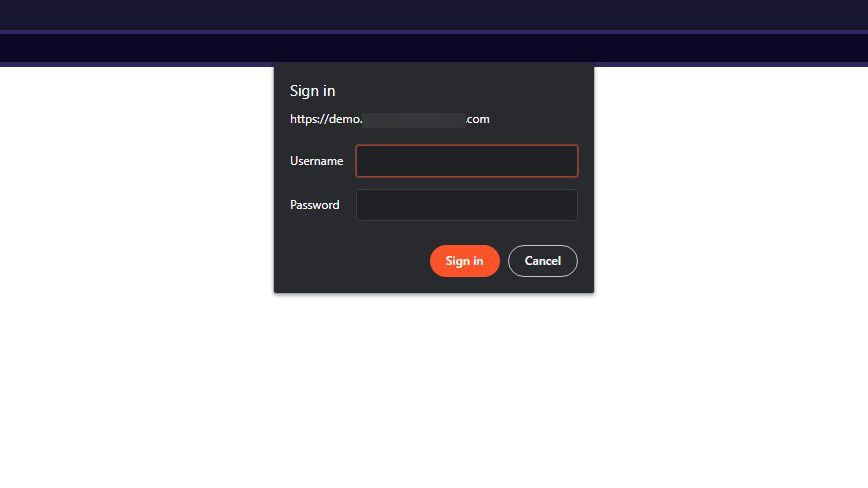
Step 3: Verify Cron Is Secure
The easiest way to verify the cron.php file is secure is by accessing it in a web browser. You can do that by opening your Magento store home page and adding cron.php to the end of the URL.
For example, https://www.example.com/cron.php.
You should see the following prompt in your browser:

How To Customize the Magento Cron Schedule
Adobe lets you to configure cron schedule for Magento 2 in two ways:
- From the command line.
- From the admin panel.
Here’s a quick overview of both methods.
Steps To Customize Magento Cron Using the Magento CLI
Log in to your Magento server as the filesystem owner and navigate to the Magento project root.
View the existing crontab schedule using the following command:
$ crontab -lThe default Magento cron interval is set to * * * * *. You can edit this value and set a custom schedule to run cron less frequently. For instance, you can set it to run every five minutes by replacing the default entry with */5 * * * *.
Use an online cron expression editor like crontab guru or Cronhub to create a custom cron job for Magento 2 and edit the crontab using the following command:
$ crontab -eIf this is your first time using the crontab edit command, you’ll see the following prompt on your screen:

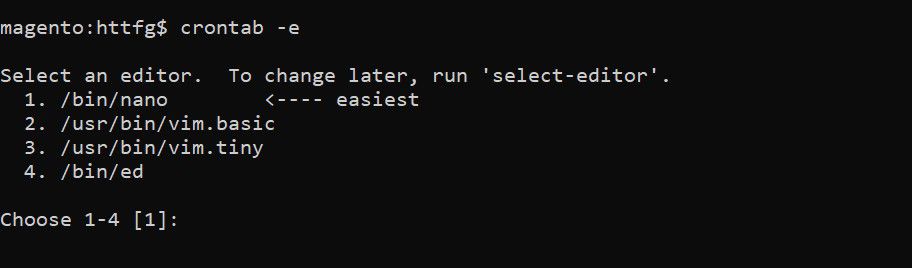
Press Enter to proceed with the default text editor — nano — or choose your preferred editor by entering its corresponding number.
Navigate your cursor to the Magento cron job configuration inside the #~ MAGENTO START and #~ MAGENTO END comments. Replace the default values with your custom expression. Then, save the file and exit the text editor.
That’s it. Magento cron will now run on the newly configured schedule inside the crontab.
Steps To Customize Magento Cron From the Magento Admin


Log in to the Magento admin panel and navigate to Stores > Settings > Configuration. Expand the Advanced setting option in the left panel and choose System.
Expand the Cron (Scheduled Tasks) section and update the values for each group by clicking the Use system value checkbox next to each setting.
Once you’re set up cron jobs to run on your preferred schedule, click Save Config.
Final Thoughts: The Only Magento Cron Configuration Guide You'll Ever Need
Magento cron is one of the most useful features in Magento 2. It automates complicated tasks so you can focus on growing your online business — just like Managed Magento Hosting with Nexcess.
Our hosting plans give you access to Magento-optimized servers without dealing with the technicalities of server security and maintenance.
Why host with Nexcess? Browse our plans to learn more.

