Almost everyone who owns a WordPress site has encountered slow loading at some point. Slow loading websites can cause you to lose visitors. It can also hurt your conversion rates.
The best solution for that problem is reducing the initial server response time.
“Initial server response time” is another way of saying Time to First Byte or TTFB. Time to first byte is the duration it takes a browser to connect to the server and download the contents.
In this article, we’ll discuss the importance of initial server response time and provide you with several tips on how to improve it.
The importance of server response time TTFB
As you might already know, the speed of your web page is of paramount importance. If your website loads slowly, there’s a big chance that these users will leave it and go to other similar sites instead.
Users leave slow sites and visit sites that load quickly because they do not want to waste time. In such cases, we see the importance of measuring server response time.
Server response time is how long it takes to receive a response from the server after an HTTP request, measured in Time To First Byte (TTFB). Your site's server response time (TTFB) is one of the most important metrics for your site's performance.
As previously mentioned, TTFB is how quickly the first byte of a response begins to arrive.
Get fully managed WordPress hosting
Power your site with the industry's most optimized WordPress hosting
What causes a slow server response time?
Server response time can be affected by many different factors. Some are out of your control, while others are related to how you configure your site. Here are some of the most common reasons for slow server response time:
- Cheap hosting
- Excessive page size (bloat)
- Slow queries
- Network bandwidth
- Cache not enabled
All of these issues can negatively impact your website's performance, which can best be seen by the TTFB value. Value that is approximately lower than 100 ms is great. While the values between 200-500 ms are deemed average, the values between 500 ms to 1 second might not be considered ideal at all.
In some cases, depending on the type of the website or page, it may be inevitable for the TTFB value to be longer than one second.
How to check your server response time TTFB
There are plenty of tools you can use to measure TTFB. Some users like using a command-line interface (CLI) while others prefer third-party tools. In this section, we’ll discuss how you can use multiple tools to measure TTFB and what kind of results you should expect from each test.
1. WebPageTest
Let us start with WebPageTest. WebPageTest is a free website speed test service. It provides real examples of how long each website takes to load. You can run a free speed test on your local machine or on any remote site.
To start using it, simply go to the site, choose a Site Performance Test, paste the URL of your website, and click on Start Test as shown on the image below.
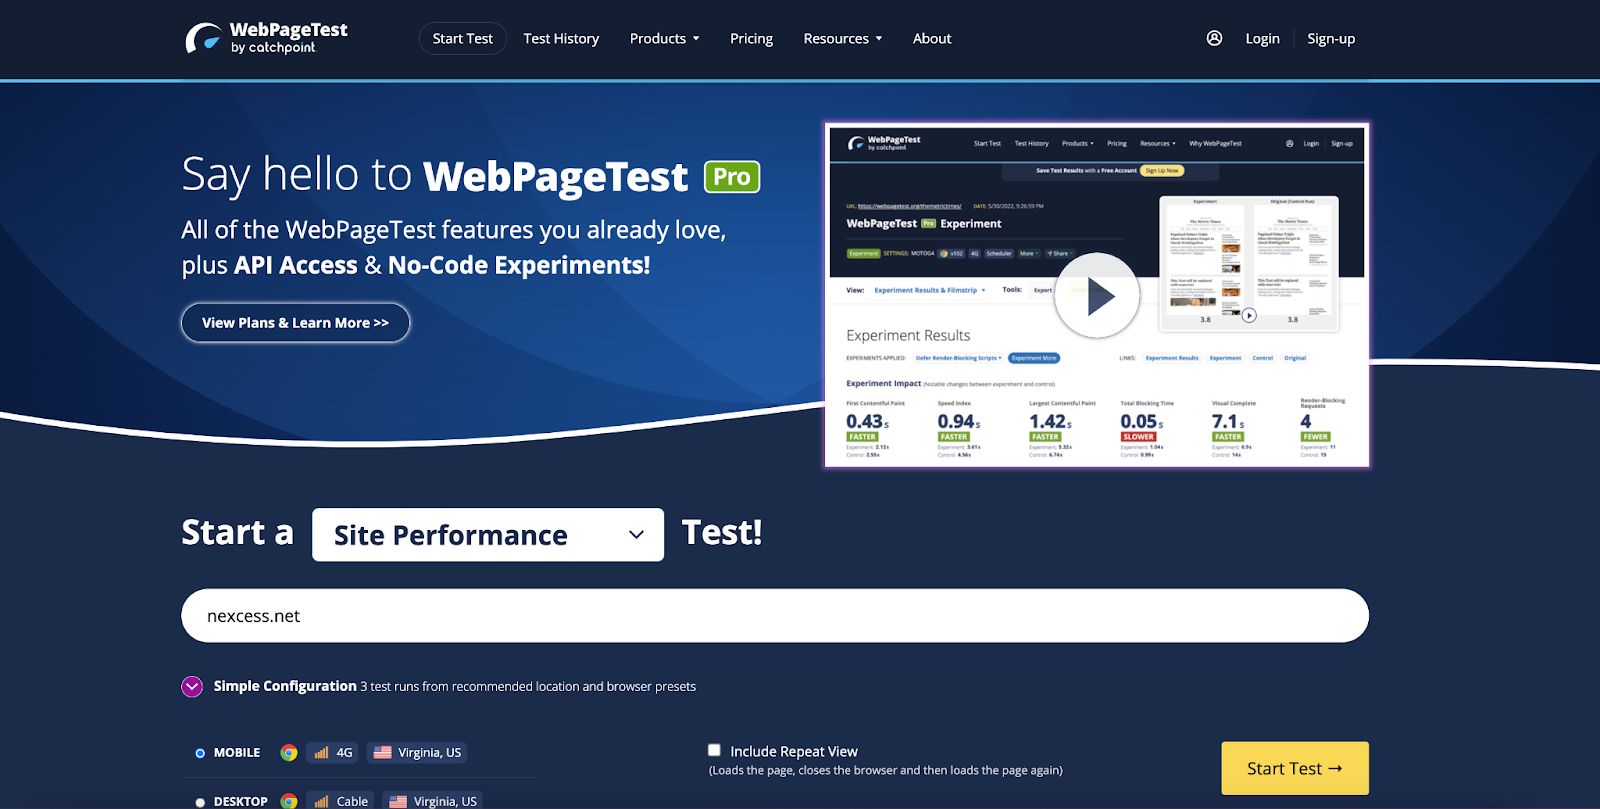
Before starting the test, it’s also possible to alter numerous advanced parameters, such as test location, connection type, desktop browser dimensions, number of tests to run, and more.
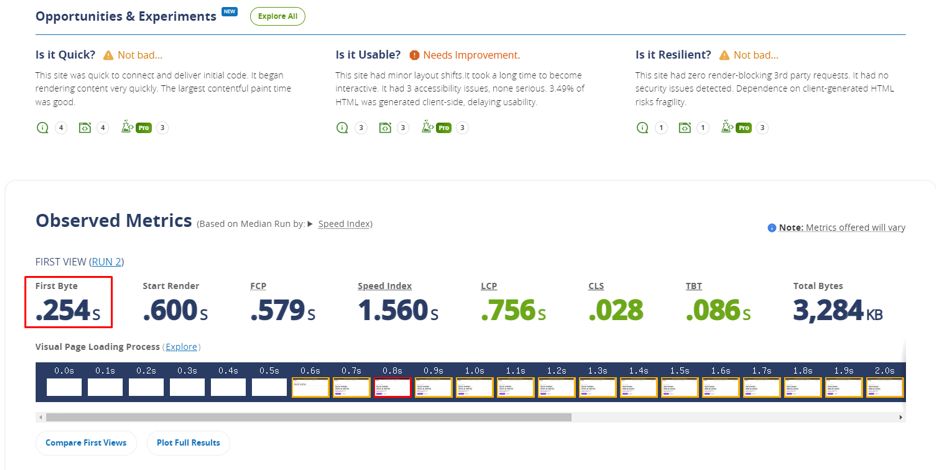
After the testing, you get a lot of useful information about your website. You can see an overview of its speed, usability, and resilience. Time to first byte can be found in the section below Observed Metrics.
2. GTmetrix
GTmetrix is a detailed web performance and speed testing tool designed to help you find ways to improve site speed and performance. It's essential reading for web professionals interested in high-performance websites.
GTmetrix tests can be easily accessed. To start testing, paste the URL of your website in the text field and press Test Your Site as shown below.

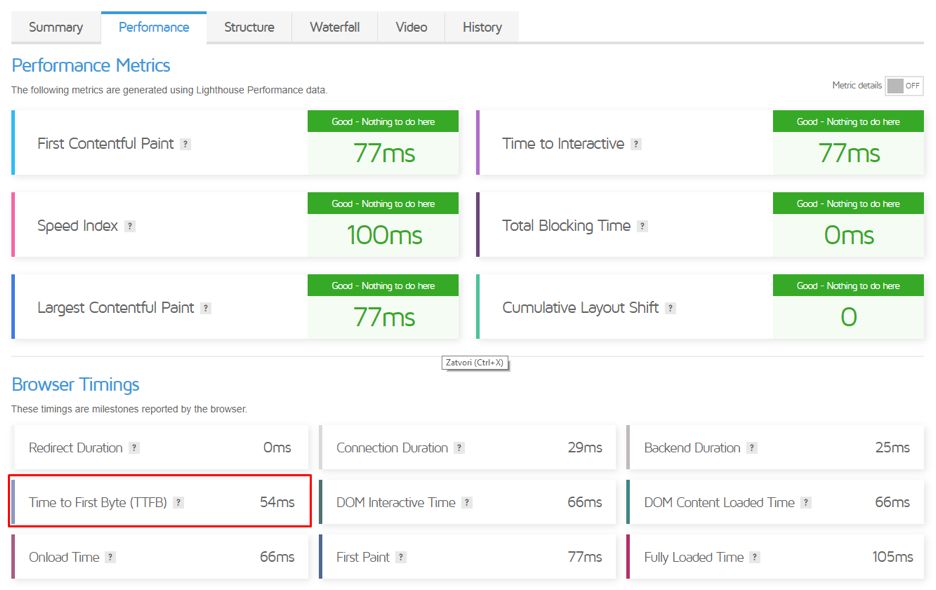
You’ll be able to see the grade for performance and structure as well as web vitals of your website.
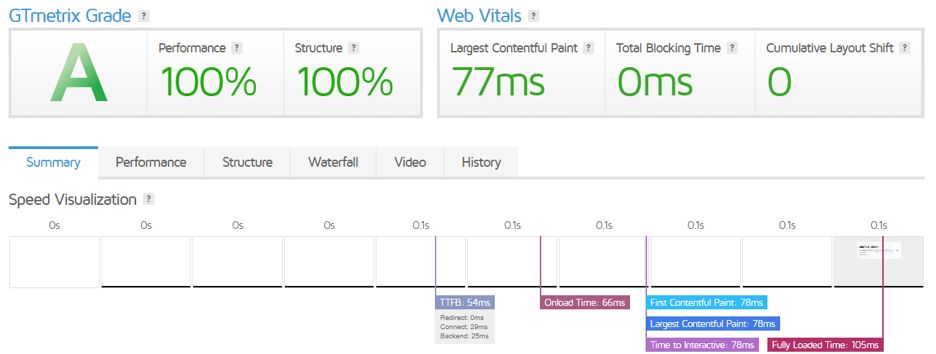
Time to first byte can be seen below in the graph. However, if you wish to see more details, you can explore the performance window.
3. Google PageSpeed Insights
Google PageSpeed Insights is one of the most popular tools for measuring site performance and speed. It is a free tool that provides suggestions to make your website faster. This includes easy optimization steps and tools to help you track your progress.
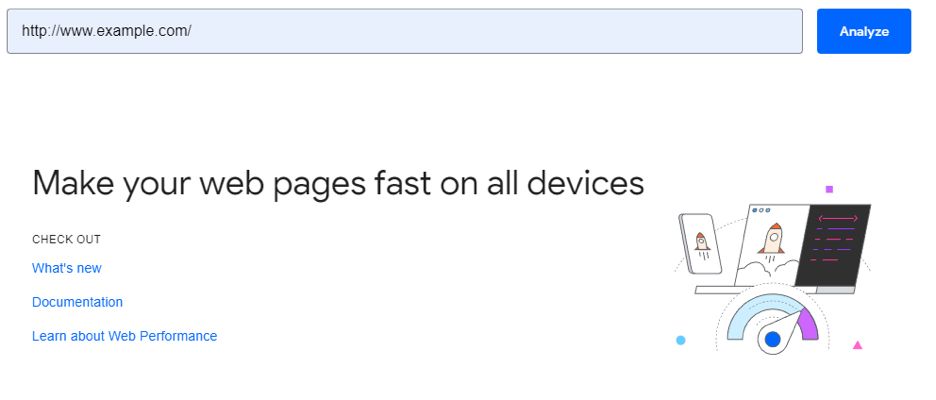
As in our previous examples, you will need to paste the URL of your website inside the text box and click Analyze.
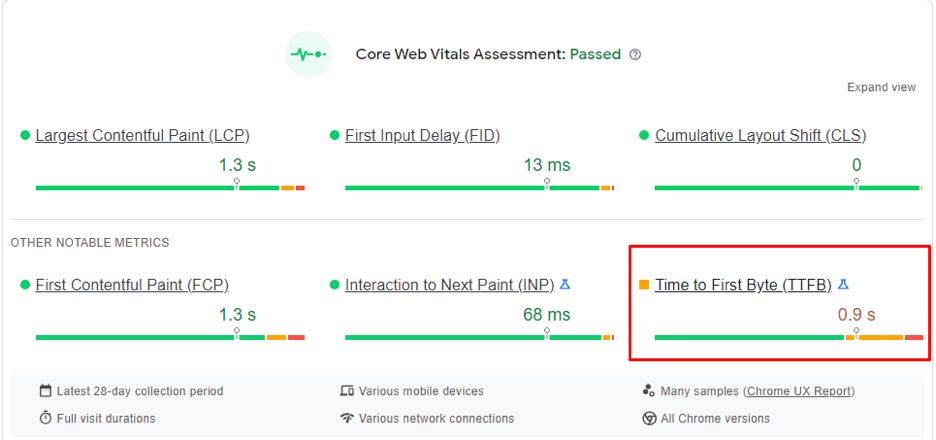
The test will show you if your website has passed or failed. Furthermore, it will show useful information including the Time to First Byte as seen in the screenshot below.
Tips for improving your initial server response time
As the top content management system (CMS) in the world, WordPress powers more than 40% of websites on the internet. Over 60 million people visit WordPress-based sites every single day.
For this reason, you need to make sure your site is as fast as it can be and that your visitors will have a smooth experience. A slow load time can be the difference between an immediate conversion and a loss of potential customers.
Here are some tips that can help improve your initial server response time.
1. Use faster WordPress hosting
If you’re running a WordPress website, you know all too well how slow and clunky the publishing platform can be when your site starts to get popular and attract more traffic. Even if your site isn’t huge, though, it might benefit from being on a faster web host.
One way to decrease server latency is to use a fast hosting provider. Your hosting provider and service level can make the biggest difference on your site's response time.
Nexcess provides fully managed WordPress hosting that includes:
- Automatic updates
- SSL for security
- Built-in CDN
- Image compression
- Advanced caching
Check out our fully managed WordPress hosting plans to get started today.
2. Enable caching on your site
With caching, you can improve the speed of your WordPress website by storing content that is often used. Caching is an important part of the WordPress ecosystem because it allows you to reduce the time to first byte of your website.
The good news is that it’s easy to enable caching on your WordPress page. We’ll show you how below.
First, you’ll need to install a caching plugin for WordPress. We recommend the Cache Enabler plugin.
Once Cache Enabler has been installed, you’ll be prompted to enable caching in your settings. Enabling caching is needed for the plugin to operate. That option is always accessible via Settings > Cache Enabler.
You can also enable the compression of your site and modify how long the cache will last. Enabling compression is a good idea unless you see an issue on the front end.
3. Make sure your database is optimized
The WordPress database is an important part of your WordPress website, storing all kinds of information about your posts, your users, and more. Because it contains so much important data that can help you run your website more efficiently, you’ll want to make sure that you keep it running smoothly at all times.
When you optimize your WordPress database, it will help your website load faster. This can be a significant improvement for websites that have a lot of traffic. The process is simple, but it does require some time.
Follow these steps to ensure your WordPress database is optimized.
- Step 1: Download and install the WP-Optimize plugin.
- Step 2: Go to Plugins > WP-Optimize > Settings tab.
- Step 3: Choose the type of optimization you want on the page (database optimization, remove unnecessary data, etc.).
- Step 4: Click the Start button and let the plugin do its work.
- Step 5: After optimizations are completed, click Check Result. You should see a pop-up message with green checkmarks on all items in need of optimizing.
- Step 6: If there are any errors, please go back to step three and choose a different type of optimization. Once all steps are complete, click Close.
4. Apply GZIP compression
GZIP is a compression technology used to quickly transfer data up to 70 percent faster than other methods, making it vital for data transfers of all sizes. GZIP compression also uses fewer server resources than comparable methods which require relatively little computing power and temporary memory space to work.
GZIP compression can be enabled through caching or performance plugins like W3 Total Cache. If you’re using that plugin, you can enable it in Browser Cache settings.
Don’t forget: you’ll need the correct permissions to make changes to files on your server. If you receive an error when installing and activating WordPress plugins, contact your hosting provider.
5. Use a content delivery network CDN
One more way to reduce the initial server response time is to use a content delivery network (CDN). A content delivery network is a network of servers and data centers with locations across the globe.
When site visitors access your page, they connect to the closest available server to download content. This minimizes the distance data needs to travel in order to fetch and display your WordPress site.
Benefits of using a CDN depend on your needs and the size of your WordPress site. There are several of them:
- Your reliability and latency get a huge boost
- 100% availability
- Decrease server load
- DDoS protection
- 24/7 customer support
- Analytics
6. Make sure your theme and plugins are up to date
Your WordPress site’s theme and plugins are its most important pieces. The last thing you want to happen is to find out one of your plugins has been compromised by a security hole or that your site breaks when WordPress issues an update that doesn’t jive with your theme.
In this section, we’ll look at WordPress plugins and themes. Furthermore, we’ll show you why it’s so important to always keep them up to date.
WordPress plugins are add-ons that can be installed to enhance or modify a website's functionality. There are thousands of plugins available, with more being created every day.
WordPress themes are a huge part of the overall site design. Themes take care of a lot. They can provide basic layouts for your site's pages, customize fonts and colors, set up menus for navigation, and more. On top of all this, they can also make sure you have an SEO-friendly site by implementing headers with titles or tags that help search engines index your content as it should be.
Keeping your WordPress plugins and themes up to date is important because they're made to be compatible with the latest version of WordPress. Outdated plugins and themes can cause your site to crash or experience problems such as slowness, missing features, or broken functionality.
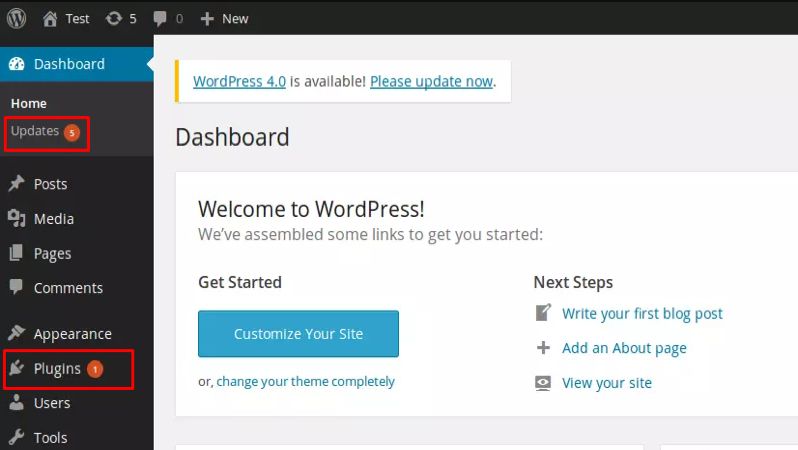
WordPress automatically notifies you when new versions are available for any plugins you have installed on your site, so make sure you pay attention to these notifications and update as soon as possible.
You can also check the version of a plugin or theme by going into the plugins menu on the left side of your admin dashboard and clicking on the name under Installed. To update a plugin or theme, simply click on its name and then click Update Now.
7. Delete any slow or unnecessary plugins
Are you experiencing any website slowdowns? If so, plugins could be to blame. Plugins can be great tools that help your site do amazing things, but if you aren’t careful with how you use them, they can also slow your website down tremendously and even make your site vulnerable to attacks or hacks.
Whether you’re just starting to build your WordPress site from scratch or are simply looking to make it run faster, it’s always wise to remove any plugins that you don’t use anymore or that aren’t being used enough to justify their presence on your website.
8. Upgrade to the latest PHP version
Hypertext Preprocessor (PHP) is an open source scripting language for web development. It's the coding language WordPress is built on. Along with updating plugins, WordPress, and themes, it's very important to keep your PHP version updated.
The benefits of keeping your PHP up to date are that your website will be faster and more secure, which means it will retain visitors better and be better protected against hackers.
Also, it is important to back up your website before switching to a new PHP version in case something goes wrong.
Minimize your time to first byte
Speed is crucial when it comes to the user experience, and initial server response time matters just as much as page load speed does. That being said, it isn’t something that most WordPress users give much thought to – until they find themselves waiting around longer than usual on their site, that is.
To review, here are the best ways to decrease TTFB in WordPress:
- Use faster WordPress hosting
- Enable caching on your site
- Make sure your database is optimized
- Apply GZIP compression
- Use a content delivery network CDN
- Make sure your theme and plugins are up to date
- Delete any slow or unnecessary plugins
- Upgrade to the latest PHP version
There are many ways to speed up your WordPress site's initial response time. Some of these tips might not apply to your website, but many will help you get server response time to a more reasonable level.
Looking for a faster solution for your WordPress site? Is your current solution not giving you the speed you need?
Consider fully managed WordPress hosting from Nexcess. Your WordPress site will load faster using Nexcess' built-in Edge CDN powered by Cloudflare with over 280 locations and advanced caching. Check out our managed WordPress plans today.
