Historically, consumer use of ecommerce stores has been a mystery to merchants. Traffic sources, bounce rates, and others were the metrics of educated guesses and opinions. Today, however, powerful tracking tools like Google Tag Manager for WordPress have brought data to that mystery, answering questions with a level of certainty never seen before.
These tools now allow you to build a clearer picture of the customer experience. Instead of guessing a consumer’s journey, you’re able to understand their path to purchase. Not only does this help you discover crucial touchpoints, more importantly, it also helps you drive your store’s growth by identifying conversion bottlenecks and finding new opportunities.
If you’re not sure you’re hitting the mark with Google Tag Manager, now is the right time to revisit your implementation and make sure everything is running smoothly. Here, we’ll walk through what Google Tag Manager is, how you can add it to your WordPress site, and how you can start measuring store performance where it matters.
![]() Running an ecommerce store and looking for the full rundown on SEO? Follow our complete guide to ecommerce SEO.
Running an ecommerce store and looking for the full rundown on SEO? Follow our complete guide to ecommerce SEO.
What Does Google Tag Manager Do?
Google Tag Manager is a free, widely-used tool that lets you create and manage the tags (more on this later) published on a website. Though it can be used on virtually any site, it’s commonly used by ecommerce business owners in conjunction with other marketing analytics platforms to manage their online stores. For example, Google Tag Manager is almost always used alongside Google Analytics for the purpose of tracking marketing campaigns, conversions, and site performance.
What Is a Tag?
When you inspect the source of a site, you see tags like , ,
Tags track and relay important user engagement data to another analytics platform. When a tag runs, or picks up an instance of the intended interaction, it’s called “firing” – i.e., “The tag has fired.”
Besides connecting to other platforms, tags can be created so you can track specific events — (like abandoned carts and video views) on your website. While Google Analytics can track many types of events, creating tags for certain events in Google Tag Manager can make tracking more specific, and situational events more effective.
Google Tag Manager vs. Google Analytics
Since Google Tag Manager and Analytics are used in tandem, it can be confusing as to what role each platform plays when it comes to marketing analytics.
Google Tag Manager can be used to manage many third-party tags, including the Facebook and Adobe Analytics tracking pixels. You can even customize and calibrate your tags, and decide when and why they fire. But Google Tag Manager just manages these tracking code snippets; there’s no actual analytics or in-depth reporting in Google Tag Manager.
Google Analytics doesn’t have the granular tag controls of Google Tag Manager, but it plays the very crucial role of collecting data from those tags. In other words, it collects, analyzes, and reports data from your tags. Thus, the two platforms have a symbiotic relationship.
How to Add Google Tag Manager to WordPress
If you’re one of the many ecommerce business owners using a managed hosting platform to run your online store, you need to know how to add Google Tag Manager to your WordPress site. Let’s go over the steps for setting up Google Tag Manager with WordPress.
Step 1: Create a Google Tag Manager Account
The first thing you need is a Google Tag Manager account.
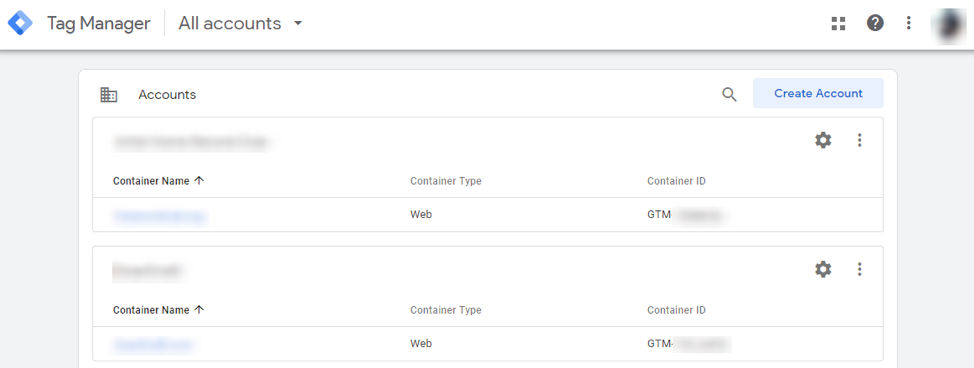
Head over to Google Tag Manager. If you already have an account, then select the account you want to use to connect to your WooCommerce store. Otherwise, click “Create Account” to begin setting up a new Google Tag Manager account. This is how you get Google Tag Manager code.
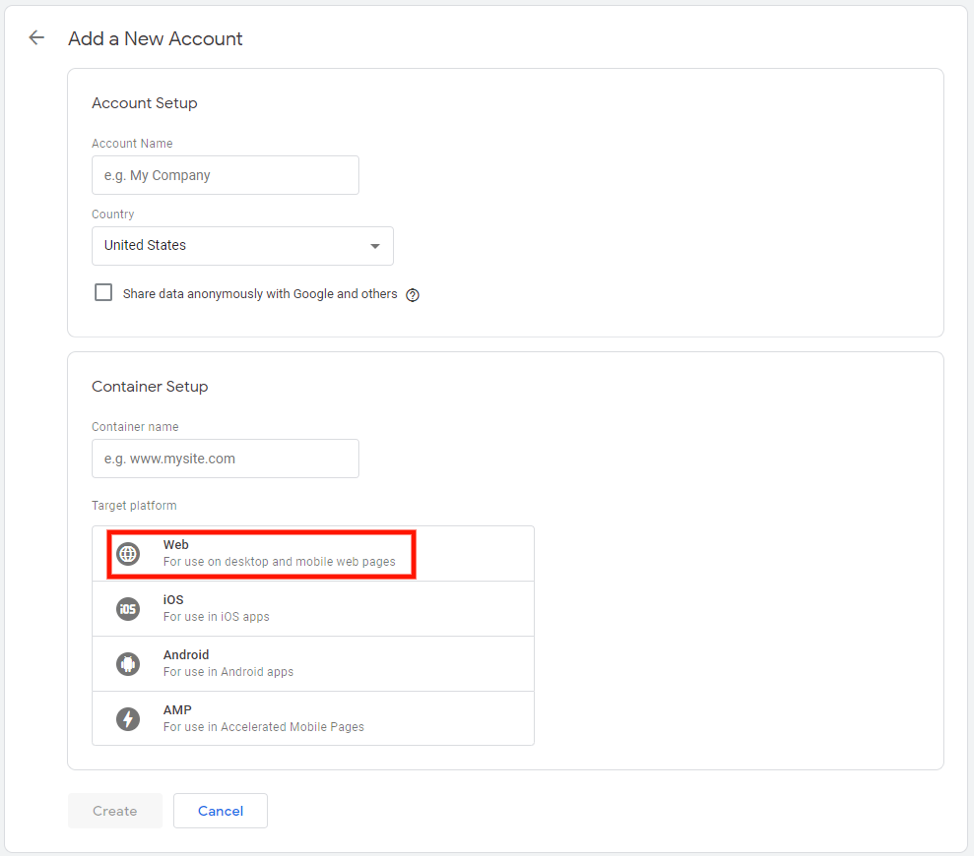
After clicking “Create Account,” you’ll see some account setup options.
Name the account, name the container — basically just a folder for your tags to be kept separate from other Tag Manager accounts you may have — and select “Web” as the target platform. Then click “Create” to immediately be taken into your new Google Tag Manager account.
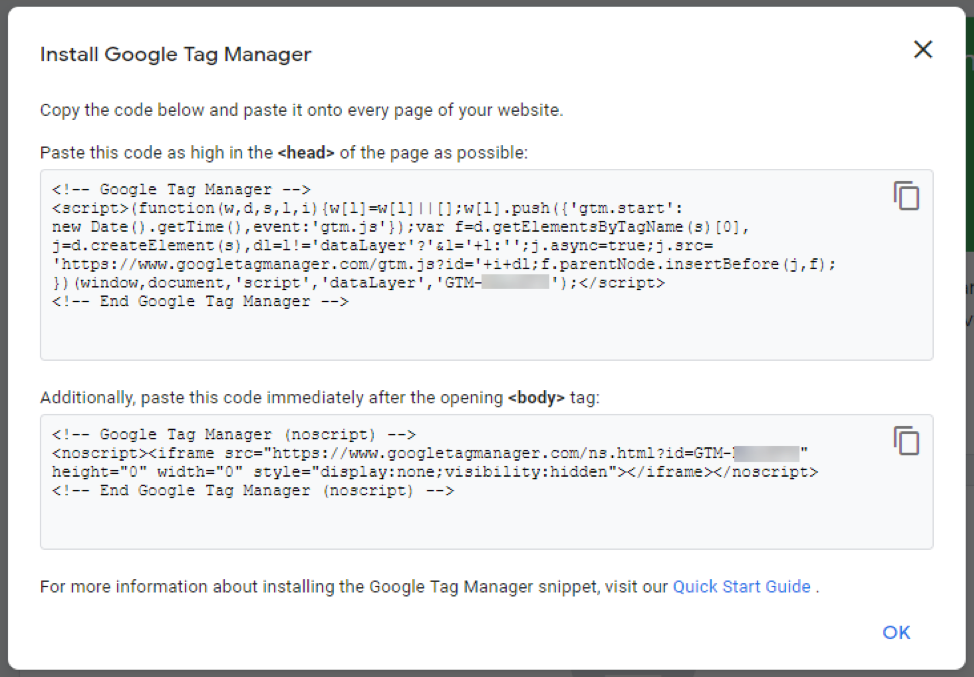
Once you’ve finished with the setup options, you’ll need to install the code snippets for Tag Manager to begin working with your ecommerce store on WordPress.
The first snippet needs to be added to the header of your WordPress site. This will ensure that the code appears on every single page of your site — which is important for Tag Manager to work with WordPress.
There are a couple of ways to add it to the appropriate file of your WordPress theme. However, the easiest way is to use a plugin like Yoast. Instead of editing the raw code of your site, just copy and paste the code into Yoast which will automatically add the code to every page of your site.
Then there’s the second snippet of code which must be added just after the opening tag on your site. Again, Yoast and other plugins can help.
If you need additional help, Google Tag Manager offers a useful Quick Start Guide that you can use as a reference. When these code snippets are installed, you’re ready to begin setting up Google Tag Manager with WordPress.
Step 2: Install Google Analytics
Once you’ve created and set up a Google Tag Manager account, you’ll need to do the same for Google Analytics. After all, you won’t get much benefit from using Tag Manager unless Analytics is receiving data from your tags. If you’ve already installed Google Analytics, you can skip this step.
These steps might seem a bit odd as you’re completing them, but don’t worry. You can, in fact, install Google Analytics from within Tag Manager.
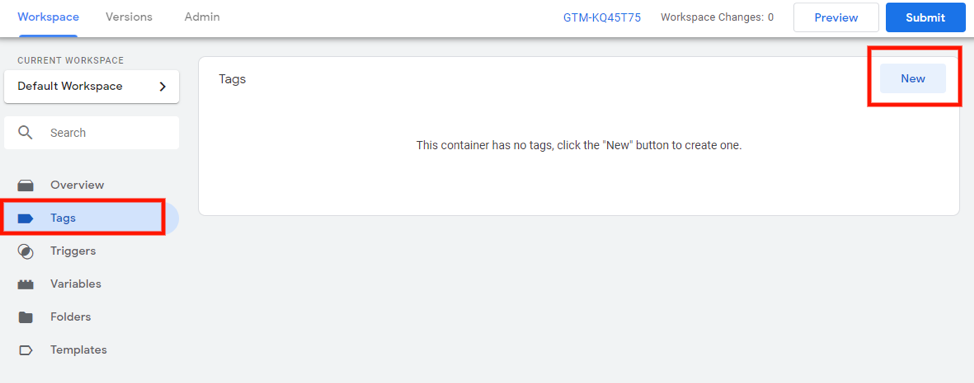
From your new Google Tag Manager account, click “Tags” from the left-hand sidebar, then click “New” in the upper right-hand corner of the window.
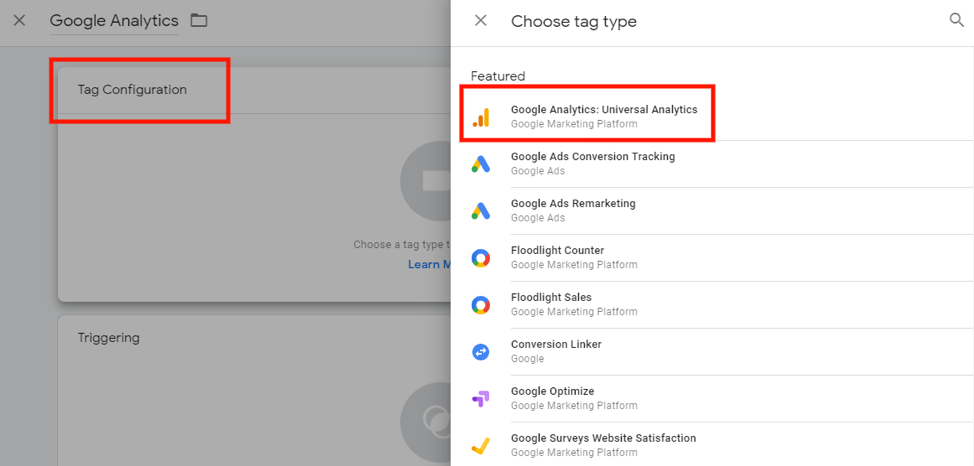
Name the tag “Google Analytics” and click “Tag Configuration” and select “Google Analytics: Universal Analytic” for tag type.
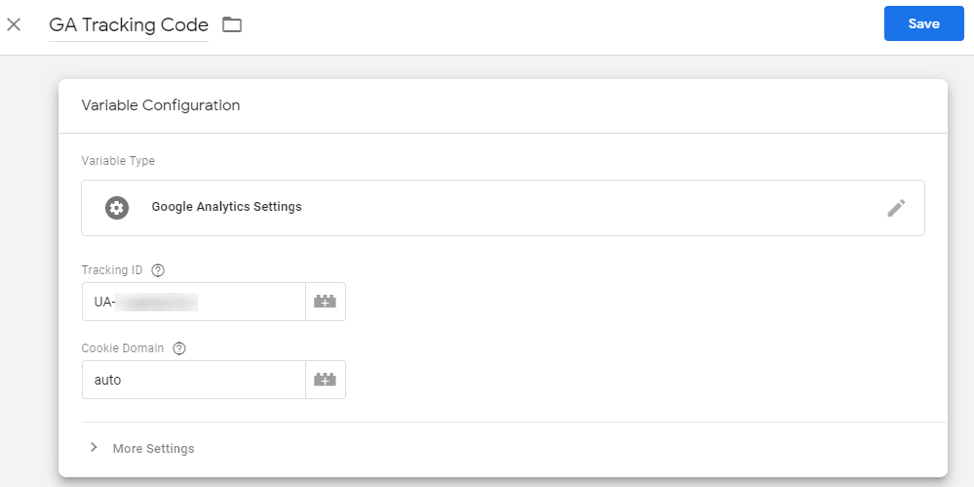
Set the track type to “Page View” then click “New Variable” under the Google Analytics Settings. Finally, name this new variable and install your Google Analytics tracking code on your WordPress site as prompted.
What Can I Do With Google Tag Manager?
Now that you have completed the installation and setup process, you need to know how to use Google Tag Manager. And, perhaps most importantly, how is Google Tag Manager used?
Google Tag Manager helps you gain insight into how people are using your ecommerce store. By setting up tags and events, you can gain valuable insights on key areas. That includes tracking form submissions, file downloads, and the effectiveness of interactions in your conversion funnel.
While there are many things you can do with Google Tag Manager, let’s go over a few of the most important (and most useful) for ecommerce businesses.
Track Goals and Events in Google Analytics
Although pageviews and referrals are important metrics, tracking how your customers and leads are using your ecommerce store provides the most accurate picture of your store’s performance. Without Google Tag Manager and Google Analytics, you’d have very little insight into how customers and leads are interacting with your store. In turn, you wouldn’t be able to identify and address variables that might, for instance, contribute to high cart abandonment.
Although we’re not going to spend too much time covering it in this Google Tag Manager overview, we’re going to give you examples of a goal and an event you can track with Tag Manager.
Goal: Added-to-Cart
With Google Tag Manager, you can set up a tracking goal for each and every time a product gets added to the shopping cart. Once you’ve completed the steps to set up an added-to-cart tracking goal, these interactions will be reported in Google Analytics. It’s important to note that this isn’t a goal that you’d be able to track in Google Analytics without using Tag Manager to create the event.
Event: Video Views
Video content is the most popular form of digital content today. So it follows that ecommerce sites that feature product reviews, launch videos, instructional videos, and other video content should be tracking how customers and leads are engaging with those videos, and most importantly, how those engagement rates affect conversion. Using Google Tag Manager, you can set up tracking events for videos and compare those events to cart abandonment, checkout abandonment, or any number of other metrics.
Install Tracking Pixels for Google Pay-per-Click Ads
One of the key uses for Google Tag Managers is to install and manage the Google Ads Remarketing and Google Ads Conversion Tracking pixels. The steps to install these tracking pixels are largely the same for both.
Google Ads Remarketing Pixel
![]()
From your Google Tag Manager account, create a new tag. Name it “Google Remarketing” and select “Google Ads Remarketing” as the tag type.
![]()
In the tag configuration settings, locate your Google Ads Conversion ID. Create a label if you’d like, then set “All Pages” for triggering.
Google Ads Conversion Tracking Pixel
For the Google Ads Conversion Tracking pixel, the steps are much the same. From your Google Tag Manager account, create a new tag. Name it “Google Ads Conversion” and select “Google Ads Conversion” as the tag type.
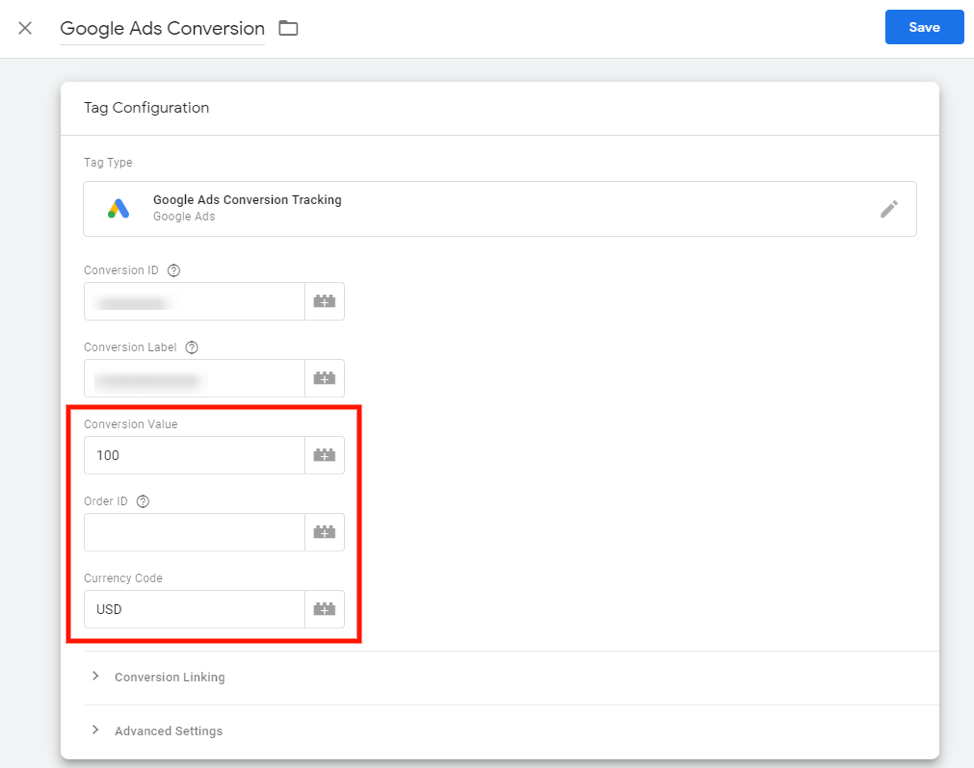
The main difference with the Google Ads Conversion Tracking pixel is the option to set a value for the tag. In the screenshot above, the value is set at 100 USD, meaning that each conversion the tag tracks is worth $100 to the business. Use an amount makes the most sense for your business. Many ecommerce business owners set the value of a conversion as the average transaction value.
Install Third-Party Tracking Pixels
Similar to the Google Ads tracking pixels, Tag Manager is often used to install tracking codes for third-party platforms. In particular, the Facebook Pixel is often installed on a WordPress site using this method.
The important thing to note is that when Google Tag Manager doesn’t provide a template for the tracking code you want to install, you’ll need to use the custom HTML option. To illustrate this process, here are the steps for installing the Facebook Pixel in Google Tag Manager.
![]()
From your Google Tag Manager account, create a new pixel. Name it “Facebook Pixel” and select “Custom HTML” as the tag type.
![]()
After selecting “Custom HTML” as the tag type, you’ll be given a place where you can paste the Facebook Pixel tracking code.
As you can see in the screenshot above, the trigger is set to “All Pages” — but there are other options available, and Facebook provides some tips to help you choose the right option for your case.
Do You Need Google Tag Manager?
We’ve gone over the ins and outs of Google Tag Manager. As we bring this overview to a close, let’s tackle one last question: Should you be using it?
For the owner of an ecommerce business, there’s arguably nothing more important than learning about customer behavior. Because if you don’t know how your customers are interacting with your online store, you have no way to optimize to increase conversion. In other words, any effort made to improve the customer experience and the buying journey is just a shot in the dark.
Google Tag Manager gives you a window into your customer experience. By using Tag Manager to publish and manage tags for your ecommerce store, you can boost conversion and generate more revenue for your business.
Nexcess is the Premiere Hosting Provider for a High-Performance ecommerce Business
What do you get when you combine 99 percent uptime, top-to-bottom SEO optimization, tons of included plugins from IconicWP, dropshipping support, and a Glew.io subscription at no additional cost? You get Nexcess Managed WooCommerce Hosting.
Nexcess WooCommerce hosting plans were designed with three principles in mind: reliability, scalability, and speed. Every ecommerce store running on a Managed WooCommerce Hosting plan benefits from everything Nexcess plans have to offer from cart abandonment technology to minimize lost sales to the nearly limitless ways in which you can customize the look and feel of your online store. Best of all, Nexcess hosting plans are competitively priced and come with outstanding round-the-clock support.
Learn more about how you can benefit from Nexcess Managed WooCommerce Hosting and get started today.

