Being able to observe and interact with customers as they shop was always an advantage that traditional brick-and-mortar retailers had over online retail. Until now.
With ecommerce analytics and reporting, online retailers can learn just as much from every customer interaction as physical retailers — maybe more. An ecommerce analytics tool can do even more than just show data. These services are essential for tracking the performance of your online store over time.
So we’re going to tell you how (and why) to use Google Analytics ecommerce reporting.
Introduction to Google Analytics for Ecommerce
An ecommerce analytics tool can help compensate for one of the biggest shortcomings of digital retail. Since you can’t be an active participant in a customer’s buying experience, an ecommerce analytics tool gives you a way to learn about customer behavior so you can further optimize customer experience.
Terms You Should Know
Before setting up ecommerce reporting in Google Analytics, let’s go over some of the terms you should know.
Average Order Value (AOV)
Your average order value is the average amount of a transaction. If you divide your total revenue by the total number of orders, you’ll get your average order value. Typically, your average order value is also the value of a conversion.
Average Quantity
Similar to average order value, average quantity is the average number of product units sold per transaction. To calculate, you take the number of product units sold and divide by the number of transactions that included one or more units of that product.
Ecommerce Conversion Rate
The ecommerce conversion rate is the number of web sessions that resulted in a purchase. To calculate, divide the number of transactions by the total number of web sessions, then multiply that figure by 100 to convert the value to a percentage.
Ecommerce Transaction
In short, an ecommerce transaction is a purchase that has been completed by a customer.
Per-Session Value (PSV)
Your per-session value is the average value of a web session on your online store. This figure is calculated by dividing your total revenue by your total number of web sessions.
Quantity
As it pertains to ecommerce, quantity refers to the total number of product units sold.
Revenue
Your revenue is the total value earned through sales. It’s an unadjusted value which means tax, shipping, and other financial variables are reflected in the total. Revenue is not the same as profit which subtracts taxes, fees, and expenses.
Transaction ID
A transaction ID is a number — usually alphanumeric — that is assigned to a transaction. These numbers should be unique and non-repeated. Transaction IDs are beneficial to both retailers and customers.
Unique Purchases
Unique purchases refers to the number of times a product was part of a transaction. When multiple units are sold at once, the transaction still only counts as a single unique purchase for that particular product.
How to Set up Google Analytics Ecommerce Tracking
Google Analytics tracks many metrics automatically, but some additional steps are necessary for ecommerce tracking.
Step 1: Install Google Analytics
Before you can track your WooCommerce site with Google Analytics, WordPress must be integrated with Analytics. This step requires you to access the Google Analytics tracking code (or “tag”) and install it on your WordPress site.
You can do it a couple of different ways. First, you could use Google Tag Manager to publish and manage the Analytics tag for your site. See our guide to Google Tag Manager for more info on this process.
If you already have an existing Analytics account but need to install the tracking code on your WooCommerce site, you need to set up a property for your ecommerce set. Then navigate to Admin > Tracking Info > Tracking Code to access the actual code you’ll need to install.
If you don’t yet have a Google Analytics account, Analytics walks you through the installation steps as part of the account setup process.
Once you have found your tracking code, copy and paste it into the header of your WordPress theme file. Alternatively, a plugin like Yoast can do this for you (many shopping cart plugins for WordPress can as well).
After completing these steps, Google Analytics will be installed on your WordPress site.
Step 2: Enable Ecommerce Tracking
To activate ecommerce tracking in Google Analytics, navigate to Admin > View > Ecommerce Settings. Locate the Enable Ecommerce toggle and move it to the On position. This will allow Google Analytics to begin receiving your shopping cart data.
Step 3: Add Ecommerce Tag to Tracking Code
Navigate to where you added the tracking code to your WordPress site — whether it’s a plugin or in the header file for your theme — and locate the first section of the code. It should look like this:
Navigate to where you added the tracking code to your WordPress site — whether it’s a plugin or in the header file for your theme — and locate the first section of the code. It should look like this:
ga(‘create’ , ‘UA-000000000’ , ‘auto’)
On the line below it, copy and paste the following snippet of code:
ga(‘require’ , ‘ecommerce’ , ‘ecommerce.js’);
The addition of this code snippet will initiate tracking of ecommerce events on your site. For instance, the code will track clicks on products, adds to the shopping cart, shopping cart removals, order checkouts, and so on.
Step 4: Test the Ecommerce Tracking
Finally, test to make sure your ecommerce tracking is working. The best way to test it is to complete a test transaction through your own WooCommerce store. After completing the test order, check Google Analytics to see if that transaction shows in the ecommerce reporting.
On a side note, make sure to account for your test transactions in your ecommerce reporting. Otherwise, your reports will be skewed.
5 of the Most Important Google Analytics Ecommerce Reporting Options
When you’re running your store with WooCommerce, Google Analytics receives lots of data about your customer interactions. The reporting menus in Google Analytics offer a visual representation of the data trends for your store from your customers’ checkout behaviors to how they interact with products. So let’s go over the most important ecommerce reporting options in Google Analytics and the value they have for your ecommerce tracking.
Ecommerce Overview
As the most basic, macro-level reporting option, the Ecommerce Overview in Google Analytics is a summary of your site-wide revenue and transaction statistics. In particular, Ecommerce Overview focuses on things like your conversion rate, the number of transactions over a specific period, revenue, and unique purchases for any given product (or group of products).
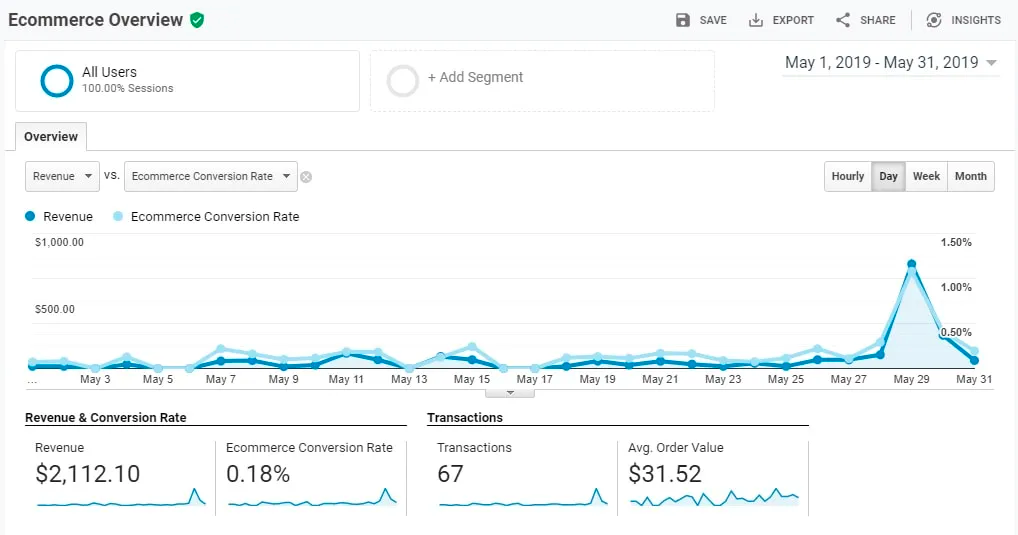
When you access the Ecommerce Overview, the default view is a comparison of your revenue to your conversion rate as shown in the screenshot above. However, you can change the metrics you want to compare. You can also change the amount of time for which to map them: days to hours, weeks, or months. By selecting the different ecommerce metrics that are available, you can get a high-level view of your marketing efforts over time.
Below the graph, you can see other relevant values for the period, including the number of transactions generated by your marketing campaigns and the number of sales earned by your affiliate partners.
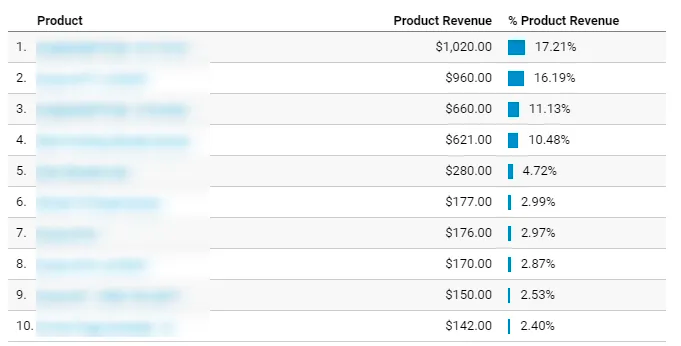
You also have access to a list of your top products sorted by the revenue generated by the sales of every product. If you click on any product in the list, you can access a graph for that particular product, showing the number of units sold and the amount of revenue those sales generated. There are other useful data points here, too: the average selling price, the number of cart removals for that product, and the total amount of refunds issued for order returns.
Generally, Ecommerce Overview is what you’ll use when you need core data points mapped over a period of time. There’s a lot of high-level information available here that can be quite useful in many situations.
Shopping Behavior Analysis
In Google Analytics, the Shopping Behavior Analysis report offers a breakdown of your purchase funnel. More specifically, this report shows you how many customers reached each point of your funnel, how many times your customers proceed from one point in the funnel to the next, and the number of times the funnel was abandoned at each stage. With this information, you can see the journey your customers are taking as they make purchases, and perhaps most importantly, identify potential bottlenecks in your purchase funnel.
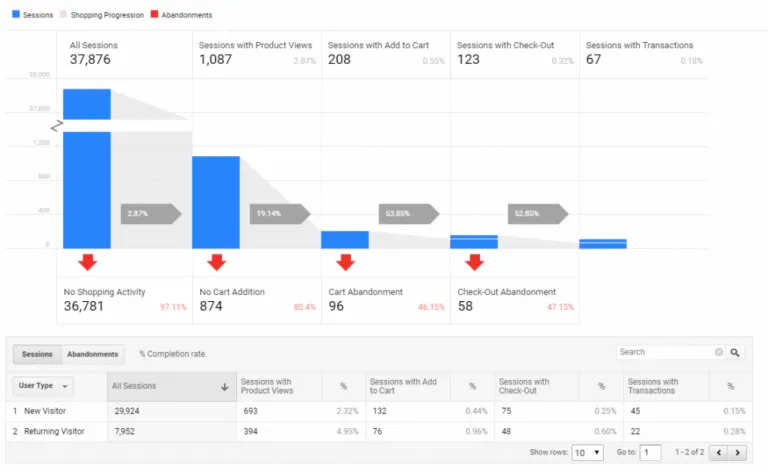
The screenshot above shows the Shopping Behavior Analysis report. There are a number of useful metrics to take note of here.
For this example, this report shows that 2.87% of website sessions involved a product view and of those, over 19% actually added a product to the shopping cart. From there, almost 54% of customers who add a product to the shopping cart begin the checkout process — of which nearly 53% actually conclude with a transaction.
Shopping Behavior Analysis is very useful for increasing your conversion rate. For instance, the cost of shipping is frequently the reason for checkout abandonment. So you might try offering free shipping, and then check the Shopping Behavior Analysis report to see if checkout abandonment has gone down.
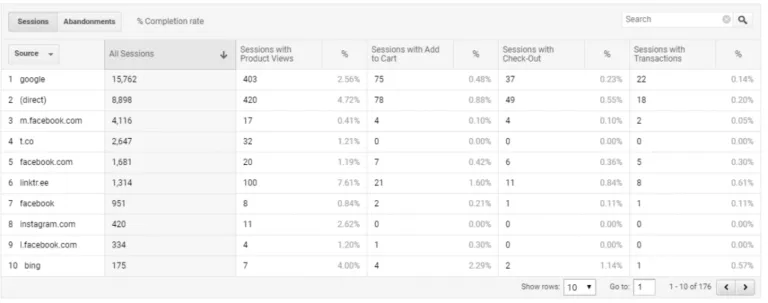
Below the main reporting area, you have access to a couple of different data view options. By default, user type is selected, but you can choose a number of other parameters. In the screenshot above, you can see that Source is selected as the primary parameter, so it’s showing session and funnel data by referral source.
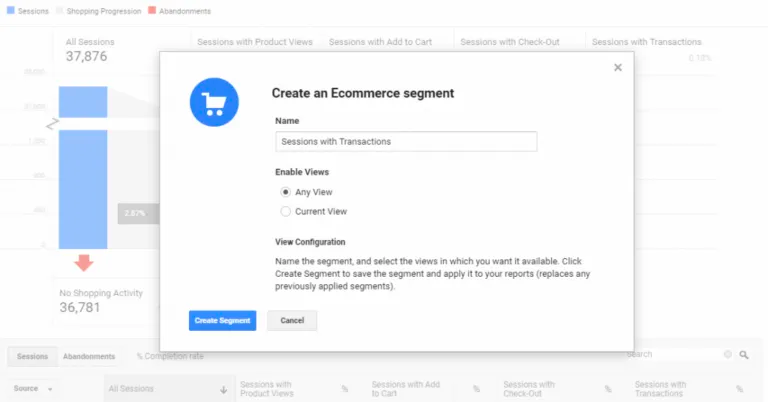
You can easily create an ecommerce segment by clicking on any of the header cells (e.g. Sessions with Product Views, b). You can even create an abandonment segment by clicking on any of the red arrows in the main reporting graph at the top of the menu. In the screenshot above, Sessions with Transactions was selected.
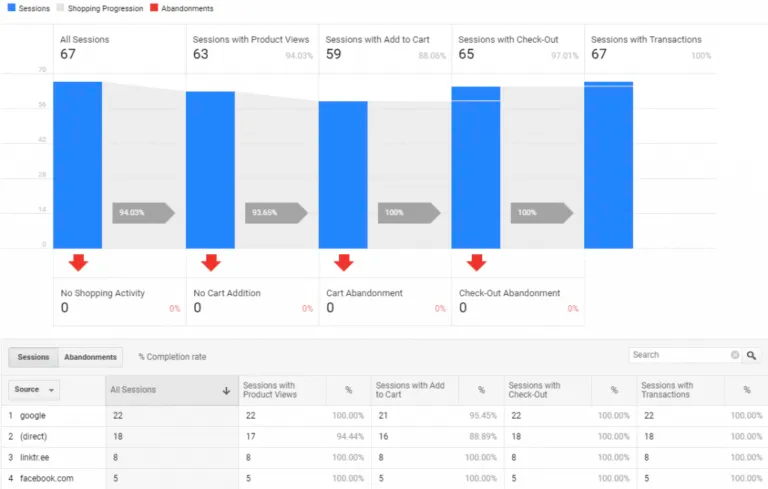
After creating a segment, you’ll see a report similar to what’s shown in the screenshot above. Since Sessions with Transactions was selected, there was zero percent abandonment at each level in the funnel because all sessions resulted in a transaction.
Shopping Behavior Analysis offers lots of insight into your customer behavior and is an ideal complement to a customer analytics tool like Glew.io. As part of its comprehensive ecommerce dashboard, Glew.io collects tons of actionable data that is compiled into customer profiles. With just a glance, you can quickly see a customer’s purchasing timeline, lifetime value, average order values, and numerous other metrics.
Checkout Behavior Analysis
The Checkout Behavior Analysis report is very similar to the Shopping Behavior Analytics tool with one key difference. While Shopping Behavior looks at the entire session, Checkout Behavior looks solely at the checkout process.
With Checkout Behavior Analysis, you can get a clearer picture of how your customers move through your checkout funnel and when the checkout process is most frequently abandoned. This is particularly useful when you have a multi-step checkout process with tags installed on each funnel step.
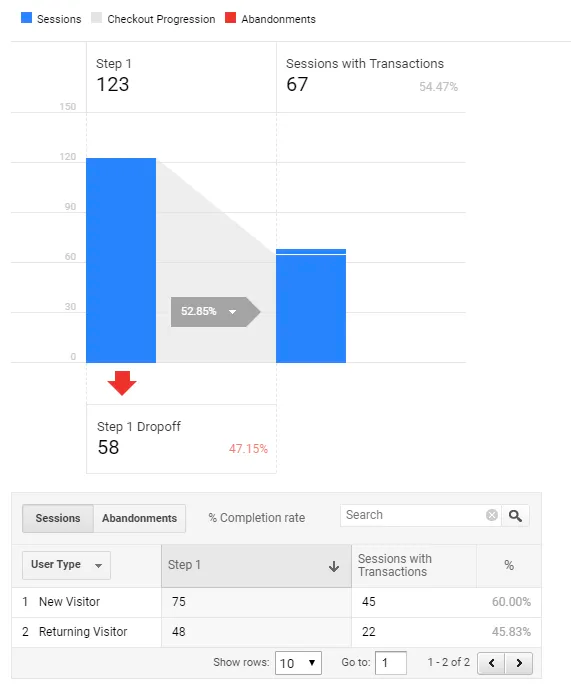
When you access Checkout Behavior Analysis in Google Analytics, you should see something similar to what’s shown in the screenshot above. In this example, we’re looking at a single-step checkout process which means the checkout abandonment rate is the difference between all the checkout sessions (100%) and the percentage of checkouts that resulted in transactions (52.85%).
Product Performance
With the Product Performance report in Google Analytics, you get a closer look at how your products are performing on your ecommerce store.
There are two different views in Product Performance: a top-level “Summary” and the more granular “Shopping Behavior” view. The Summary gives you more generalized information including revenue generated by sales of a product as well as the unique sales and quantity sold of a product. Then there’s Shopping Behavior which will indicate product list and product detail views, the number of times a product was added to the shopping cart, and the number of checkout sessions for a product. Generally, you could consider Product Performance to be a more in-depth version of the Ecommerce Overview.

The Product Performance chart lets you compare a number of different dimensions and shopping behaviors. In the example above, you can see a graph of the revenue generated by a product compared to the number of times the product’s details were viewed by customers. Alternatively, you can choose other dimensions like product SKU, product category (if you have Enhanced Ecommerce enabled), or the brand of the product.
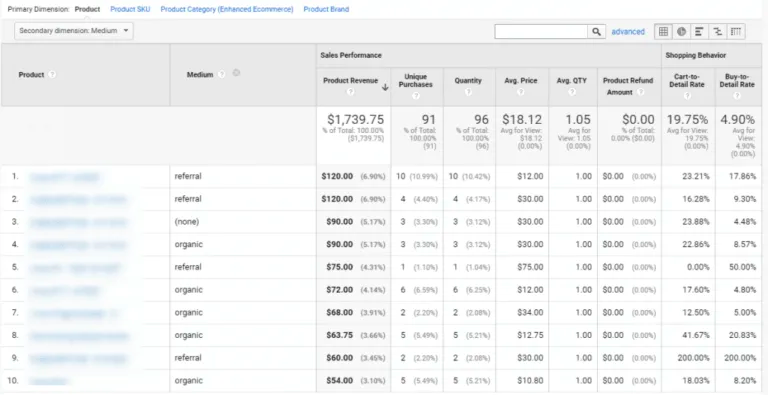
Moreover, you can apply a secondary dimension to the report. In the screenshot above, Medium was chosen as the secondary dimension to indicate the origin of the customer who interacted with the product.
Sales Performance
As arguably the most straightforward of the Google Analytics ecommerce reporting options, Sales Performance reporting gives an overview of your revenue through one of two dimensions: transaction or date. If you choose transaction, data for your transactions is shown, including the data, time, and transaction ID. With date, you won’t see details for transactions and instead, will see the total amount of revenue earned per day.
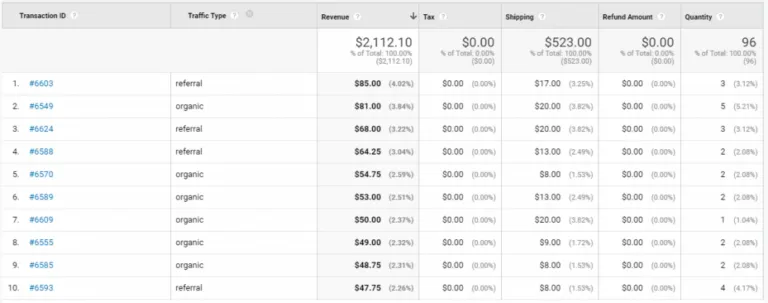
In the screenshot above, you can see a Sales Performance report for which transaction was the primary dimension. For this report, Traffic Type is the secondary dimension to show the origin of every customer who placed an order. Additionally, you’ll see a number of primary metrics and ecommerce KPIs.
If you click on an order number, you can see all products purchased by that same person or on that same day, depending on whether transaction or date is your primary dimension.
Why Use Google Analytics for Ecommerce Reporting?
Historically, ecommerce has left retailers with very little knowledge when it comes to customer behaviors, but ecommerce analytics tools have changed that. When combined with WooCommerce and WordPress, Google Analytics can offer a lot of insight into how your customers are interacting with your online store.
Nexcess Is Your Premiere WooCommerce Hosting Provider
Before you can start to learn about customer behavior, you need a fast, reliable store. Managed WooCommerce hosting from Nexcess is built with speed and performance in mind. Packed with tons of cutting-edge technologies and ecommerce analytics, you have everything you need to start, run, and grow a thriving ecommerce store.
To learn more, check out our plans and get started today.

