

Secure File Transfer Protocol (SFTP) and File Transfer Protocol Secure (FTPS) are two prevalent data transfer protocols that employ additional security measures for confidentiality, data integrity, and endpoint authentication. In this article, we will compare and contrast SFTP vs. FTPS.
FileZilla FTPS client — how to connect FileZilla for FTPS
Nexcess allows you to transfer data between your account and a local device by establishing a secure connection via SFTP or FTPS. While multiple software solutions can be used for this purpose, FileZilla is a fast and reliable cross-platform FTPS client with an intuitive user interface and extensive functionality.
Let’s dive into why FTPS is an excellent alternative to SFTP for securely transferring data and how to connect to your website files using the FileZilla FTPS client. First, let's look at the main differences — SFTP vs. FTPS
Comparing and contrasting SFTP vs. FTPS
We've captured the main differences related to SFTP vs. FTPS and listed them in the following table for easy comparison:
| SFTP vs. FTPS | ||
| Criteria | SFTP | FTPS |
| Security mechanisms | Employs SSH as its secure channel. | Uses TLS as a security enhancement. Requires an SSL/TLS certificate on the destination host. |
| Users | Allows for only one SFTP account. You cannot create multiple SFTP accounts for one website. The Linux user created for your website will be used as your SFTP user. Your SFTP user will have access to all website files. | Allows for multiple FTPS accounts. You can create multiple FTPS accounts for one website. You can choose what files and folders each FTPS user can have access to on your website. Different FTPS users can have different levels of access to your website. |
| Ports | The 22 port is used by SFTP by default. | The 21 port is used by FTP and FTPS. The 20 port is used in active mode. Otherwise, a random port from the passive range is selected for data transfer. |
All data you send to and receive from remote systems has to travel through the global network. And while on its way to the destination machine, data passes through multiple routers and switches. If the data isn’t encrypted, the possibility exists for it to be intercepted by a third party.
Both SFTP and FTPS ensure that your data is transferred securely, but the methods they use to do this couldn’t be more different. Let’s take a look at how each of these protocols works.
How does SFTP work?
SFTP (Secure File Transfer Protocol) runs over SSH (Secure Shell Protocol) as a secure channel, providing both authentication and data transfer encryption. While SFTP can sometimes be called "secure FTP (File Transfer Protocol)," the two protocols are unrelated.
SFTP is also not an extension of SSH but a separate protocol working on the application layer. SFTP employs the encryption mechanisms of SSH, such as Advanced Encryption Standard (AES), to secure the connection and hashing algorithms like Hash-Based Message Authentication code (HMAC) to ensure data integrity.
The protocol also uses the same 22 port as SSH, unless the system administrator has changed it for security reasons. As SFTP requires a Linux user to connect, you can’t create additional SFTP accounts for one website. This constraint can be inconvenient for website owners who want to grant access to multiple users.
Nexcess SFTP
Nexcess allows you to connect via SFTP and SSH using the standard 22 port. You can find your SSH/SFTP credentials in the Nexcess Client Portal. Use the login information from the Credentials tab to transfer files to the server with SFTP.
How does FTPS work?
FTPS (File Transfer Protocol Secure) is an enhanced version of the FTP protocol that employs Transport Layer Security (TLS) to transfer data securely.
TLS provides critical security services, which include encryption, data integrity, and endpoint authentication. The enhancements offered are used by various application-level protocols, including Hypertext Transfer Protocol Secure (HTTPS).
FTP leverages the benefits of TLS, which makes FTPS a great alternative to SFTP for ensuring secure data transfer. But remember that you need a valid SSL/TLS certificate installed on the destination host to use FTPS.
FTPS uses the 21 port, the standard FTP port. As the only difference between FTPS and FTP is using TLS to secure the process, FTPS also creates two channels for client-server communication:
- a command channel
- a data channel
Unlike SFTP, you can create multiple FTPS accounts and choose what directories FTPS users can access on your website. This is one of the benefits the protocol offers that makes FTPS more appealing than SFTP for website owners.
Nexcess FTPS
You will use the 21 port to connect to your websites at Nexcess. You can retrieve your FTPS login information from your WordPress dashboard or the Credentials section of your hosting plan’s menu for Magento, Drupal, and other Content Management Systems (CMSs).
FileZilla FTPS client setup
FileZilla is a free, open-source file transfer client. To set up FileZilla on your personal computer, install the FileZilla FTPS client.
FileZilla and FileZilla Pro
The basic version of the software supports transferring data over FTP, FTPS, and SFTP protocols. FileZilla Pro, a premium version of the client, includes additional functionality and support for cloud storage protocols like Amazon S3, Dropbox, and Microsoft OneDrive.
FileZilla setup on Windows and MacOS
For devices on Windows and MacOS, download the installation file, open it, and complete the installation process by following the instructions in the dialog box. If you’d like, you can download FileZilla Pro from the Mac App Store.
FileZilla setup on Linux
The FileZilla FTPS client version for Linux listed on the official website is built for Debian 10.0, so it’s recommended to use the package management system of your distribution to set up FileZilla on your Linux computer.
For example, you can install the FileZilla FTPS client on your Ubuntu desktop from Ubuntu Software or by running the following command from the terminal:
apt-get install filezilla -yHow to use the FileZilla FTPS client to transfer data securely
Once the FileZilla FTPS client has been successfully installed on the PC you use, you are able to access your website files at Nexcess using the FTPS login information from the Credentials tab of the Nexcess Client Portal.
Step 1: Locate your FileZilla FTPS login information
Log into your Nexcess Client Portal and choose a hosting plan If you have a managed WordPress or WooCommerce plan, open your website dashboard and navigate to the Credentials area in the user interface.
If your website uses Magento, Drupal, or another content management system, open the Credentials section of your hosting plan’s menu.
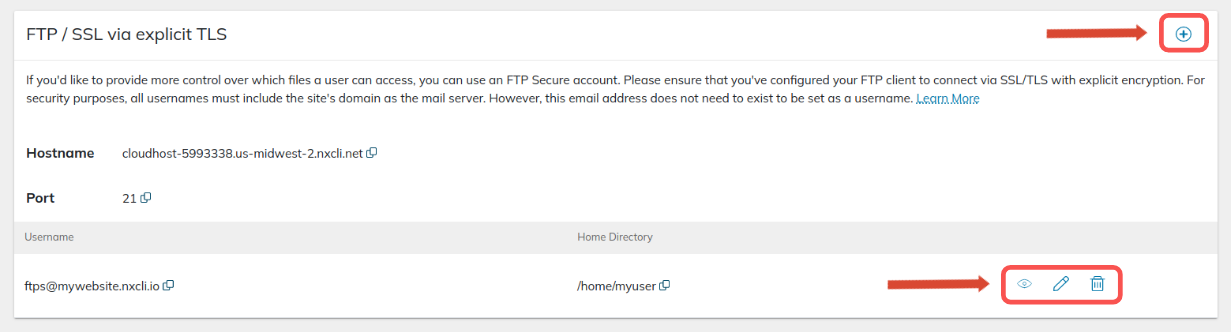
Step 1a: Add a new FTPS user
You can add new FTPS users by clicking the Plus button on the top-right side of the section. From here, you can also remove any existing FTPS users or modify their login information and access level:

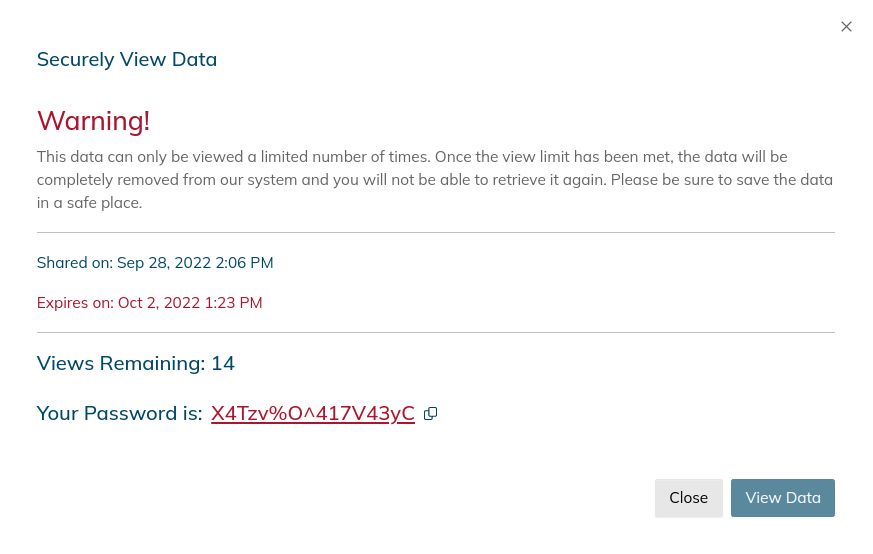
Once a new user has been created, you can view their password a limited number of times. Click the Eye icon to retrieve the user’s password:

Step 1b: Change an existing FTPS user’s password
If you want to change the FTPS user's password, choose the Edit FTP User option. You can provide the new authentication details or use the Generate Password option.
Step 1c: Change an FTPS user’s access level
Choose what folder your FTPS user can have access to by selecting it from the dropdown menu under Home Directory. By default, each new FTPS user will have full access to your website, including its Linux user’s home directory, which is shown as /home/mywebsite in the screenshot below:


Step 1d: Save your FTPS login information for the FileZilla FTPS client
Copy your FTPS login information, including hostname, port, username, and password. You will need these authentication details to connect to your website using the FileZilla FTPS client.
Step 2: Provide your FTPS login details to FileZilla
Open the FileZilla FTPS client. You can use one of the two options to establish a secure connection to your website at Nexcess using FTPS:
- Quickconnect: This option allows you to enter your FTPS login information and connect to the remote server without saving any credentials in the FileZilla FTPS client.
- Site Manager: Using the Site Manager interface, you can save your login information and connect to your website without having to enter your credentials every time you log in.
Before you initiate a connection to your Nexcess website, make sure you have the following login information required by the FileZilla FTPS client:
- Host: This is the address of the destination system. On cloud plans, it will be something similar to cloudhost-5993338.us-midwest-2.nxcli.net.
- Username: FTPS accounts are similar to email accounts, consisting of a username followed by your website address — for example, ftps@236003uh84.nxcli.io.
- Password: Your FTPS account’s password.
- Port: You’ll use the 21 port for FTPS.
Step 3: Connect to your website using the FileZilla FTPS client
If you choose Quickconnect, enter your login information on the main page of the FileZilla client. You can open the Site Manager interface from the main menu via the File menu entry. Select it from the dropdown list. Let’s review both connection options.
Step 3a: Connect with Quickconnect
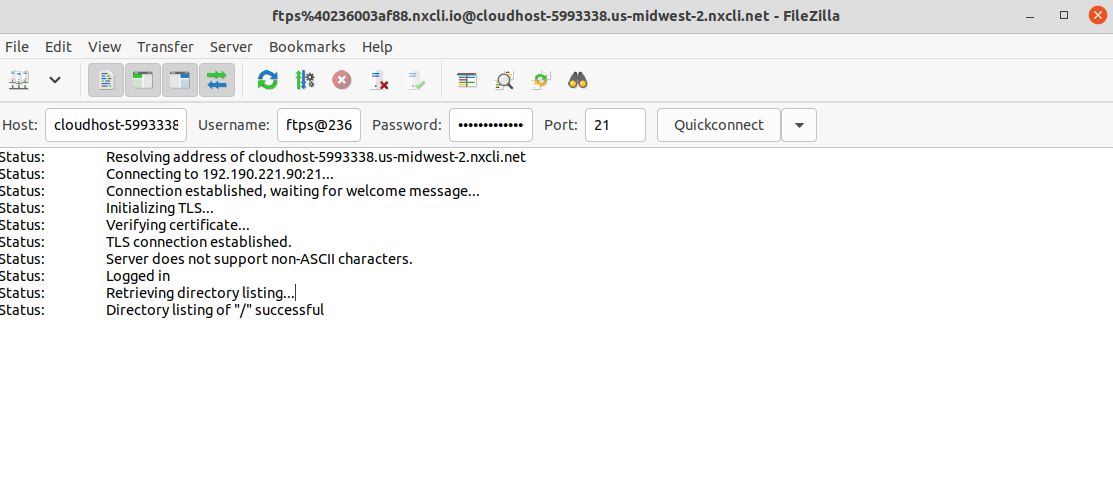
Enter your FTPS login details and click Quickconnect. Typically, if you use the Quickconnect option the FileZilla FTPS client offers, you must specify the protocol before the hostname.
As Nexcess doesn’t allow unencrypted connections, you do not need to add the protocol part to the host address. If you connect using SFTP, add sftp:// to the beginning of the hostname — for example, sftp://cloudhost-5993338.us-midwest-2.nxcli.net.
FileZilla will list all connection information, letting you know that TLS has been initialized and it has checked the destination server’s SSL/TLS certificate. The directory listing of “/” means that the FileZilla FTPS client has listed everything the user has been granted access to:

Step 3b: Connect with Site Manager
Open FileZilla and choose Site Manager from the main menu. On the left side of the window, you will see a folder named My Sites, which doesn’t contain anything yet. This folder is where you will save your website’s FTPS login information.
The location of FileZilla's settings directory depends on your operating system. See the FileZilla FTPS client FAQ for more information. Add a new website by clicking the New Site button. It will allow you to add your FTPS login information for the chosen website and save it in the system. You can create new subfolders if you have many websites you want to connect to and would like to divide them into groups.
After you have added a website, enter its FTPS user’s authentication information. Choose the FTP - File Transfer Protocol option using the Protocol picklist and then Require Explicit FTP over TLS as the encryption type using the Encryption picklist. You do not typically need to change any other settings. However, you can set up FileZilla to use the desired data transfer mode (either active or passive) from the Transfer Settings tab:

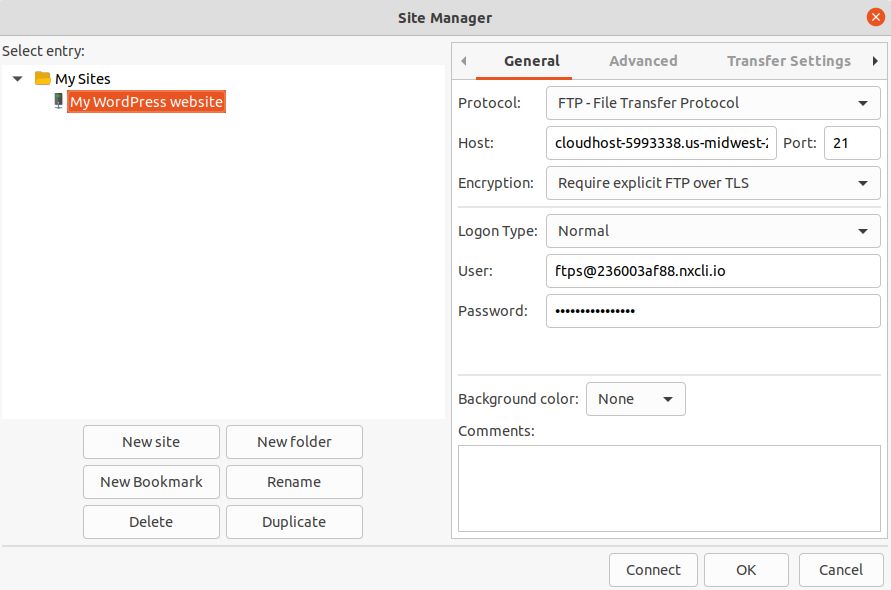
Click OK to save the FTPS login information without establishing a connection, or choose Connect to browse your website files on the Nexcess host.
Step 4: Transfer your data/files
Now that you’ve established a secure connection between the FileZilla FTPS client and your Nexcess site, you can transfer files back and forth between the remote system and your computer quickly.
You can modify, remove, or download your website files, restore them from a backup, and even save a backup of your website to store it locally. The FileZilla FTPS client will ensure secure data transfer, so you do not have to worry about your data’s safety:


Final thoughts on SFTP vs. FTPS and configuring FileZilla for FTPS use with your Nexcess web hosting account
SFTP vs. FTPS — FTPS is a superb alternative to SFTP for securely transferring data from your computer and a remote system. By using transport-layer security, FTPS ensures encryption, data integrity, and endpoint authentication.
One of the tangible benefits FTPS provides over SFTP is the ability to create multiple FTPS users. This functionality allows you to have greater control over what a particular FTPS user can access.
Discover our data center locations
Websites hosted in close proximity to their target audience perform better. All of our data centers include PCI compliance, advanced security, and 24/7 support.
Nexcess makes it easy to transfer your data using SFTP or FTPS securely. All you need to do is retrieve your login information from the Credential page in your Nexcess Client Portal and set up FileZilla.
When it comes to web hosting, you shouldn’t settle for anything less than the best. At Nexcess, we offer secure, scalable, and flexible enterprise WordPress hosting plans to set your business website apart from the competition.


