

When we hear the word “cache,” one of the first things that comes to our mind is speed. Caches play a vital role in improving a WordPress website's performance and give visitors a seamless experience while surfing various website pages.
But is there anything you can do beyond enabling a cache on the website? What are the different areas of your WordPress website where you can employ caching? How can you take advantage of our managed platform features to their fullest?
The information in this article will provide insights into the above questions and caching in WordPress, in general. The sections below will shed light on advanced caching options for WordPress — and how to leverage the robust caching-related functionality of the W3 Total Cache plugin and its many features.
Overview of the W3 Total Cache plugin
WordPress repositories have many cache plugins available, but the W3 Total Cache plugin is, perhaps, the most robust in terms of functionality. With over one million active installations, what makes this plugin special is the granularity offered by this plugin over the cache control for its users and developers.
In this article, we mainly focus on using the cache features offered by the W3 Total Cache plugin using the Redis cache service that Nexcess offers with every Managed WordPress or Managed WooCommerce plan and the optimal minification settings.
Why is there so much hype around caching?
The default behavior of a WordPress application is that it generates dynamic pages using a PHP compiler when a user makes a request. Therefore, when multiple requests stack up, it will reciprocally shoot up the load time on your server. This condition can negatively impact your website’s performance, decrease its user-friendliness, and sabotage its SEO.
And this is where a caching plugin plays an integral part. The caching plugin serves as a cached copy of the webpage, leaving PHP and the database unbothered. It also facilitates the process by providing an option to integrate a CDN:


How to install and set up the W3 Total Cache plugin on your WordPress website
The steps below will guide you through the setup process for the W3 Total Cache plugin for your WordPress website hosted with Nexcess.
1. Deactivating other caching plugins
To begin with, please ensure that you have deactivated any other plugins that provide similar functionality (caching) to avoid plugin conflicts and issues that may arise from similar plugins.
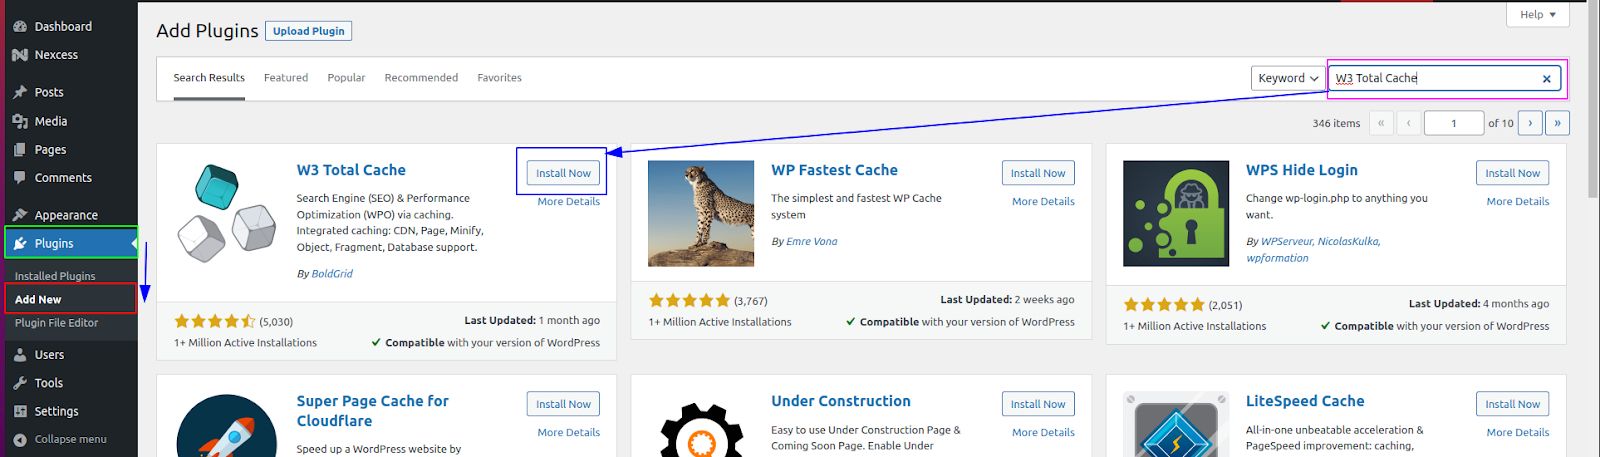
2. Installing and activating the W3 Total Cache plugin
After that, log in to your WordPress Admin Dashboard, go to Plugins > Add New, and search for W3 Total Cache.
Click the Install Now button, followed by the button labelled Activate:

After installing and activating the plugin, you can access it from Plugins > Installed Plugins > W3 Total Cache.
3. Configuring the W3 Total Cache plugin
In addition to that, W3 Total Cache will add a new menu item called Performance to your WordPress admin sidebar. Tap on it and click the Next button to start configuring the plugin:

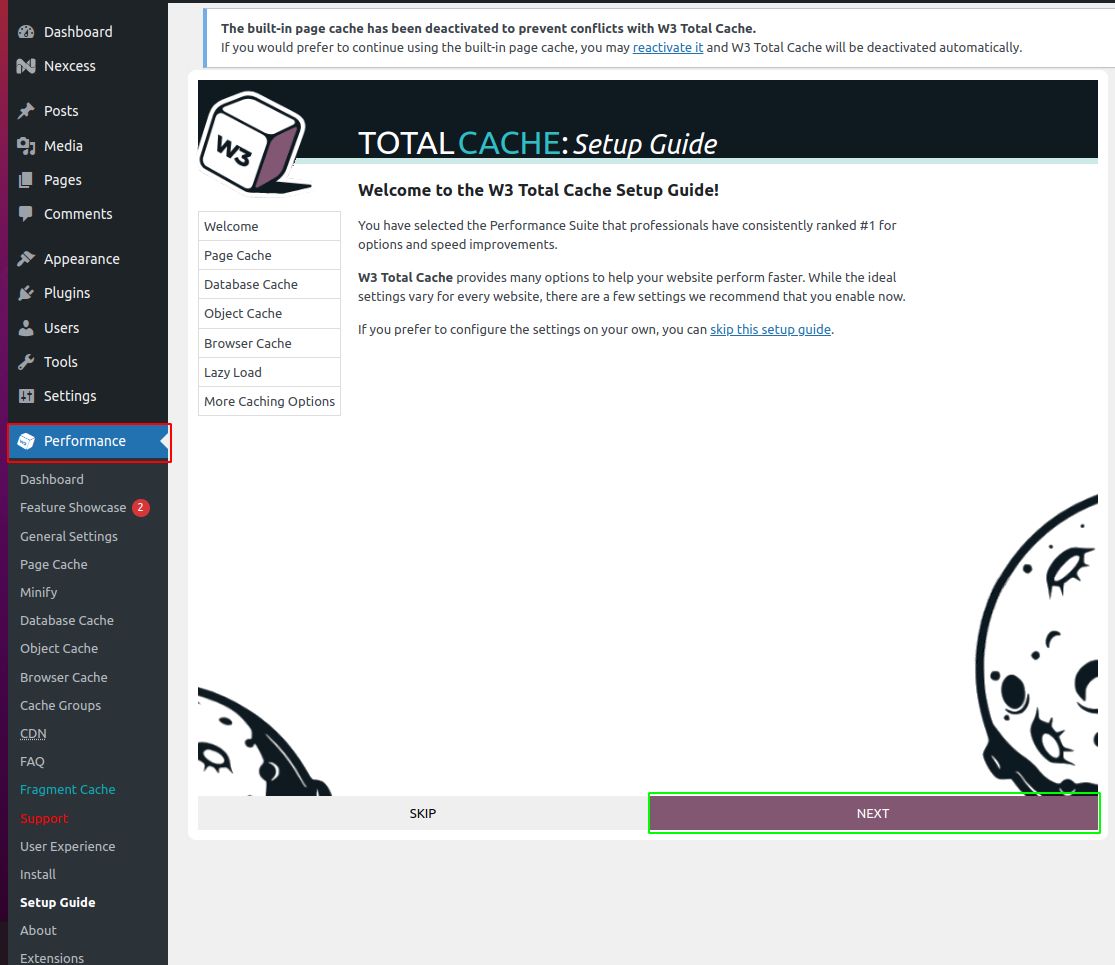
The wizard will take you to its first page, where you’ll be asked to enable the page cache. Click the Test Page Cache button to continue:

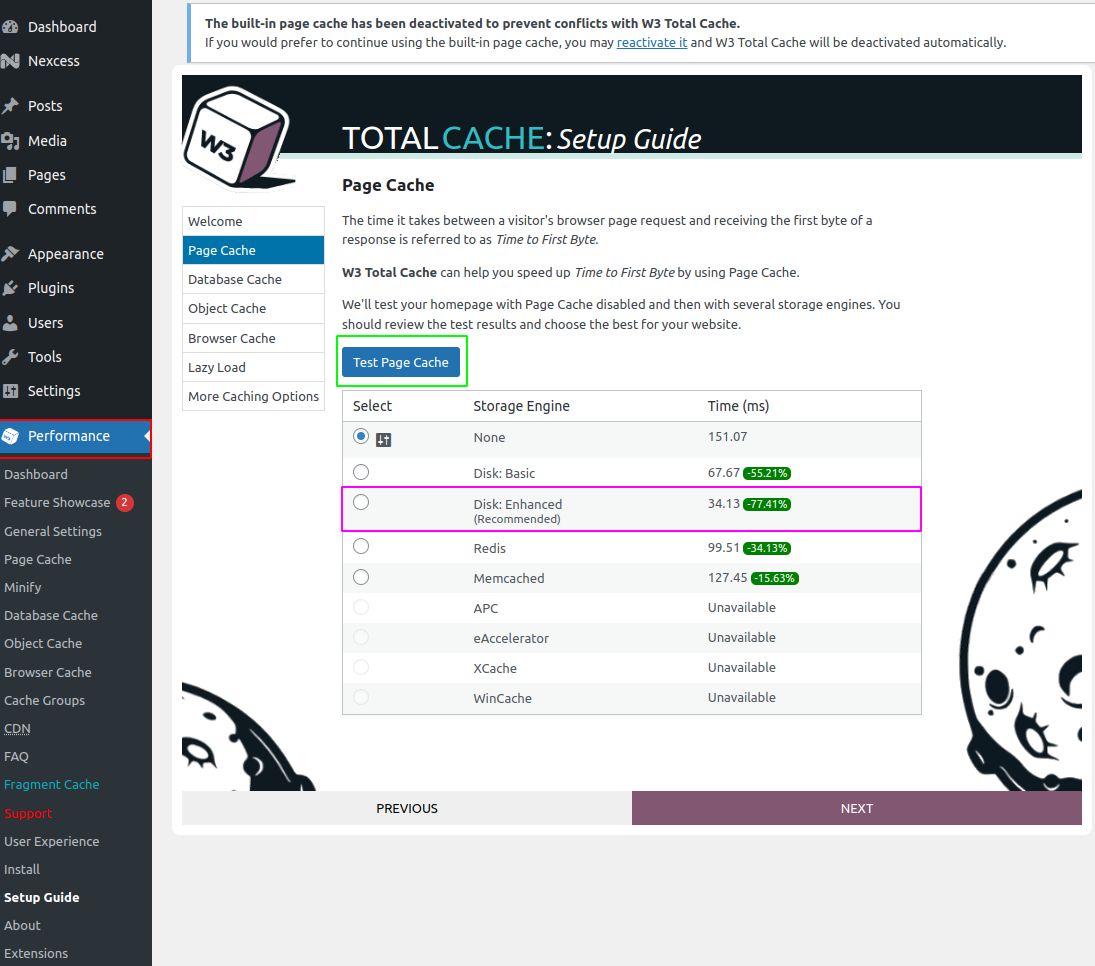
4. Selecting the best storage engine to use
It will show you various storage engine options. You need to choose the one that consumes the lowest time in milliseconds (ms). Usually, the Disk: Enhanced option will be the best among all available options. Once you’ve selected the appropriate option, click Next to continue.
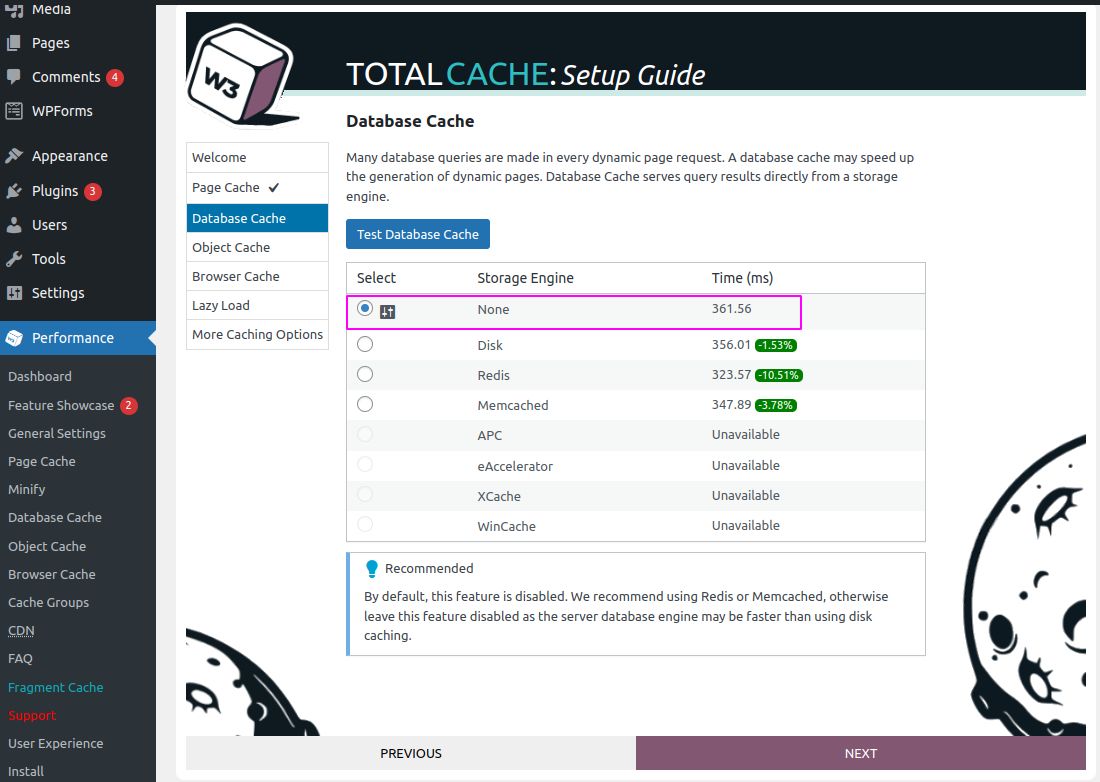
5. Understanding the Database Cache option and its high CPU usage
On the next page, you’ll be presented with a screen to configure Database Cache. Although this feature does sound useful, our recommendation is to keep it to None since the database cache feature can result in high CPU usage.
Additionally, the amount of CPU required for this feature could easily outrun the amount of CPU that would be required to perform database querying in real time:

6. Understanding the various object caching options, layers, and configurations
After completing the Database Cache step, you can move forward by clicking the Next button, which will take you to the Object Cache setup page.
According to WordPress, an object cache stores the results of completed database queries. Although WordPress has a built-in object cache that will store data for a single page load, W3 Total Cache’s Object Cache feature adds a custom caching script to your wp-content directory.
This additional feature alters the functionality of WordPress’s object cache by making it store data persistently, thus achieving persistent data across multiple page loads, improving performance.
All Nexcess Managed WordPress and WooCommerce websites come with a Redis container. Redis is an additional layer of high-performance cache that is commonly used with databases:

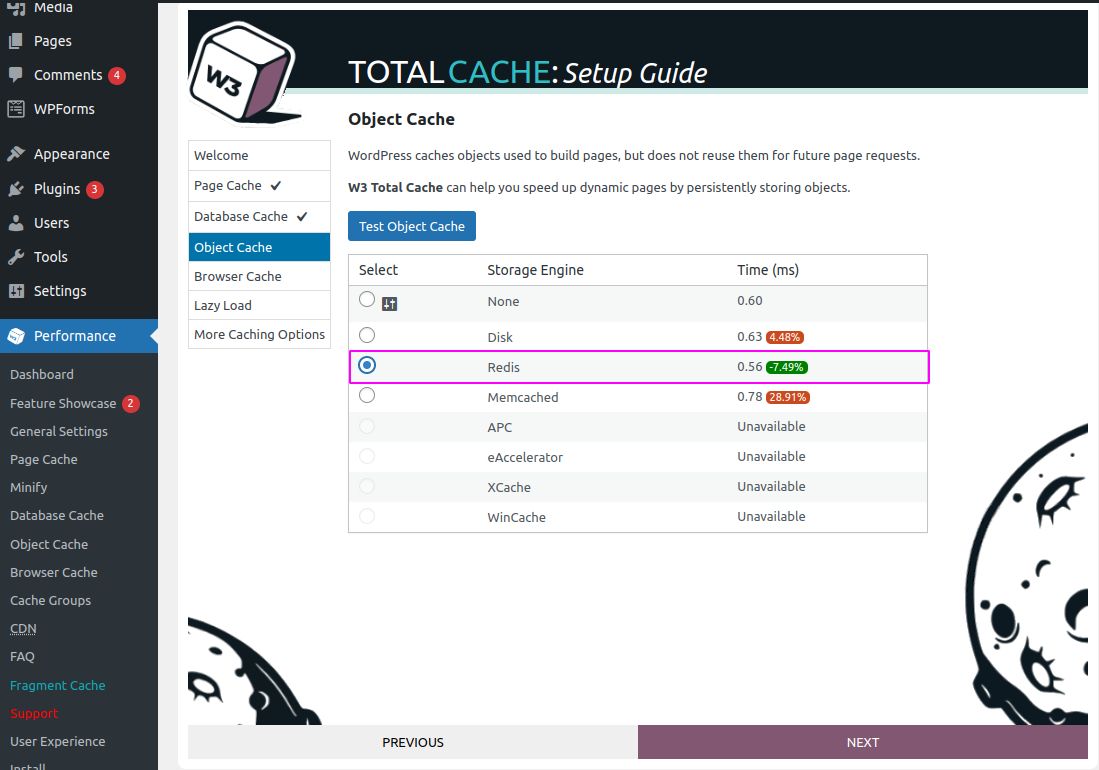
Redis stores cache in RAM — hence WordPress can access the cached files much faster than it would have been able to access those same files using the default object cache setup.
7. Understanding the Browser Cache option and its performance gains
The next page is the Browser Cache. As you are already aware, reusing an image, Cascading Style Sheets (CSS) file, JavaScript (JS) file, or a font file locally cached on the visitor's browser is much faster than any other type of cache.
By eliminating the need to download the requested asset, the Browser Cache saves time and improves performance.
Essentially, the Browser Cache tells the browsers how long a file can be cached before re-downloading it. A common value to use is a cache expiration period of one year for static files:

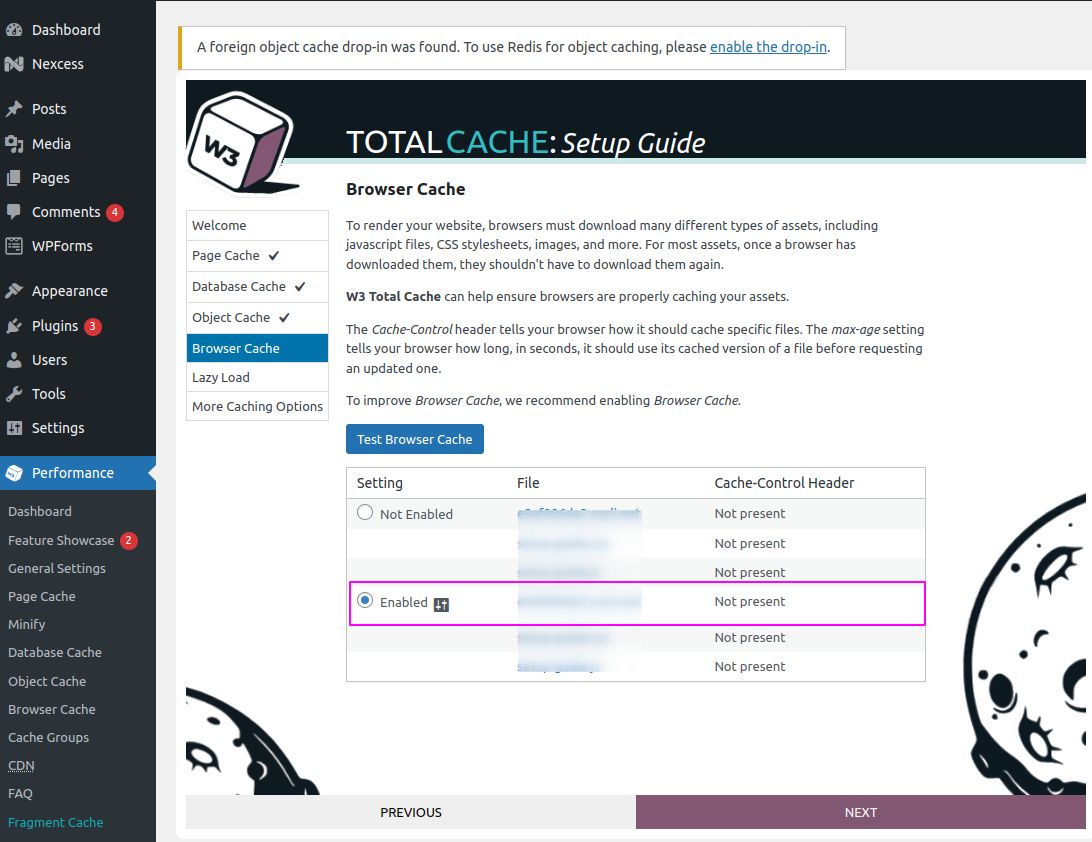
The W3 Total Cache plugin makes enabling the Browser Cache easy with the click of a button.
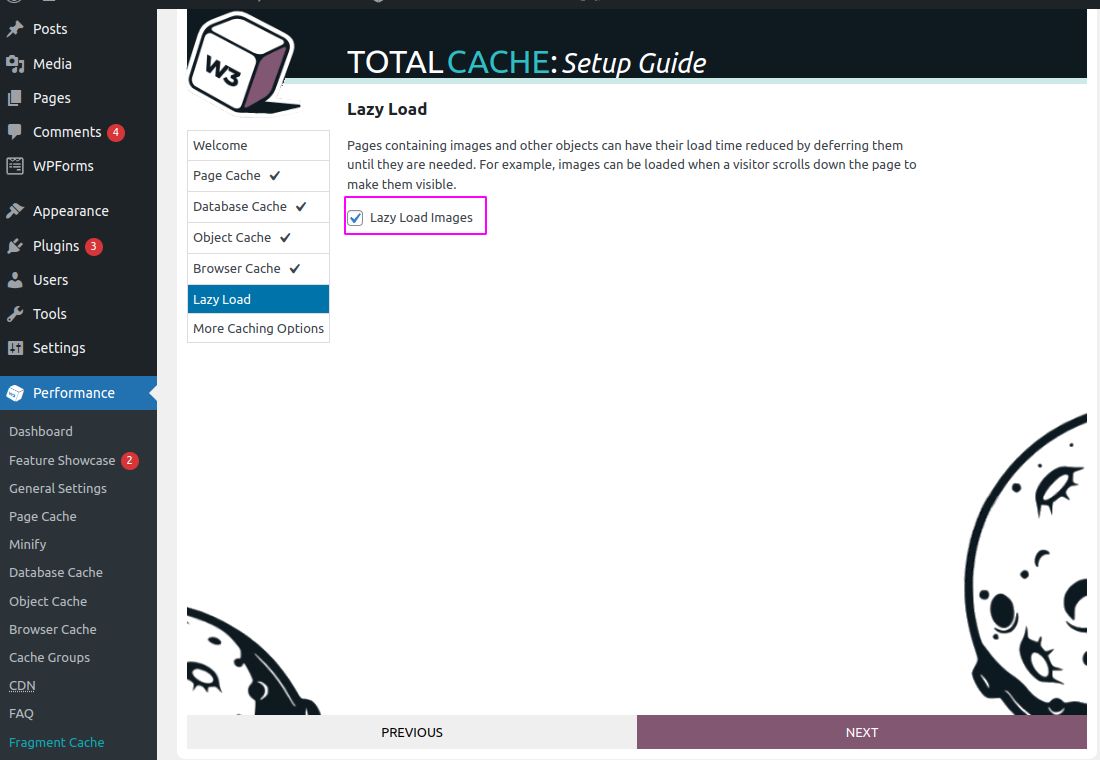
8. Understanding the Lazy Load feature for images and its performance gains
Toward the end of the setup, the wizard will ask you to enable the Lazy Load feature specifically for images:

9. Reviewing your configured W3 Total Cache plugin settings
Now click the Next button for the last time, and you’ll be shown to a window where you can review the different values that you’ve set for other caches:

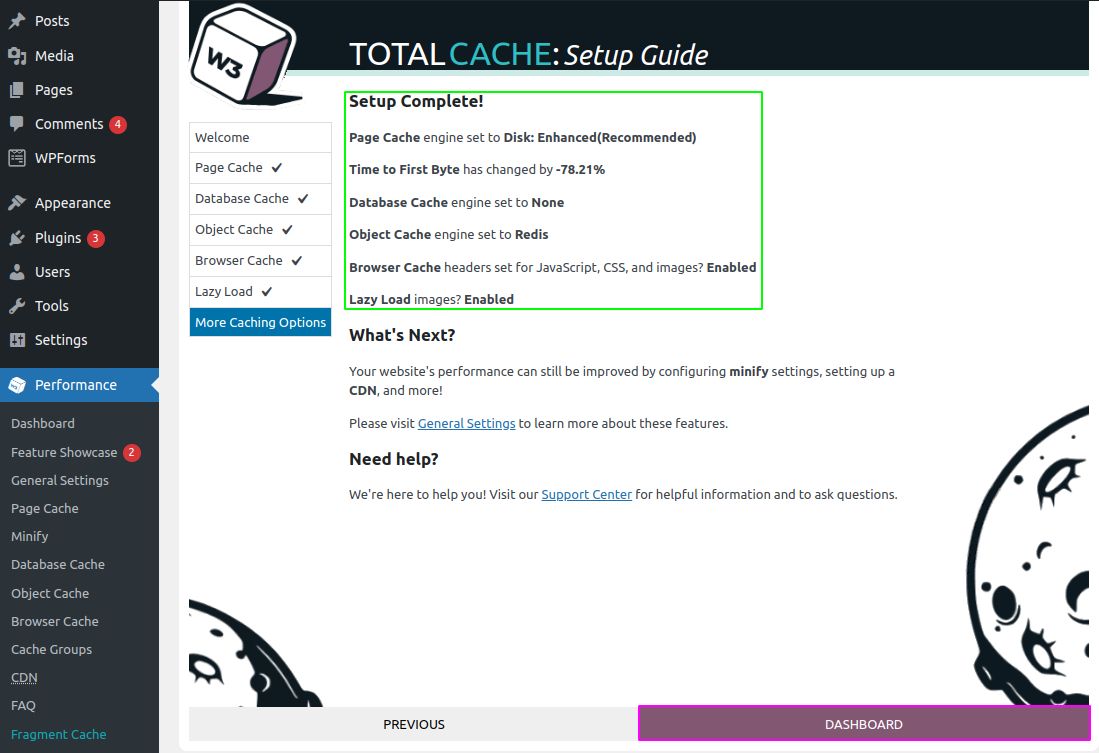
To complete the setup, click the Dashboard menu option, and you’ll be taken to the W3 Total Cache Dashboard.
How to leverage the more advanced caching options offered with the W3 Total Cache plugin
Now that we have configured the basic W3 Total Cache settings, many advanced options can accelerate your website's performance by enabling and configuring them. Let’s dig into some of the most important ones in the next sections.
1. Minification options for performance
Minifying is the process of reducing the overall size of your website’s source code by removing white spaces, lines, and unnecessary characters.
In most cases, enabling the Minify feature and opting for the auto option under the Minify Mode will be sufficient. However, if you observe any discrepancies in how your website looks after enabling this feature, leave it disabled as minification can sometimes break your website’s appearance:

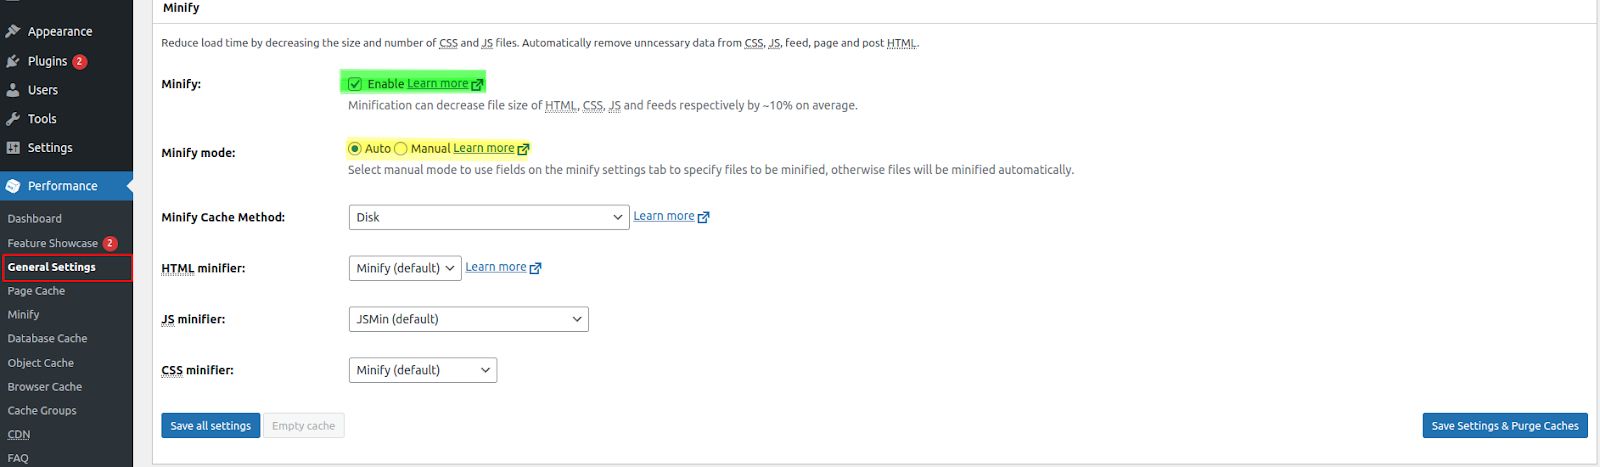
After enabling Minify from Performance > General Settings, head over to Performance > Minify to configure the advanced features offered by W3 Total Cache Minification.
Under General, you’ll find two options:
- Rewrite URL structure: Enabling this option would affect the structure of the minified assets. We recommend keeping it on so that your URLs look neat.
- Disable minify for logged-in users: Keep this option disabled, as it would only help you if you’re doing some troubleshooting.
Next, under the HTML & XML section, you can find the following options:
- Inline Cascading Style Sheets (CSS) minification: Enabling this option will remove the whitespaces in inline CSS. Our recommendation is to keep this option enabled.
- Inline JavaScript (JS) minification: We recommend only using this feature if the website shows no signs of malfunction, as JS minification can sometimes result in code errors.
- Don’t minify feeds: Keep this option disabled since minifying feeds isn’t necessary.
- Line break removal: The default W3 Total Cache settings for this option is disabled, and we recommend keeping it that way.
JavaScript (JS) minification underneath the HTML & XML is to be followed next.
- Minify method: This option allows you to choose between Combine Only, where JS files will be combined, and Minify Only, which will combine and minify the JS files.
By default, this option would be enabled, and if you see any oddity after enabling this option, we recommend using Combine Only mode. - Minify engine settings: This option lets control how the minified JavaScripts are embedded. It allows you to switch between four options: Default-Blocking, Nonblocking using JS, Nonblocking using Async, and Nonblocking using Defer.
Although nonblocking loading methods typically yield better results, they are known to break the website code because they are incompatible with all JavaScripts. Hence, our recommendation is to use the Default-Blocking method. - HTTP/2 Push: All Nexcess Managed WordPress servers support HTTP/2 protocol. So, enabling this option helps to reduce the page load time.
The HTTP/2 Push option sends files to visitors before they request them. However, we suggest conducting test runs using a staging website before deploying the changes to your live environment.
Under the Cascading Style Sheets (CSS) section, you can set up minification configuration for CSS files.
- Minify method: CSS files don’t usually have minification-related issues so you can switch between Minify & Combine, Minify Only.
- Minify engine settings: This option allows you to enable Preserved Comment Removal, which we recommend since it can help reduce the overall file size as much as possible by removing comments from your CSS files.
We also recommend enabling Line Break Removal, a helpful feature to reduce the file size by removing line breaks from CSS files. In addition, we suggest enabling this option while keeping an eye on the front end of your website.
Next up, the Advanced section contains some additional settings that can be used to customize the minification.
- Update external files every: This option allows you to set up an interval between CSS and JS file updates.
By default, the W3 Total Cache plugin downloads and minifies the assets every 24 hours. However, feel free to input a longer time period if your website doesn’t change too often. - Garbage collection interval: Using this option, you can set up how frequently the expired cache should be removed. By default, it will be 24 hours.
Coming up in the next section is the W3 Total Cache plugin's object caching configuration. So, let’s head over there and see what changes we must make.
2. Setting up object caching with Redis
As you may already know, all Nexcess Managed WordPress/WooCommerce sites come with Redis by default.
You can configure the W3 Total Cache plugin Object Cache to use Redis to save the data into it. To begin with, you need to gather the Redis containers IP and port from the Nexcess Client Portal.
After logging into the Nexcess Client Portal, click the name of the plan where the website resides:


Then, click the website name for which you would like to find the Redis IP and port:

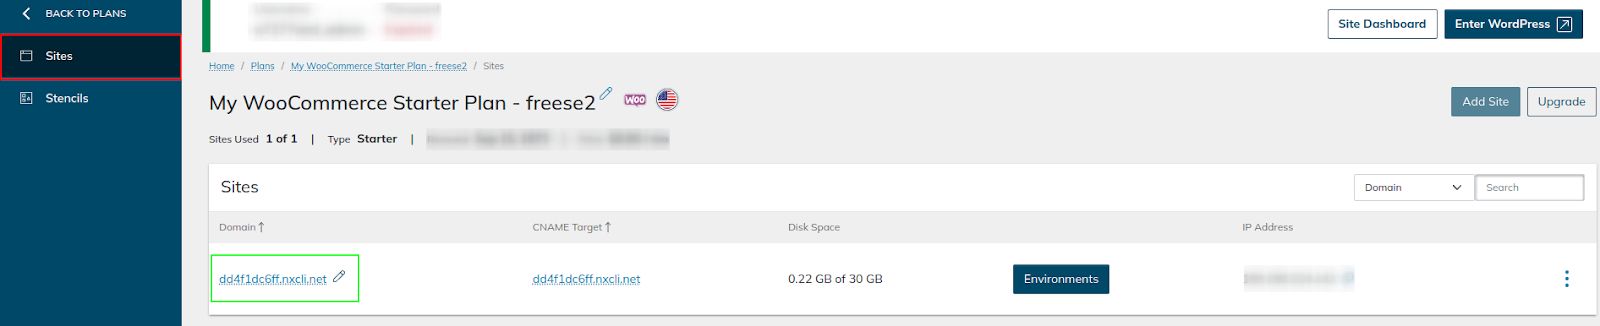
Inside the Credentials menu, you can find Redis-related information:

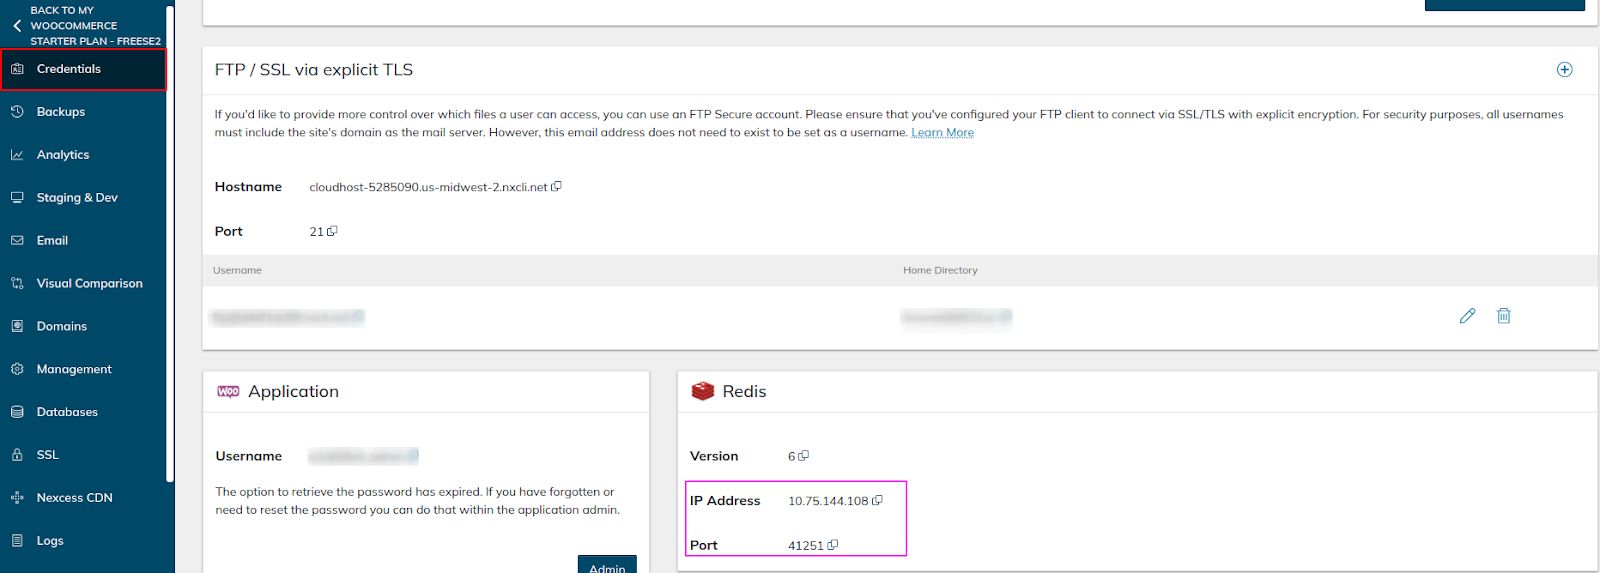
Once you find the Redis IP address and port, go back to the Object Cache menu of the W3 Total Cache plugin and fill the fields highlighted in the below screenshot:

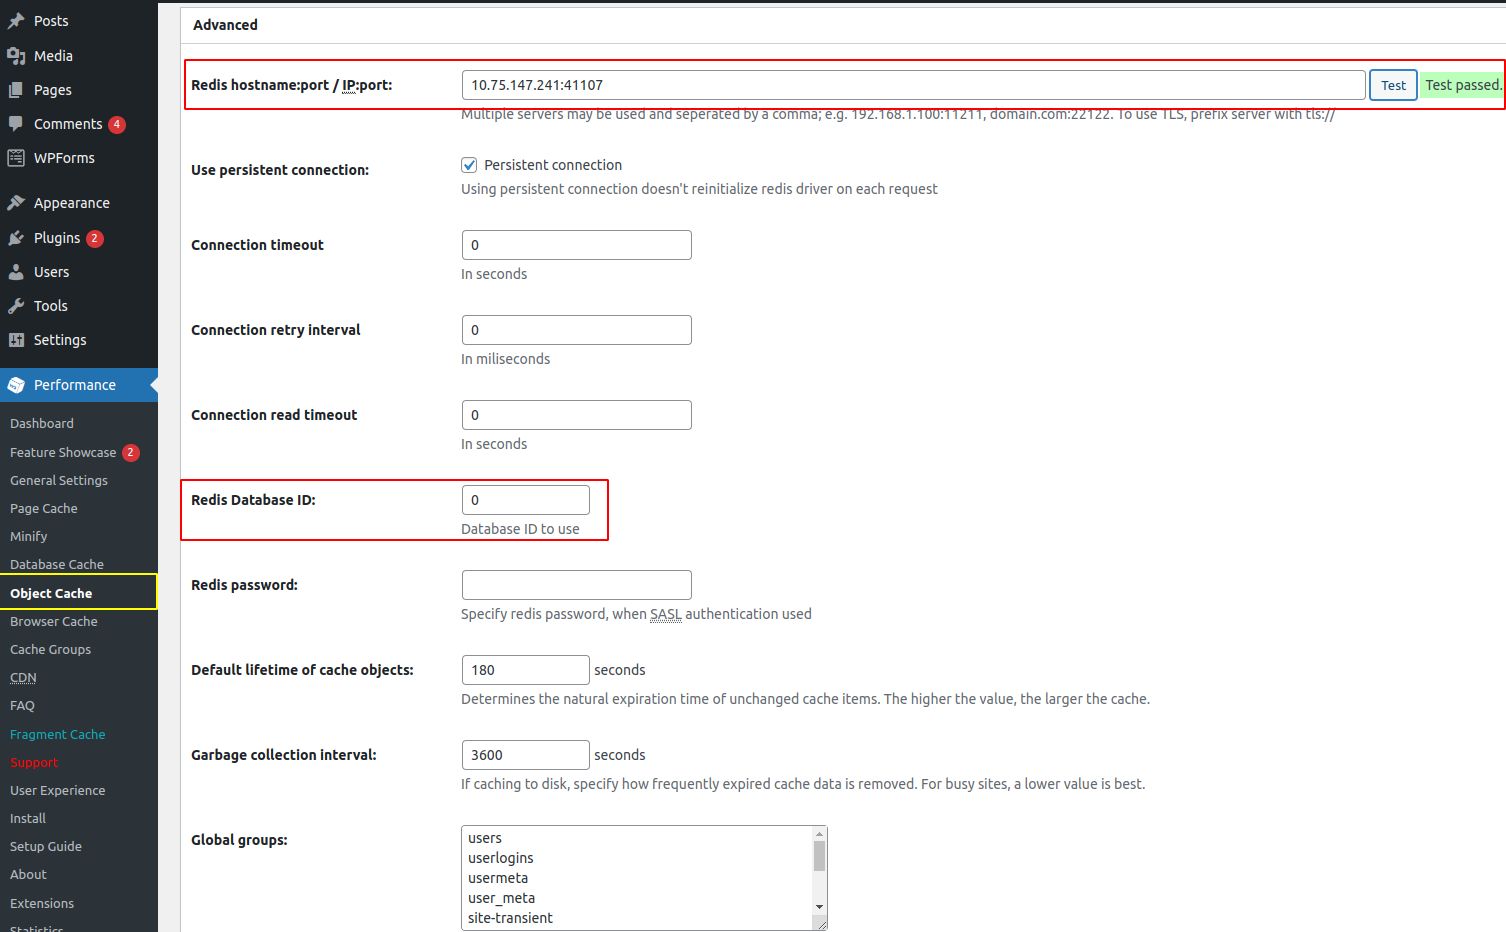
After adding the IP address and port, check the connectivity using the Test button, and if everything is working, it will show you the “test passed” message. You can leave the rest of the settings unchanged since the default values are sufficient.
Page caching would be our next important topic in this list. So let’s take a look at it.
3. Page caching options
Page caching is the process of building a cache of your dynamic webpages and reusing them when the same page is requested again. Sounds awesome, right?
When a page is served from the cache completely, it will bypass all the correlated processes that go into making a page load.
- Cache front page: We recommend enabling this option since it is very commonly viewed page for most WordPress sites that is the gateway to your website. Hence, it will be accessed every often.
- Cache feeds: You may enable/disable this at your discretion since RSS feeds aren’t that popular nowadays.
- Cache SSL (HTTPS requests): Nexcess servers don’t enforce HTTPS by default unless you add relevant logic into the .htaccess file or seek assistance from our support team to enforce HTTPS for your site.
- Cache URIs with query string variables: We don’t recommend enabling this option. Query string variables are usually used to pull unique data from your website, and this feature contradicts the actual purpose of query string variables.
- Cache 404 (not found) pages: This one is another option in this category that you can leave disabled.
- Don’t cache pages for logged-in users: This is a critical option, and we recommend not disabling it.
- Don’t cache pages for certain user roles: This option is ineffective if the Don't Cache Page for Logged-In Users feature is already enabled.
5. Aliases
This option mainly focuses on caching identical content that can be accessed using different domains.
6. Cache preloading feature
If enabled, the W3 Total Cache plugin will crawl through your sitemap and preload the page cache by sending requests to your pages.
Ideally, this is a fantastic feature, but in reality, using this feature can penalize your server resources — offsetting the potential performance benefits.
7. Purge policy settings
This feature of the W3 Total Cache plugin allows you to specify pages or feeds you want to purge when posts are created, edited, or posted.
We recommend sticking to the default options for this feature, but you’re free to add additional pages or feeds as you see fit. In addition, there is a wide variety of customization options that can be tweaked.
8. Representational State Transfer (REST) — REST API
The best use case scenario is to keep this option disabled unless you have a specific reason to enable it.
9. Other advanced options with granularity
In this section, you can strengthen your website's security by adding Rejected User Agents, Rejected Cookies, Accepted Query Strings, and pages that should never be cached, etc.
This option also gives you granular control over page cache so that you can configure the W3 Total Cache plugin to not cache a page if a specific tag is attached to it or pages that use a custom field and pages from a particular author.
10. Browser caching and related settings
Our next topic is the browser caching feature. By default, the options underneath “General, CSS & JS, HTML & XML, Media & Other Files'' should be configured to achieve the optimal output from your WordPress website.
But we are mainly focusing on the Security Headers in this section:
- Use cookies to store session IDs: This feature help prevent attacks caused by passing session IDs in URLs. Since anyone that passes a valid session ID can inherit the session, this option would deny such attempts.
- Access session cookies through the HTTP only: This extends the above feature. Enabling this will instruct the user’s browser not to make session cookies accessible to client-side scripting and thus, an attacker can never pretend to be an owner of the session using JavaScript.
- Send session cookies only to secure connections: Another must-use feature that only allows transmission of session cookies in an encrypted format.
- HTTP Strict Transport Security policy: HSTS or HTTP Strict Transport Security is a tool that protects websites against man-in-the-middle attacks like a protocol downgrade attack or cookie hijacking.
When this feature is enabled, the server will communicate the HSTS policy to the user-agent via an HTTP response header Strict-Transport-Security.
Once the connection is established, the user-agent is not allowed to communicate with the server over an unsecured protocol (for example, HTTP). The Directive option allows you to switch between the directives that can be applied to the response header. - X-Frame-Options: Using the X-Frame-Options HTTP header response, you can instruct the browser whether or not it is allowed to render a page in a <frame>, <iframe>, <embed>, or <object>.
This feature is pretty helpful in that it can be used to avoid click-jacking attacks by ensuring that your content is not embedded into other sites.
This option also allows you to configure three different directives: Same-Origin, Deny, and Allow-From.
We are down to the last important feature, which related to subject of Content Delivery Networks (CDNs).
11. Content Delivery Networks (CDNs)
CDNs or Content Delivery Networks help reduce the load on the hosting server and improve page load time by serving static assets like CSS, JS, and Images from a global network of content delivery systems.
You’ll be thrilled to learn that all Nexcess Managed WordPress and Managed WooCommerce websites come with CDN as a default service. You can refer to our article on How to configure the Nexcess CDN with WordPress and W3 Total Cache to get this done using the W3 Total Cache plugin.
This plugin's features are not only limited to the ones discussed here. There are many other options, such as the W3 Total Cache Extension's support for Cloudflare, support for Accelerated Mobile Pages (AMP), and support for integrating New Relic.
Summary
As you have already witnessed, the W3 Total Cache plugin is loaded with features and options like page caching, minifications of assets, CDN integration, and many more. This plugin is an all-under-one-roof solution for all your website performance needs. We hope this article helped you install the plugin and fine-tune the necessary settings.
More about the Nexcess hosting difference
We’ve optimized hosting for the industry’s leading commerce and content platforms. That means speed, security, scalability and support are built-in. Backed by free migrations and 30-day money-back guarantee, let us show you why we’re the best.
You can find more information about this and other WordPress plugins in our WordPress Knowledge Base.
Related articles
- What is W3 Total Cache?
- Your guide to the W3 Total Cache plugin settings and setup
- How to configure the Nexcess CDN with WordPress and W3 Total Cache


