

When it comes to the setup of a WordPress Multisite, the ability to administer many websites from a single dashboard can be a game changer. However, there may come a moment when you need to change the primary domain of your WordPress Multisite's setup in the WordPress database.
This post will discuss the steps necessary to make this transition smoothly. But, before we get there, let's go over the fundamentals of how WordPress Multisite domains are configured.
About the setup of a WordPress Multisite network
Before we change the primary domain, it's essential that we understand the concept of a WordPress Multisite and the associated domains. You can administer several websites with different domain names under a single installation in a WordPress Multisite network. Because of this centralized control, it is a popular option for businesses and bloggers wishing to streamline their online presence.
The key benefit of the setup for a WordPress Multisite is its ability to combine multiple websites into one, simplifying website management and saving time. You can run multiple websites from the same WordPress installation, such as blog.domain.com, shop.domain.com, and so on. This is the essence of WordPress Multisite — a flexible, effective solution for managing multiple websites under one roof.
WordPress multisite setup and the change domain procedures to follow for the primary domain
Now, let's get down to the specific business of changing the primary domain of your WordPress Multisite. To guarantee a flawless transition, a series of procedures must be followed. The following sections outline the steps you should take.
Step #1. Create a backup of your website
Making a backup is a crucial step that should not be skipped. It ensures you have a safety net in case anything goes wrong during the domain change process. You can create a manual backup of your site from within the Nexcess Client Portal.
Step #2. Update DNS records
You'll need to update your DNS records to change the primary domain. This step involves pointing your new domain to the same WordPress installation. Be sure to configure the necessary A and CNAME records with your domain registrar. It might take some time for the DNS changes to propagate, so be patient.
Step #3. Change domain name
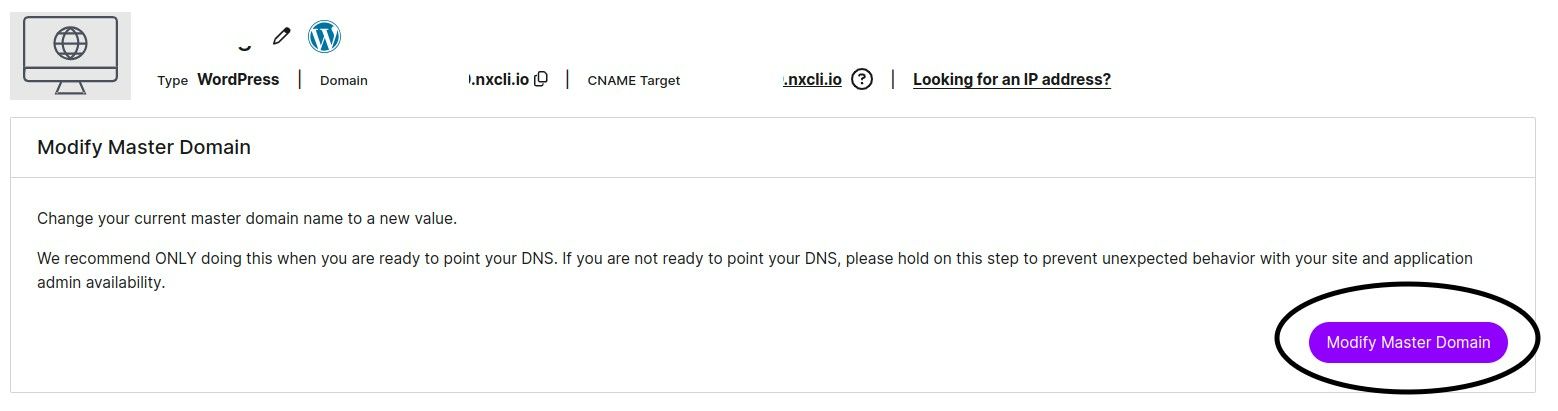
After pointing the domain to Nexcess, you can add the domain to your website via the portal under the Domains tab in the Modify Master Domain area, as seen in the screenshot below:

Step #4. Change the domain name in the wp-config.php file
Before proceeding with any changes in the wp-config.php file, it's crucial to emphasize here that you should have a full backup of your website from step one. If you haven't already, make a complete backup of your website to ensure that you can restore it in case anything goes wrong during the domain change process.
You'll need to access your site's files via SSH or FTP to change the primary domain of your WordPress Multisite's setup. Locate your wp-config.php file once you've gotten access. This file provides critical WordPress installation setup settings.
Having a backup and making a copy of the wp-config.php file ensures that you have a safety net in case any issues arise during the domain change, allowing you to restore your website to its previous state.
Edit the wp-config.php file and locate the section related to your WordPress Multisite setup. It should look something like this:
define( 'MULTISITE', true );
define( 'SUBDOMAIN_INSTALL', false );
define('DOMAIN_CURRENT_SITE', 'wp.nexcess.com');
define( 'PATH_CURRENT_SITE', '/' );
define( 'SITE_ID_CURRENT_SITE', 1 );
define( 'BLOG_ID_CURRENT_SITE', 1 );
To change the primary domain, update the DOMAIN_CURRENT_SITE value from wp.nexcess.com to the new (primary) domain you wish to use. It should look like this:
define( 'DOMAIN_CURRENT_SITE', 'newdomain.com' );Save the changes to the wp-config.php file.
Step #5. Update the URL in the database
You'll need to update the URL in your database to ensure a complete transition to the new primary domain while setting up your WordPress Multisite. This is a crucial step to maintain the integrity of your network and ensure that all links and resources point to the new domain. Here's how to do it. You can either use Method #5a or Method #5b documented below.
Method #5a. Access the phpMyAdmin utility to get started with the URL replacement
You can access phpMyAdmin through your Nexcess Control Panel. Navigate to the Database tab and look for the phpMyAdmin option.
Back up your database for beginning this effort. Before making any changes in the database, it's advisable to create a backup. Doing so adds an extra important layer of security in case anything goes wrong during the process.
Once the database backup has been created, you will want to edit the following database tables as listed below:
- wp_options: Inside the wp_options table, find and update the siteurl and home rows to reflect the new domain. These rows are usually located on the first page of wp_options. Update them to your new primary domain, for example, newprimarydomain.com.
- wp_blogs: In the wp_blogs table, you'll need to update the domain field to match your new primary domain in all relevant rows.
- wp_site: In the wp_site table, update the domain field to match your new primary domain.
- wp_sitemeta: Similarly, in the wp_sitemeta table, find the rows related to the siteurl and home, and update them to your new primary domain.
- wp_#_options: If you have multiple subsites within your WordPress Multisite network, make sure to replace # with the corresponding site ID in the wp_#_options table. Then, update the siteurl and home rows for each subsite.
Then save changes — after updating the URL in these tables, you must save the changes, which is a step that cannot be overlooked.
Method #5b. Use the WP-CLI utility for a search and replace URL task
Alternatively, you can use the WordPress Command Line Interface (WP-CLI) to perform a search and replace in the WordPress database. WP-CLI is a command line tool that saves you time and effort in the process.
To preview the changes before making them, use the --dry-run option. This will show you what the replacement would look like without applying it. Search and replace the old domain with the new one across all database tables using the following command:
wp search-replace 'https://wp.nexcess.com' 'https://newdomain.com' --all-tables --dry-run Replace https://wp.nexcess.com with your old primary domain and https://newdomain.com with the new primary domain. The --all-tables flag ensures that all database tables are included in the search and replace process.
After executing the command with --dry-run, review the output to ensure that the replacements are as expected. This step allows you to verify the changes before they are actually applied. Once you are satisfied with the dry run results, you can proceed to make the changes across all database tables. Use the following command:
wp search-replace 'https://wp.nexcess.com' 'https://newdomain.com' --all-tablesThis command will perform the actual search and replace across all tables, updating URLs from the old domain to the new one.
By using WP-CLI with the --all-tables flag and the --dry-run option, you can ensure that all instances of the old domain are updated across your entire WordPress Multisite setup and network while having the opportunity to review the changes before they take effect.
Updating the URL in the database is essential to ensure that your WordPress Multisite setup functions seamlessly under the new primary domain. By following these steps, you will effectively redirect all internal links and resources to the new domain, providing a consistent and user-friendly experience for your visitors.
Once these changes have been made and your DNS settings have propagated, the setup of the WordPress Multisite network should be fully operational under the new primary domain. This outcome marks the successful completion of the primary domain change process.
With the proper steps, you can confidently manage the setup of your WordPress Multisite and make necessary adjustments to adapt to your evolving needs. Your websites will continue to function optimally, and your online presence will remain strong.
Conclusion
In conclusion, changing the primary domain of your WordPress Multisite network is a process that requires careful planning and execution. The guidance provided in this article will help you ensure a smooth transition without impacting your website's functionality.
Stop worrying about your WordPress web servers
- Enterprise WordPress hosting with unrivaled expertise.
- Let us create a custom WordPress hosting solution for your enterprise.
- Curb costs and save time with Nexcess fully managed WordPress enterprise solutions.
- Nexcess supplies full IT management and maintenance.
If you're considering setting up a WordPress Multisite, don't hesitate to explore our Nexcess hosting options. We offer top-notch hosting services to make your WordPress Multisite setup a hassle-free experience.


