


How to use our website to purchase a non-cloud, shared hosting plan for Magento or WordPress.
But first...
- Before purchasing any plan, we recommend contacting our sales team between 9 a.m.–5 p.m., Monday to Friday . They will work with you to pinpoint your needs, weigh options, and help you identify your ideal plan.
- If you wish instead to purchase a Nexcess Cloud plan, see How to create Nexcess Cloud accounts.
Magento
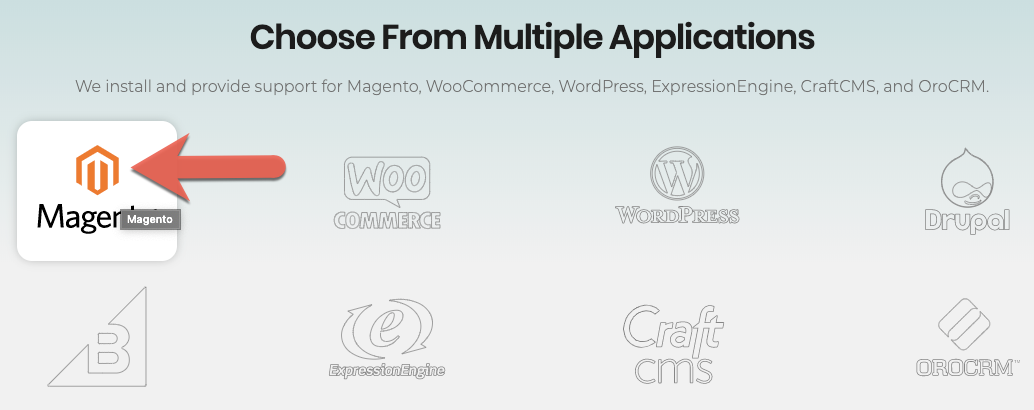
- Navigate to our website. On the home page, in the Choose From Multiple Applications section, select Magento.
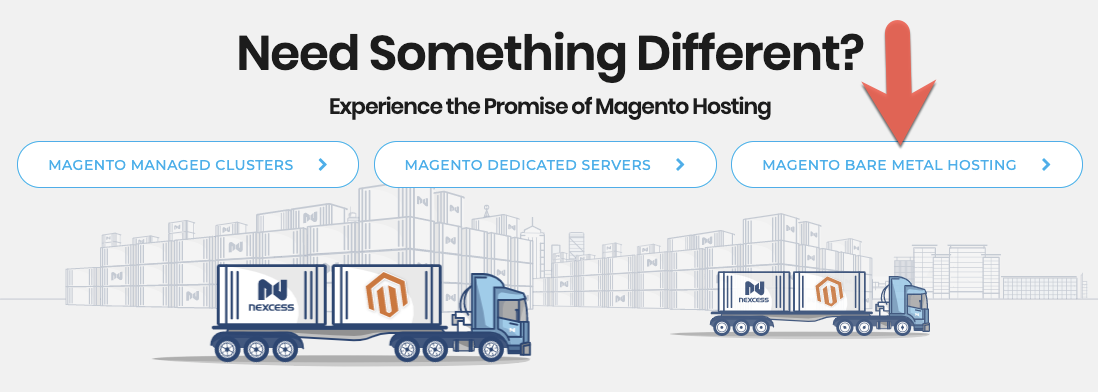
- Scroll down until you locate the Need Something Different? section, then click Magento Bare Metal Hosting.
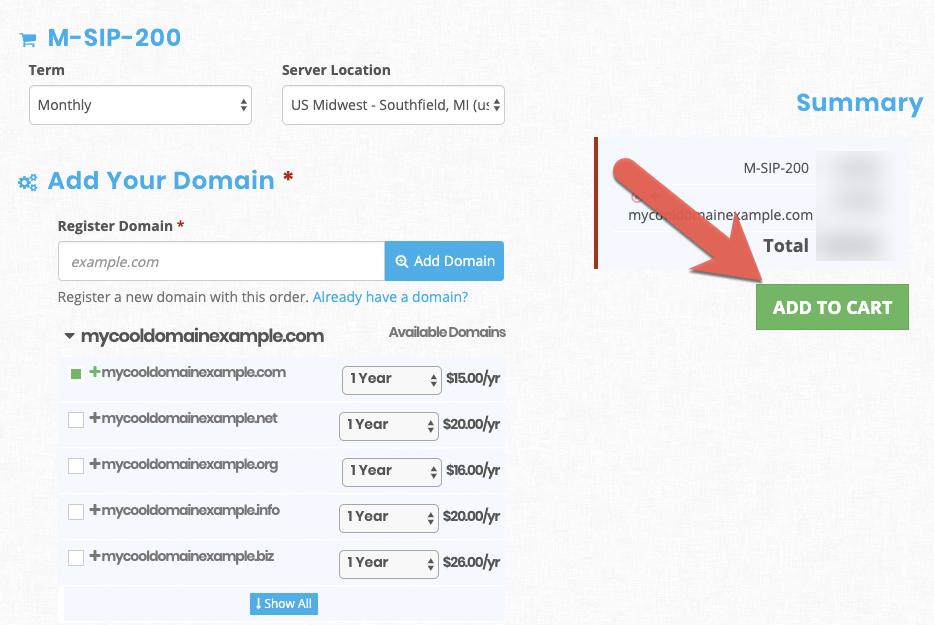
- Scroll down to the service plans. Choose SIP 100, SIP 200, or SIP 300 as desired, then click Sign Up. If you are uncertain which plan is best for you, contact our sales team.

Though the price will vary, the purchase options for the SIP-100, 200, and 300 are identical. As always, if you are unsure of the best option, contact our sales team.
- If you chose a SIP 100, 200, or 300:

- Term: Choose the term of your hosting agreement. Select Monthly, Quarterly, Annually, or Semi-Annually.
- Server Location: Select your preferred location of your physical server.
- In the Add Your Domain section, choose one:
- If you are registering a new domain, click Register New. Enter your domain name in the Register Domain field, then click Add Domain. If that domain name is available, select your desired option and registration term.

- If you plan to migrate your existing domain to this new server, click Add Existing and enter your domain name.
- If you are registering a new domain, click Register New. Enter your domain name in the Register Domain field, then click Add Domain. If that domain name is available, select your desired option and registration term.
- Select your Magento version.
- If you chose a SIP MR (Reseller) plan:
- Term: Choose the term of your hosting agreement. Select Monthly, Quarterly, Annually, or Semi-Annually.
- Server Location: Select your preferred location of your physical server.
- In the Configuration section, in the Order Notes field, enter any other information that may be of use when we process your order.
- If you chose a SIP 100, 200, or 300:
- Click Add to Cart.
- Confirm your selections, then click Checkout when ready.

- If you have not already done so, the site will prompt you to log in using your Client Portal credentials. If you are a current client, enter them and click Login. If you are a new client, click Sign Up.

- Verify your total and selections are correct, then click Place Order.

- The system will prompt you to make payment and send you a confirmation email. After you make payment, we will process your order and contact you with further instructions.
WordPress
- Navigate to our website. On the home page, in the Choose From Multiple Applications section, select WordPress.

- Scroll down until you locate the Need Something Different? section, then click WordPress Bare Metal Hosting.

- Choose one of WP-OBP 100, 200, or 300, as desired, and click Sign Up. If you are uncertain which plan is best for you, contact our sales team.

- Though the price will vary, the purchase options for all three plans are identical. As always, if you are unsure of the best option, contact our sales team.

- Term: Choose the term of your hosting agreement. Select Monthly, Quarterly, Annually, or Semi-Annually.
- Server Location: Select your preferred location of your physical server.
- In the Add Your Domain section, choose one:
- If you are registering a new domain, click Register New. Enter your domain name in the Register Domain field, then click Add Domain. If that domain name is available, select your desired option and registration term.
- If you plan to migrate your existing domain to this new server, click Add Existing and enter your domain name.
- If you are registering a new domain, click Register New. Enter your domain name in the Register Domain field, then click Add Domain. If that domain name is available, select your desired option and registration term.
- Click Add to Cart.

- Confirm your selections, then click Checkout when ready.

- If you have not already done so, the site will prompt you to log in using your Client Portal credentials. If you are a current client, enter them and click Login. If you are a new client, click Sign Up.
- Verify your total and selections are correct, then click Place Order.

- The system will prompt you to make payment and send you a confirmation email. After you make payment, we will process your order and contact you with further instructions.
For 24-hour assistance any day of the year, contact our support team by email or through your Client Portal.


