
Since WordPress added multisite support to its suite of features, people have been using it as an easy way to create and manage several websites from one account.
Domain mapping is one way you can extend the functionality of the WordPress Multisite feature to create unique websites with their own identity. In this guide, we’ll show you how to do just that.
Here’s what we’ll cover:
- What is WordPress domain mapping?
- WordPress Multisite domain mapping: Use cases
- Multisite domain mapping requirements
- How to set up domain mapping on a WordPress Multisite
- Final thoughts: WordPress Multisite domain mapping guide
What is WordPress domain mapping?
WordPress Multisite domain mapping is the process of connecting subsites in a WordPress Multisite network to top-level domain names. Network websites with domain-mapped URLs can have an identity separate from the other websites on the network.
Typically, when you create a multisite network with WordPress, one main site acts as the core of the network that you use to manage all the other websites. This main website has the primary domain for the network, like www.mainsite.com.
The subsites that make up the rest of the network will have domain names based on that of the main domain.
So, if your multisite network creates websites using subdomains, then the web address of any new sites will follow this layout: www.subsite1.mainsite.com, www.subsite2.mainsite.com, and so on.
If the network uses subdirectories to create new sites, the new site addresses will follow this layout: www.mainsite.com/subsite1, www.mainsite.com/subsite2, and so on.
With domain mapping, each of the subsites in the network can have a domain name that’s not tethered to the top-level domain of the core website. So, instead of www.subsite1.mainsite.com or www.mainsite.com/subsite1, you can have www.mainsite2.com.
WordPress Multisite domain mapping: Use cases
The primary advantage of domain mapping is the unique identity it gives to websites on a WordPress Multisite network. This functionality makes it perfect for a number of scenarios.
If you’re a business with several brands, you can create a multisite network with subsites for each brand. Domain mapping will allow each website to have a unique identity on the front end while you manage all of them from the same WordPress administrator dashboard.
A freelancer or agency can use domain mapping with a multisite network to manage multiple domains. Each client website will be a subsite with a distinct domain name.
Multinational organizations that require localized websites for each country they operate in can map country code top-level domains (ccTLDs) to the respective subsites.
Even a private WordPress user who enjoys building online communities for their different interests or hobbies can use domain mapping to manage their websites.
Multisite domain mapping requirements
WordPress Multisite domain mapping is a relatively straightforward process. You must meet two major requirements before getting started.
You must have:
- A multiple domain hosting plan: You need a hosting plan that includes this functionality to host multiple domains and websites. You can get the multi-domain hosting feature with a shared, managed, enterprise, or dedicated hosting plan since most hosts don’t restrict this feature to only one type of plan.

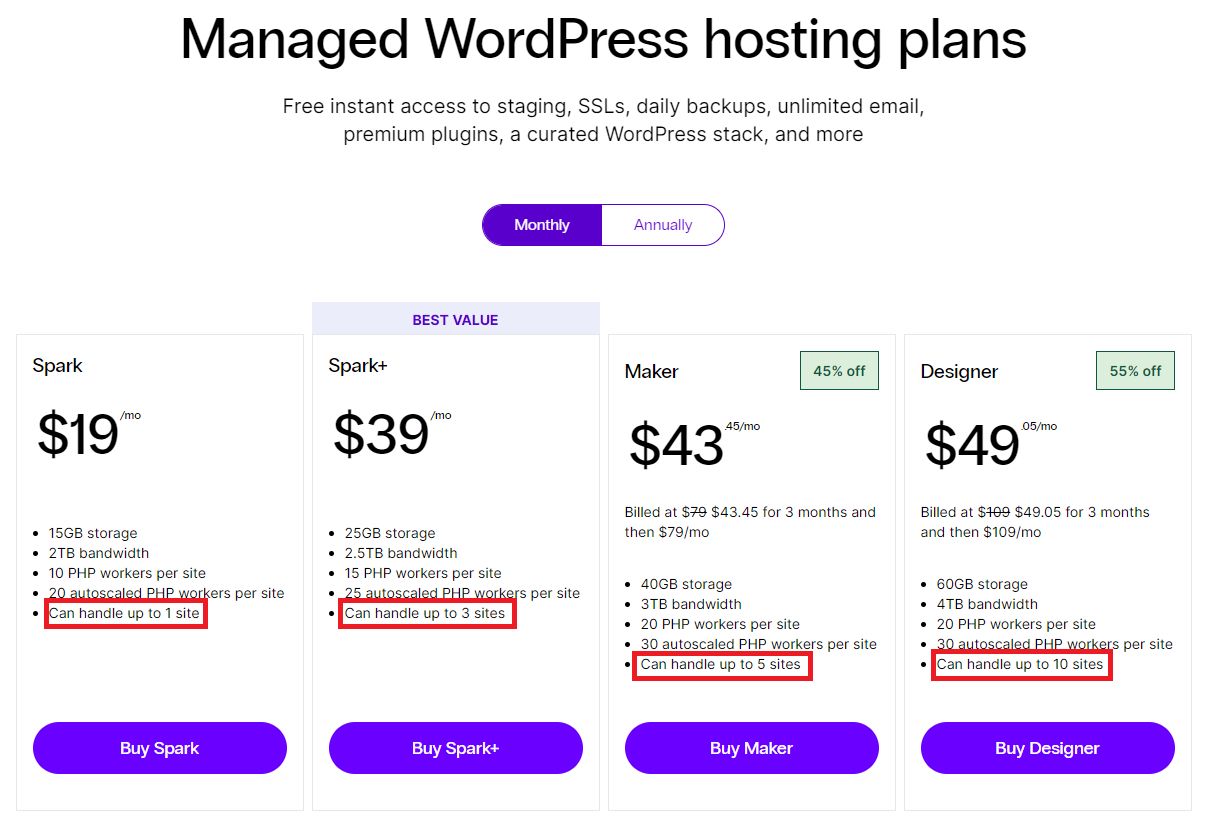
Also, the hosting plan prices will vary based on the number of domains supported, with some supporting just a few and others offering unlimited domains. Nexcess offers multi-domain hosting with most of its fully managed hosting plans.
- The domain names you’ll map. These names will be assigned to your subsite. You need one for each subsite you’ll map. Some hosts, like Nexcess, allow customers to register domain names while purchasing hosting packages. Others may not, and you’ll have to purchase and register elsewhere.
Previously, you needed plugins to set up and configure a WordPress Multisite, but that’s no longer the case. The WordPress core file now includes everything you need.
Also, multisite domain mapping is free, but you must pay for the domain names and the hosting. The process of linking them doesn’t have any monetary costs attached.
How to set up domain mapping on a WordPress Multisite
Now, you’re ready to set up WordPress multisite domain mapping. Just follow these seven steps.
Install WordPress on your hosting plan
If you’re using a fully managed WordPress hosting plan, like the Nexcess Maker plan, then the process of installing WordPress is as simple as adding a new website from your dashboard and giving it a name.
Everything else is taken care of, and when the setup is complete, you get access to the login details you need to access the admin dashboard. If you purchased a domain name as part of your hosting plan, then it will already be linked.

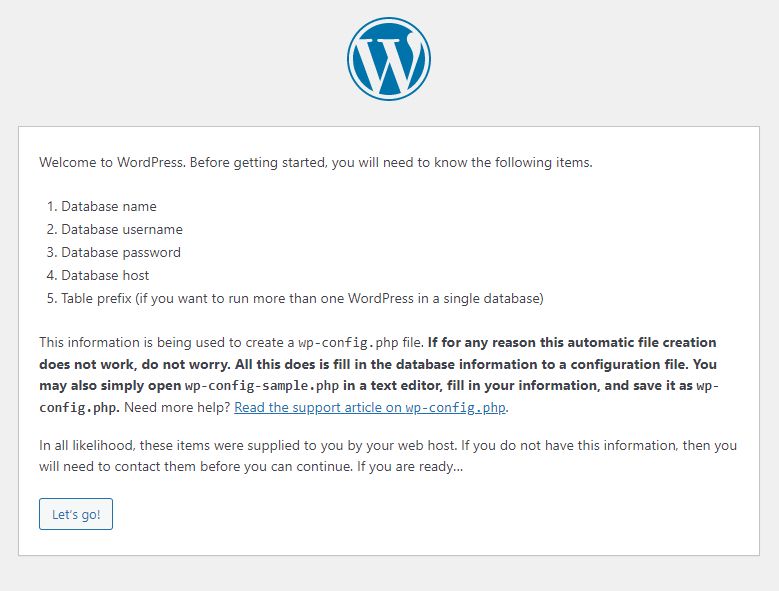
If you’re using a non-managed hosting plan, there are a few more steps involved in installing WordPress. You’ll need to set up a database, configure user accounts for it, then upload the WordPress files to your hosting account and complete the setup wizard.
Your web host’s support team can assist you if you have any questions.
Enable the multisite feature
Multisite support isn’t enabled with a default WordPress install. You need to make some changes to the configuration of your WordPress website to have this feature.
Use a File Transfer Protocol (FTP) client, like FileZilla or WinSCP, to gain access to the files and folders of your WordPress installation.
You should see the FTP credentials for your hosting plan in your web host's dashboard. If your hosting provider uses cPanel, then you can use the file manager to browse through your website’s files instead of using an FTP client.

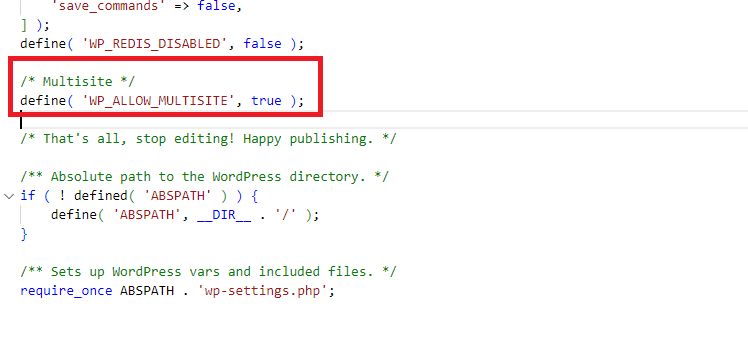
From the root directory of your website, locate and open the wp-config.php file. Look for the line of text in the file that says:
/* That's all, stop editing! Happy publishing. */Just above that line of text, add the following lines of code, then save the file:
/* Multisite */
define( 'WP_ALLOW_MULTISITE', true );
Configure your multisite network
The changes to the wp-config.php file enabled multisite installation, and you can now configure your network. Log in to the administrator dashboard for your WordPress site and navigate to Tools > Network setup from the menu.
From here, you can configure how the site addresses for the subsites on your multisite network will work (either as subdomains or subdirectories). Either option works since you’ll be mapping domain names to the subsites.
You can also configure other network-related details, like the network title (the name of your network), the server address, and the network admin email address.
Once you’re finished, the installer will provide you with two code snippets and instructions for where to paste them. The first code snippet goes into the wp-config.php file in a similar location to the first piece of code you added.
Add this line of code right below the specified code snippet:
define('COOKIE_DOMAIN', $_SERVER['HTTP_HOST']);That piece of code is required explicitly for domain mapping to ensure that the network super admin can log in to any of the subsites, even with the new domain names.

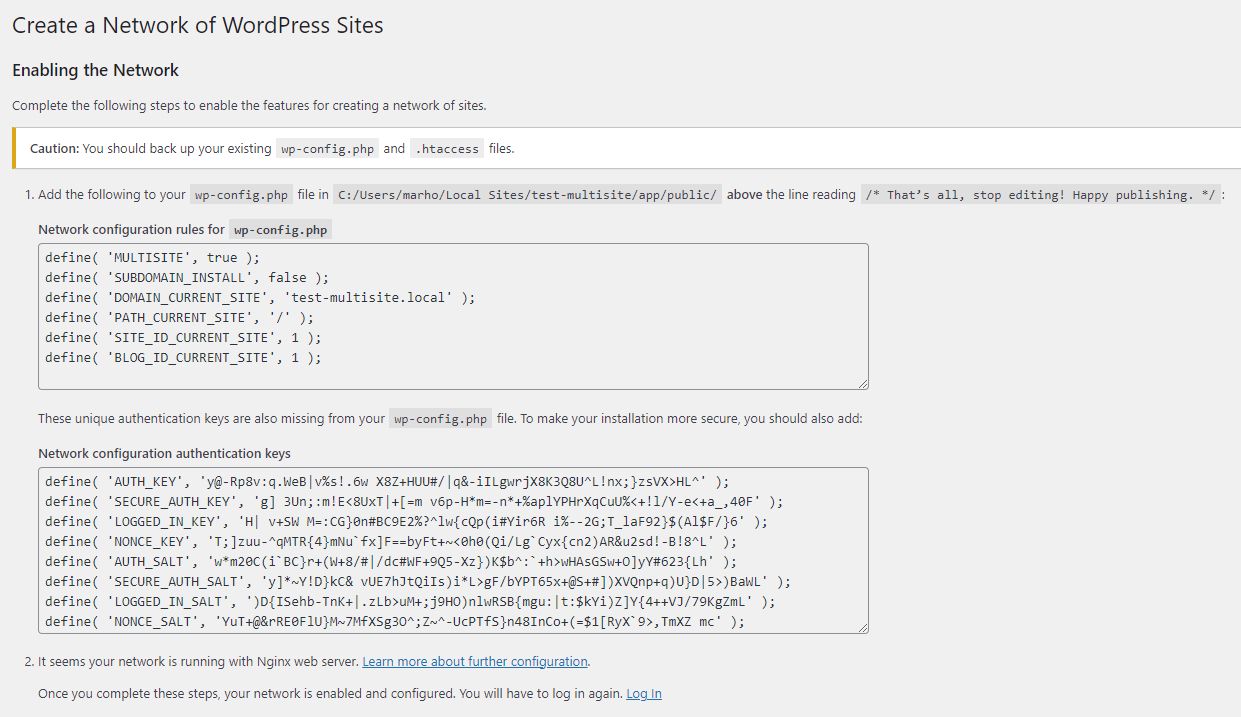
The second code snippet goes into the .htaccess file, which is in the same directory as wp-config.php. Once you make these changes, you’ll have to log in again to access your admin dashboard. Signing in this time will log you in as the super administrator of your WordPress Multisite network.
Create your subsites
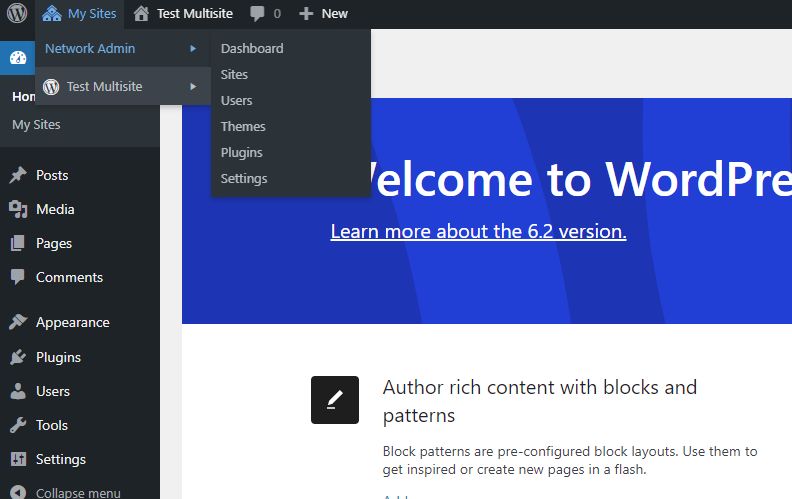
Now that you have properly configured your multisite network, you can start adding subsites to it. First, ensure you’re on your network’s admin dashboard, not the one for the primary website.
As the super admin for the network, you can navigate to the network admin dashboard by going to My sites > Network admin > Dashboard.

From the dashboard, go to the Sites > Add new. Fill out the details of the new site you want to add to the network. These include the admin email and the site address, title, and language.

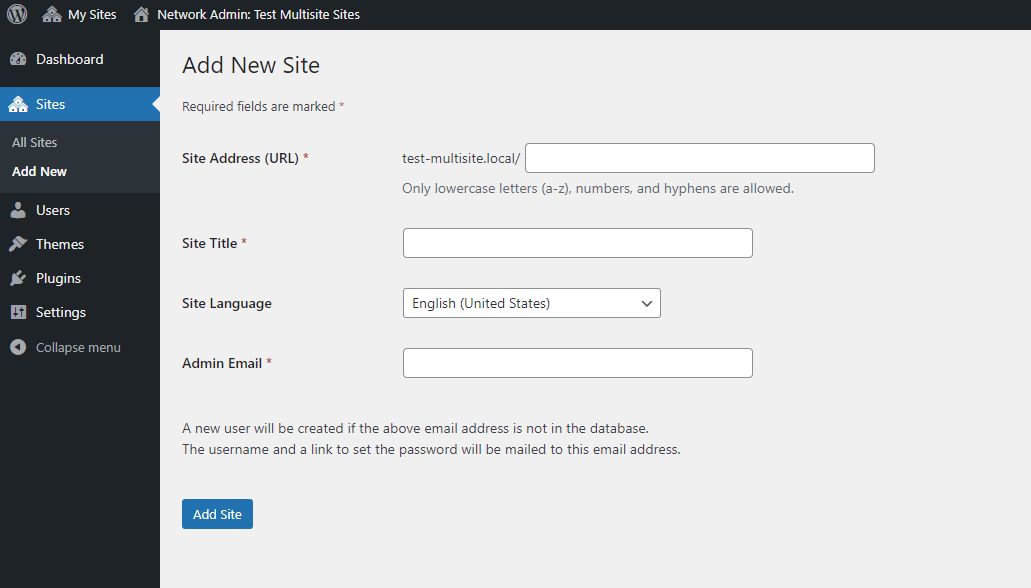
The site address you use will depend on how you configured your network addresses. But you shouldn’t worry too much about what you choose here because you’ll map a domain name that will serve as the address. The admin email you should enter here differs from the one you entered while setting up the network.
Once you’ve entered the necessary information and saved, the new site will be part of your network. You’ll need to repeat this process for each subsite.
Update the site address for each newly created subsite
Next, you need to update the new website’s URL to match the domain name you purchased for it. Remember that this is a different domain from the URL for the main site of the network.
Go to Sites in your admin dashboard to view all the network sites. For now, there should only be the main site and the subsite you just created. Move your pointer to the name of the subsite and click the “edit” link that appears under it.

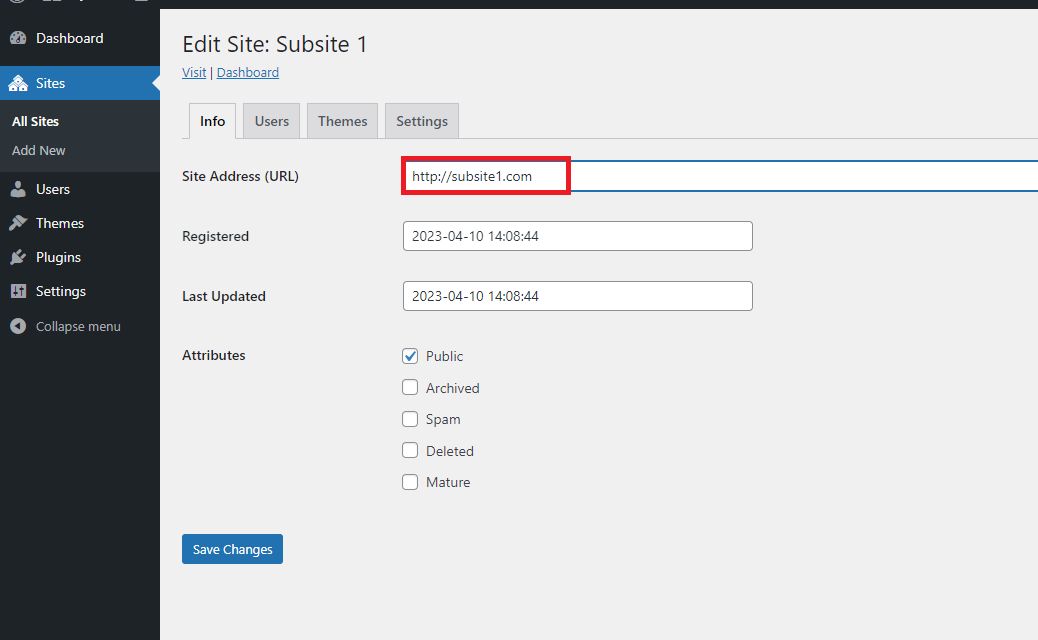
On the new page that appears, change the Site address (URL) to the domain name you purchased and want to assign to this subsite. Add all the parts of the domain name, including the protocol, so that it appears as https://www.domain.com and not just domain.com.
Save the changes when you’re done, then repeat the process for the other subsites.
Create DNS records for your subsites
You may have linked the domain name to a website within your network, but that association is only recognized within your WordPress install.
If you try to visit the domain name from your browser, it won’t be able to access your website. That’s because the Domain Name Server records haven’t been updated.

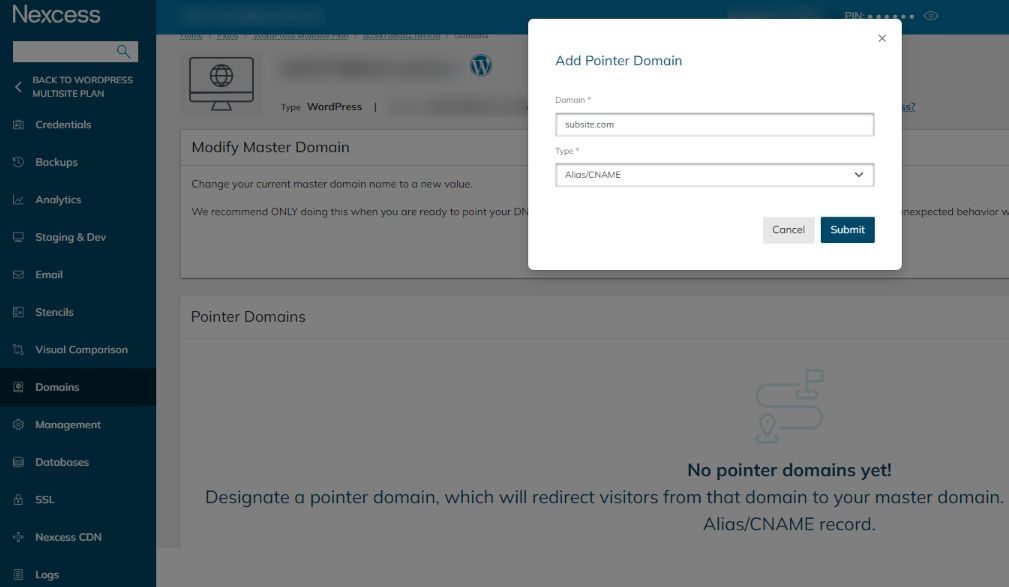
The process for creating a record varies from host to host. With Nexcess, the first step is to add a pointer domain right from your customer dashboard. The type of pointer domain you’ll create is an Alias/CNAME record. With this, you publicly link the domain name for a subsite to the one for your main site.
Other web hosting providers use a similar process to create these DNS records, but you can review their documentation or contact their support team if you need help.
If you purchased the domains for your subsite from your web host, then you’re done with this step. However, for domain names registered with a different service provider, you must point the domain name to your web host’s nameservers.
The process involves getting the right nameservers from your web host, logging in to the dashboard of your domain name register, and looking for the DNS settings that allow you to update the nameservers with the nameservers from your host.
After you’ve updated and saved these settings for each subsite, you’re done mapping the domain names. But it may take up to 24 hours for the changes to propagate across the internet.
Generate SSL certificates for the subsites
Secure Sockets Layer (SSL) certificates are necessary to secure your newly created subsites. They allow visitors to access your websites using the more secure HTTPS protocol, which encrypts their connection.

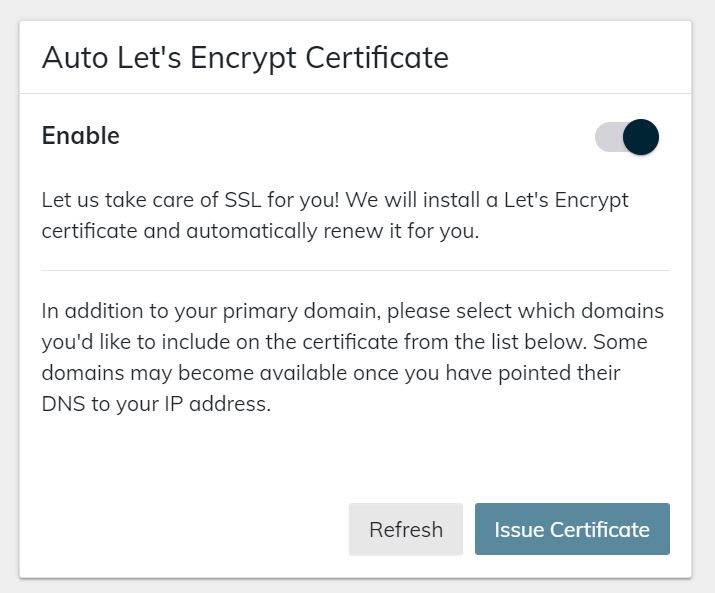
Managed hosting plans from Nexcess come with free SSL certificates from Let’s Encrypt for all domains used with a hosting package, regardless of whether you paid Nexcess for the domain. You can enable the SSL certificates from the client portal and issue new certificates for any subdomains you configure.
Sometimes, you may not have access to free SSL certificates because of your hosting plan and will need to add them manually. This process involves acquiring your SSL certificates from a certificate authority (CA) and then importing the keys you received from the CA into the hosting dashboard for your website.
Final thoughts: WordPress Multisite domain mapping guide
Mapping domain names opens up new possibilities for WordPress Multisite networks for multinational companies, multi-brand businesses, and agencies managing clients’ websites.
To make the process run smoothly, you need a hosting plan that supports multiple domains and the domain names for your subsites. If you’re missing either of these two criteria, you'll run into problems during the mapping process.
Looking for a host that provides superior support and a plan that includes all you need to map and run your multisite network? Check out fully managed enterprise WordPress hosting from Nexcess today.

