
Managing your website can be a challenging experience. And it’s not always due to the difficulty of the tasks, but the amount.
Besides publishing website content, you must update plugins and WordPress core, delete spam comments, add internal links, and more — and do so regularly.
While all of these tasks seem menial, and they are, you still have to navigate your WordPress admin to perform them.
And that’s where the issue lies. If you’re reading this page, you’re probably facing the same problem: a slow WordPress admin panel.
In this guide, we’ll explore what makes WordPress admin slow and how to speed it up.
- Why is your WordPress admin being slow?
- How to speed up WordPress admin
- Update PHP version
- Update WordPress core
- Check your theme
- Remove admin bloat
- Replace memory-hogging plugins
- Increase PHP memory limit
- Enable persistent object cache
- Increase Heartbeat API call intervals
- Remove database bloat
- Install a WordPress caching plugin
- Limit the number of posts or comments per page
- Monitor Time to First Byte
- Switch to a better hosting provider
- Final thoughts: 13 ways to fix a slow WordPress admin dashboard in 2024
Why is your WordPress admin being slow?
A slow WordPress admin has much to do with the supply and demand gap. Out of the box, WordPress has minimal demand that even a basic shared web hosting plan can fulfill. But as you configure and customize your website, the demand can run higher than the supply, making WordPress admin slow.
Let’s look at the common troublemakers behind a slow WordPress admin:
- Heavy plugins: While plugins help you add different functionalities to your WordPress admin, some plugins can be more memory-intensive than your hosting infrastructure can handle. For instance, installing a page builder plugin on a basic shared web hosting plan is rarely a great idea.
- Outdated infrastructure: Older versions of WordPress and PHP aren’t the best options if you want great performance. Also, contemporary plugins are often tweaked based on the latest PHP and WordPress core versions, so your WordPress admin might run slow if you continue using older versions.
- Poor hosting choice: You can’t install Elden Ring on a Pentium III and expect it to run. Similarly, hosting a high-traffic business website on a basic shared hosting plan won’t work. You’ll need a better hosting infrastructure to support the immense traffic and many concurrent logged-in users.
How to speed up WordPress admin
- Update PHP version.
- Update WordPress core.
- Check your theme.
- Remove admin bloat.
- Replace memory-hogging plugins.
- Increase PHP memory limit.
- Enable persistent object cache.
- Increase Heartbeat API call intervals.
- Remove database bloat.
- Install a WordPress caching plugin.
- Limit the number of posts or comments per page.
- Monitor Time to First Byte.
- Switch to a better hosting provider.
1. Update PHP version
While the front end of your WordPress website depends on HTML, CSS, and JavaScript, the back end is almost entirely PHP. For example, WordPress core and plugins are typically written in PHP. And if you’re using a classic WordPress theme, your theme depends on PHP as well.
And, like WordPress, PHP evolves with every passing year and brings several security and performance enhancements. That’s one of the reasons why WordPress 2.0 required PHP version 4.2 or greater, but WordPress 6.2 recommends a PHP version of 7.4 or later.
You can check your WordPress website’s PHP version by navigating to Tools > Site Health > Info and expanding Server in your WordPress dashboard.

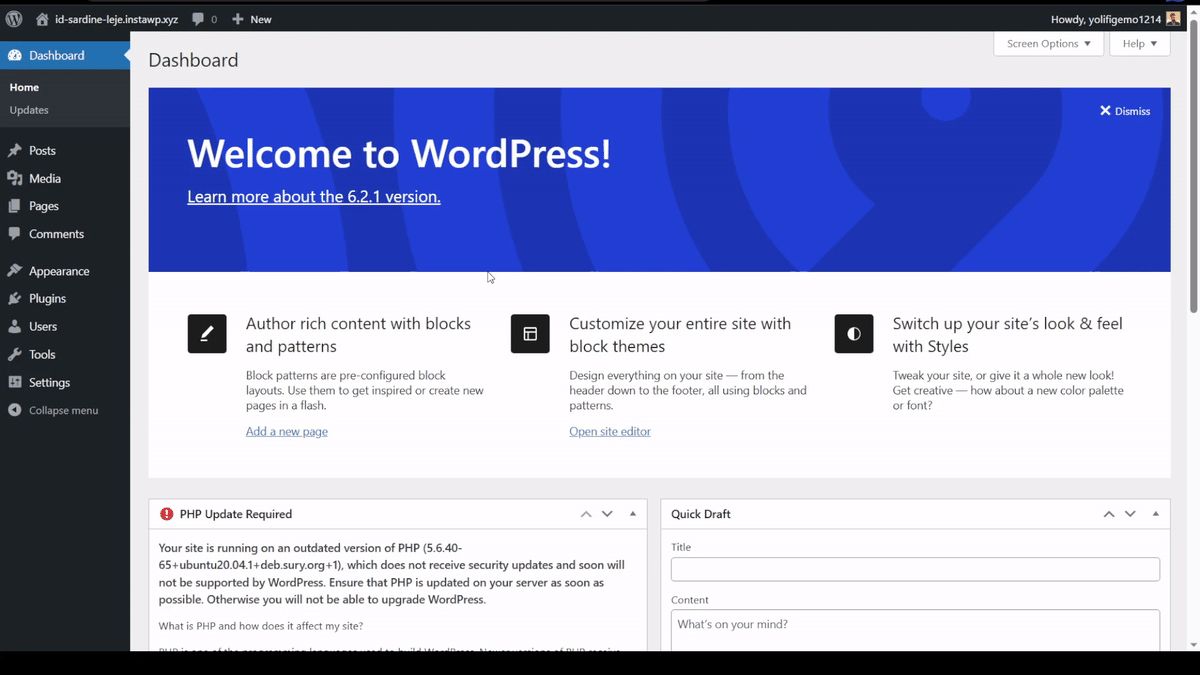
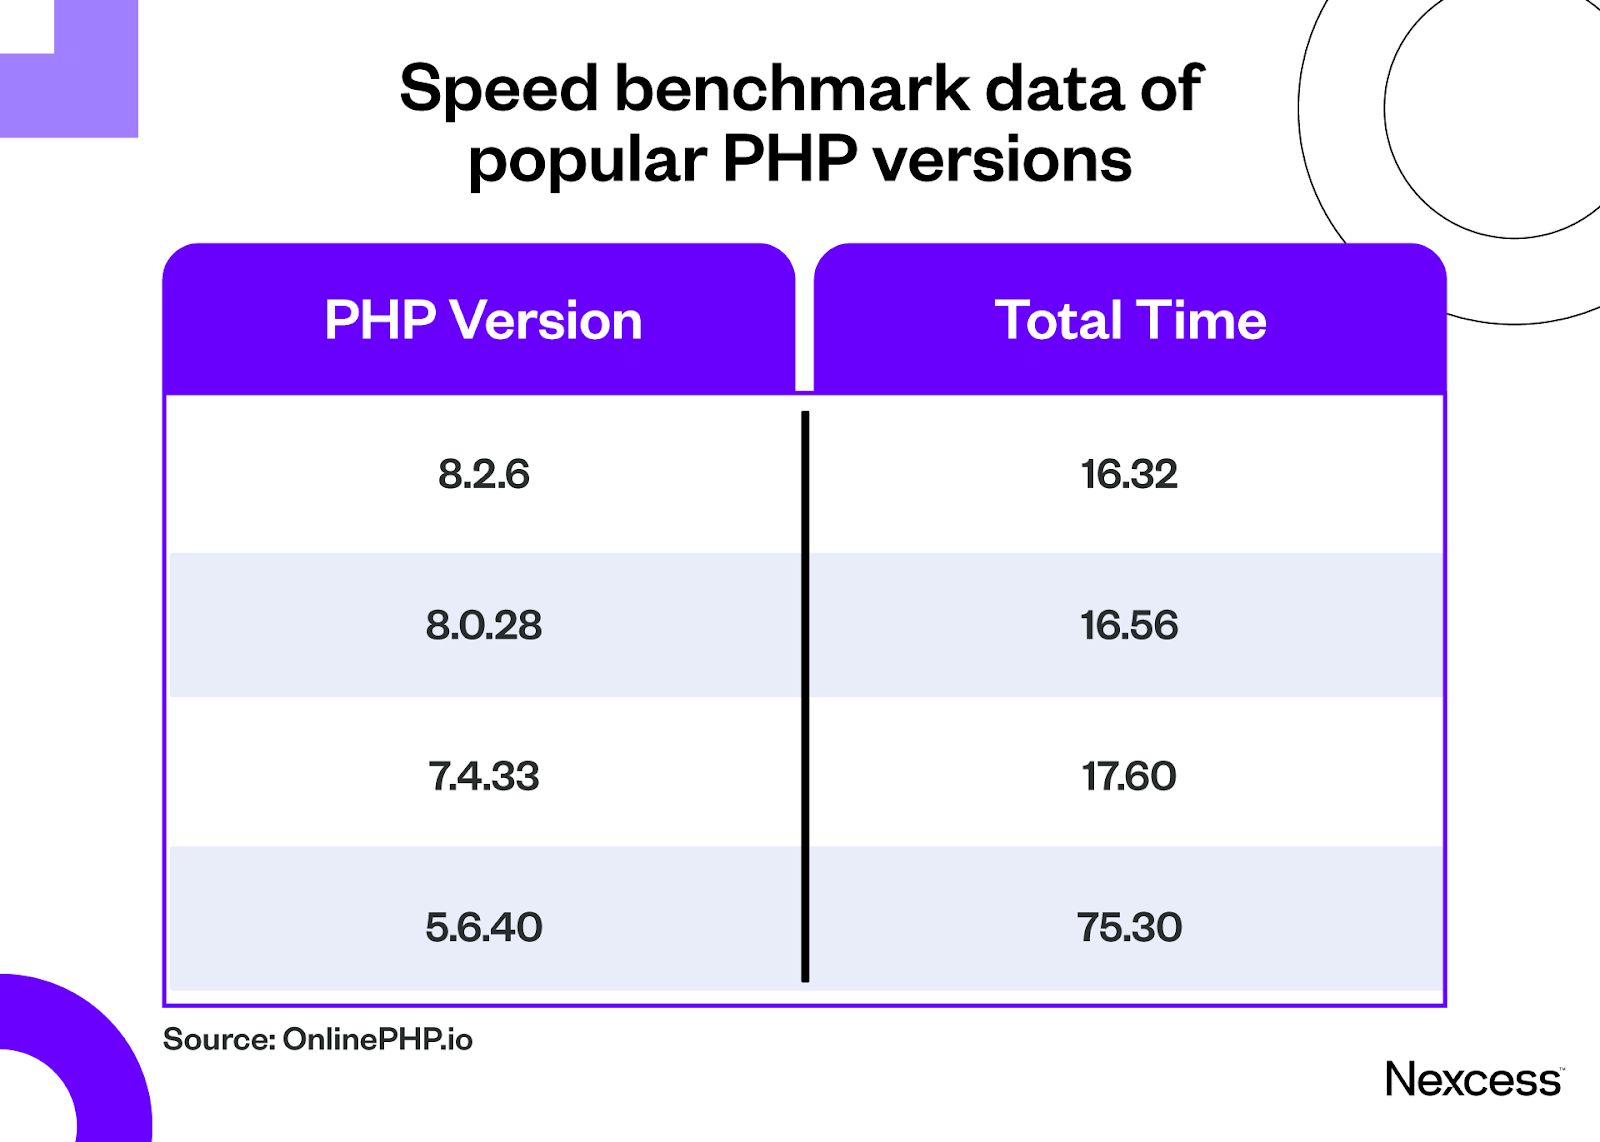
Does using an older PHP version make your WordPress admin slow? Yes. In fact, PHP version 5.6 — the last version of PHP 5 — runs almost five times slower than PHP version 7.4 or 8.0.
Not to mention, WordPress itself is also dropping support for PHP 5 starting from WordPress 6.3. So, if you’re relying on PHP 5, it’s time to upgrade.

Here’s how you can update your PHP version to speed up your WordPress admin panel.
Through cPanel
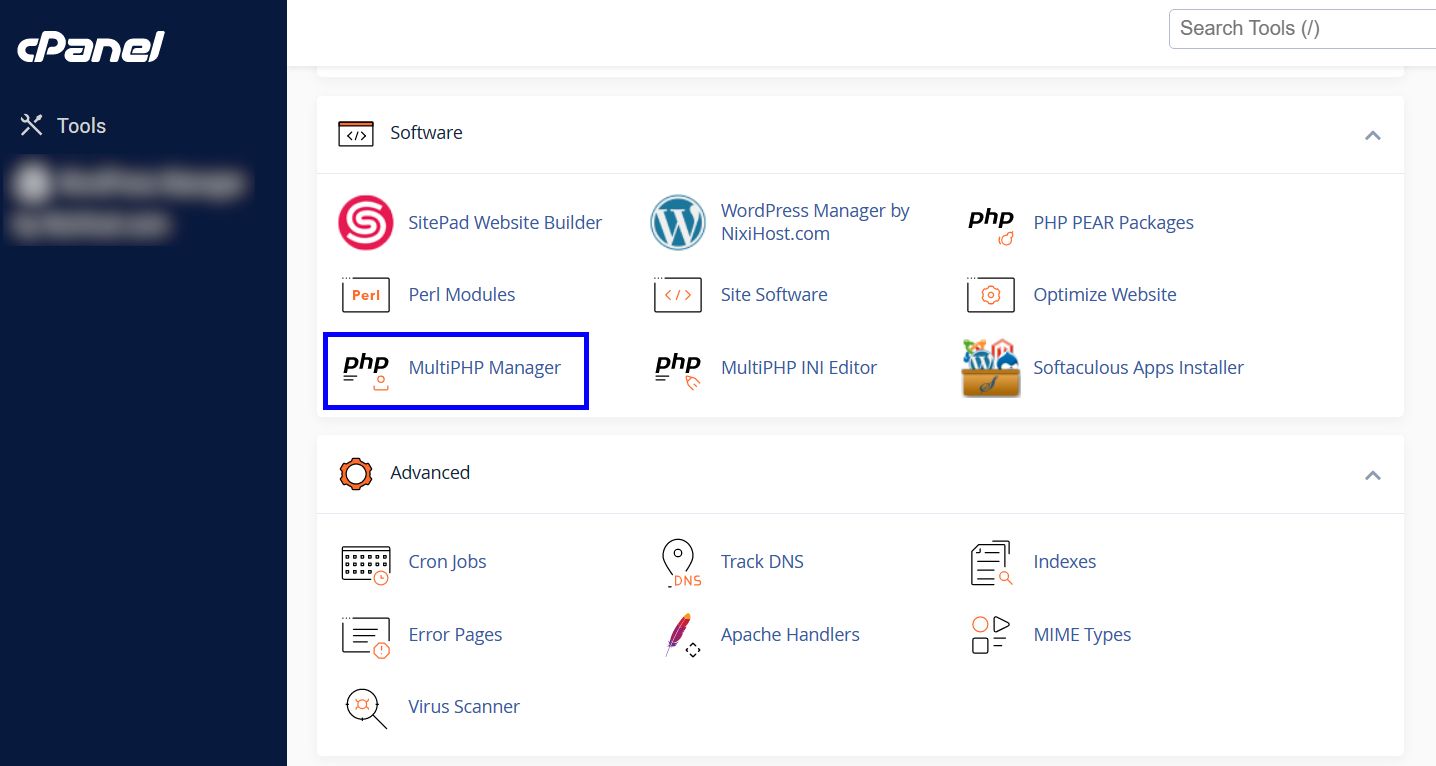
If your host offers a cPanel, you can update your PHP using MultiPHP Manager.
1. Navigate to the software section and open MultiPHP Manager.

2. Tick the checkbox for the domain or website you want to upgrade PHP for.
3. Open the PHP version list and apply the desired PHP.

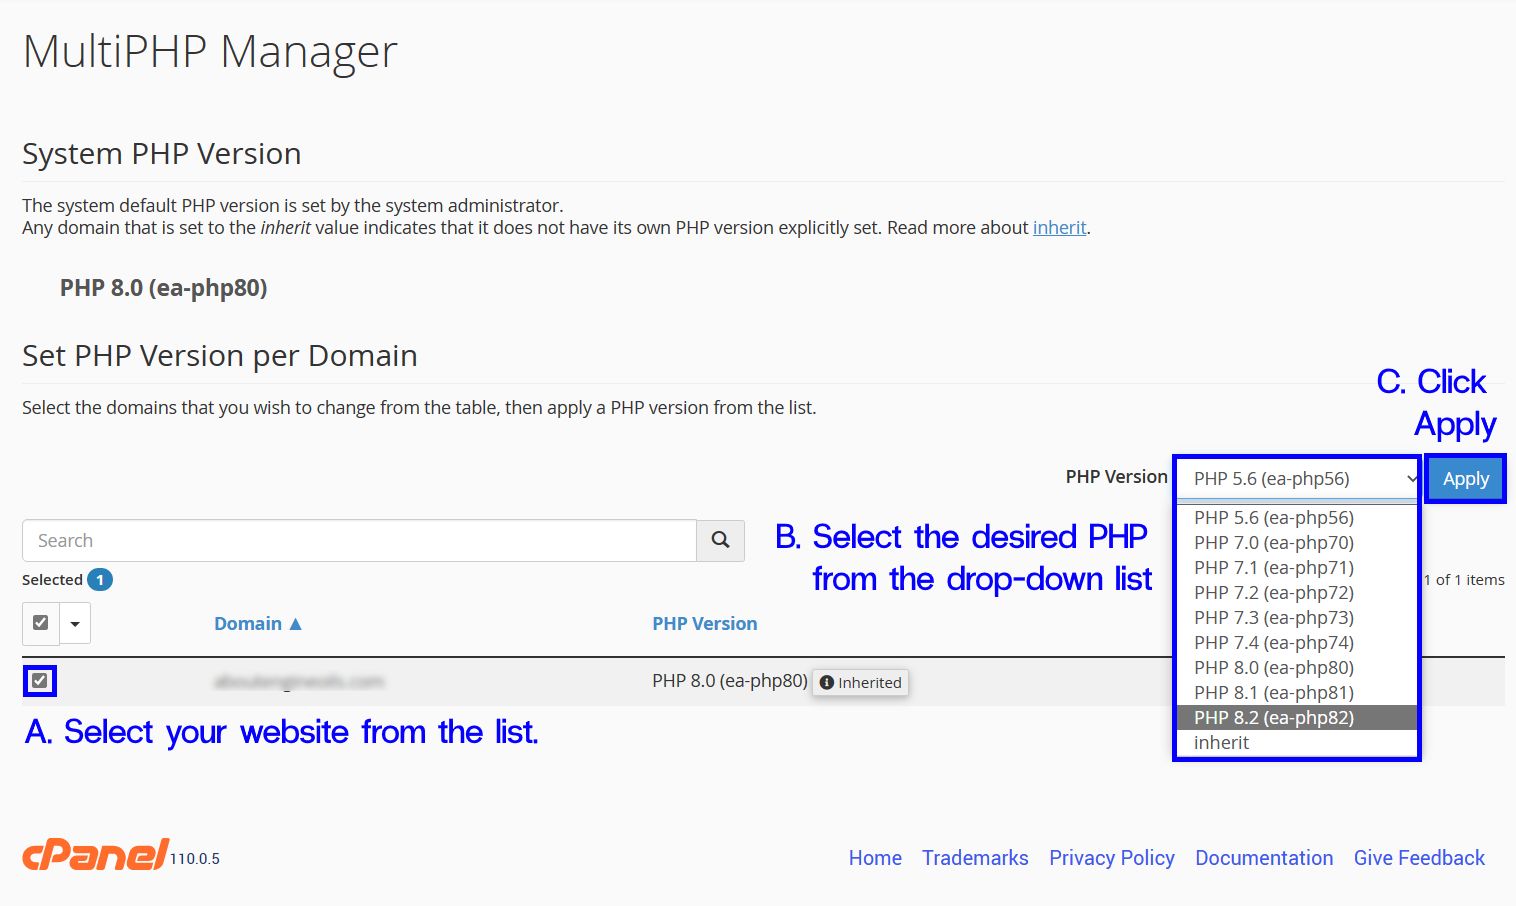
Your web host will update the PHP version within a few seconds.
Using your web host’s custom dashboard
Premium web hosts let you update your PHP version right from their intuitive dashboards.
For example, here’s how you can update your PHP version from the Nexcess dashboard:
- Open Sites from the side panel.

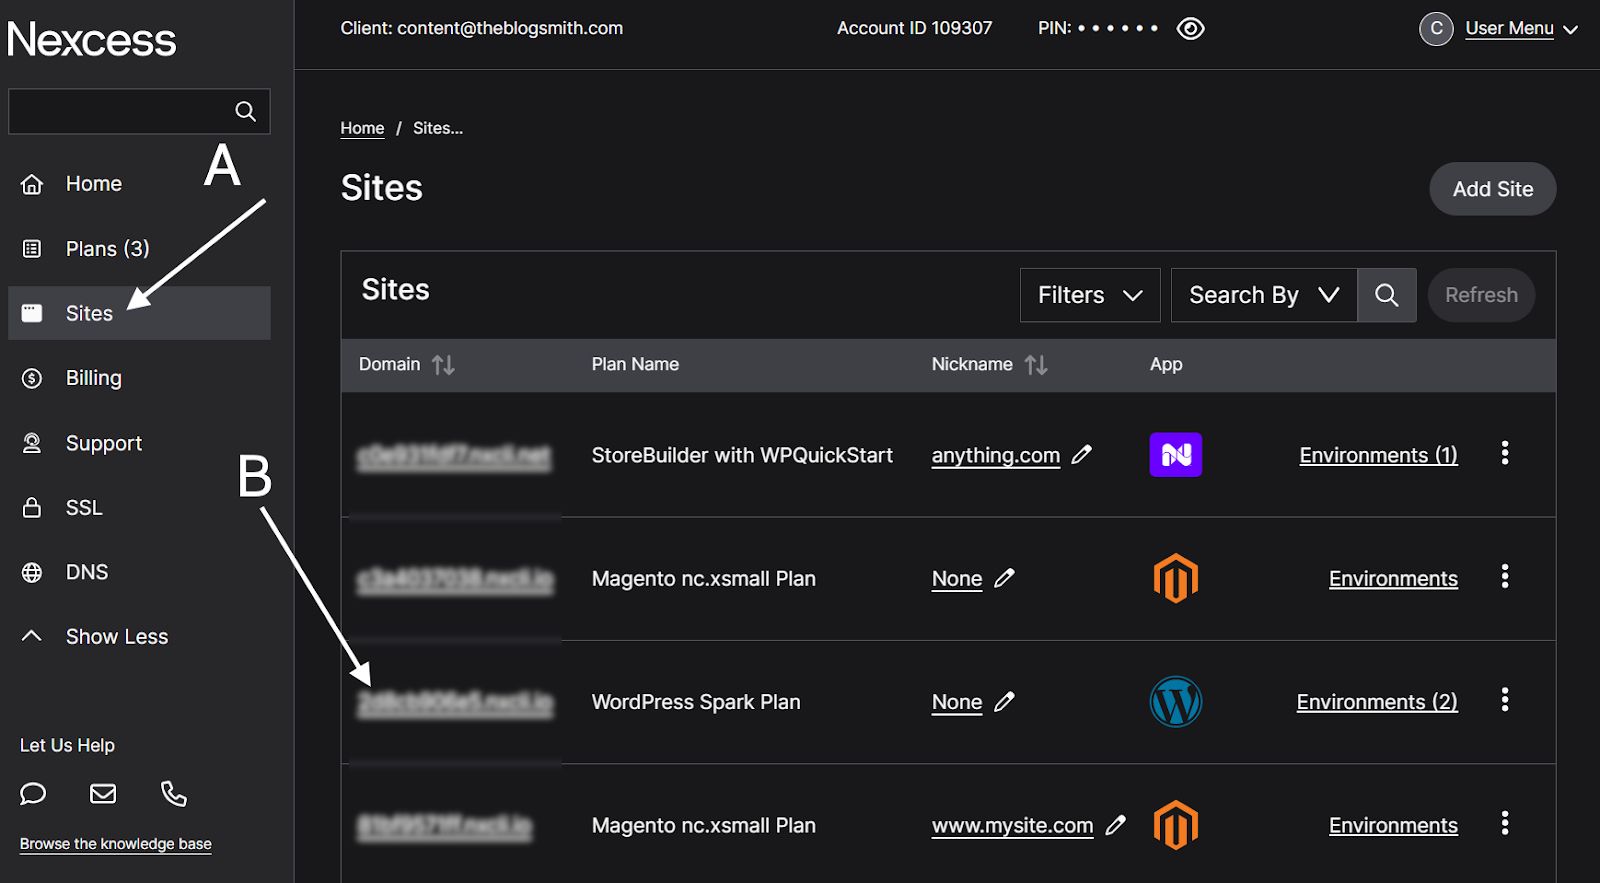
2. Navigate to the site dashboard of your WordPress website.
3. Open Management.

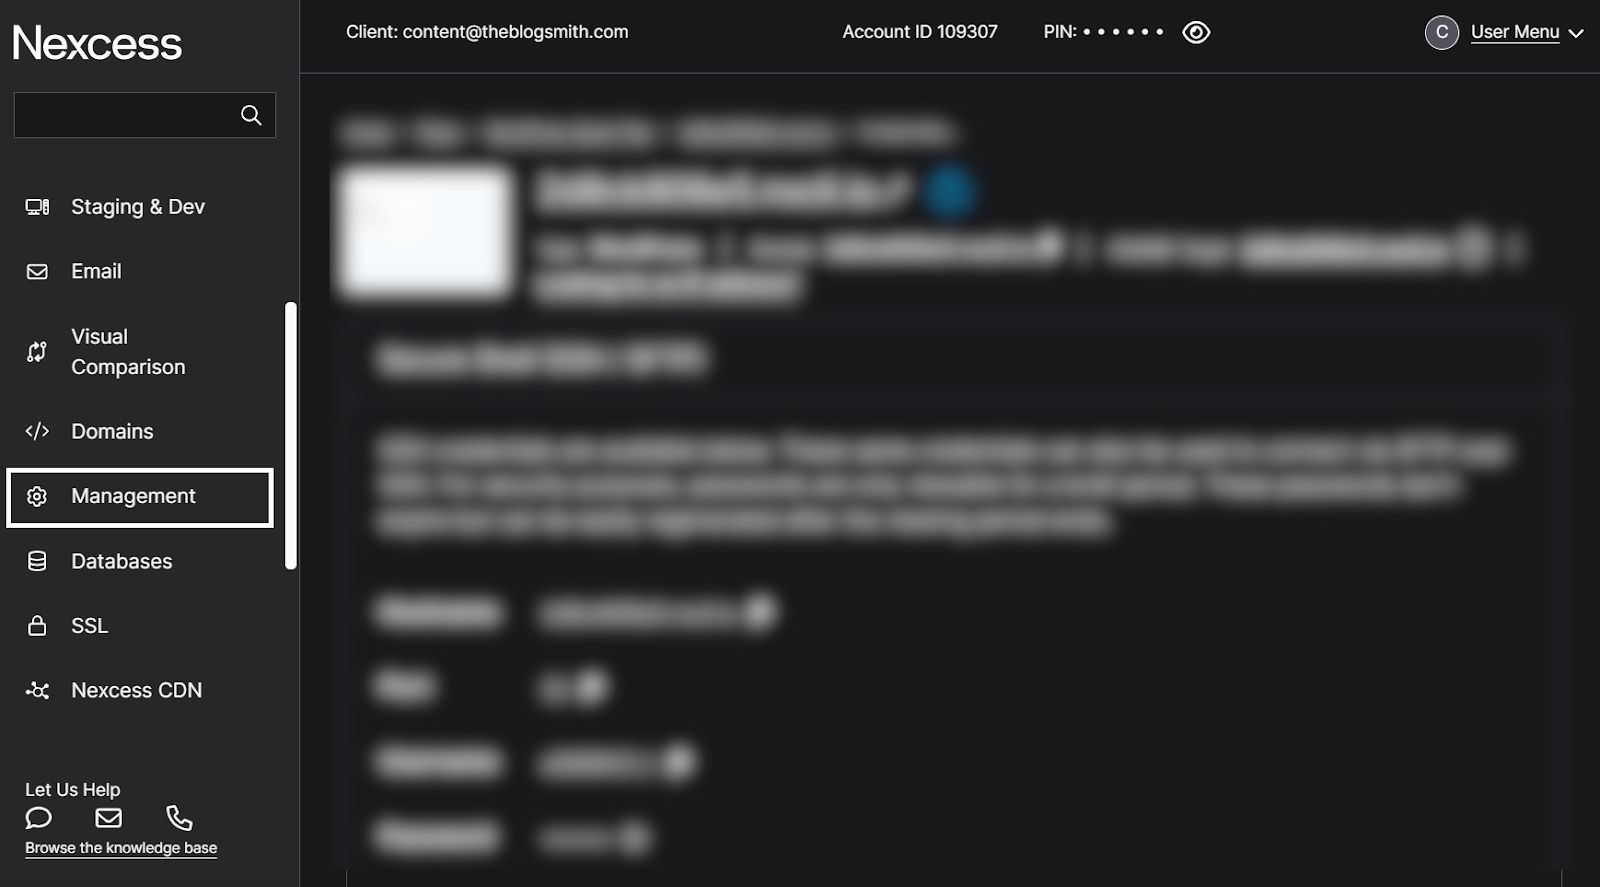
4. Scroll down to the PHP section and click Change PHP Version.
5. Select the desired PHP version and update.

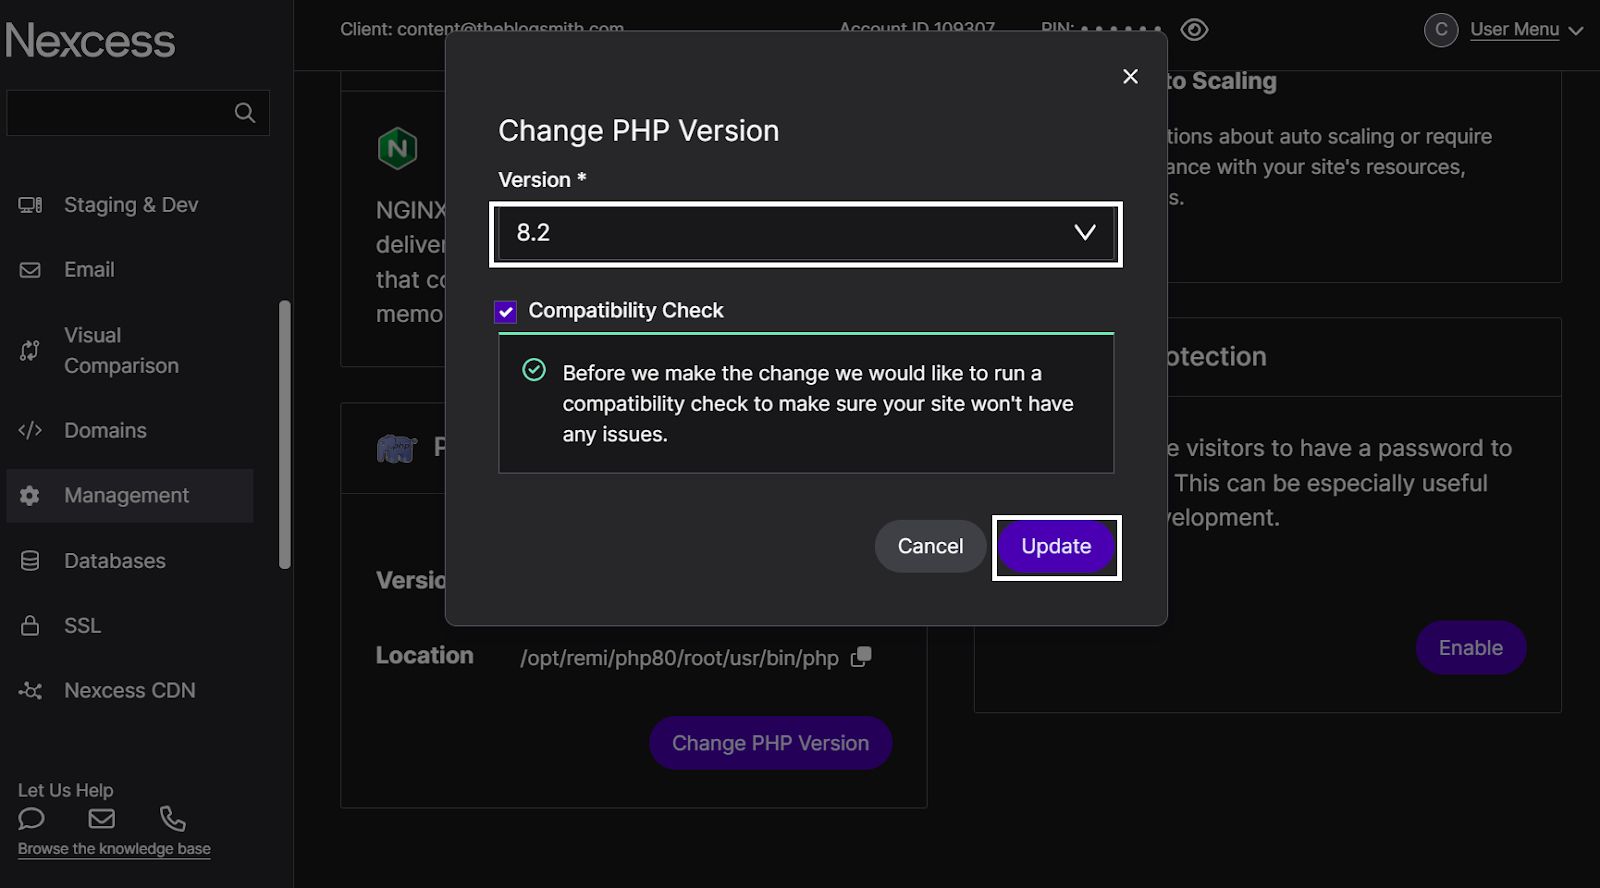
Nexcess will perform a compatibility check on your WordPress website and update the PHP. This way, you don’t have to worry about incompatible plugins after the update.
Contacting customer dashboard
Contact customer support if your web hosting provider doesn’t offer the above options. But if the support team doesn’t answer your query or the web host doesn’t support the latest PHP versions, switching to a better web host is always a great idea.
2. Update WordPress core
Almost every WordPress core update comes with performance improvements and bug fixes — some more than others.
For instance, WordPress version 6.1, released on Nov. 1, 2022, addressed 25+ performance-related issues in WordPress. It improved WP_Query and changed how PHP handles core block registration.
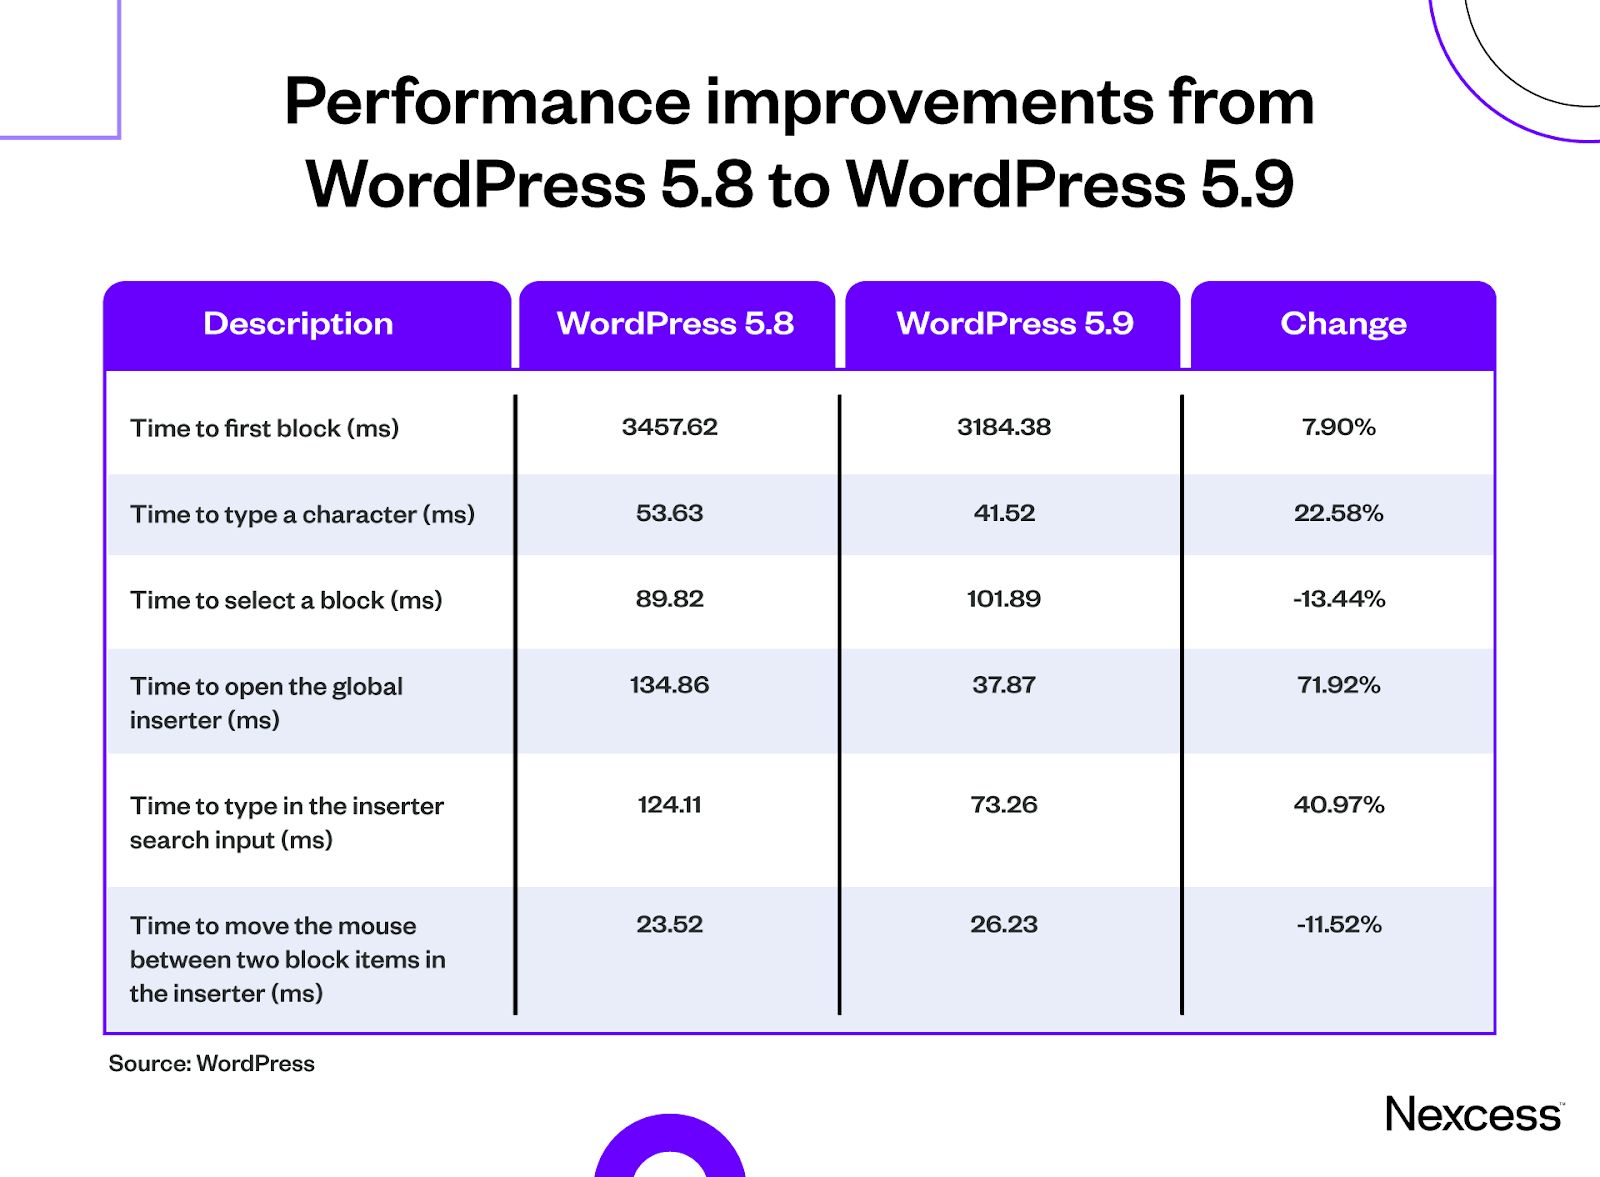
Before that, WordPress 5.9 brought immense performance changes for the admin dashboard and WordPress editor. You can see the changes in processing time for multiple editor-related tasks in the table below.

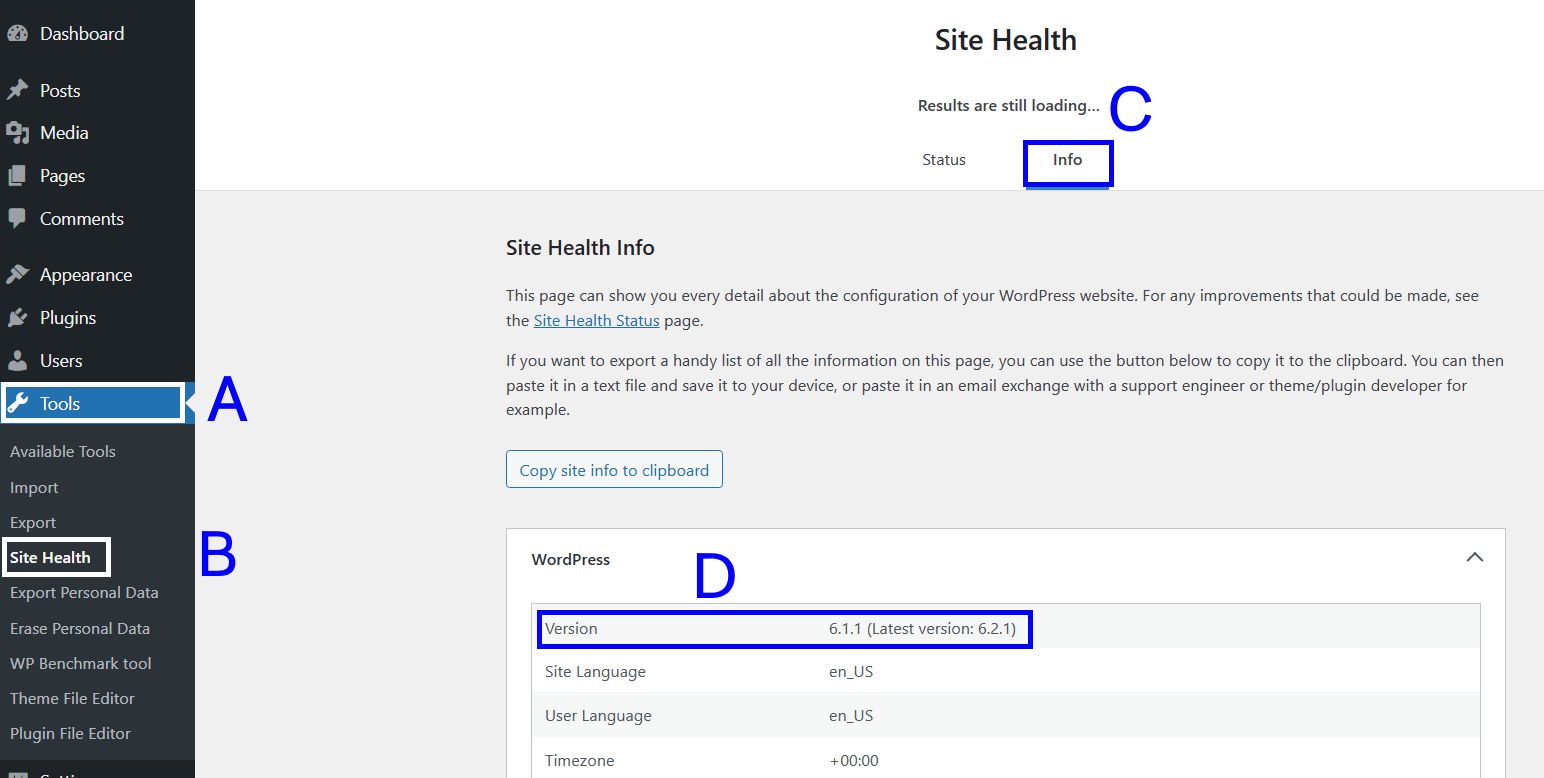
You can check your WordPress version by navigating to Tools > Site Health > Info > WordPress.

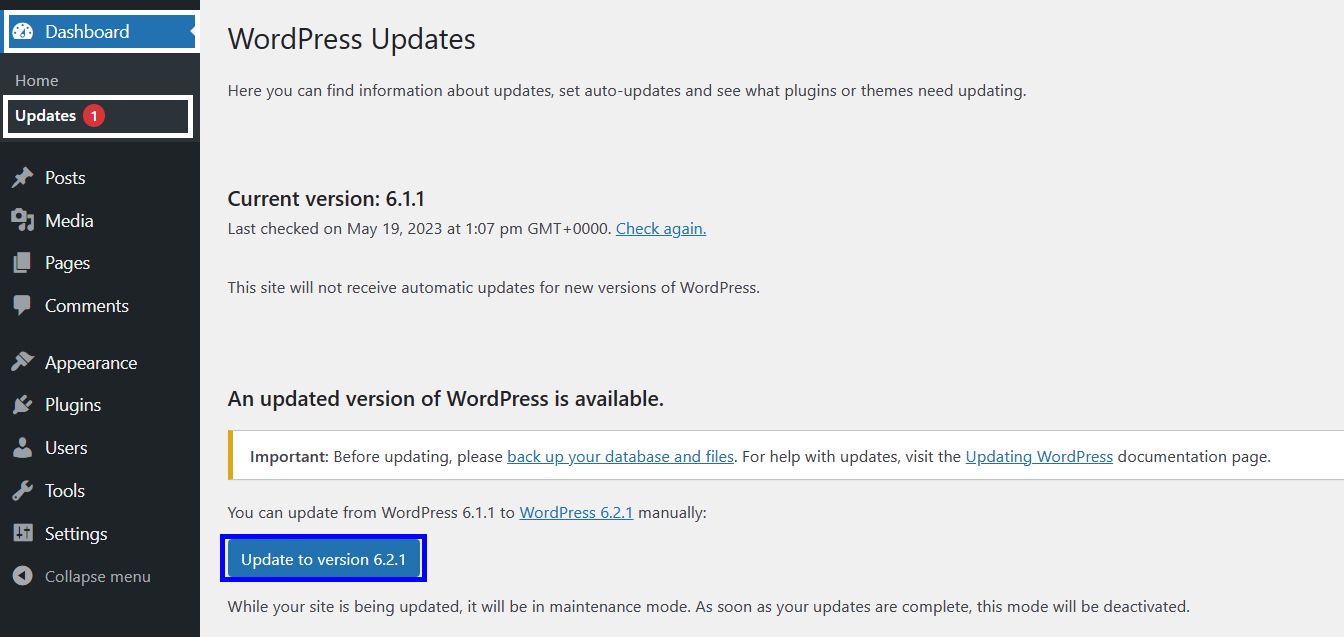
If your WordPress is out of date, you can update it via your WordPress dashboard by navigating to Dashboard > Updates.

We do it automatically if you’re hosting your WordPress website with Nexcess. You never have to worry about an outdated WordPress core.


3. Check your theme
WordPress themes help you improve your website’s visual game by adding custom layouts, unique typography, and feature-rich webpages.
However, themes typically rely on the functions.php file and integrated plugins to offer these functionalities. Depending on how the functionality is configured and which plugins the theme has added, your WordPress admin can get slow.
You can check how your theme affects your WordPress admin by switching to one of the default WordPress themes. For company or blog websites, you can go for Twenty Twenty-Three. And if you manage a WooCommerce store, WooCommerce’s Storefront would serve you well.
But please don’t switch the theme in the production site — the version of your website your customers can see — because it will disturb those interacting with your website. Instead, set up a WordPress staging website to troubleshoot your theme without affecting end users.
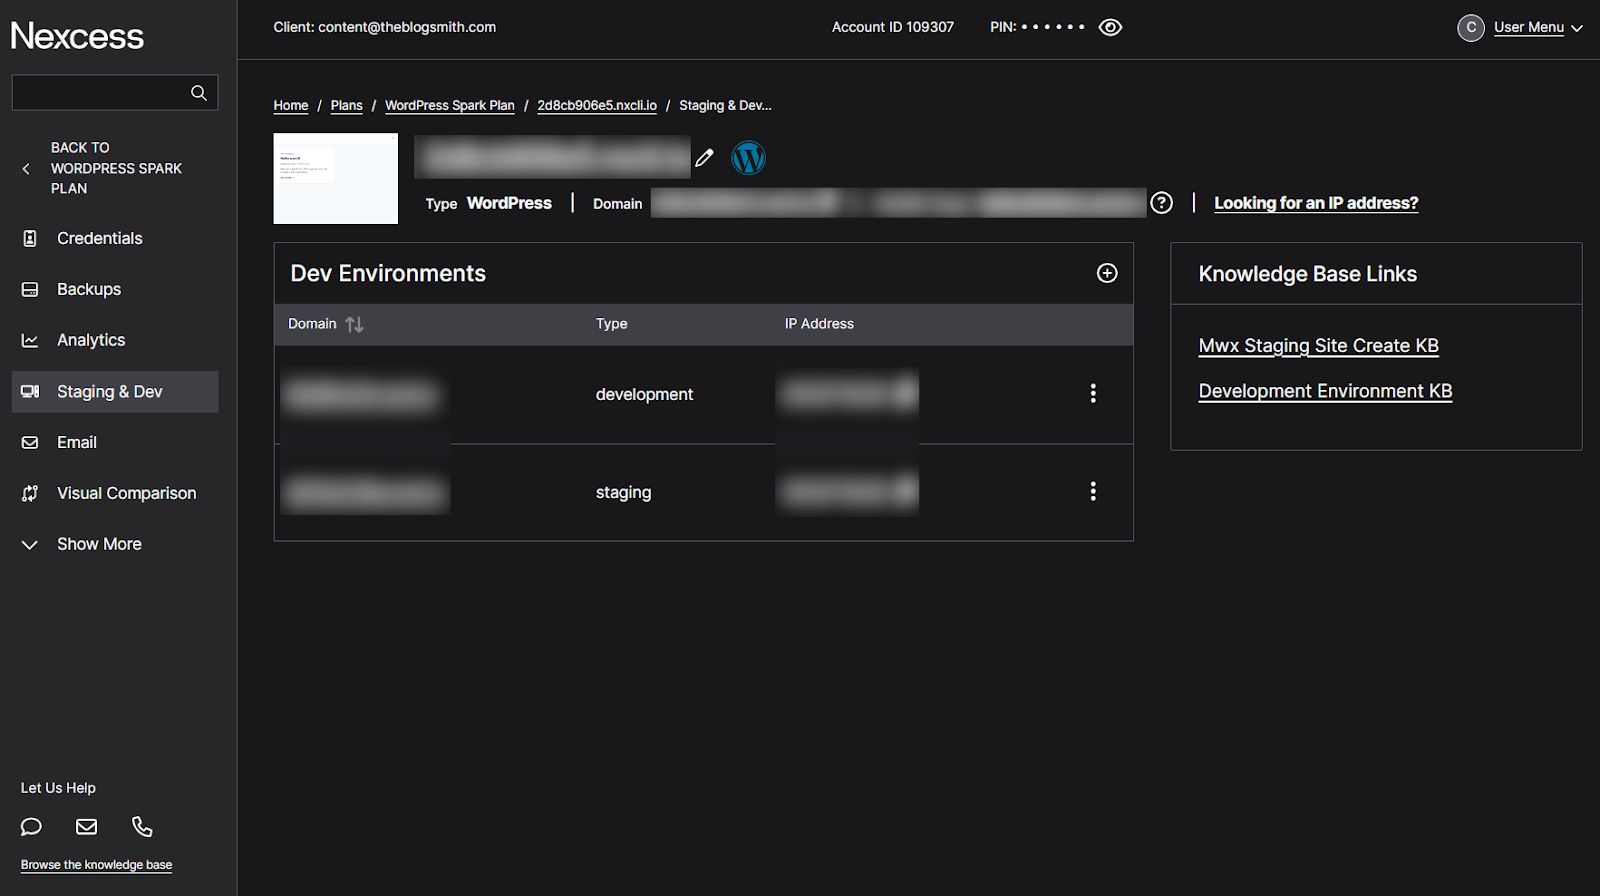
If you’re using Nexcess managed WooCommerce or managed WordPress, you get a free staging website for every live website.

4. Remove admin bloat
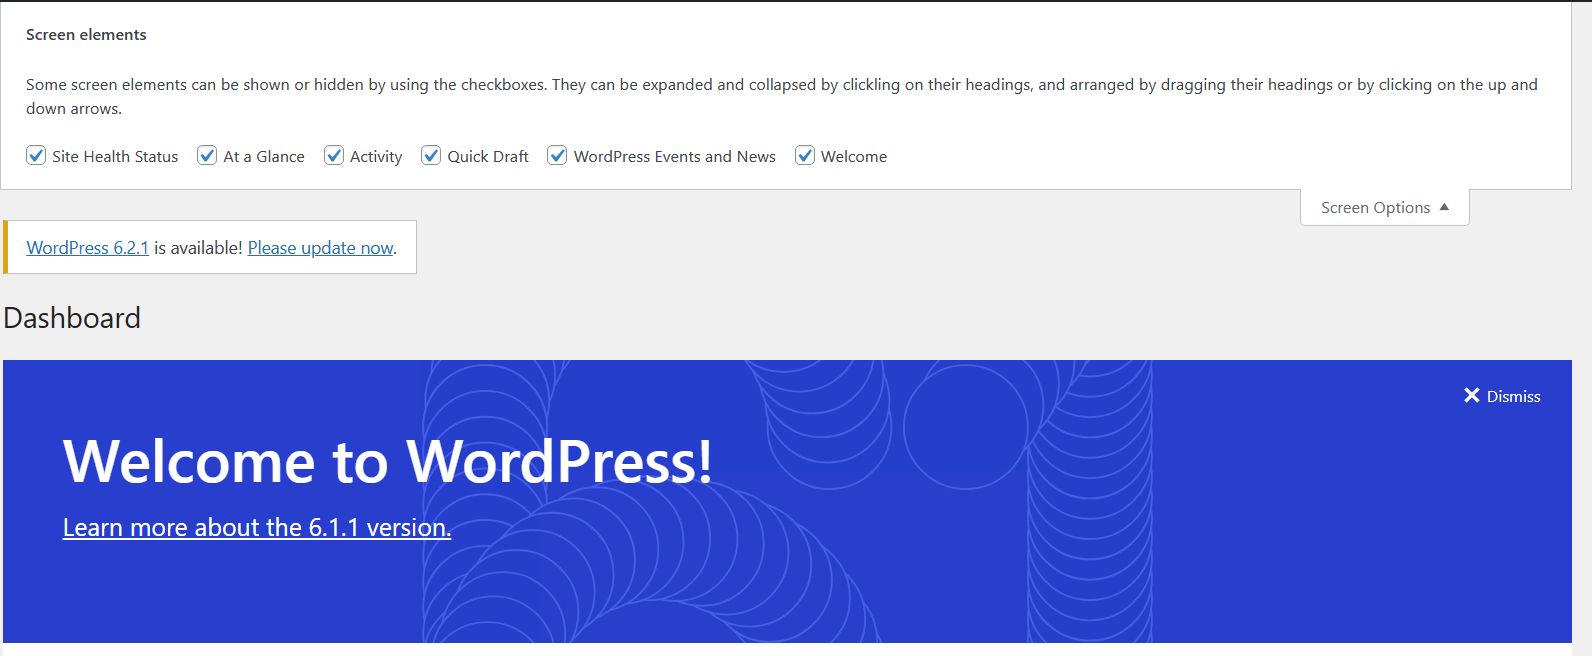
The WordPress admin panel has several bloated features you typically don’t need. For instance, when was the last time you tried Quick Draft or checked WordPress Events and News?
You can expand Screen Options in the top right to disable unnecessary dashboard widgets.

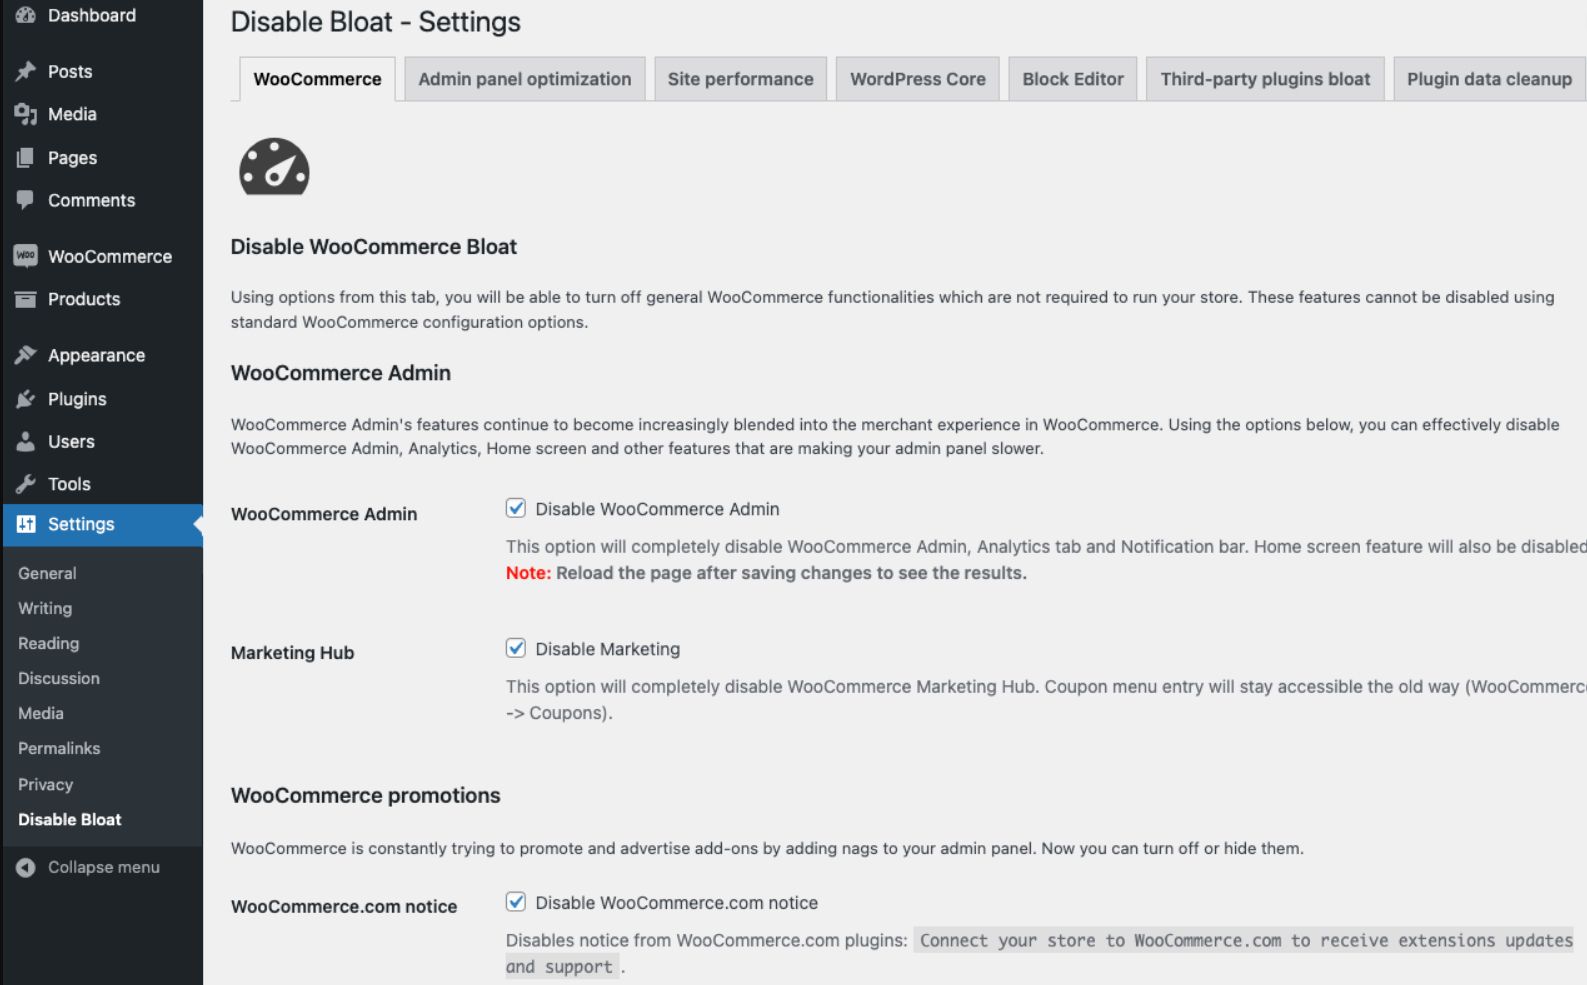
And if you want even more control over your WordPress admin, try debloating plugins like Disable Bloat. With Disable Bloat, you can debloat both WordPress and WooCommerce.

5. Replace memory-hogging plugins
Plugins are notorious for skewing the demand side of the supply and demand equation. And it’s not just uncommon plugins — even renowned plugins can slow down your WordPress admin.

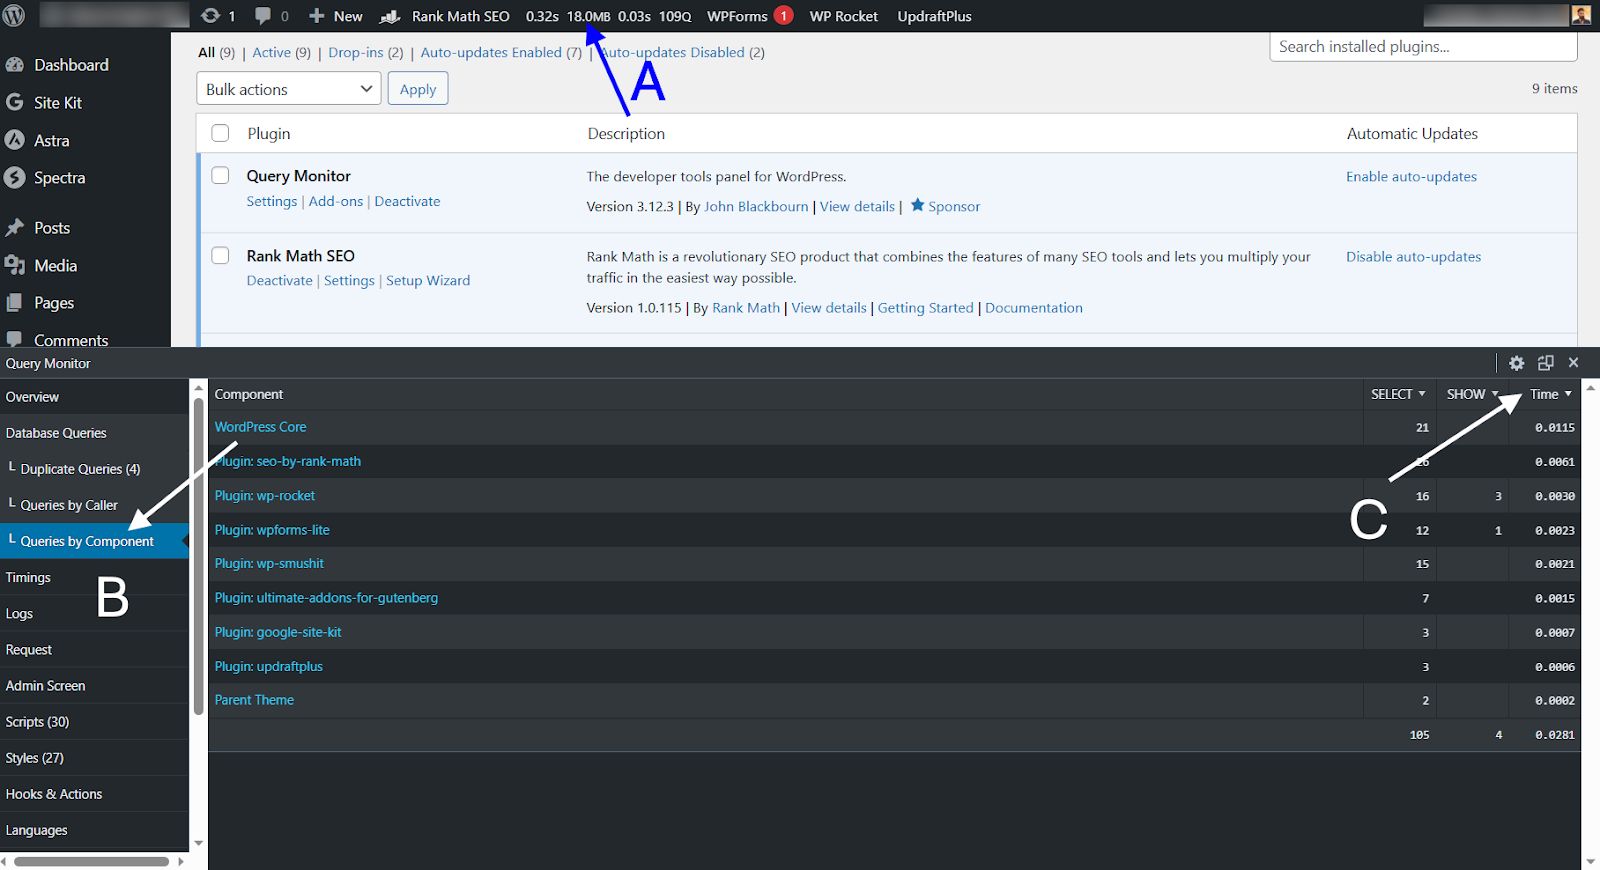
You can look for heavy plugins your WordPress site uses via monitoring tools like Query Monitor.
For instance, here’s how you can see the effect on loading time by individual plugins using Query Monitor:
- Click on Query Monitor’s menu in the admin toolbar.
- Go to Queries by Component.
- Sort the list by time to see the most resource-intensive plugins.

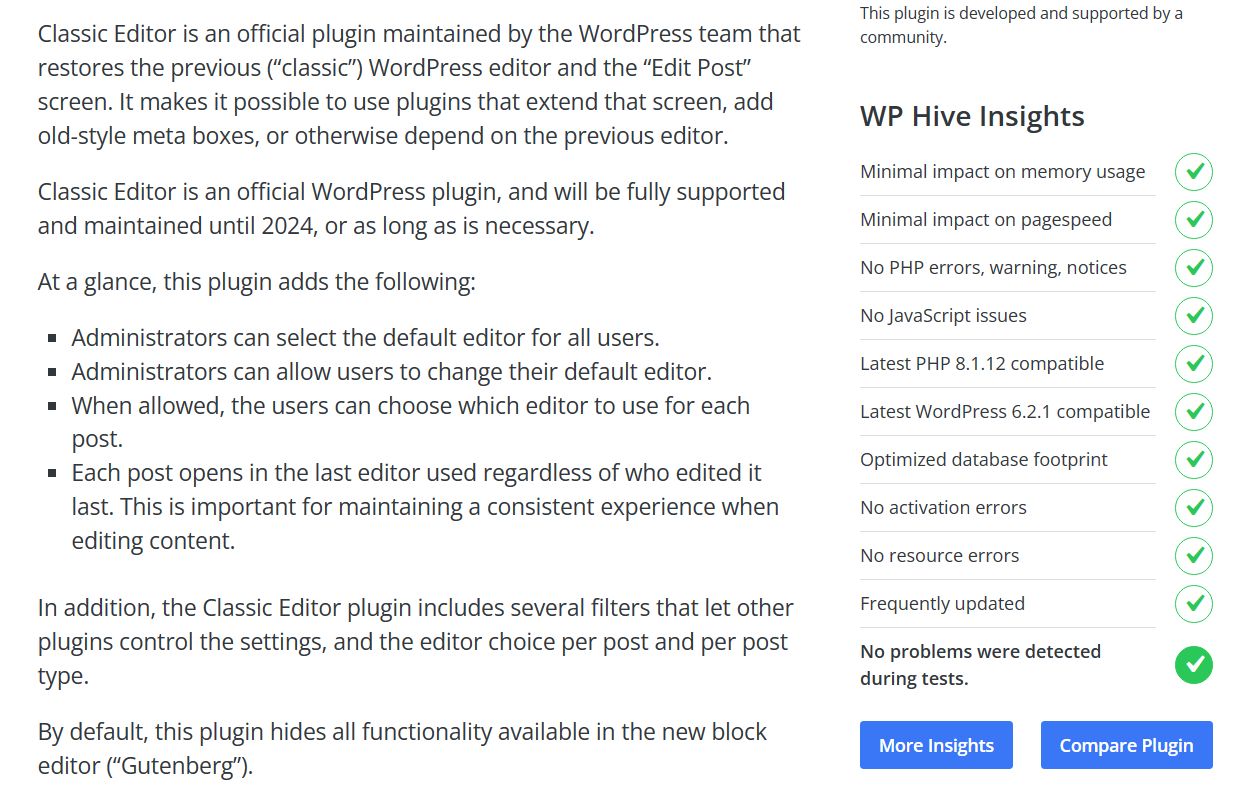
If the demanding plugins aren’t essential, uninstall them right away. If they add an essential functionality, use WP Hive’s Chrome extension to look for alternatives in the WordPress plugin repository.

6. Increase PHP memory limit
Even if you get the newest truck, you can’t use it if the street is too narrow. Similarly, the latest PHP version might not help if your PHP memory limit is too low. PHP memory limit is the amount of memory a PHP script on your WordPress website can use.
At Nexcess, we recommend running a WordPress installation with a PHP memory of at least 256MB. If your WordPress setup is configured with a lower value, you should increase the PHP memory limit to give breathing room for WordPress core and installed plugins.
Like the PHP version, you can check your WordPress website’s PHP memory limit by navigating to Tools > Site Health > Info and expanding Server.

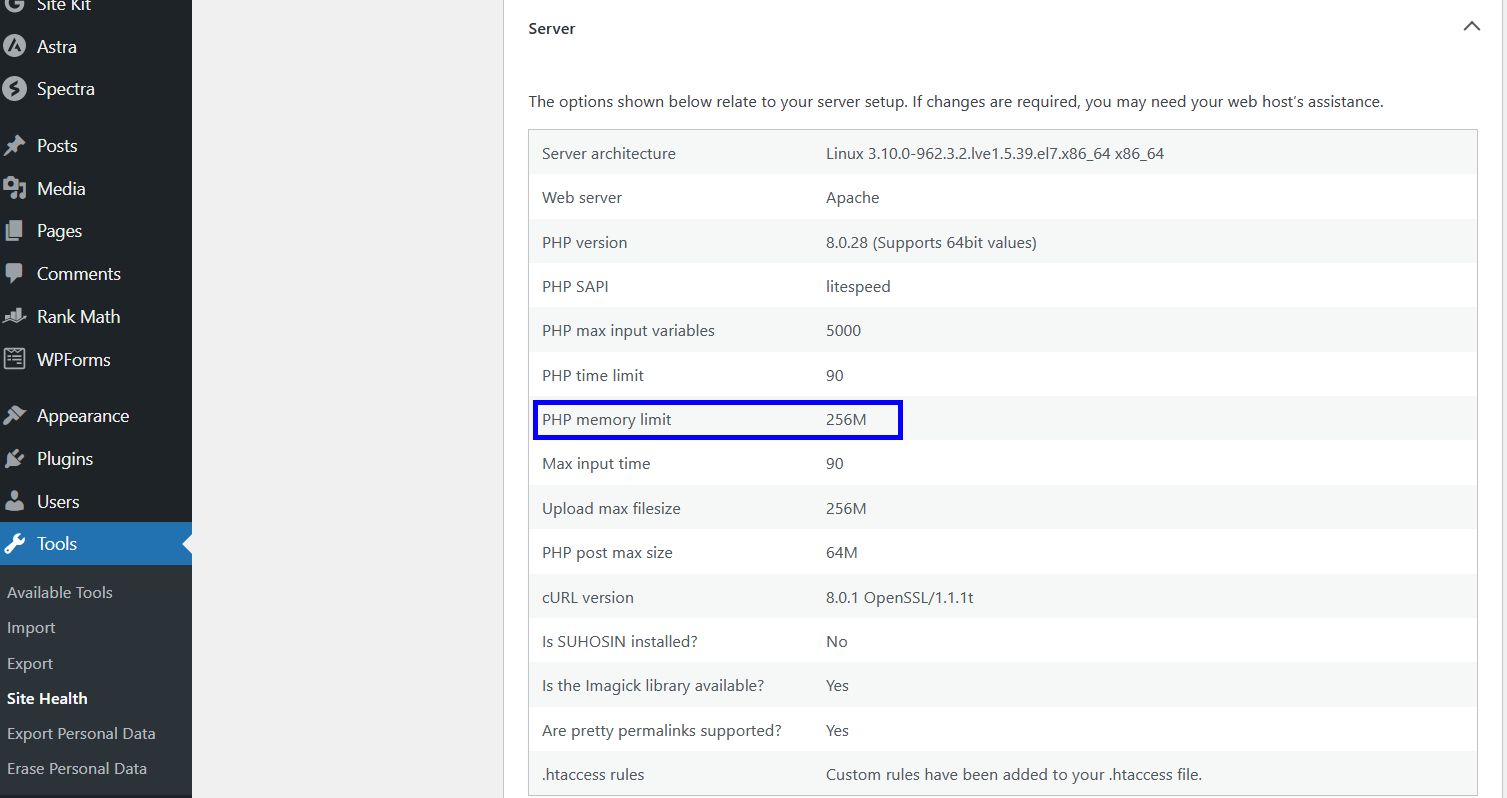
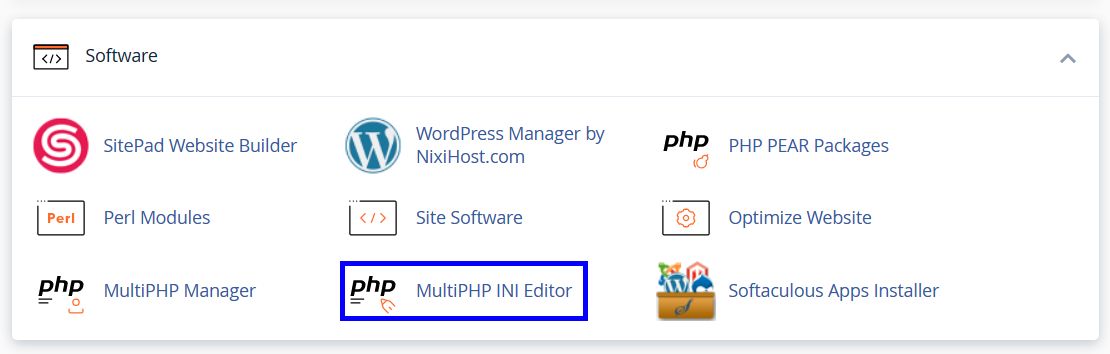
In our case, it’s already set to 256MB. If yours is lower, you can increase the PHP memory limit using cPanel’s MultiPHP INI Editor.

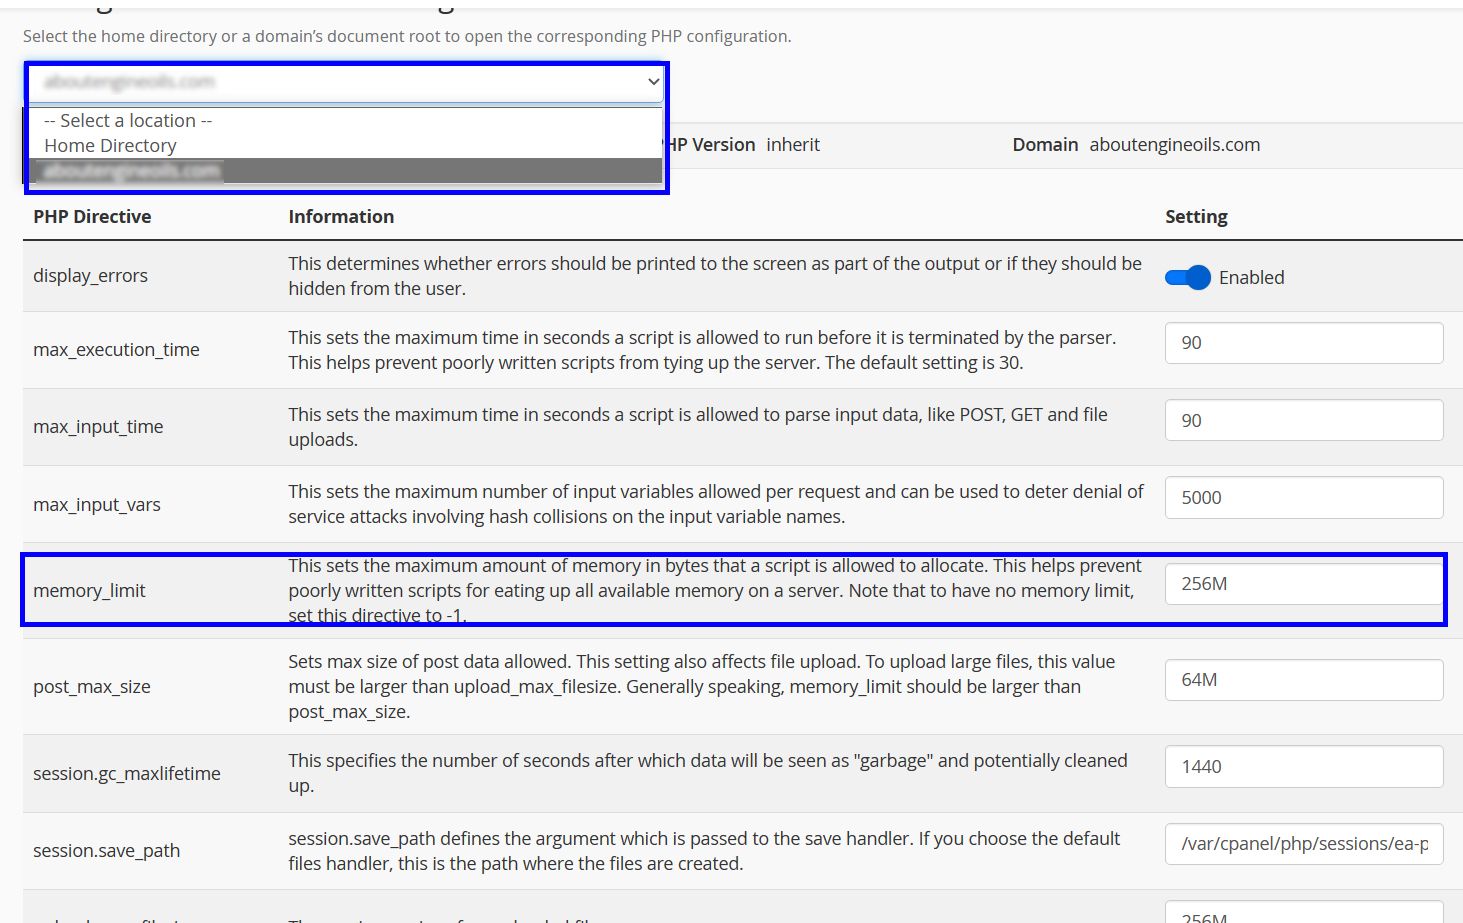
Once you’re in the MultiPHP INI Editor, use the drop-down menu to select your WordPress website, write 256M in the memory_limit field, and apply the changes.

If your host doesn’t offer a cPanel, you may need to edit your wp-config.php file or contact customer support to help you out.
Alternatively, you can host your website with Nexcess, which offers much more than what’s required with its high PHP defaults.
7. Enable persistent object cache
Since WordPress admin constantly changes, typical caching mechanisms don’t apply to the WordPress dashboard. In other words, page caching and browser caching won’t help.
However, object caching that caches frequently accessed information can cache frequently accessed data objects. In particular, it’ll serve the WordPress admin the data objects it needs to load fast.
You’ll need a persistent object cache to benefit from it. If your web host offers support for Redis or Memcached, you can enable that to add persistent object caching. Alternatively, you can install Docker Cache.
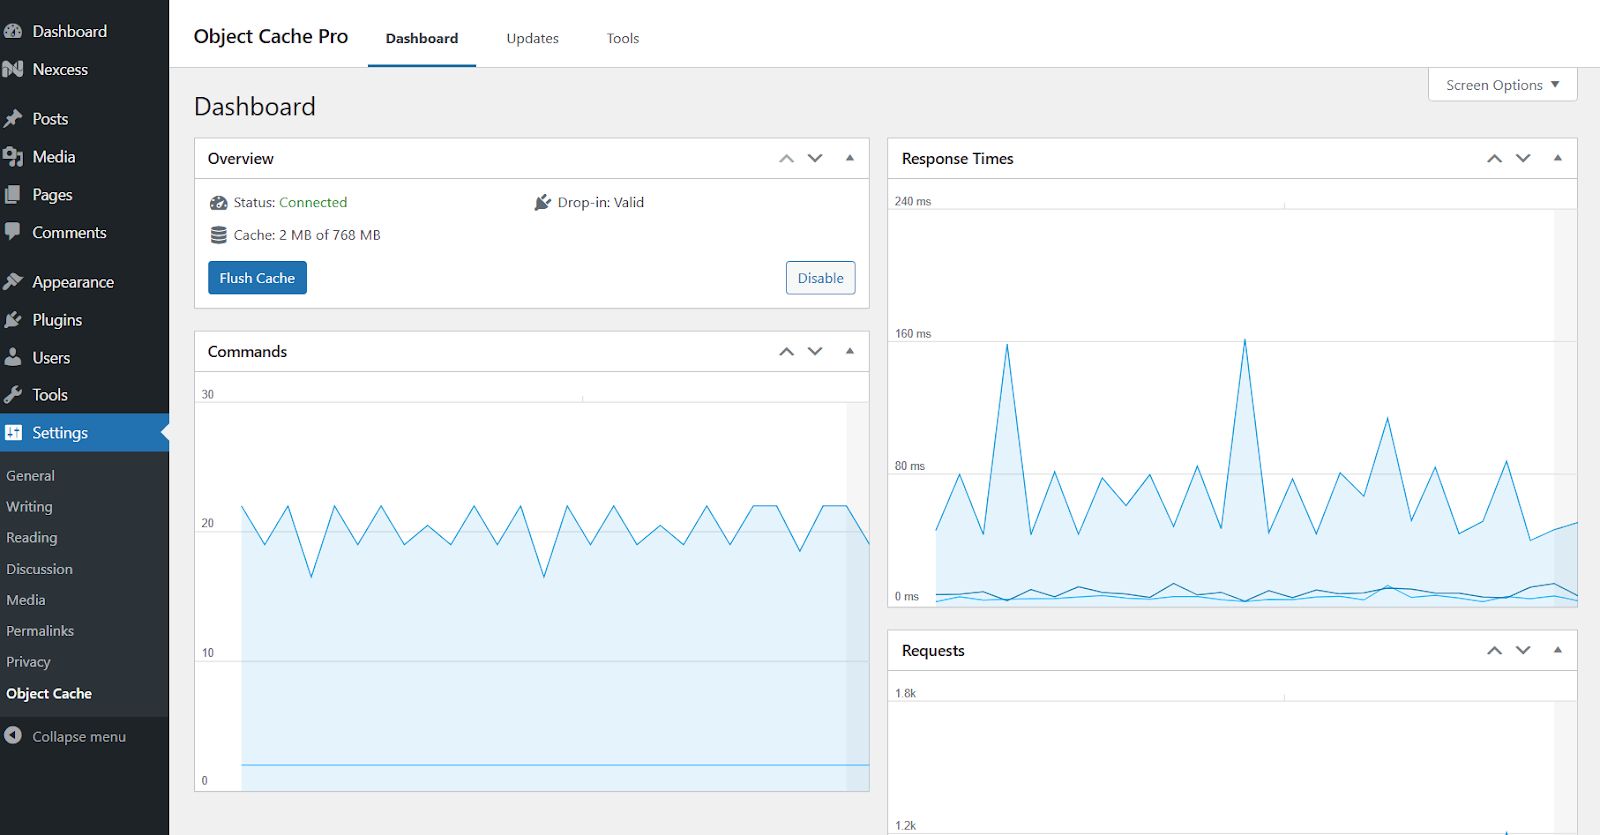
Nexcess offers Redis for object caching and integration with Object Cache Pro for WordPress plans.

8. Increase Heartbeat API call intervals
WordPress relies on Heartbeat API to facilitate real-time communication between the web browser and the server. In other words, the changes you make on the back end register with the server through the Heartbeat API.
In particular, Heartbeat API helps WordPress exchange the following information:
- Changes you make in the content editor.
- Notifications about ecommerce orders, comment submissions, and plugin updates.
- Updates surrounding post activity — whether someone is editing a particular post.
While you want all this since you wouldn’t want a computer crash to erase your whole draft, it strains your WordPress admin by sending regular AJAX requests.
For instance, if a user is working in the editor, WordPress admin sends an AJAX request every 60 seconds to autosave the draft. On the other hand, the Posts page is typically synced every 15 seconds to prevent two users from editing the same post.


If multiple users work on your WordPress website, all these requests can almost shut your WordPress admin down. If you’re using shared WordPress hosting, your host might even suspend your hosting due to high CPU usage.
So, what’s the solution? Increased Heartbeat API call intervals.
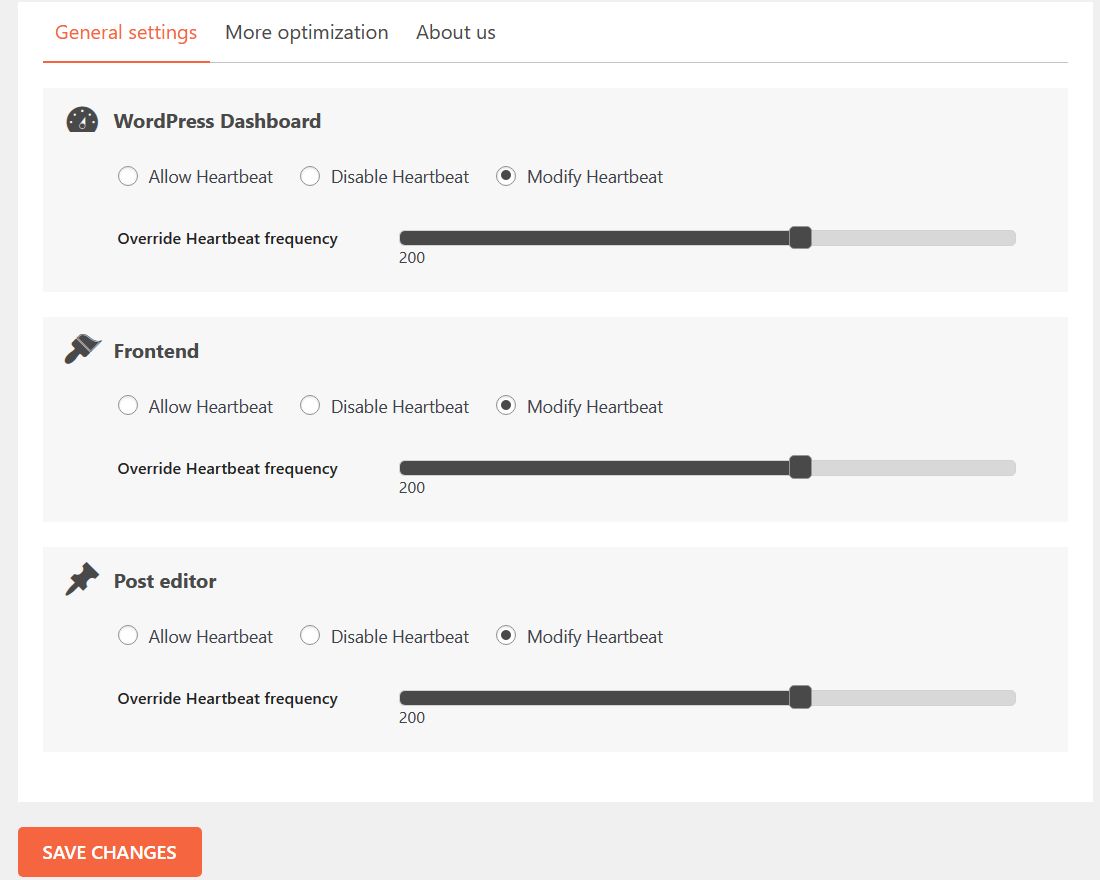
You can tinker with your Heartbeat API settings using WP Rocket’s Heartbeat Control plugin. After installing it, increase the Heartbeat frequency as you see fit. Typically, a range of 100-200 seconds works well.

9. Remove database bloat
Like Windows’ temp folder that fills up every few months, WordPress and its plugins generate their fair share of bloat.
In particular, different plugins use transients to cache and store temporary data in the WordPress database. These transients help speed up WordPress performance since the plugins don’t need to regenerate the required data.
The transients typically expire after a particular duration, becoming expired transients. They stay in the database until they’re requested again. However, that “until” might mean an hour, a day, or a year, depending on the plugin.
For instance, WooCommerce has a history of bloating WordPress databases with expired transients. To manually remove those expired transients, you can use the Delete Expired Transients plugin.
Alternatively, if you’re hosting your website with Nexcess, you can Delete expired transients using the Nexcess menu without bothering with a third-party plugin.


Besides expired transients, you might also have to attend to post revisions.
Every time you save a post or page, WordPress creates a post revision you can use to revert if required. While they can be helpful when working on a post, they don’t add much value after you finalize it.
You can remove these extra post revisions using a plugin like WP-Optimize.
10. Install a WordPress caching plugin
While caching plugins typically deal with the website's front end, they can also mean good news for the WordPress admin.
In particular, WordPress caching plugins reduce the need for repetitive and resource-intensive processes since they cache dynamic webpages in the form of static HTML. As a result, your WordPress site has more free CPU for the WordPress admin.
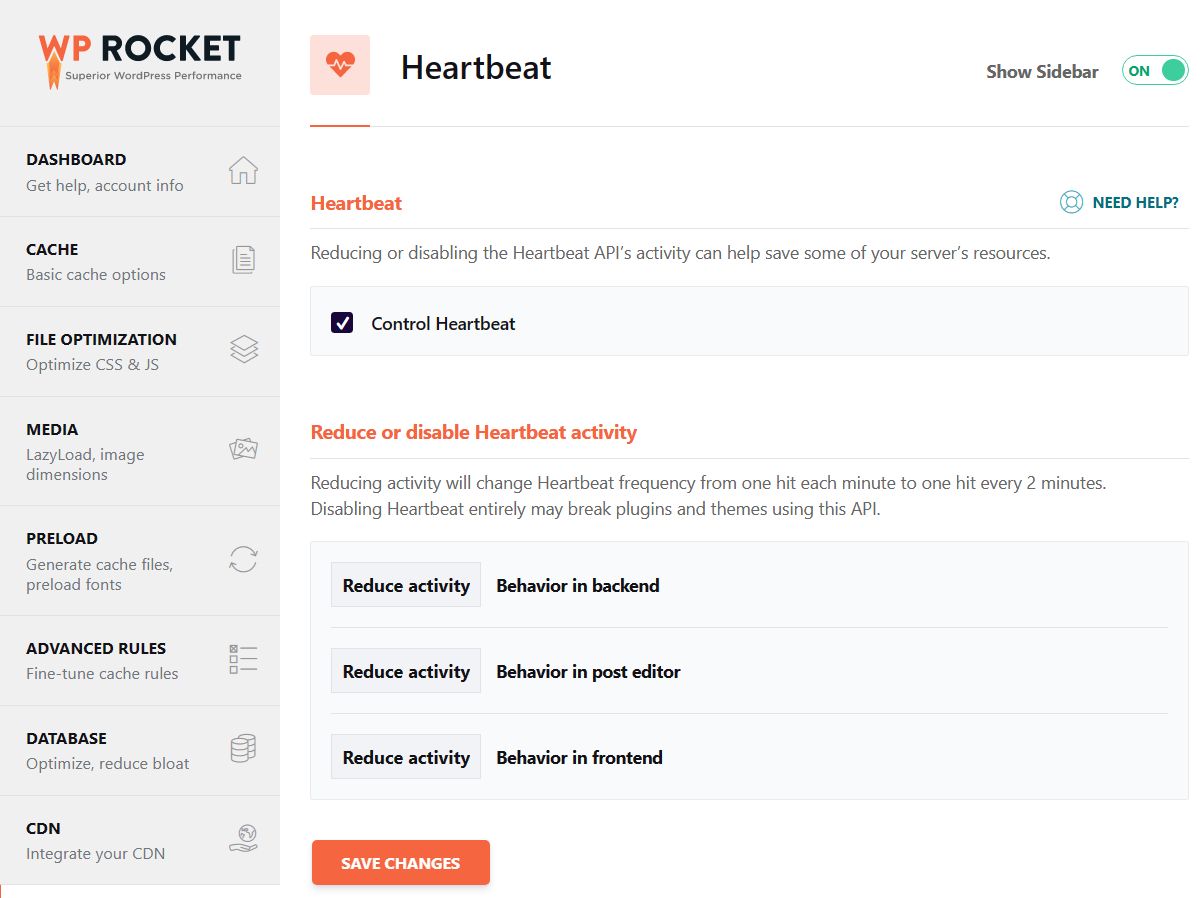
WP Rocket might be a great choice for a caching plugin since it’s an all-in-one solution that also helps with configuring Heartbeat API and removing database bloat.

11. Limit the number of posts or comments per page
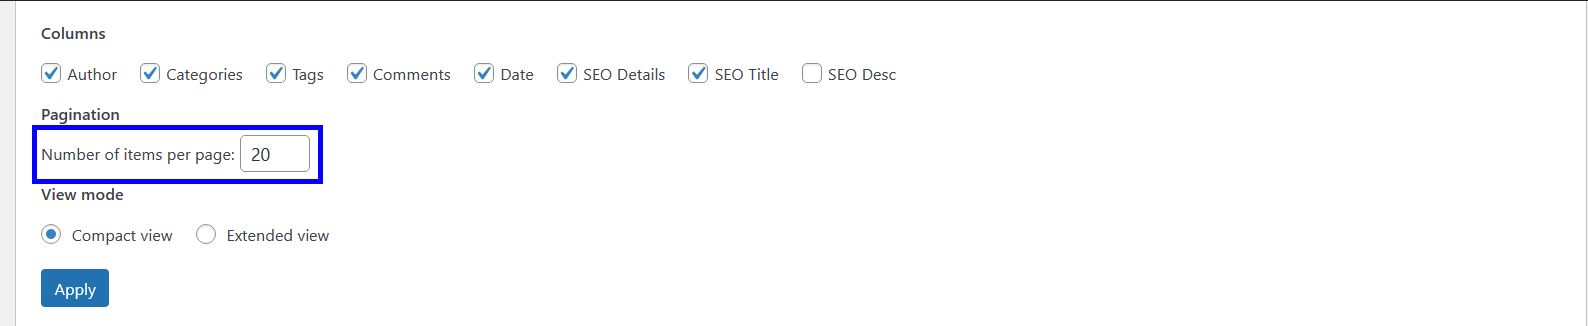
By default, WordPress shows up to 20 posts, comments, or custom post types (like WooCommerce orders) per page. However, if you increased the number of items to avoid pagination in the past, this number might be higher.
Loading fewer items will always take less time than loading more. So, if you’re experiencing a slow WordPress admin, it might be worth a try to reduce the number of items per page from Screen Options.

12. Monitor Time to First Byte
Time to First Byte (TTFB) refers to the time it takes for the web browser to receive its first byte from a server after sending a request. While it’s typically a web metric to test a WordPress site's front end, you can also use it to test the back end.
In particular, a high TTFB means that the admin areas take too long to even send their first byte. Besides that, if your TTFB is high, it means you either have resource-intensive plugins, or your hosting infrastructure is not appropriate for your website.
13. Switch to a better hosting provider
In the previous 12 tips, we’ve explored multiple ways to lower the demand end of the equation. However, there’s a limit. You can’t expect to run a growing ecommerce store on a shared WordPress hosting plan without issues.
In other words, if none of the tips help you speed up the WordPress admin, it’s time to look for a better hosting infrastructure with industry-competitive technical specs, premium performance add-ons, and a content delivery network (CDN) to offload intensive processes.
In addition, look for a host that offers:
- PHP 8 compatibility: Given each new PHP version's performance improvements, you shouldn’t stick with a web host that doesn’t support the latest PHP versions.
- Performance monitoring tools: If you rely on external performance monitoring tools, you often don’t know how much burden each add-on brings until your WordPress admin slows to a crawl.
- Staging site: You shouldn’t have to do all the testing on the live website. Make sure the web hosting company offers a free staging site.
Final thoughts: 13 ways to fix a slow WordPress admin dashboard in 2024
Website management is hard enough as it is with the number of tasks you have to handle. You don’t want to make it harder by using a slow WordPress admin.
To get help speeding up your WordPress admin and offloading menial website management tasks, check out Nexcess. With Nexcess managed WordPress hosting, you get a free plugin performance monitor, compatibility for PHP 8, and Object Cache Pro.
Not to mention, Nexcess hosting gives you optimized hosting servers, 24/7/365 support, and a free staging site per live website.
If you manage an enterprise website with multiple concurrent logged-in users, you might also benefit from Nexcess enterprise hosting for WordPress. It offers everything you need — and more.

