

Studies have found that around 70% of online businesses are selling internationally from 2022 onward. This fact creates a new challenge for ecommerce business owners as they need to come up with a solution for payment acceptance and processing that could address the diverse preferences of the customers around the world. Not being able to accept payments through your online store or lack of payment methods may be one of the reasons for poor conversion rates. Your potential customers may leave their cart during the checkout process due to not being satisfied with the available checkout options.
In this article, we will learn how to set up WooCommerce-Stripe Payment Gateway Integration to accept secure payments through your store while keeping the checkout experience secure and convenient for your customers.
What are the Costs of Using Stripe with WooCommerce?
- There are no monthly or annual fees with the Stripe pay-as-you-go payment processing platform.
- There is a 2.9% + $0.30 per transaction fee to accept credit card payments online. The fee is increased by 1% using international cards and currency conversions. Chargebacks are $15 per dispute.
- There is a 2.7% + $0.05 per transaction fee to accept payments in person.
Overview of the WooCommerce-Stripe Payment Gateway
WooCommerce is a powerful ecommerce platform used by StoreBuilder by Nexcess that works with the majority of the modern payment gateways, and Stripe is one of them. WooCommerce-Stripe Integration with payment gateways can be set up using different WooCommerce extensions. Stripe is considered one of the most popular and convenient payment solutions to integrate with your WooCommerce store for multiple reasons, including its transparent fees policy, easy setup, and secure payment channel.
Stripe is a Payment Card Industry (PCI)-compliant payment gateway that supports taking onsite payments using various payment methods, including credit cards and mobile payment options like Apple Pay or Google Pay. Let’s look at the benefits of using Stripe as the payment gateway integrated with your online store.
WooCommerce-Stripe Payment Gateway Features
- Availability: Stripe is currently available for businesses in 47 countries and supports more than 100 currencies.
- Fees: Stripe has no setup or monthly fees, and the base processing fee is 2.9% + $0.30 per successful card charge. The fee is increased by 1% using international cards and currency conversions. Chargebacks are $15 per dispute.
- Security: Stripe is a PCI-compliant payment gateway.
- Payment Options: Stripe accepts cards, digital wallets, bank debits and transfers, local payment methods like Alipay, and more.
- Customization: Stripe Checkout is highly customizable.
WooCommerce-Stripe Payment Gateway Integration Solutions Comparison
WooCommerce-Stripe Integration for payment processing can be set up using a number of WooCommerce extensions the platform provides. Although all plugins offer very similar functionality and can be used to integrate Stripe with your online store, there are a few points to take into consideration to choose the best software before we can start the integration process. Let’s compare the three best and most widely used WooCommerce-Stripe Integration solutions to better understand which extension we should choose.
WooCommerce-Stripe Payment Gateway Integration Solutions Comparison Table
| Criteria | WooCommerce Stripe Payment Gateway | Payment Plugins for Stripe WooCommerce | Stripe Payment Plugin for WooCommerce |
| Developer | WooCommerce | Payment Plugins | WebToffee |
| Status | Official WooCommerce Solution | Stripe Partner | Third-Party Solution |
| Cost | Free | Free | Free |
| Number of Installations | 900,000+ | 100,000+ | 10,000+ |
| Rating | 3.1 out of 5 stars based on 115 reviews | 4.9 out of 5 stars based on 136 reviews | 4.6 out of 5 stars based on 30 reviews |
| Support for WooCommerce Subscriptions | Included | Included | Included |
| Support for Stripe Checkout Customization | Included | Included | Included |
| Support for Saving Payment Methods | Included | Included | Included |
As you can see, WooCommerce-Stripe Payment Gateway and Payment Plugins for Stripe WooCommerce are official solutions for Stripe integration. Still, the third option, Stripe Payment Plugin for WooCommerce, developed by WebToffee provides all the same features and has earned high rankings from WooCommerce users. In addition, all three extensions provide excellent documentation and can be used to integrate StoreBuilder with Stripe for payment processing.
Overview of the WooCommerce-Stripe Gateway Integration Process
The WooCommerce-Stripe integration process consists of three steps:
- Getting a Stripe account created.
- Installing a WooCommerce extension for Stripe integration.
- Configuring and establishing the Stripe payment gateway in WooCommerce.
Step #1: Stripe Account Creation
Installing any software for Stripe payment gateway integration with your WooCommerce store does not make much sense without having a Stripe account first. Once you have created an account, you will receive a unique merchant number as well as be able to view statistics and activity reports. To set up our WooCommerce-Stripe Payment Gateway Integration for StoreBuilder, we need to obtain API keys that we will use to connect your store to the Stripe system.
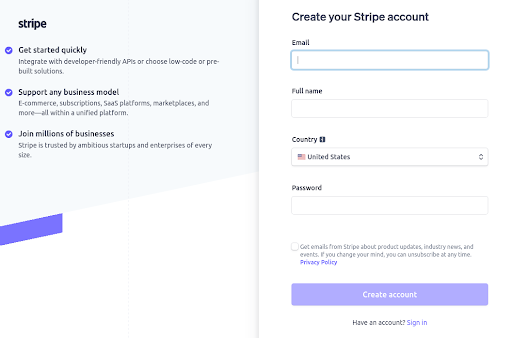
Open the Stripe official website stripe.com and click Start Now. The account creation page will open and ask for your email address, full name, and country of business. Once you have filled in the form and generated a strong password, click Create Account. Stripe will also require you to provide your business details, including your address, banking account information, etc. Please be extra careful typing in all information to ensure payments go through without any issues:

Once you have created your Stripe account and provided all the required information, we can move on to having one of the integration solutions installed from our WooCommerce admin or StoreBuilder panel.
Step #2: WooCommerce Extension Installation
There are multiple WooCommerce extensions to integrate Stripe with your store. They work in a very similar manner and provide the same functionality.
To install one of them, navigate to the Site > Plugins interface from the streamlined menu of your StoreBuilder Dashboard. Next, Install and activate one of the solutions we compared earlier in the article. After that, we can move on to linking your Stripe account to your WooCommerce store.
The WooCommerce Stripe Payment Gateway plugin is installed and activated by default for everyone building their online shop using StoreBuilder. You can use the official extension developed by WooCommerce or use an alternative like the Payment Plugins for Stripe WooCommerce plugin.
The configuration process and the functionality provided are very similar, so you can use any of the three extensions we compared earlier in the article. However, if you choose not to use the WooCommerce Stripe Payment Gateway plugin, make sure to deactivate it from Site > Plugins.
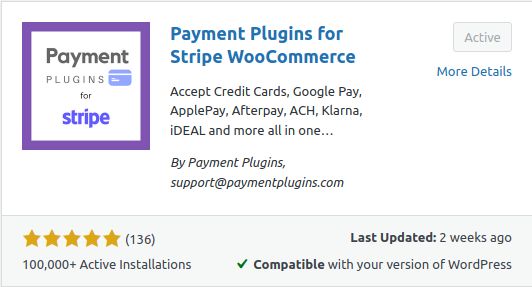
We have installed the Payment Plugins for Stripe WooCommerce extension developed by a Stripe partner:

Step #3: Establishment of a WooCommerce-Stripe Payment Gateway Connection
To establish a connection between our store and the Stripe account we have created, we need to either log in to it from the WooCommerce admin panel or provide API credentials from the account.
Open the newly installed plugin settings from your WordPress or StoreBuilder dashboard, and let's start with the payment gateway configuration. It will take you straight to the plugin’s API Settings tab under WooCommerce Payments settings:

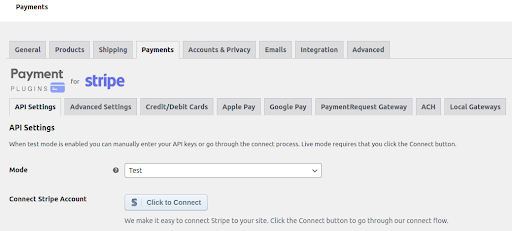
There are two modes to choose from, Test and Live. The Test mode allows you to test transactions without an actual card being charged. You can turn on the Live mode when you have configured everything and are ready to accept payments from your customers.
Click on the Click to Connect button to proceed with the WooCommerce-Stripe Gateway Integration setup. You will be taken to a page that will ask you to log in to your Stripe account or confirm you would like to choose the existing one saved in the browser, depending on whether you are currently logged in to the Stripe account you created.

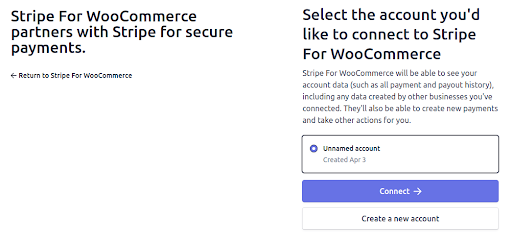
Choose the account and click on Connect. If you haven’t completed your Stripe account setup, you will be asked to fill in the required information like your bank account and product details. Once the account is connected successfully, you will be redirected back to your WordPress or StoreBuilder dashboard. This time you will see the new information WooCommerce needs to establish a connection to Stripe added there, including the Account ID and Publishable Key. Please note that these credentials will only work for testing purposes if you choose the Test mode. You will need to repeat the process once you switch to the Live mode.

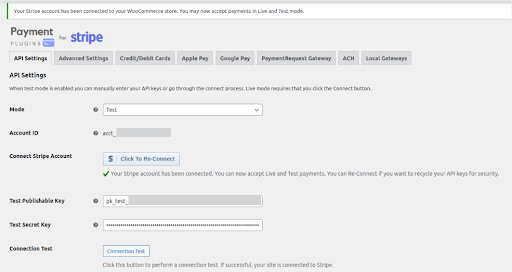
We can test the connection between our store and Stripe by clicking the Connection Test button before we can save the settings. If the connection is successful, you will see a message from your dashboard saying so. Click on the Save Changes button once you are done with connection testing:

Stripe Payment Methods Configuration
When we have successfully connected our WooCommerce store to the Stripe account, the Stripe Credit Cards payment method is enabled by default, but there are a few more settings you may want to enable or modify. Below we will review how to configure Stripe payment methods from the StoreBuilder dashboard.
Enabling More Payment Methods
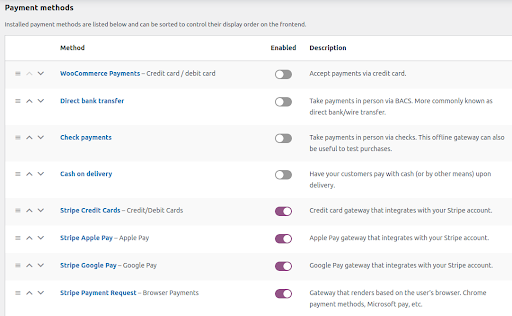
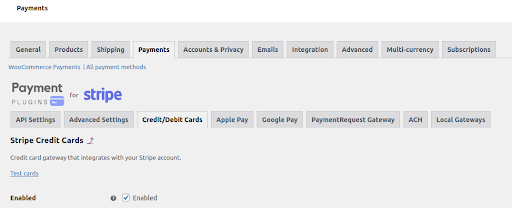
Choose Store > Settings > Payments from your StoreBuilder dashboard. Next, make sure the Stripe Credit Cards option is enabled. You may still have the WooCommerce Payments method selected, leading to multiple credit card fields shown on the front end. Uncheck WooCommerce Payments as well as any other methods that Stripe does not provide.
In addition to the Stripe Credit Cards method, we will likely want to activate support for digital wallets or other payment methods like Apple Pay or Google Pay. These options have their own buttons, and you can see that we have enabled both Apple Pay and Google Pay, as well as the Stripe Payment Request below:

Configuring Credit Cards Payment Method
You can see a more detailed credit cards payment method settings menu from the Credit/Debit Cards tab under the Payment tab settings below:

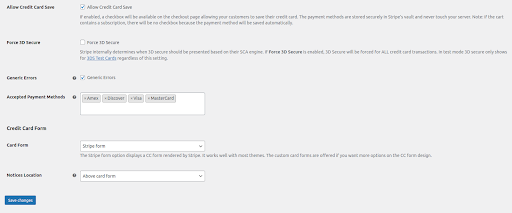
You can allow your customers to save their credit card information for further orders, edit the list of the accepted payment methods, or change the payment form layout. Do not forget to click on Save Changed once you are done with the configuration:

Once we have configured which payment methods will be used at our store, you can test the configuration by placing test orders.
Stripe also provides test card numbers to test your WooCommerce-Stripe Integration. You can find test card numbers of all kinds and additional information by checking out the link above. When you have confirmed everything is working correctly and are ready to accept actual payments using Stripe, perform the same configuration step, but this time in the Live mode.
Bottom Line
Stripe is one of the best payment solutions to integrate with your WooCommerce store. It provides numerous benefits to ecommerce business owners, ensuring secure payment processing and providing customizable checkout.
There are multiple extensions for StoreBuilder-Stripe Integration, including official solutions developed by WooCommerce and Stripe partners, offering a wide range of features and customization options.
The integration process is straightforward. After creating a Stripe account and installing the chosen integration extension, all you need to do is connect it with your store to ensure smooth payment processing.
If you'd like to further assistance moving forward, check out what Nexcess offers for managed WooCommerce hosting.
This blog was originally published in April 2021. It has since been updated for accuracy and comprehensiveness.


