

A 2021 consumer survey by iPaper found that 66% of online shoppers choose not to visit ecommerce stores that offer a poor user experience (UX). And there’s nothing that screams bad UX like landing on a Magento store undergoing maintenance.
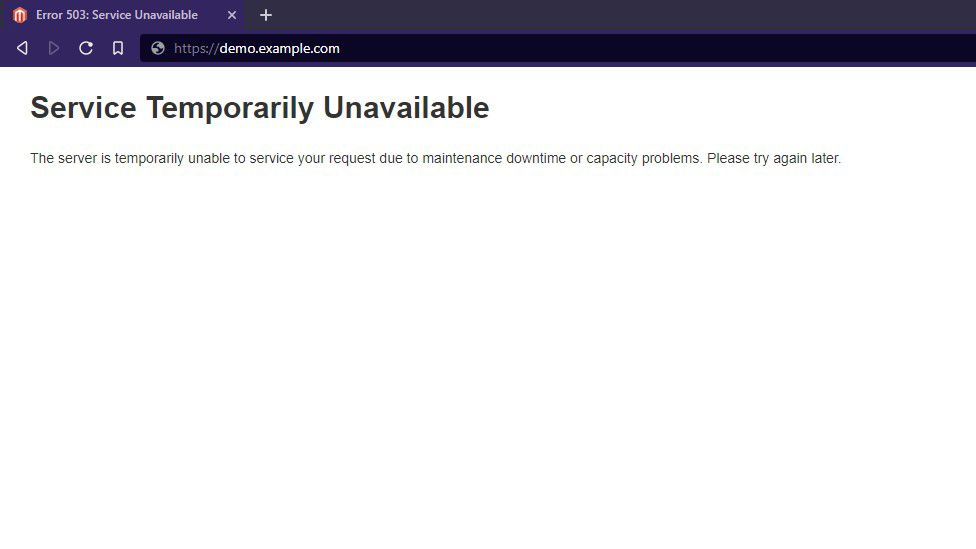
The default Magento 2 maintenance page displays an uninformative Service Temporarily Unavailable message that can confuse your customers. Some visitors might assume you’ve shut up shop.
To prevent such outcomes, we’ve created this guide to help you create a custom Magento 2 maintenance page with information that encourages visitors to return to your store.
Here’s what we’ll cover:
- The Magento 2 Maintenance Mode in a Nutshell
- Steps To Create a Custom Magento 2 Maintenance Page
- Step 1: Log In to Your Magento Server and Duplicate the Default Magento Maintenance Skin Folder
- Step 2: Create Your Custom 503 Maintenance Page Using HTML and CSS
- Step 3: Create a local.xml File
- Step 4: Enable Maintenance Mode and Verify Your Maintenance Page Contents
- Final Thoughts: How To Create a Custom Magento 2 Maintenance Page
The Magento 2 Maintenance Mode in a Nutshell
The Magento 2 maintenance mode is one of the four operation modes in which you can use the Magento application. When Magento is in maintenance mode, the front end is offline, and visitors are redirected to a Service Temporarily Unavailable page.
The Magento 2 maintenance mode helps test new changes since it lets you allow one or more IP addresses to retain access to the front end. That way, you can test design and theme changes or troubleshoot bugs in a production store.
You can enable maintenance mode in Magento 2 with the following command:
$ php bin/magento maintenance:enableOnce enabled, Magento adds the .maintenance.flag file to the var/ folder in the project root directory. If you’ve exempted one or more IP addresses from being redirected to the Service Unavailable page, it includes those in a separate file called .maintenance.ip in the same folder.
When a visitor reaches your website, Magento checks for the maintenance file in the var/ folder. And if the file exists, it checks for the .maintenance.ip file containing the list of exempt IP addresses.
In case of a match, it directs the visitor to the front end. And if the IP isn’t listed in the .maintenance.ip file, it redirects them to the maintenance page.
Here’s what the default maintenance page looks like:

Steps To Create a Custom Magento 2 Maintenance Page
Now that you understand Magento maintenance mode and how it works, let’s explore how to create a custom maintenance page for your online store.
Note: Magento won’t display the maintenance mode page in developer mode. Make sure you’re running Magento in production mode before following our tutorial.
Step 1: Log In to Your Magento Server and Duplicate the Default Magento Maintenance Skin Folder
Access the Magento command line interface (CLI) over SSH and go to the pub/errors/ folder in the Magento root directory.
Duplicate the default/ folder using the following command:
$ cp -R default customThe above command copies the contents of the default folder into a new folder called custom. That way, the default folder can be a fallback for when the Magento error processor cannot find our custom template.

Step 2: Create Your Custom 503 Maintenance Page Using HTML and CSS
Navigate inside the newly created folder as follows:
$ cd custom
Edit the 503.phtml file inside the folder using your preferred text editor and replace its code with the following:
<?php
/**
* Copyright © Magento, Inc. All rights reserved.
* See COPYING.txt for license details.
*/
?>
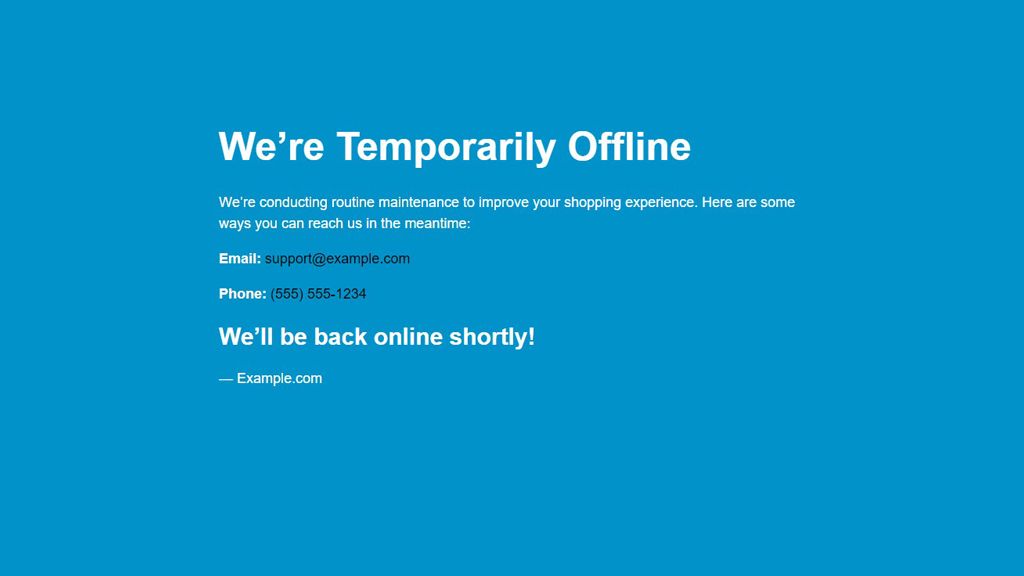
<h1>We’re Temporarily Offline</h1>
<p>
We’re conducting routine maintenance to improve your shopping
experience. Here are some ways you can reach us in the meantime:
</p>
<p><strong>Email: </strong><a href="mailto:#">support@example.com</a></p>
<p><strong>Phone: </strong><a href="tel:#"> (555) 555-1234</a></p>
<h2>We’ll be back online shortly!</h2>
<p>— Example.com</p>The above code is a simple responsive maintenance page template. Make sure to edit the information inside it, such as the business name, email address, and phone number, before pasting the code.
Next, we’ll create a CSS file to style our custom Magento 2 maintenance page.
Navigate to the CSS folder inside the custom directory and create a backup of the default .css file as follows:
$ mv styles.css styles.css.bakThen, create a new CSS file named styles.css and insert the following code inside it:
/**

* Copyright © Magento, Inc. All rights reserved.

* See COPYING.txt for license details.

*/


body {

display: block;

max-width: 750px;

background: #0092C8;

color: #fff;

font-family: Helvetica, sans-serif;

font-size: 18px;

line-height: 1.5;

margin: 0 auto;

padding-top: 150px;

text-align: left;

}

a {

color: #000;

text-decoration: none;

}

a:hover {

color: #fff;

text-decoration: none;

}

h1 {

font-size: 50px;

font-weight: 700;

margin: 0 0 20px;

}

h2 {

font-size: 30px;

font-weight: 700;

margin: 0 0 10px;

}
Step 3: Create a local.xml File
Now, it’s time to edit the local.xml file to instruct Magento to use our newly created custom Magento 2 maintenance page.
Navigate back to the pub/errors/ folder using the following command:
$ cd..Copy the sample local.xml file to create a new one using the following command:
$ cp local.xml.sample local.xml
Edit the newly created file and replace default inside the <skin> node with the name of the folder containing our custom maintenance mode page. In our case, it’s custom. Here’s what the file should look like:


After that, save the file and exit the text editor.
Step 4: Enable Maintenance Mode and Verify Your Maintenance Page Contents
Navigate to the project root directory and enable Magento 2 maintenance mode using the following command:
$ php bin/magento maintenance:enableAccess the front end of your Magento store in a web browser and verify the page displays correctly. Here’s what it looks like for us:

Finally, head back to the Magento CLI and disable maintenance mode using the following command:
$ php bin/magento maintenance:disableFinal Thoughts: How To Create a Custom Magento 2 Maintenance Page
We’ve shown you how to create a basic custom Magento 2 maintenance page without a Magento extension. But that’s just a glimpse of what’s possible. Play around with the HTML and CSS to customize the maintenance page to match your online branding.
And make sure you test this in a staging environment before implementing it in your production store. If you don’t have access to a staging environment, sign up for Managed Magento Hosting with Nexcess to access Magento-ready servers with dedicated staging websites.
Browse our plans to get started today.

