

Setting up a local WordPress site for development presents lots of challenges for users. Specifically, configuring a local WordPress database, setting up the correct version of PHP, and installing a WordPress site that mimics the production site can be a good amount of work. Furthermore, there are detailed setup tasks involved.
But, with the right tools and help, developing your WordPress site locally can be quite beneficial. Therefore, let's look at one good option for local WordPress development.
Why choose Local (localwp.com) for local WordPress development?
Local (localwp.com) is a tool created to help simplify the process of spinning up a local WordPress server on a Mac, PC, or Linux for local WordPress development.
Key features
Installing Local provides many crucial features for running a WordPress site on your local computer.
Configurable environment
Local provides two types of servers capable of running PHP:
- Apache
- NGINX
By default, Local assumes you’re using NGINX but you can always change the web server used to process your requests.
Additionally, Local handles spinning up an isolated MySQL database and configuring your wp-config.php file to connect to it automatically. With these two environment factors handled, you’re practically done setting up a proper environment for local WordPress development.
Hot swappable features
When you set up a site, you need to decide which version of PHP you’d like to use, and it can be challenging to install PHP on your local machine. Local handles isolating its installation of PHP and provides a select box to swap out different versions quickly.
If you’re working on a local WordPress installation and want to test if your site is compatible with PHP version 8, you can select PHP 8 on your site, and Local will install and configure it automatically. Local also provides the ability to switch between an Apache server and NGINX.
Addon ecosystem
Local allows developers to create addons that can supercharge Local to do some cool things. Although there is only a handful of addons at the moment, they are still very powerful in what they let you accomplish locally.
Here are two of the most popular addons created by the team working on Local:
- Image Optimizer helps you optimize the images you’re using locally. Then, when you’re ready to push images up to your production environment, you can be sure you are using optimized images.
- Link Checker allows you to scan your local site for broken links or links to pages that will result in the user seeing a "404: Not Found" error.
These are just a few reasons Local makes local WordPress development easy, and you can view a complete list of the features on their website.
Setting up Local
Installing local is like installing any other program on your computer. You can download the application for Mac, PC, or Linux straight from the homepage.
Minimum requirements
To install Local and create a few local WordPress sites, you’ll need a computer with at least the following resources.
- 4 GB of Ram
- 1.5 GB of free disk space
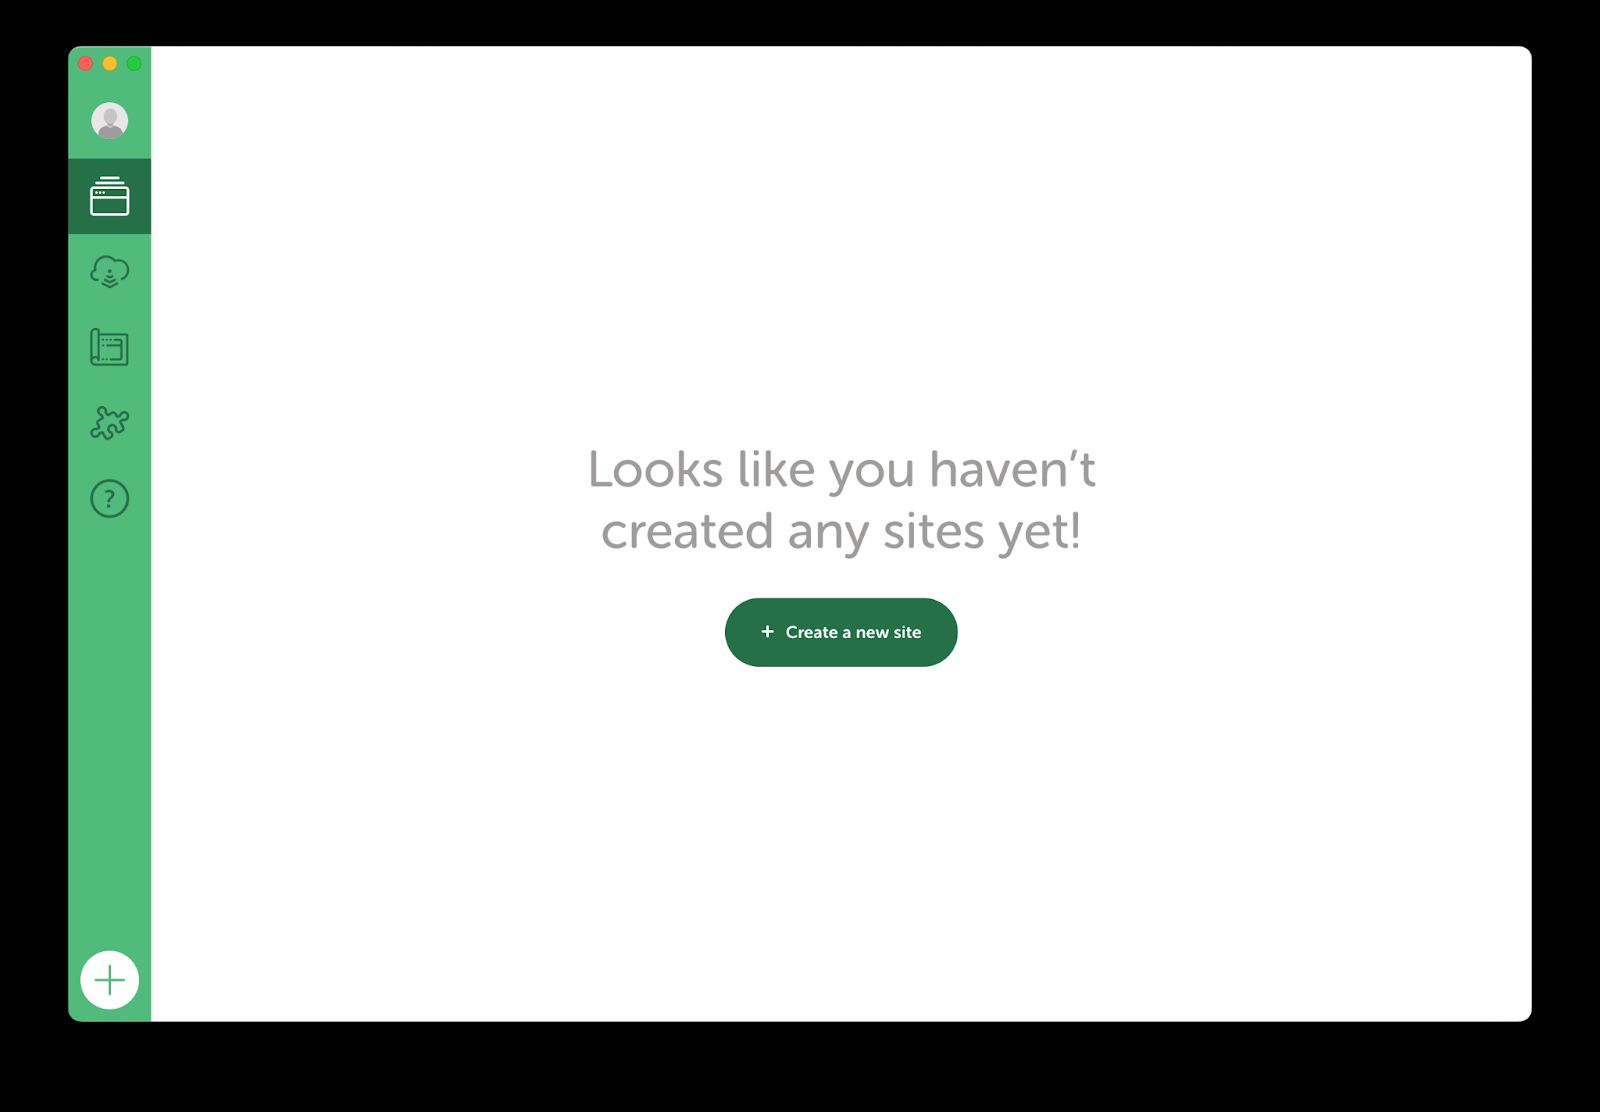
Step #1: Set up a new WordPress Site
When you initially start Local and don’t have a site set up yet, it will prompt you to create your first Local WordPress site:

Clicking Add New site or using the plus sign (“+”) in the bottom left corner of the application will present you with two options. You can “Create a New Site” or choose “Create a New Site from Blueprint” as the next step:
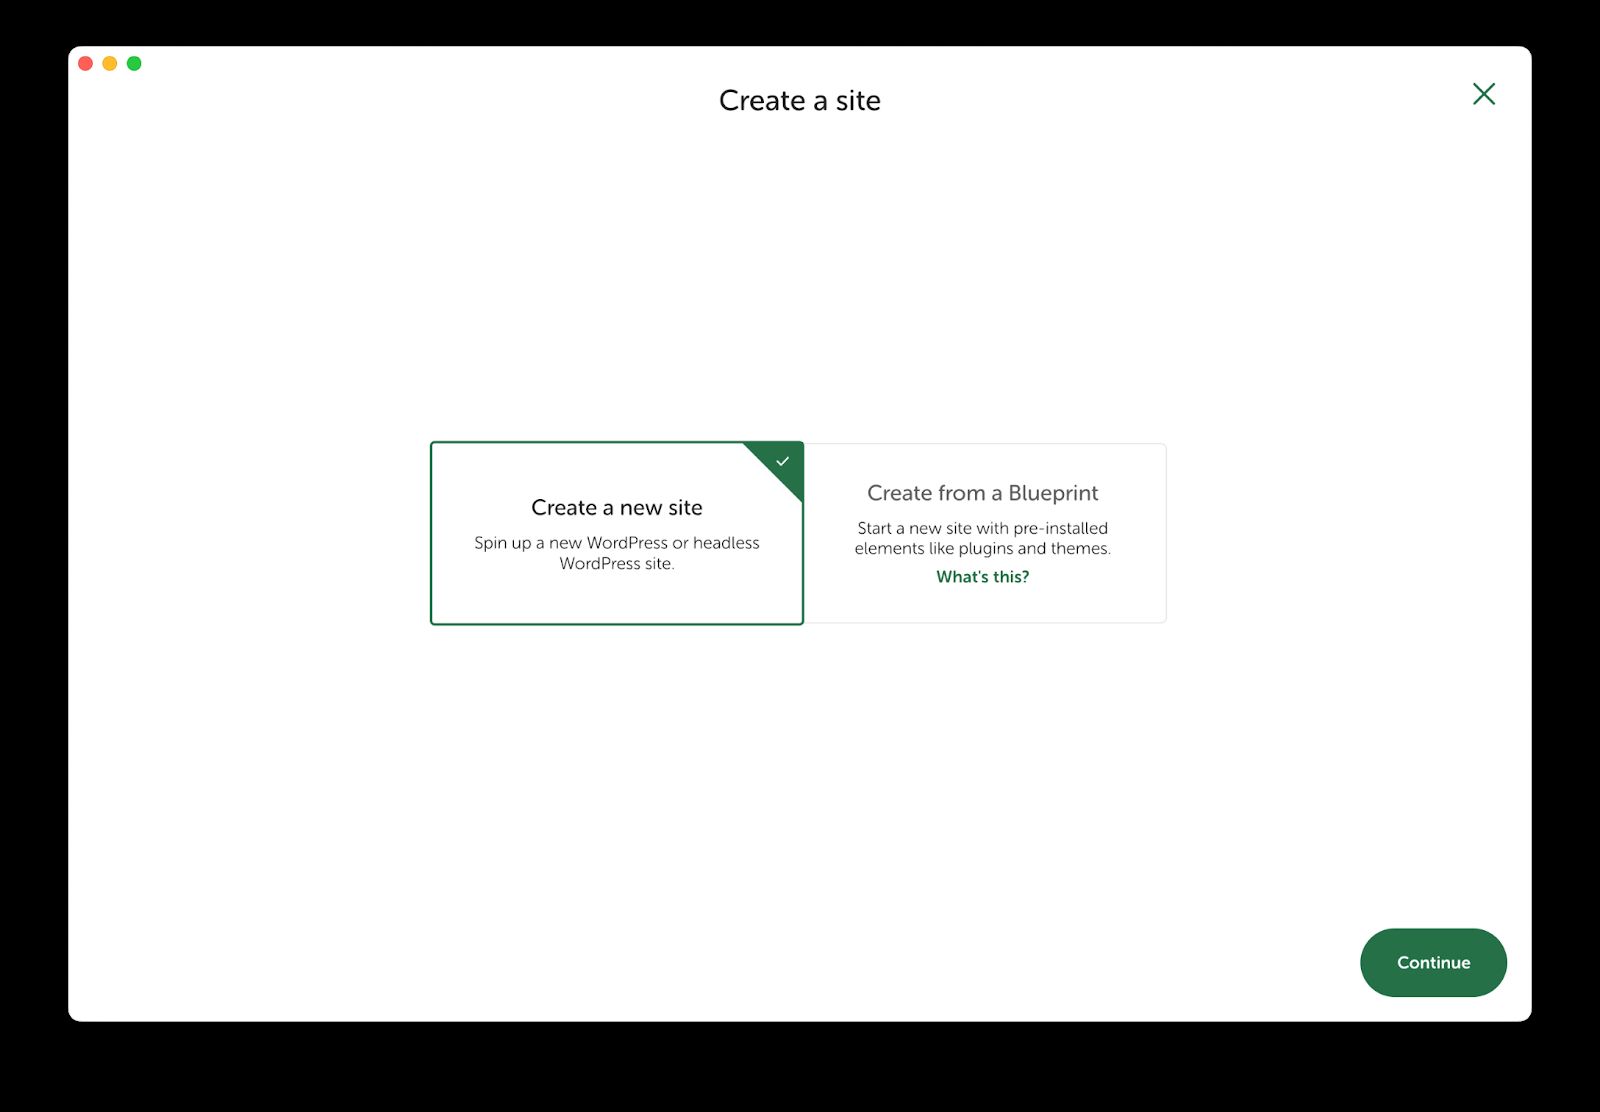
Blueprints are handy because you can save an existing site as a blueprint to rapidly create similar sites with pre-installed themes and plugins.
Once you have chosen an option, Local will guide you through three more steps to create your local WordPress site.
Step #2: Choose a name and domain for your local WordPress site
The next step is to choose a name for your site and a domain name you’d like to use for viewing the site locally. You can also choose where you would like Local to place the files it will use to run your site:
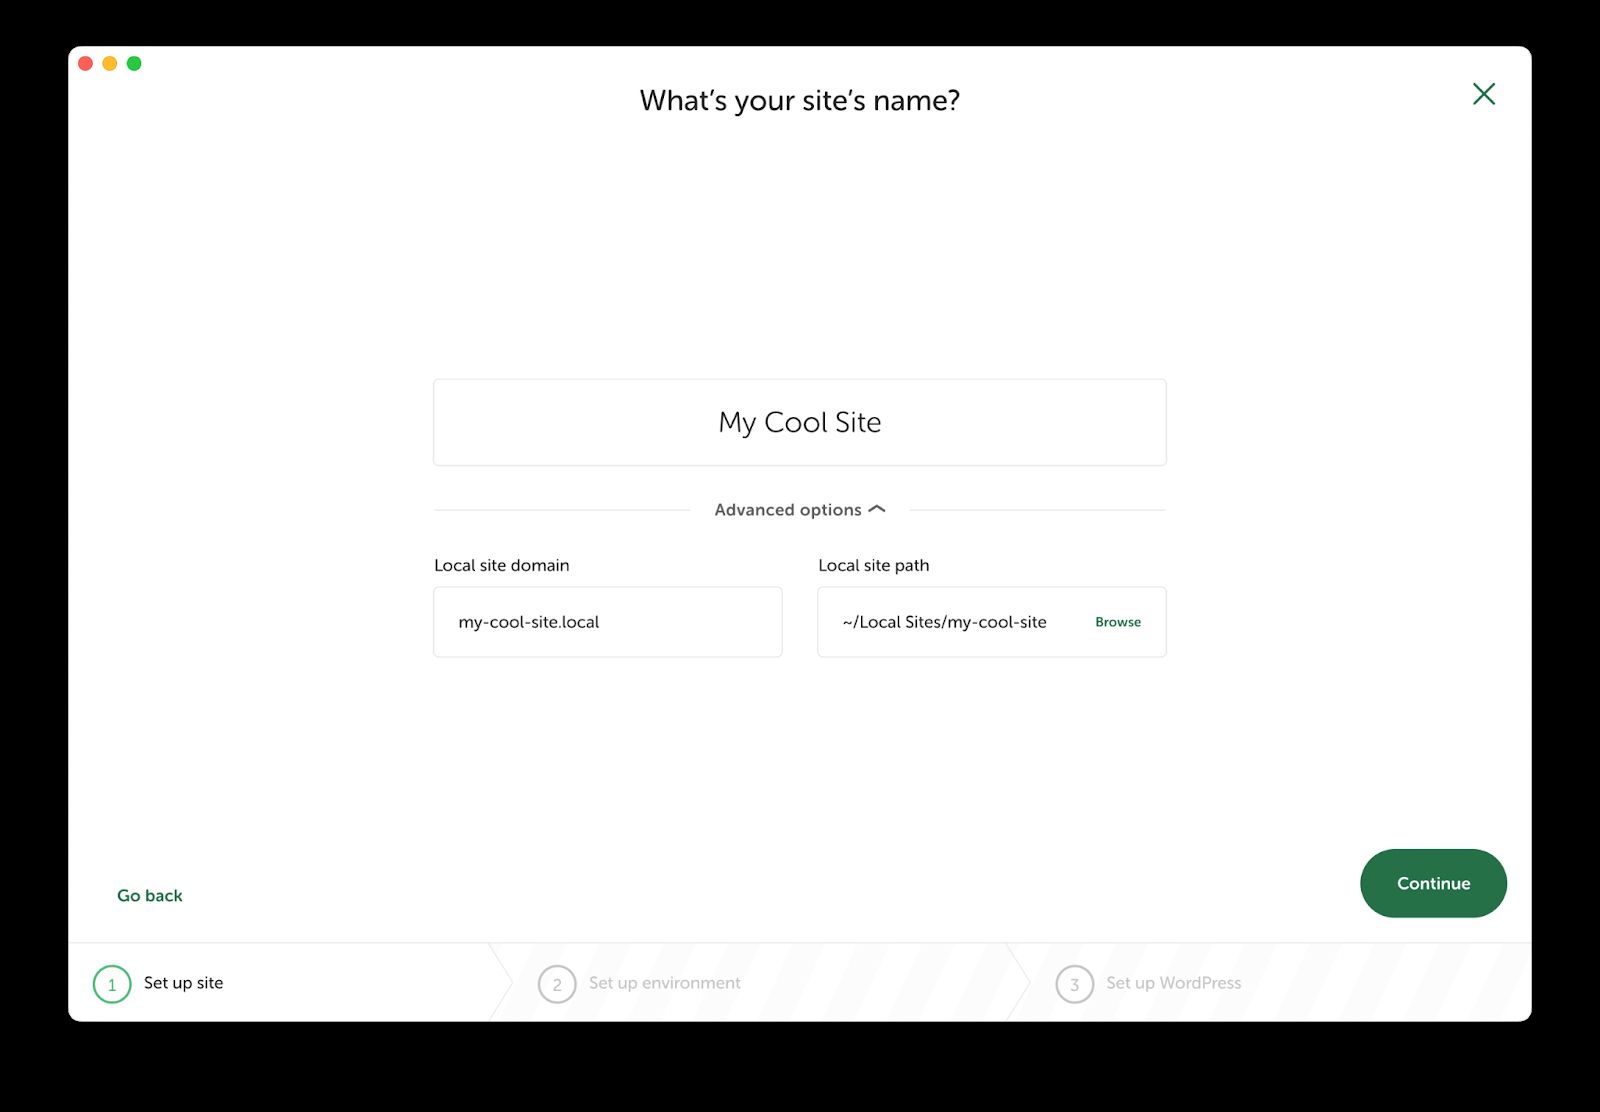
Pick a name for your site that will help you identify it in the future. For example, if you’re setting up a local version of your current site, you could just use the domain name.
You’ll also want to configure your domain to be something memorable. Local will try to guess what your domain should be based on your chosen name. But you don’t have to use it.
Clicking the Advanced link will expand your options so you can customize your domain to be whatever you want. We recommend keeping the .local TLD, as this will keep you from running into hard-to-debug issues when working with your new local site.
Just like a server, your site files should be in a convenient location if you want to edit them in the future. It is also a good idea to create a folder on your computer that you will use to store all your local site files.
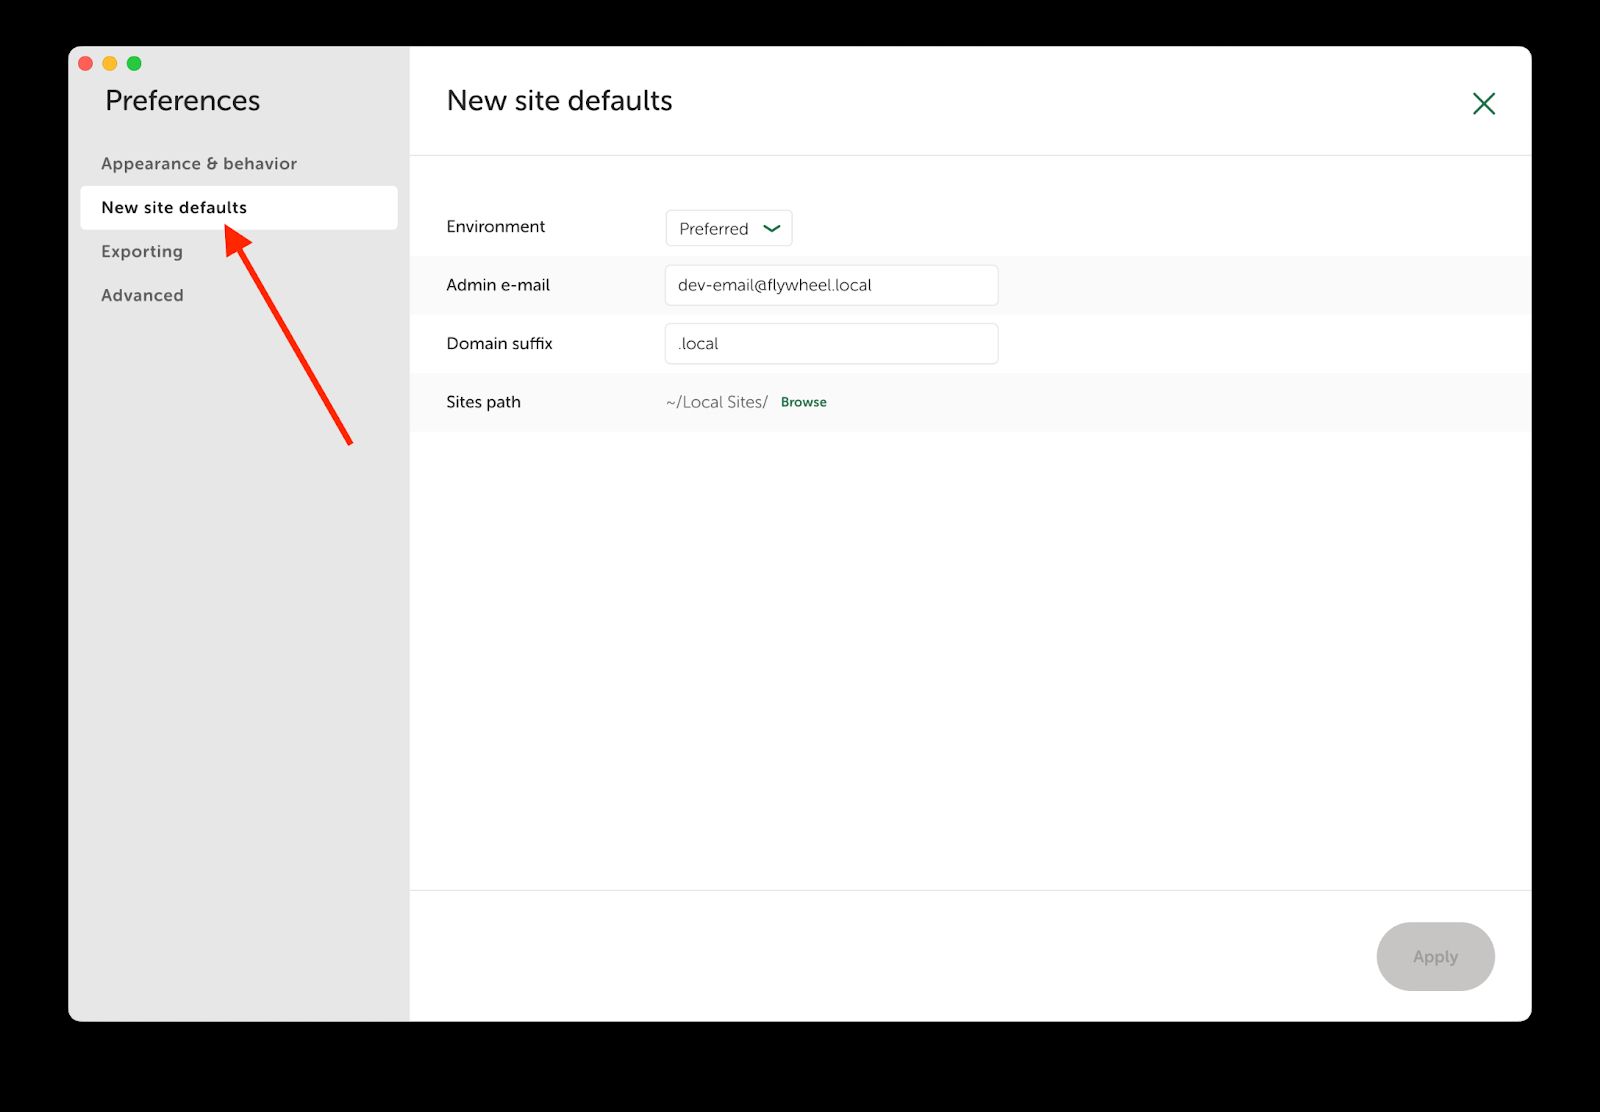
You can set a default folder in the preferences of Local by clicking the user icon in the top left corner of the application and navigating to New Site Defaults:
Local User Interface > Top Left Corner > Preferences
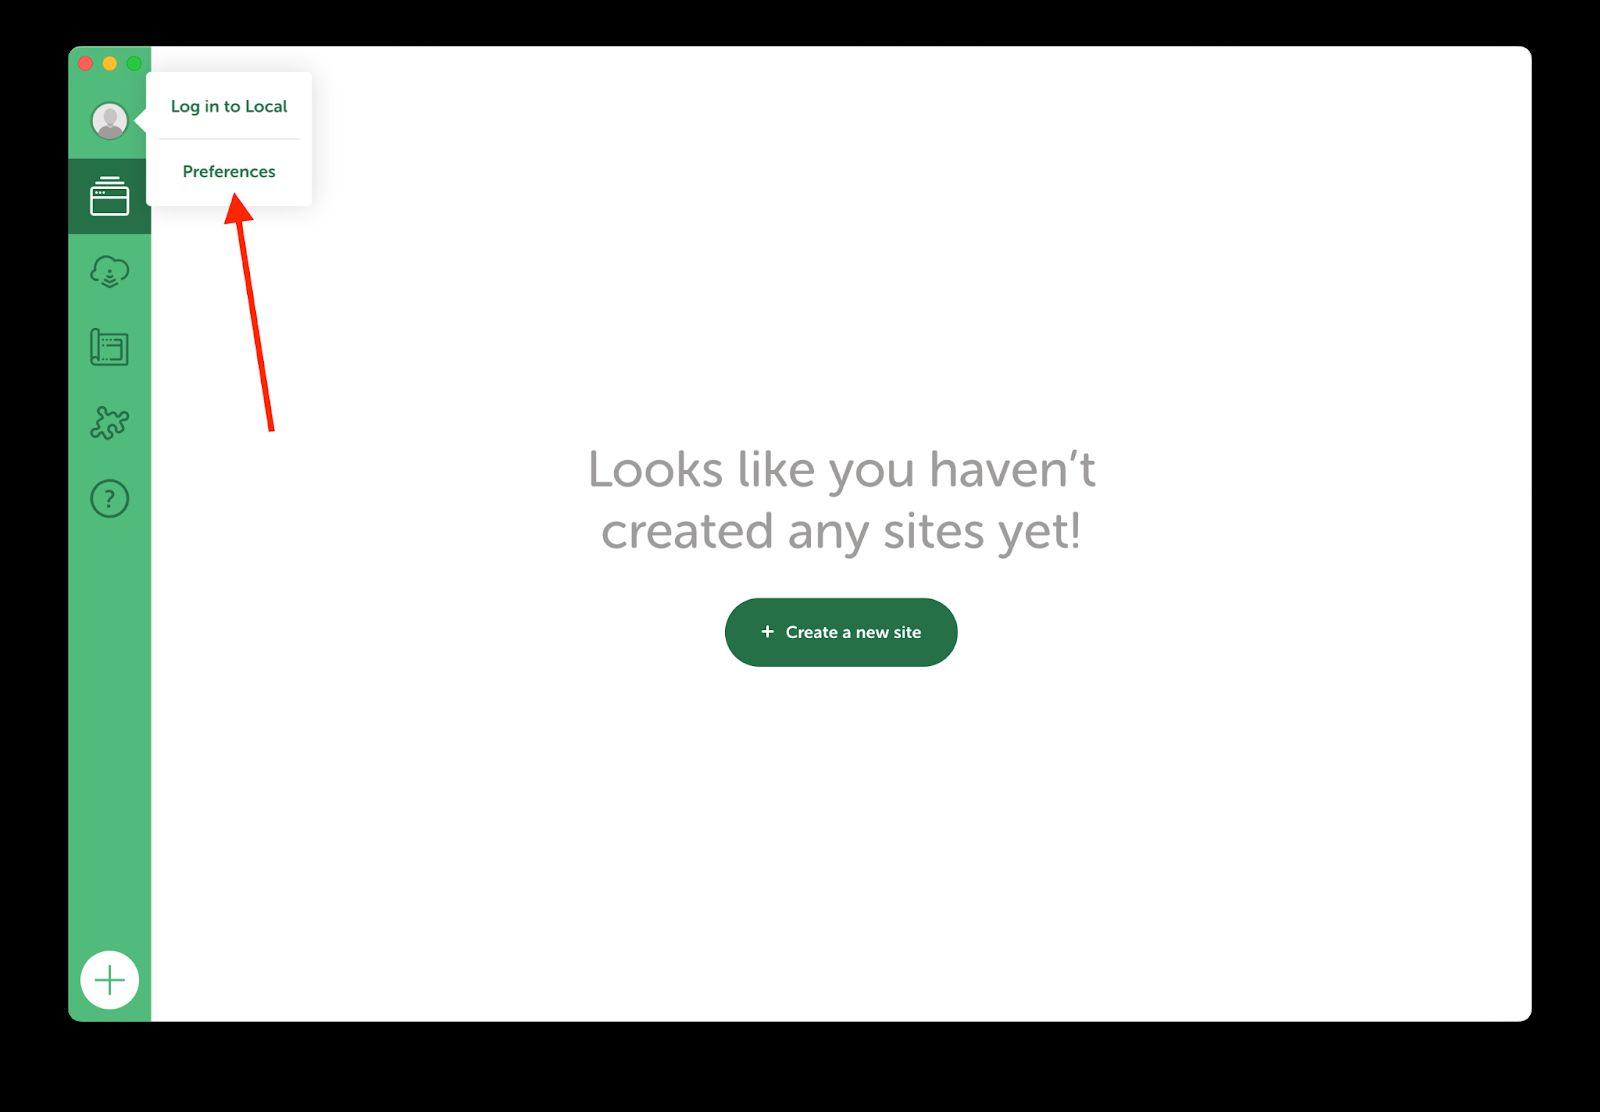
Local User Interface > Top Left Corner > Preferences > New Site Defaults
Step #3: Choose your local WordPress site's server configuration
Once you have chosen a name, domain, and location for your local site, the next step is to decide how you want Local to run your local WordPress site.
Local presents two options in this step: Preferred and Custom. In most cases, you should choose Preferred, which uses the latest versions of PHP and MySQL running on the NGINX web server:
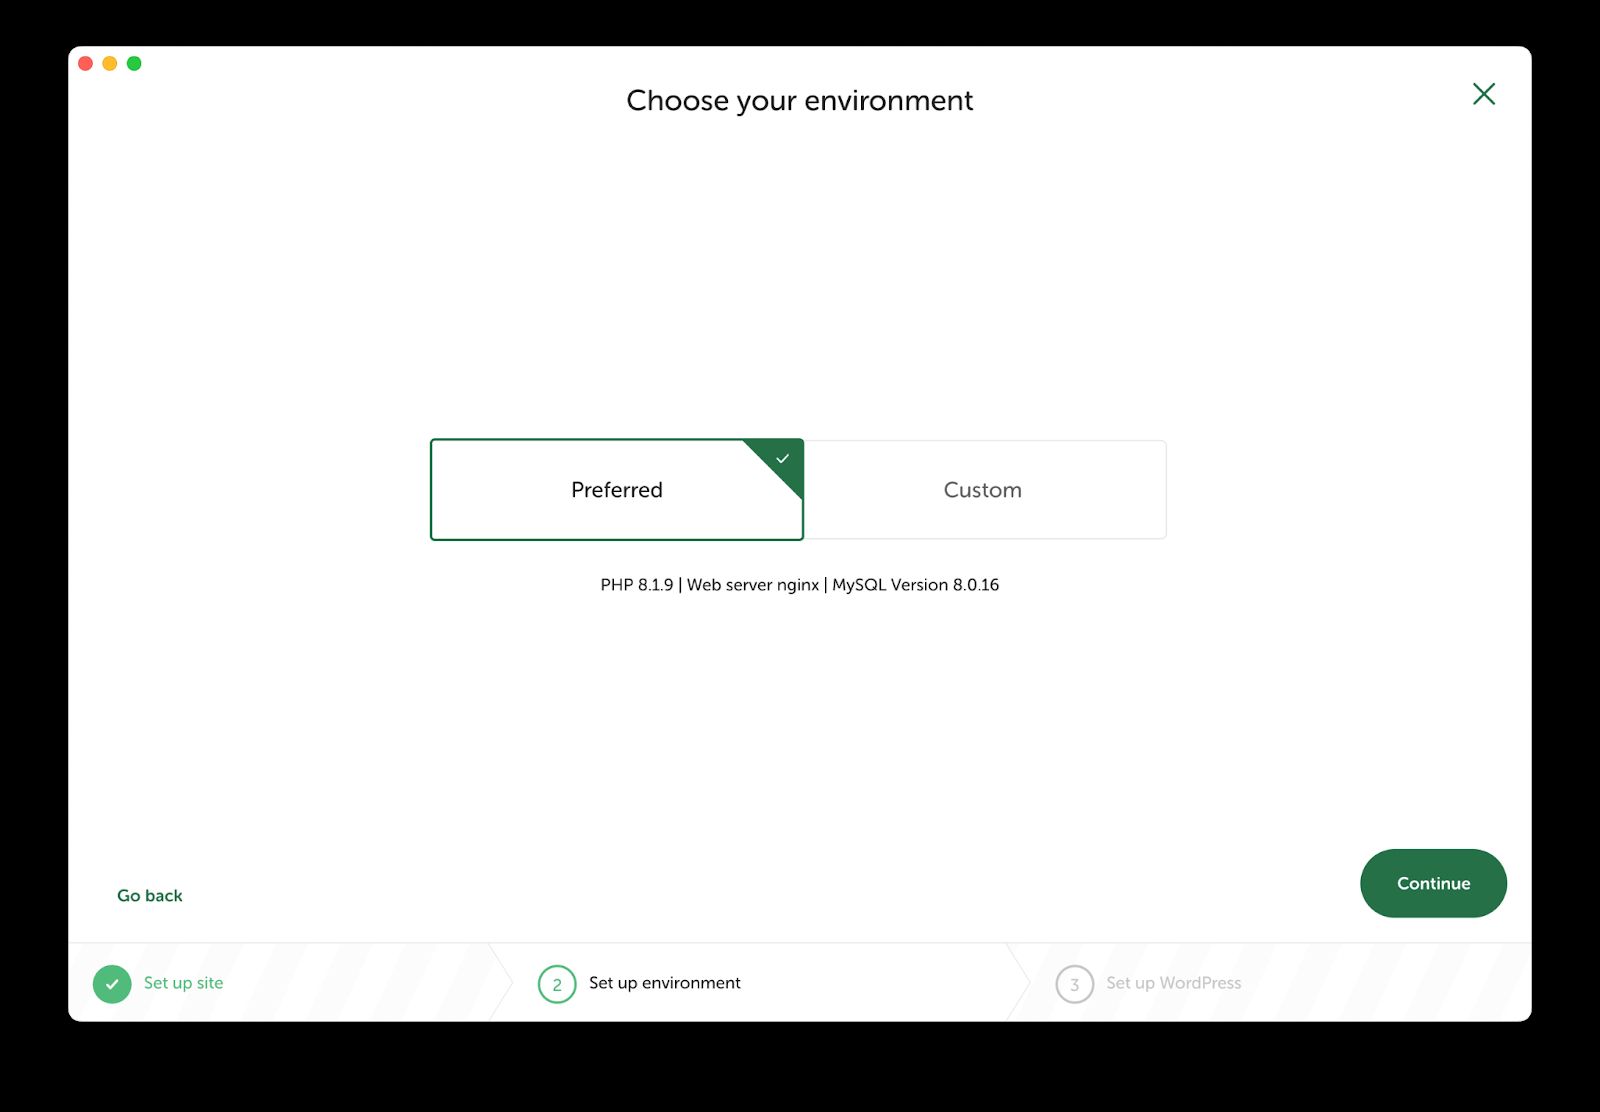
If you choose Custom, Local allows you to select each option individually. You could use this to match your current site’s server resources and configuration:
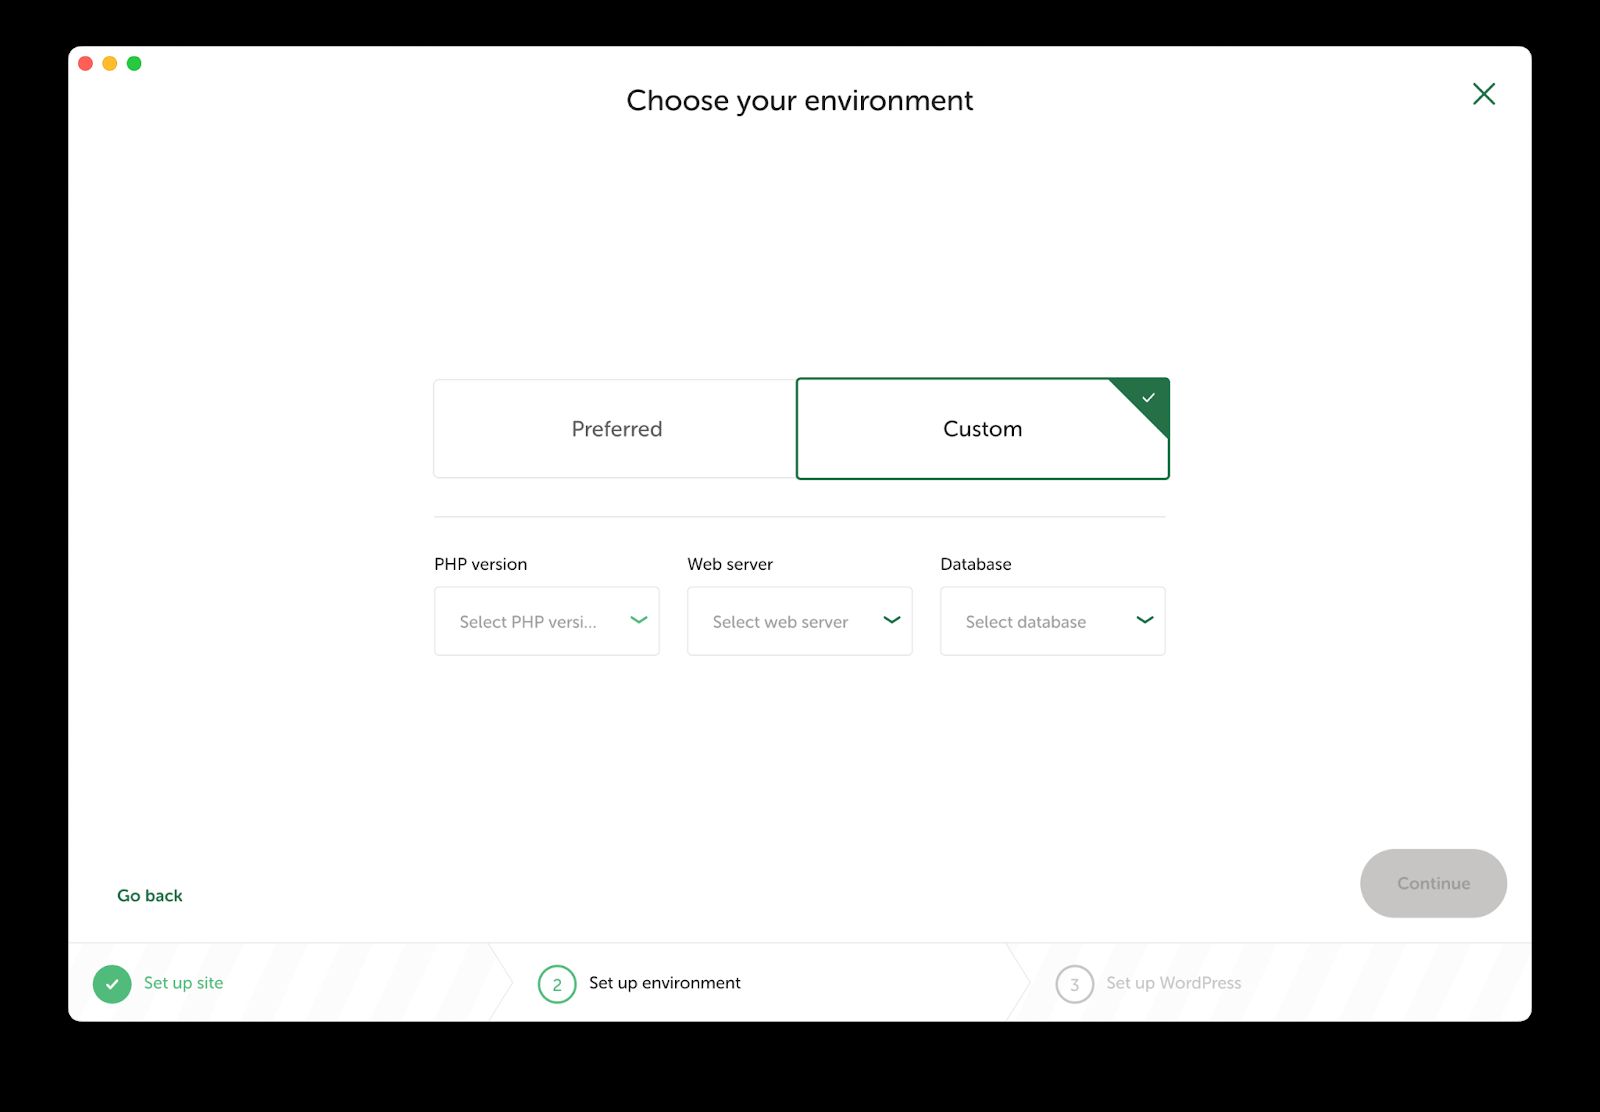
You can choose the version of PHP you want your website to use. This option is useful if you want to run your site on a different version than your live site for testing purposes. PHP 8 is the current version of PHP, so we recommend starting with the highest version Local supports.
Additionally, you can choose the MySQL version you want to use. Unless you have a specific reason to use anything other than the latest versions of PHP and MySQL, we suggest using the Preferred option in this step.
Step #4: Create a default user account
In this step, you can create the default admin account you will use to log into your local WordPress site. These credentials can be anything you want, but be sure to make note of them, as you’ll need them once your site has been created:
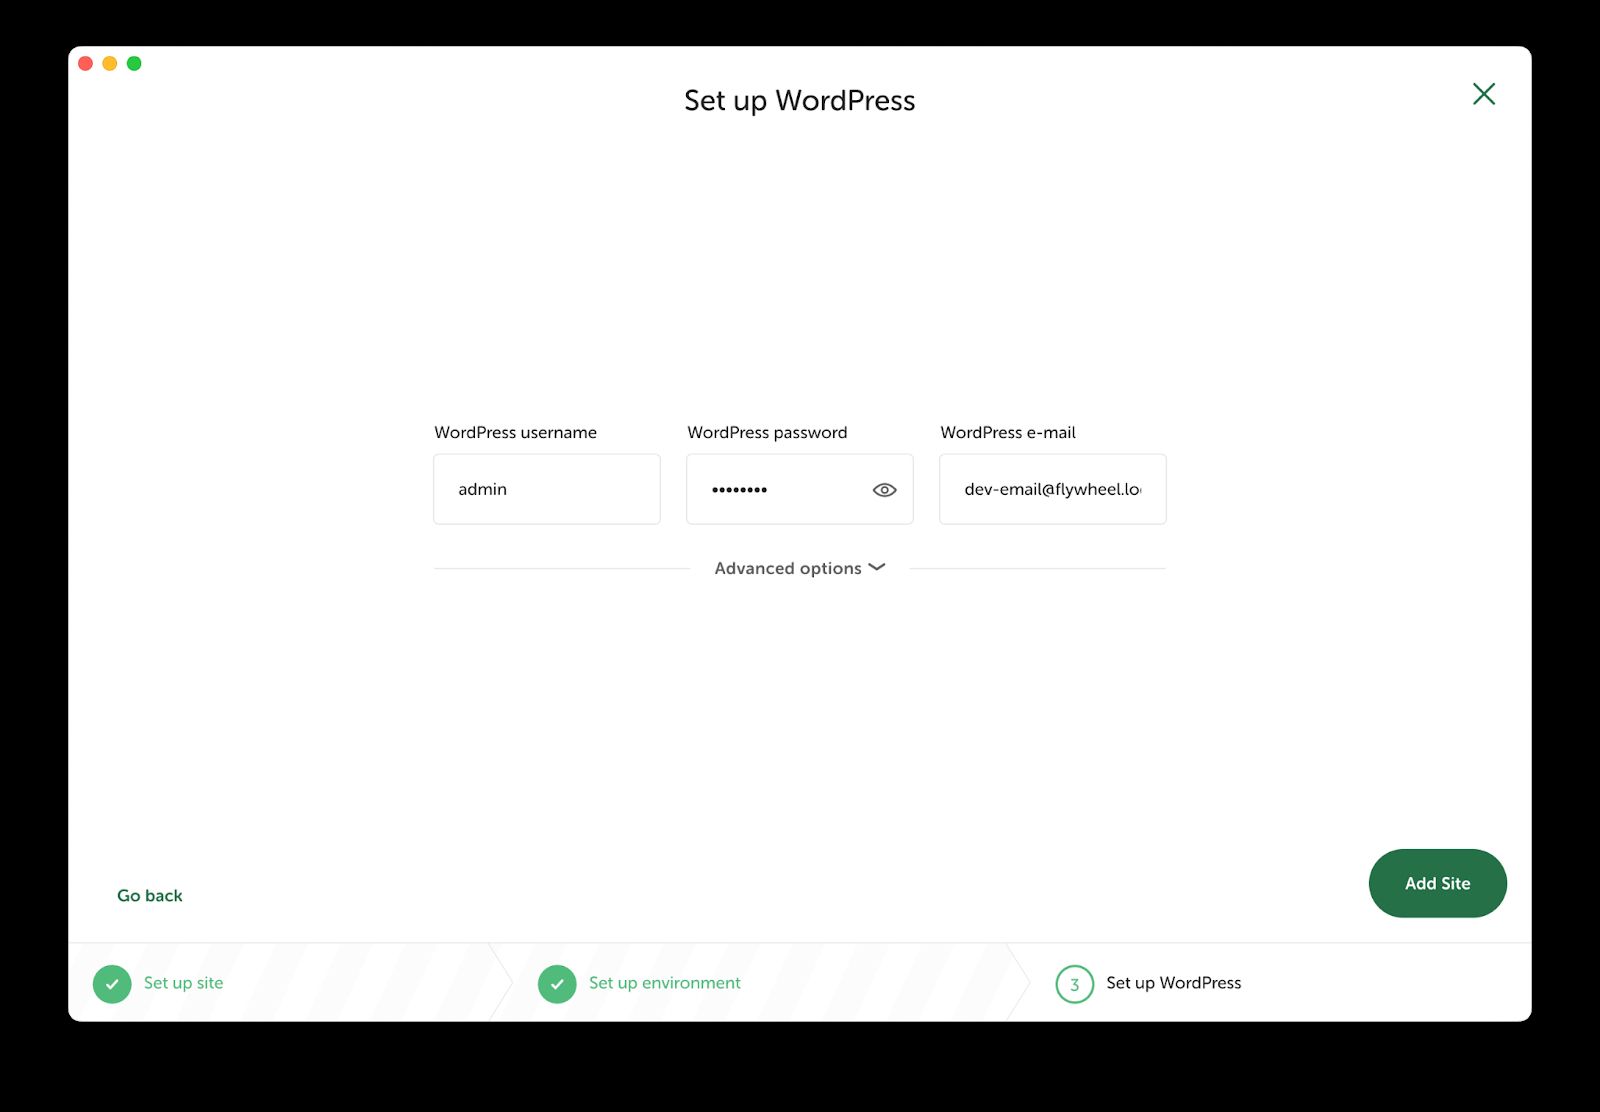
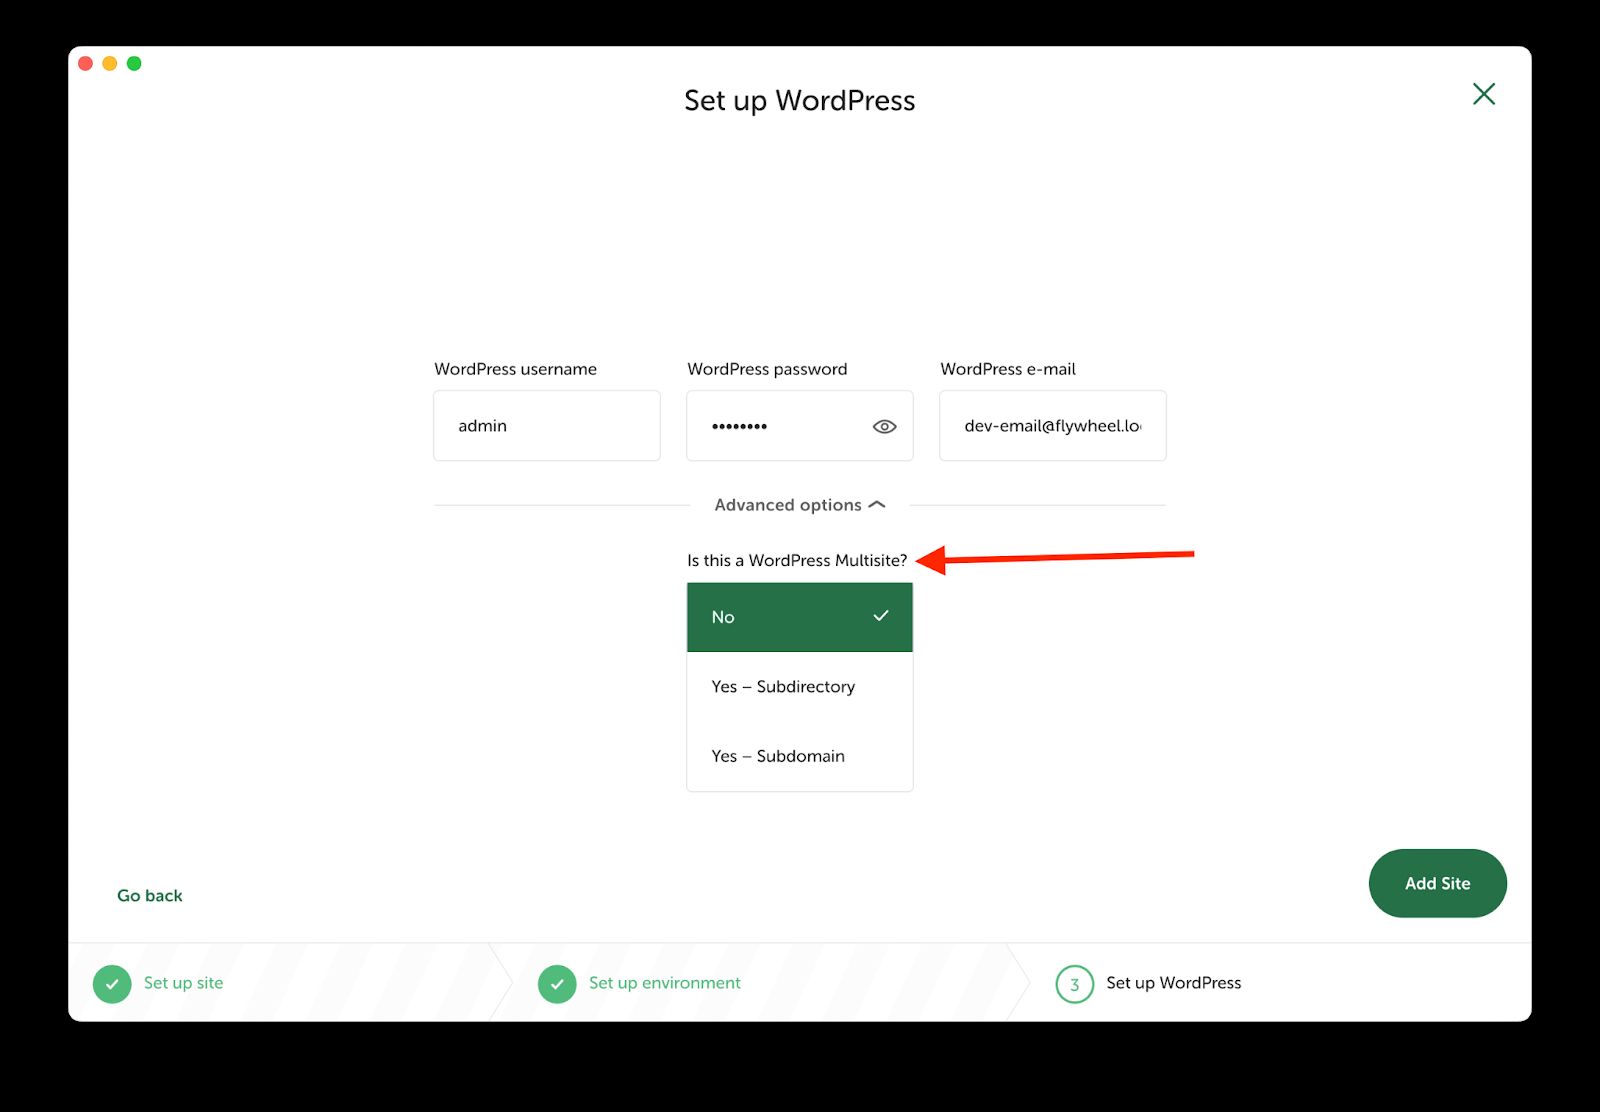
Additionally, if you want to set up a multisite installation of WordPress, you can choose this in the Advanced tab below, where you added your WordPress Admin Account information:
Step #5: View your new local WordPress site
Once you’ve configured your site, Local will begin spinning up the site and installing the latest version of WordPress:
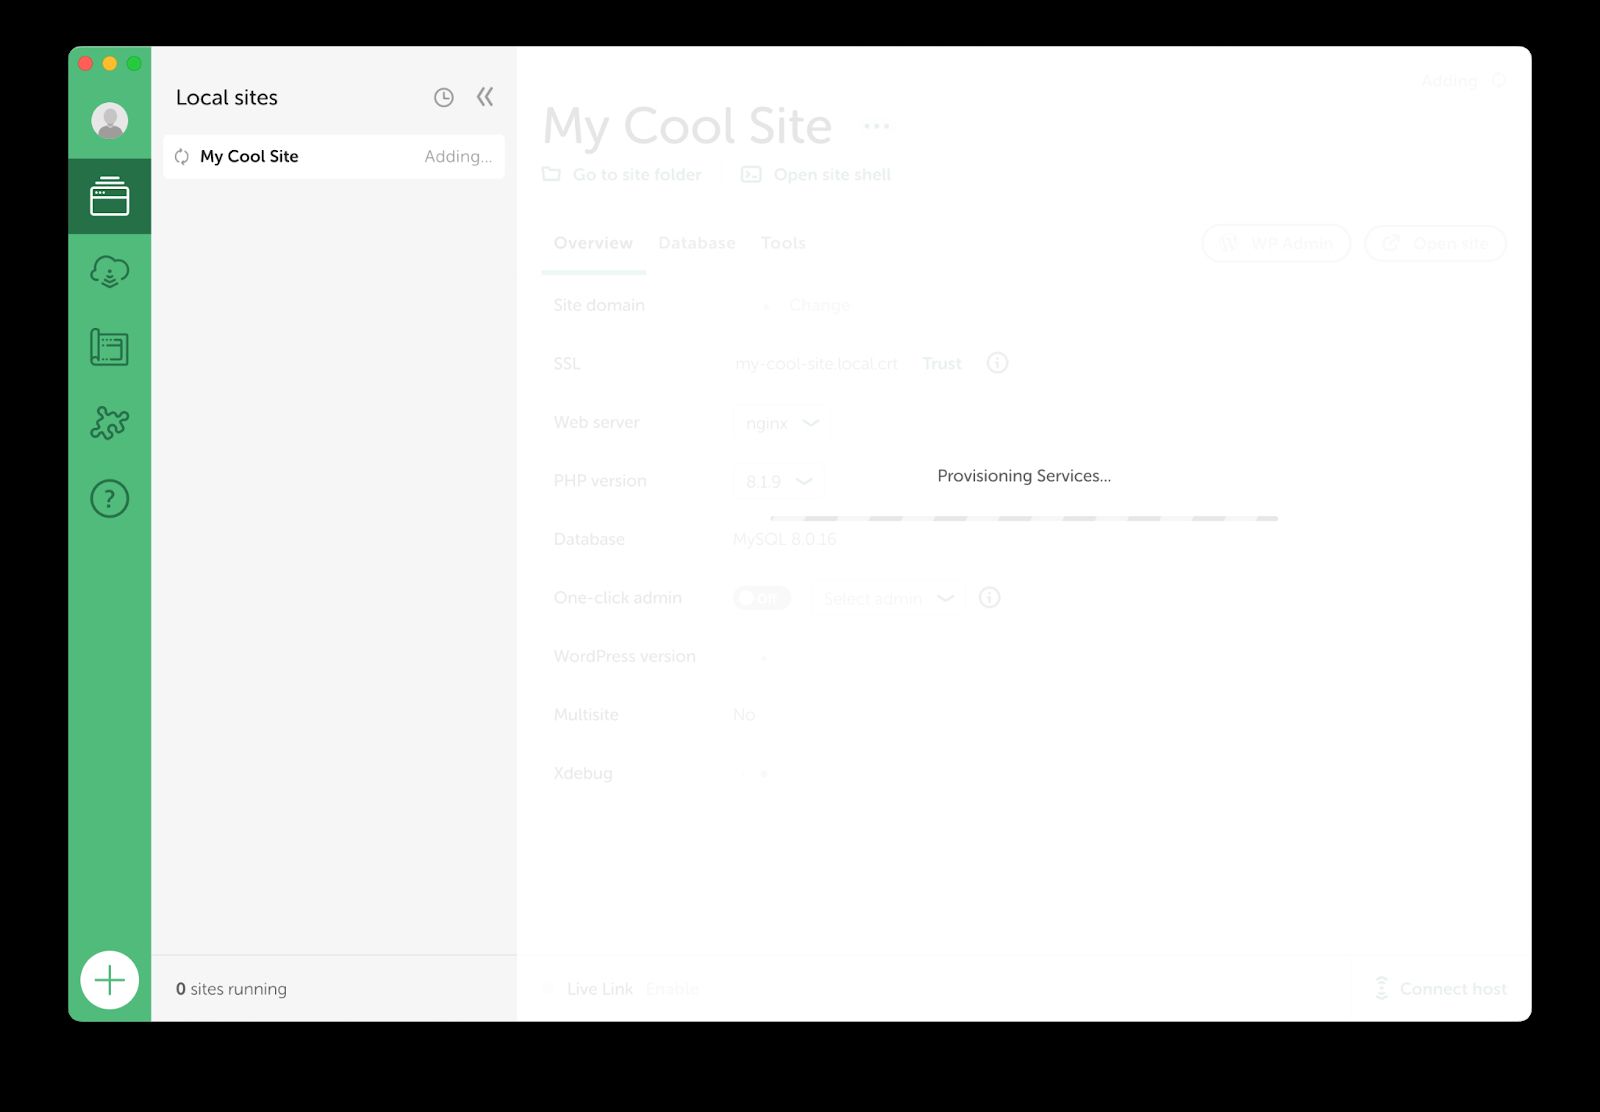
Once it has finished installing, navigate to the domain you configured for the site, and you should now see a fresh instance of WordPress in your browser.
How to copy a local WordPress site to a Nexcess hosting server
Now that you have a local WordPress site running, the next step is to export it and migrate it to a production environment.
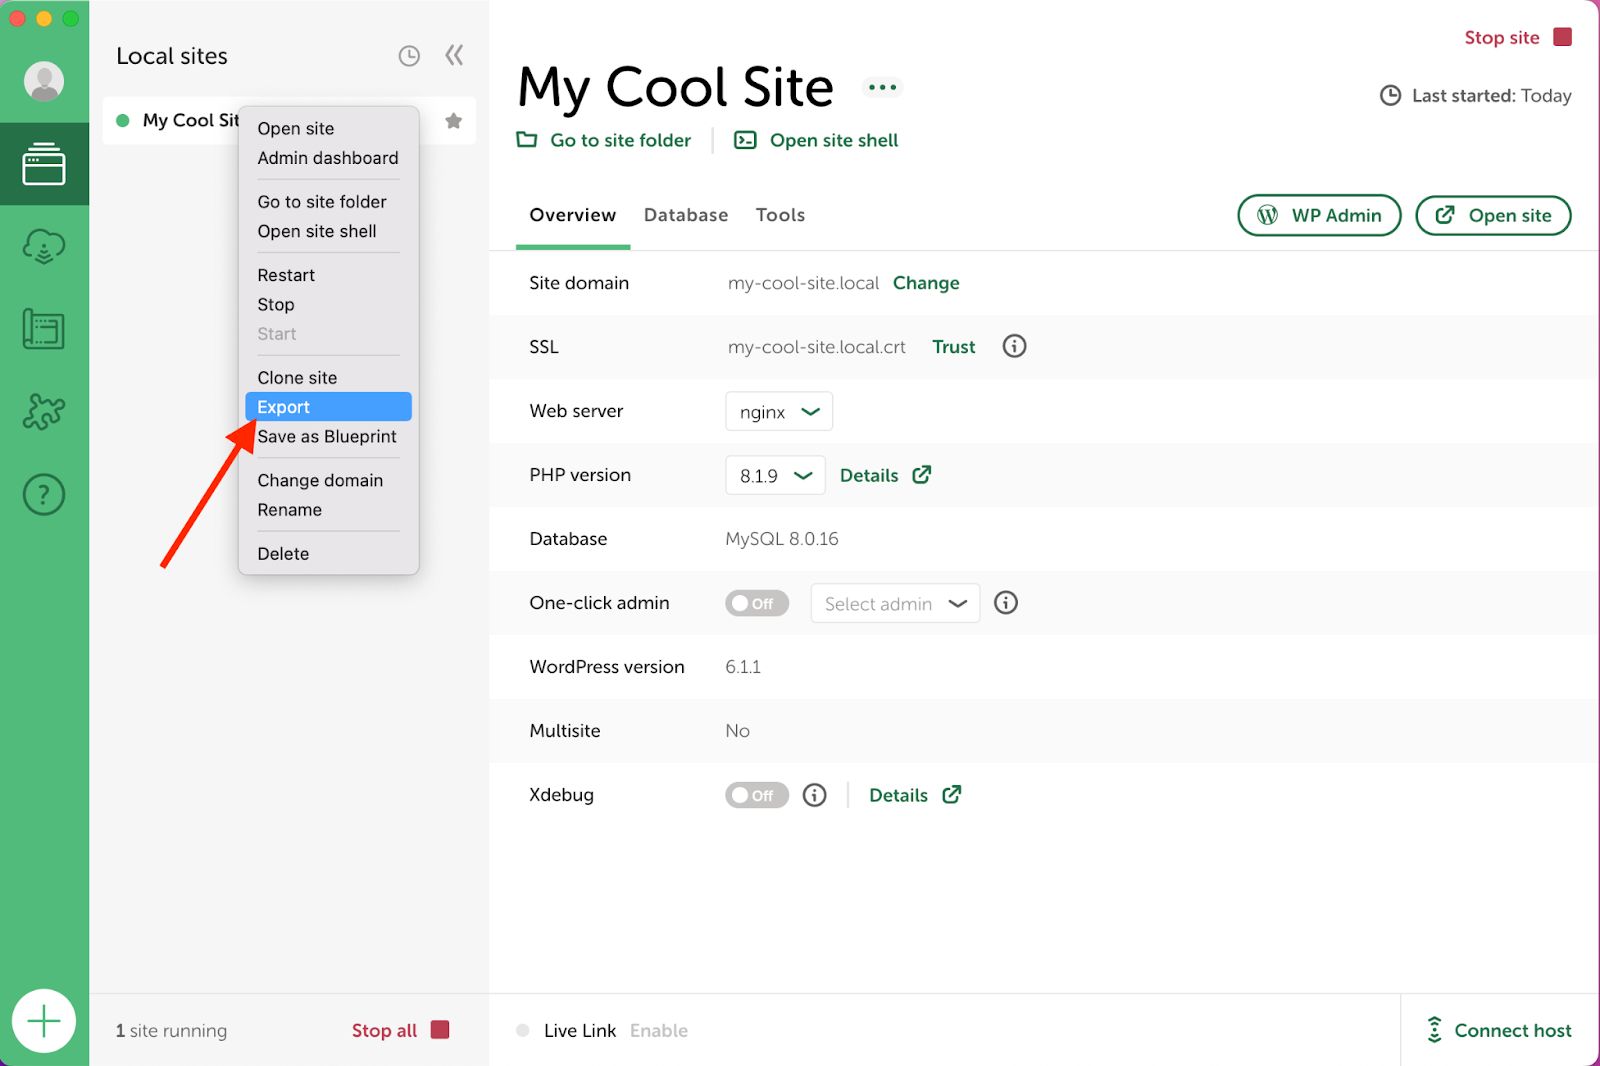
Step #1: Export your site from Local
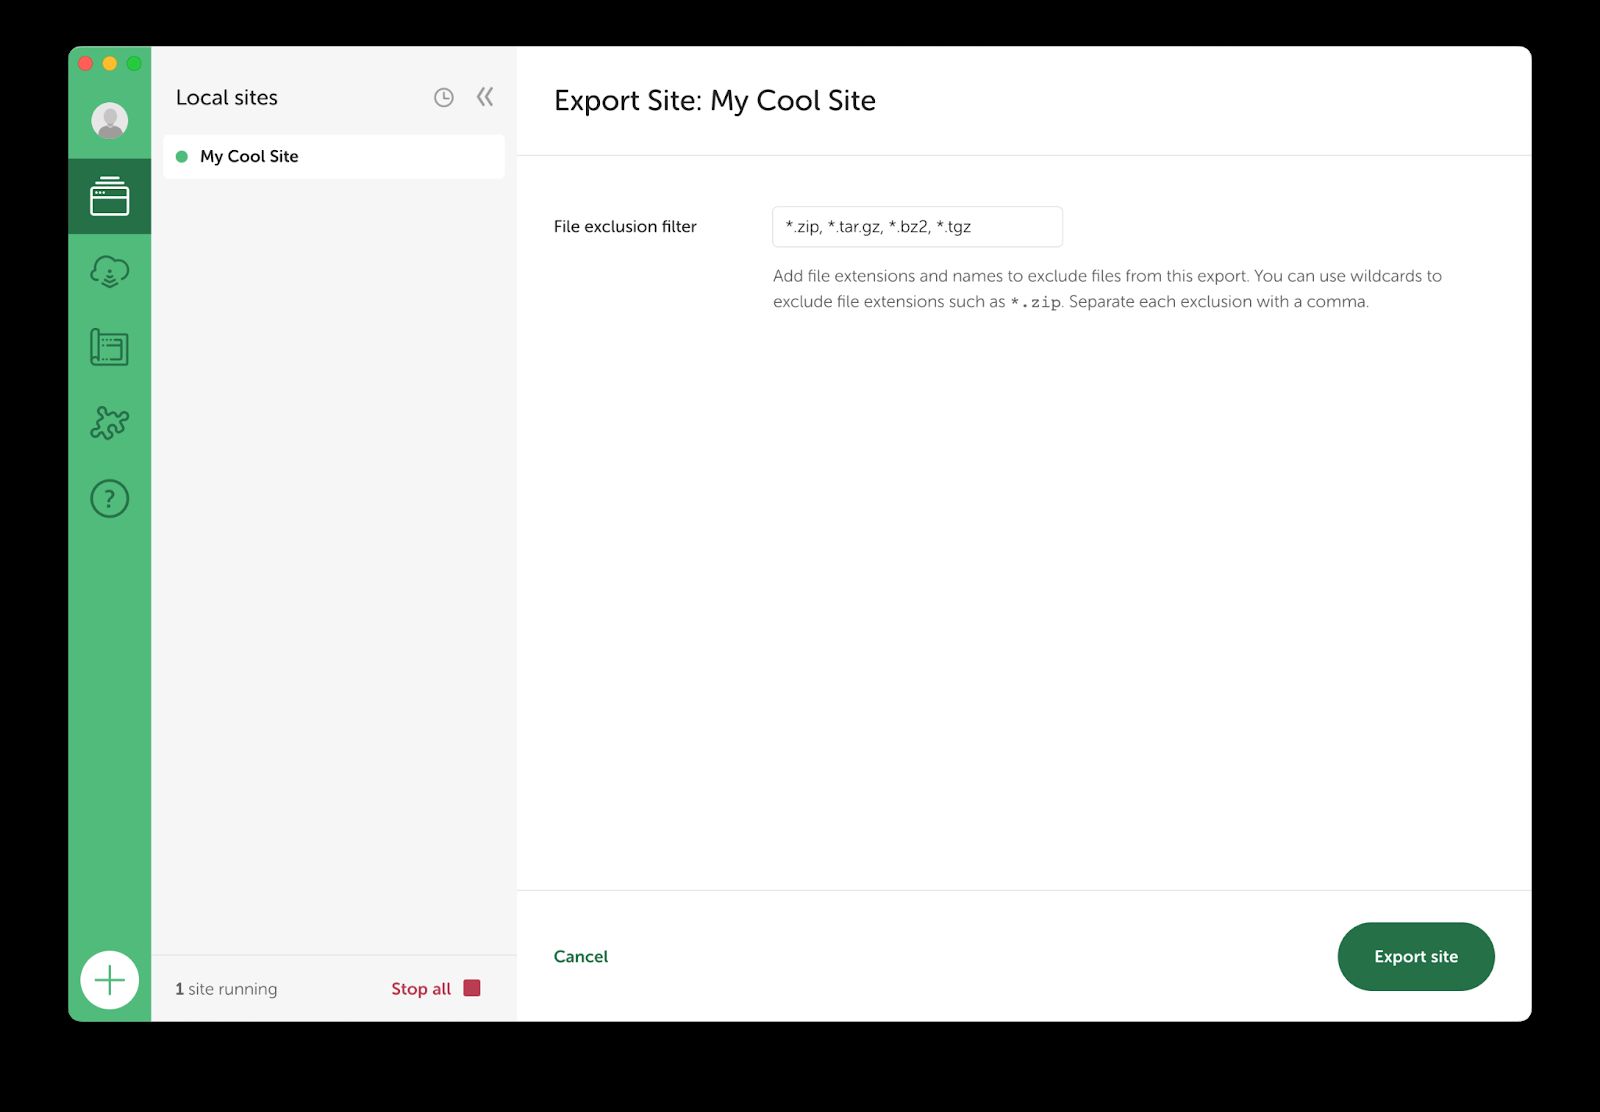
The first step is to export your site files from Local. Right-click on the site that you want to export and click the Export menu option (the site has to be running to be able to export it):

Local will show you a screen that lets you filter out specific types of files from the export. The filter defaults to excluding ZIP and compressed files such as plugin or theme zipped files. You can modify this if you want, but the defaults should be enough for most exports:
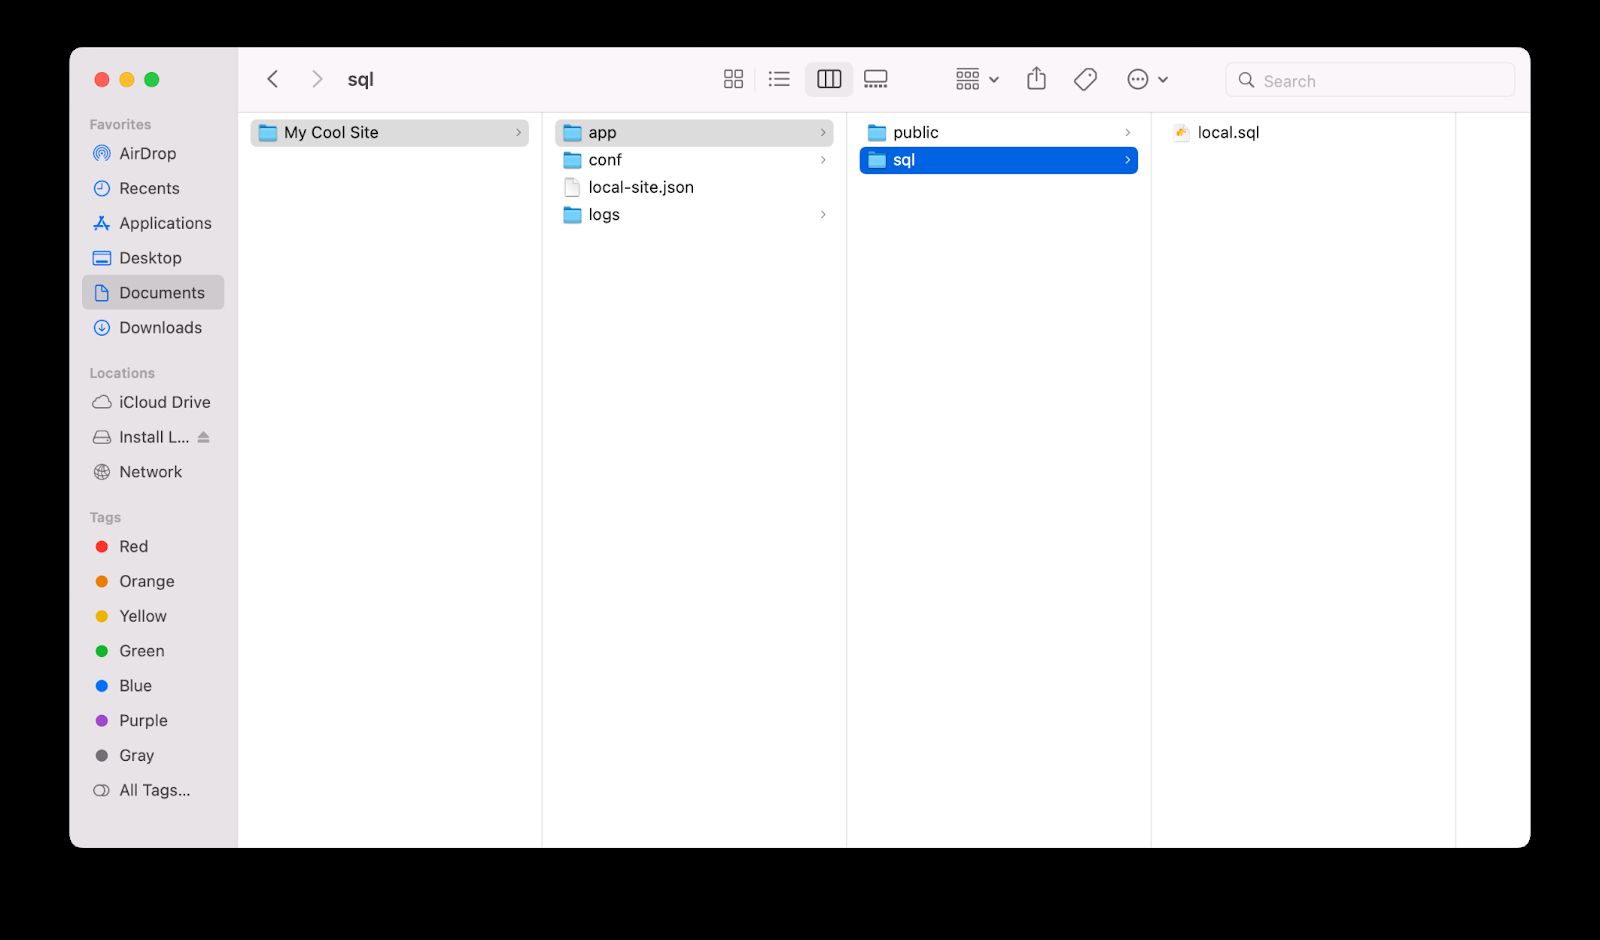
When you export your site from local, you’ll end up with a ZIP file that, when uncompressed, will be a folder of the entire site that includes your WordPress installation.
Within the app/sql folder will be a local.sql file with the entirety of your local database. You can use that file to migrate content you’ve made locally to your production environment:

Get managed WordPress hosting
Free instant access to staging, SSLs, daily backups, unlimited email, premium plugins, a curated WordPress stack, and more.
Step #2: Set up SFTP credentials in your Nexcess plan and upload your local export’s public folder
The next step of the process is to upload your site files to your Nexcess plan and set up a new Nexcess-managed WordPress website.
Once your site is set up, you’ll need to set up SFTP or FTP credentials and log into your site’s home directory. From there, copy all the files except wp-config.php in the public folder from your Local export and upload them to the server in the public_html folder.
Step #3: Import your local WordPress database
Now that your site files have been imported, your database also needs to be imported into the site database on your Nexcess-hosted WordPress plan.
Using SSH access, log into your server and run the following commands.
1. Import the local database into your Nexcess site's database:
wp db import ~/public_html/wp-content/your-local-site-domain.sql
2. Next run the search-replace command to find all instances of your local URL (that probably ends with .local) and update it to your actual site domain:
wp search-replace <local-site-domain> <server-site-domain> -dry-run
This command searches the database, converts all instances of your local site domain, replaces it with the new domain. For example, if your local site had the domain boom.local and your server domain was boom.com, you would enter those in the command:
wp search-replace boom.local boom.com --dry-run
The --dry-run option searches but won’t replace anything, so you can review the replacements before it does anything.
Typically, you’ll want to use the dry-run option initially, and when you feel good about what it will replace, you can remove the option to run the search and replace officially. Here’s what you might run with the boom.local example:
wp search-replace boom.local boom.com
Now that you’ve replaced the database domain, you should be able to navigate to your server domain and see your site.
Bottom line
In conclusion, Local is an effective and easy way to spin up local WordPress sites on your computer for updating content, building new sites, or debugging issues on current sites. We’ve reviewed the features and the steps required to get your local WordPress server running.
We’ve even walked through exporting your local site and uploading it to a Nexcess Managed Hosting plan. Local is a great tool you can use every day to quickly spin up local WordPress sites and one application that many WordPress admins use every single day, given its worthwhile capabilities.
Not a managed WordPress customer yet?
Check out our plans to get started today.
Recent articles
- How to view your Nexcess account ID number and account PIN number
- Magento or Flex Cloud plan — how to set email password
- How to easily set up a WordPress staging site 2023


