

Are you starting to find Squarespace’s limits for your website too constricting
Join us as we look at the steps to transfer your Squarespace domain and website to Nexcess — and why you should.
About transferring a Squarespace domain to another web hosting company
Although Squarespace is a great way to get up and running quickly, there are many limitations that you may (just as quickly) feel constricted by. From price levels for features, to only around 100 templates existing in the template library, to not owning all your data, the case for moving on to a different solution may build over time. That is where we come in!
Why hosting your domain on Nexcess is an excellent Squarespace domain alternative
There are many benefits to moving away from a proprietary system like Squarespace to an open source solution like WordPress. And when those benefits outweigh those of staying with Squarespace, you will need to evaluate an optimal WordPress hosting company.
At Nexcess, offer a plethora of robust open source hosting options, including WordPress, WooCommerce, and Magento. In the event, you are ready to make this platform move, let's dig into the details of moving your Squarespace domain to Nexcess.
Why Nexcess?
Nexcess is a high quality, high value hosting provider, which you will need if you’re leaving Squarespace. Hosting is where your website lives. If you are currently using a Squarespace domain, your server host is Squarespace.
With different plans to meet your needs, no matter the size of your site, Nexcess can help. Nexcess offers managed hosting plans, along robust support that covers the setup and maintenance of your server.
Overview of the Squarespace domain move process
The first step is to export all of the data you are allowed to take with you from Squarespace. Though Squarespace buries where to find the export functionality, and don't allow you to choose what data to export, the export process is relatively simple if you want to move your Squarespace domain to another provider. Let's dig into it!
Transferring a Squarespace domain —exporting from Squarespace
First, log in to your Squarespace account, and go to where in the user interface you can edit your homepage:


Step #1
From this page, click on the Settings option:

Step #2
A new menu will appear. Click on the Advanced option located at the bottom of the resulting menu:


Step #3
Click on the Import/Export menu option to open a screen with your import and export options:


Step #4
Here, you can import and export you content. We are most concerned with the Export option. Go ahead and click the Export button:


Clicking he Export button will present a new window showing the export options. Click on the WordPress icon to start the export:

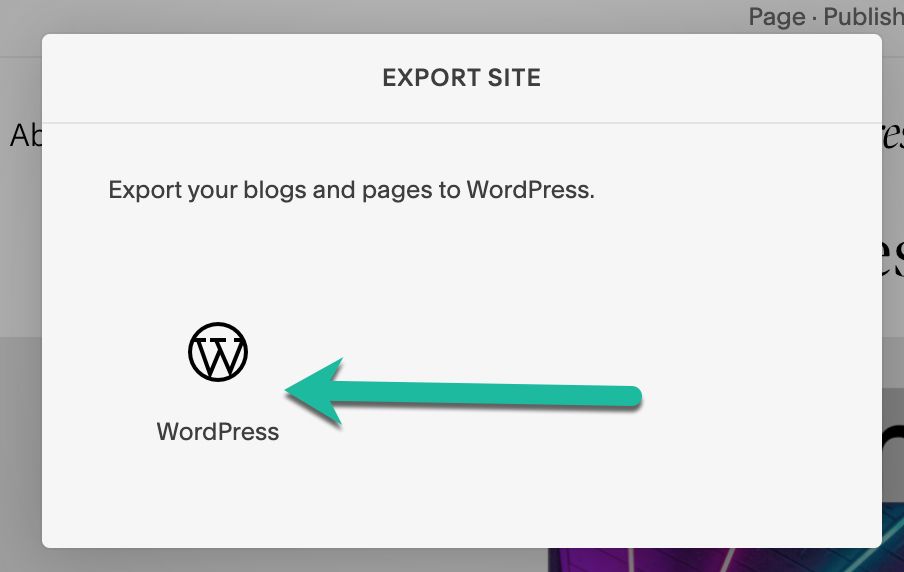
Step #5
The export will close the popup window and show a progress bar in the left-hand menu below the Import and Export buttons:


Step #6
Once the export is complete, a Download and a Clear button appear in place of the progress bar:

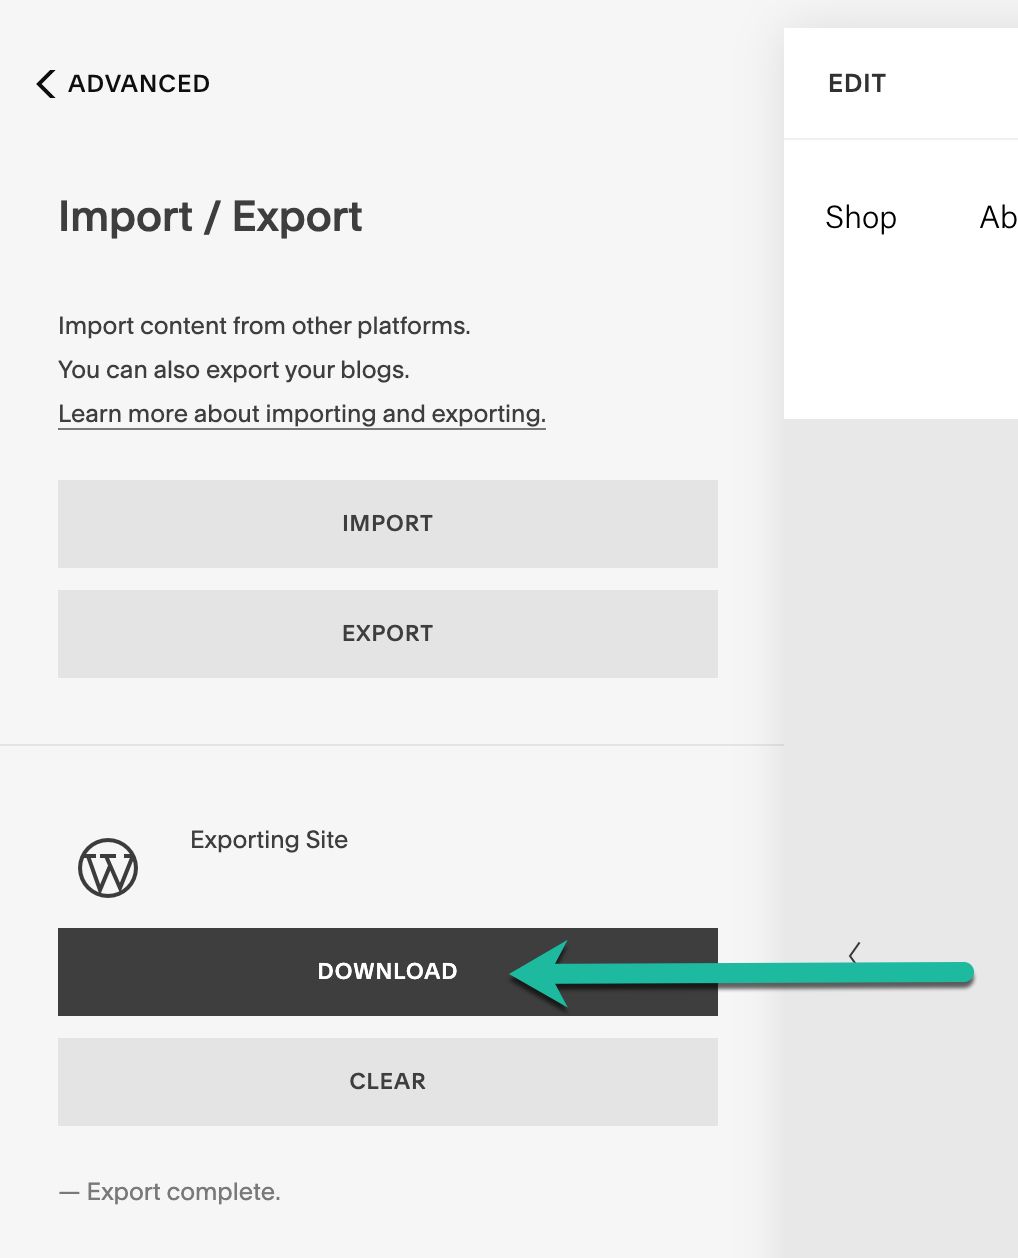
Step #7
For our purposes in this current how-to article, click the Download button. This action will download your exported Squarespace domain content to your computer — usually in the Downloads directory. Make sure you know where that file is; you will need it later with regard to the content importing steps for your new Nexcess web hosting provider.
Transferring a Squarespace domain — importing to Nexcess
After you sign up for a Nexcess account, acquire a hosting plan, and your WordPress site is all installed with us, you can import your file downloaded from your Squarespace domain, if you are moving to WordPress.
Unfortunately, Magento does not have the same import/export tooling support WordPress has. If you decide to go with Magento, you will need to write a script to import your information or manually move all your data and assets.
If you've chosen WordPress, continue to the next steps of importing your site.
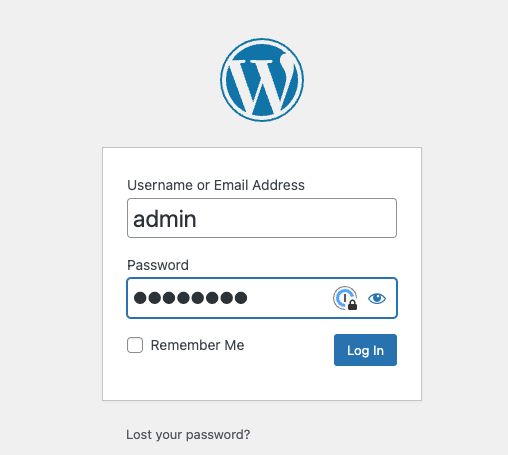
Step #1
Log in with your admin account arriving at the WordPress Admin Dashboard page:

Step #2
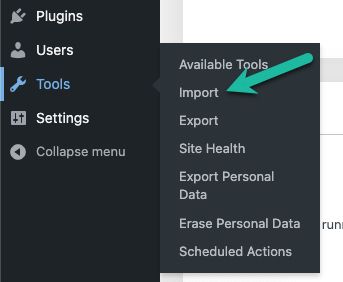
Once logged in, look for the Tools option on the left side of the screen:


Step #3
To pull up the Import option, mouse over the Tools option in the menu. Click the Import option:

Step #4
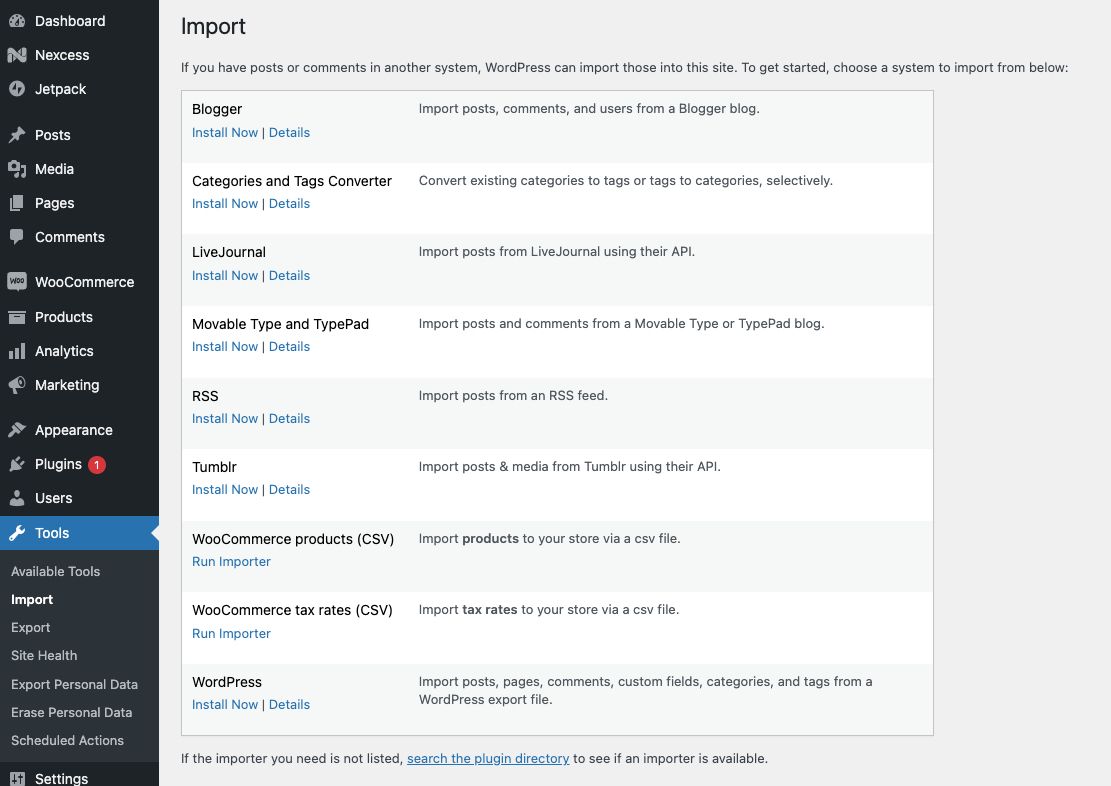
You will see a list of options to import from on the Import page:

Step #5
The next step in the process is to install the WordPress Importer. To start the installation, click the Install Now link:


Step #6
Then, click the Run Importer link:


Step #7
When the Import WordPress screen comes up, click the Choose File button. Then, find the file location containing the WordPress export from Squarespace:

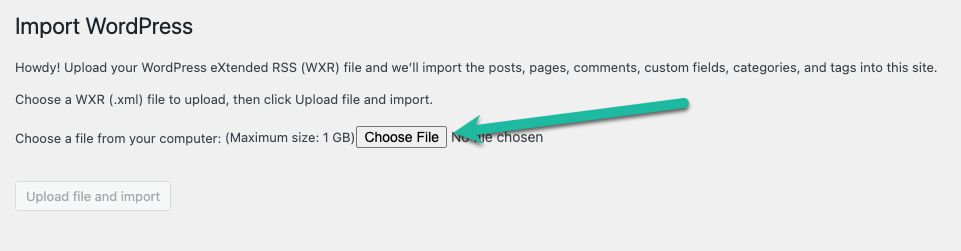
Step #8
Once you locate and select your WordPress export file, click the Open option. The file's name will be displayed near the Choose File button in the user interface. You will notice that the Upload File and Import button is now blue. Click this blue button to start the import process:


This click will start the import process. You should use the Assign Authors functionality to associate the incoming WordPress posts to one author using the corresponding user interface feature. Remember, you can always reassign the posts to the proper authors if you so choose once the import is complete.
Step #9
Next, click the Submit button to import your file:


Step #10
You will see a confirmation message after the import process has completed with the content under posts. You should review your website at this point to ensure everything you want is there before deleting your Squarespace site/account.
As mentioned previously, Squarespace will not let you take everything with you via the export. You will need to personally move over any content not brought over during the import process.
Transferring a Squarespace domain — remembering image management
Because your images were hosted on Squarespace, the WordPress Importer will have had issues importing them. Therefore, you will want to make sure to import these images properly, so when you delete your Squarespace site, your images will stay with your site.
Step #1
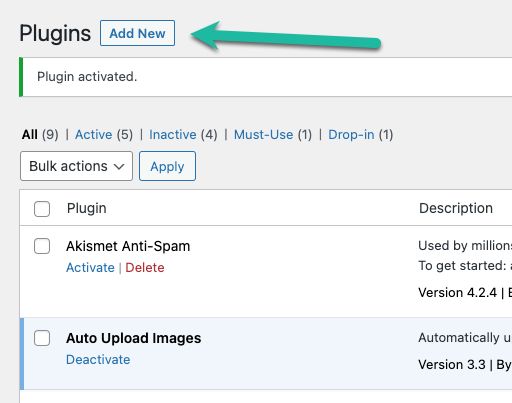
The free plugin Auto Upload Images is a great utility for this effort. It is extremely helpful in with regard to image management during your site move. Using the link above, install and activate the Auto Upload Images plugin:

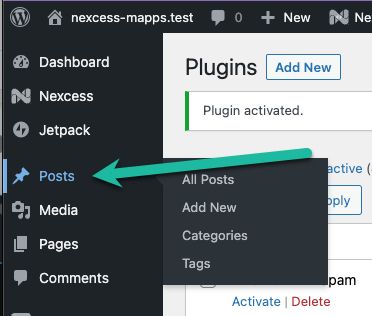
Step #2
Once the plugin is installed, go to the Posts page by using the Posts menu option to take you there:

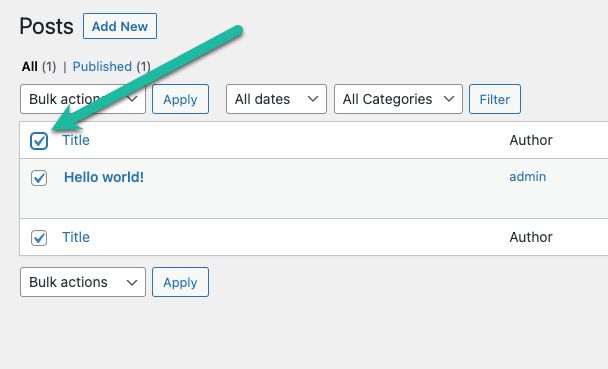
Step #3
Here you will want to set the posts per page value to 999. By doing so, you are able to select all your posts using the checkbox in the upper left corner:

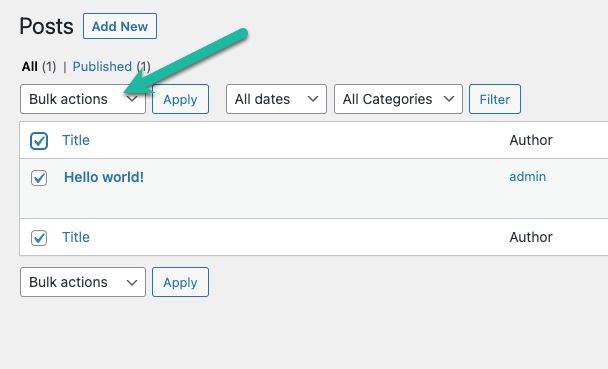
Step #4
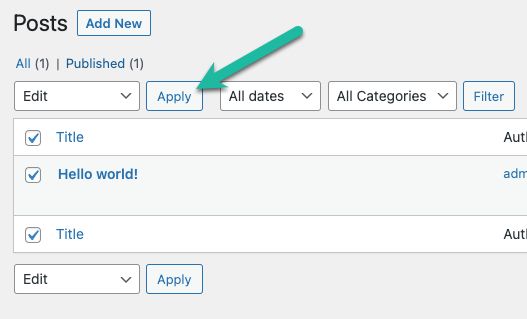
Then, select on the Bulk Actions option to display the menu under it:
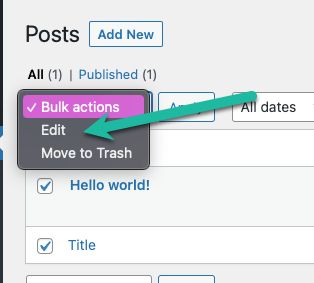
Step #5
Pick Edit from the menu options shown:

Step #6
Next, click the Apply option and a new window will appear:

Step #7
Leave the settings unchanged and click the Update button.

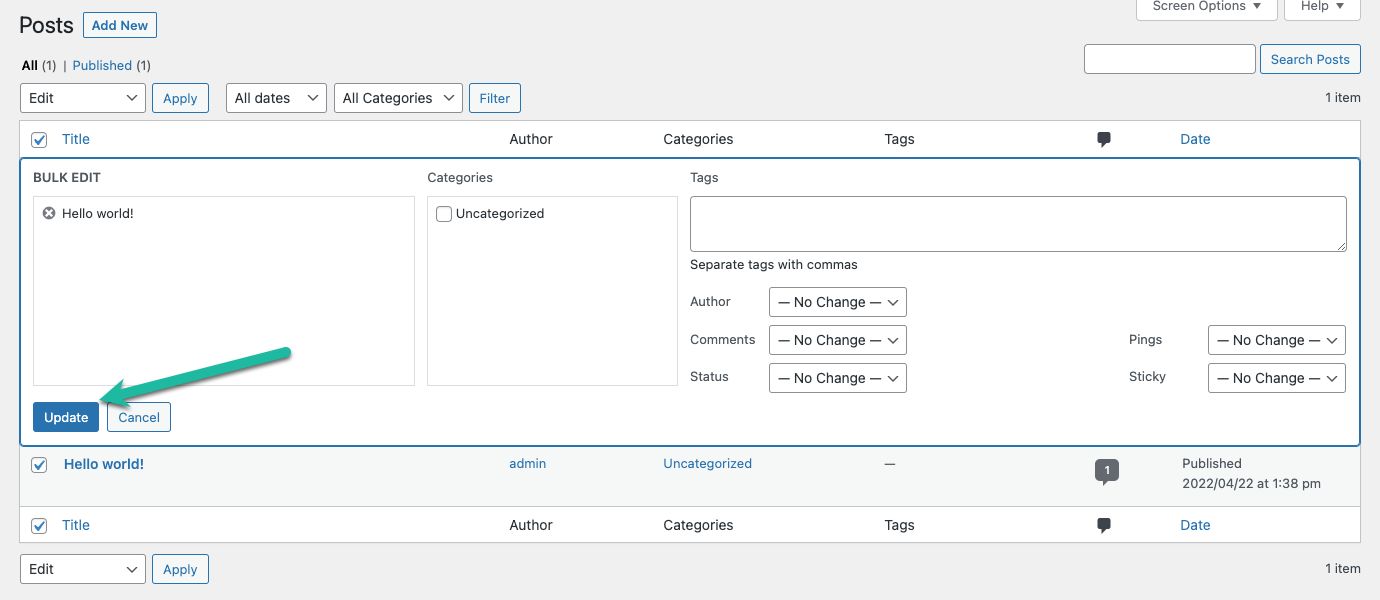
Step #8
This action will automatically save the images still linked to Squarespace to your WordPress media library and update the links in your posts.
Transferring a Squarespace domain — handling your domain
At the time of moving your website, consider if you want to change your domain. If so, this is the ideal time for taking that big step. However, choosing a new domain could mean a loss of customers if not marketed properly. If you are sticking with the domain you started with, however, you can follow Squarespace's documentation to transfer your Squarespace domain.
Powerful managed web applications
Discover managed hosting for the industry’s top content and commerce platforms.
With regard to transferring your Squarespace domain to Nexcess, other website management logistics to think about include the following:
- The 60-days rule for locking domain changes in place required after a recent domain administrative attribute update.
- Domain record and nameserver management via the domain registrar.
- Mail Exchange (MX) record management if you have a custom email system associated with your domain.
- The 24 hours it takes nameservers to be updated regarding your site's URL.
- Having your tested as working precising how you want it to function before you move on to deleting your Squarespace domain, site, and account.
Step up to the next level with web hosting from Nexcess
Take your online store and website to the next level with Nexcess!
Find a web hosting platform that grows with your business.
Recent articles
- Migration guide: transfer my Wix website to Nexcess
- How to customize the Nexcess MAPPS MU (must-use) plugin
- Secure Shell (SSH) user setup, access, and FAQ for the Nexcess Cloud


